


Our step-by-step guide teaches you how to Overclock GPU safely without any risks. Discover the various troubleshooting steps and learn how to test GPU overclock stability to enhance your Graphic card performance:
GPU overclocking, or Graphics Processing Unit overclocking, is basically speeding up your PC, gaming console, or even your mobile device in order to enhance its performance for gaming, crypto mining, and other purposes, so that it can perform better at a faster speed.
GPU overclocking increases the number of processing cycles per second.
Overclocking GPU: Safe and Easy Steps to Follow
This enables the device to process more data per second. This way, you can renew your old, slowed-down device and save money.
Gamers, crypto miners, video editors, etc. usually look for ways to safely overclock GPUs.
Points to Remember Before Overclocking GPU on Your Device
First, you need to know that overclocking can lead to overheating and cause damage to the device’s hardware. It also increases energy consumption, and when the graphics card is put to overuse, its lifespan can also decrease.
Plus, users have even reported frequent crashes and fire warnings after doing GPU overclocking on their devices. But we have come up with solutions to these issues: the best software that can be used for GPU overclocking, which keeps you updated about metrics like device performance and stability, temperature, power supply, cooling system, etc.
Additionally, we recommend stress-testing and monitoring tools for continuous tracking of device performance post-GPU overclocking. You will also find safety guidelines to follow while you overclock the GPU on your Laptop or desktop.
Make sure you consider these points before overclocking your GPU:
- Pick a software for GPU overclocking. Make sure you download the GPU overclocking software from a reliable source. There are a number of fake, phishing software that can cause severe damage to the hardware or other issues. So be very cautious while choosing one. We have provided a list of reliable and useful software for GPU overclocking.
- Check your system’s current graphics card performance, clock speed, temperature, and frames per second. Take a screenshot of all these values to compare them with the change in them after overclocking.
- Make sure you are not overclocking an Intel graphics chip with a name like Intel HD Graphics, GMA 4500mhd, etc. These chips are not suitable for overclocking. If it’s an AMD or NVIDIA chip, then you can go ahead with the process.
Here is the step-by-step video guide on how to overclock a Nvidia GPU:
How to Overclock GPU: Step-by-Step Guide
Before you go ahead, make sure you know well about the metrics you want for improving your graphics card performance. You can also consider raising the different statistics in small amounts until you get the desired performance on your desktop. But make sure you keep track of the system’s temperature.
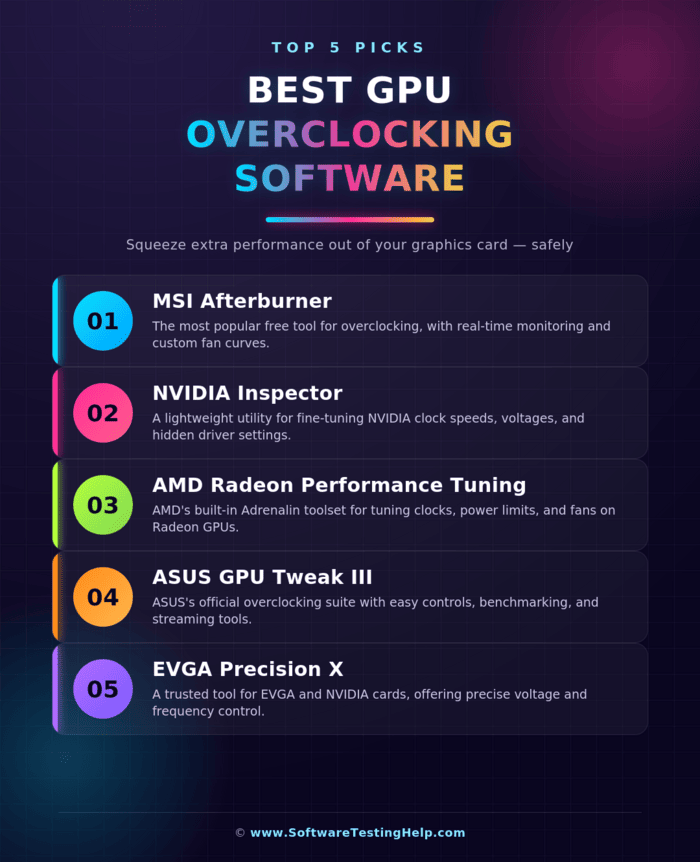
Some of the best GPU Overclocking Software that you can trust are:
Here is a step-by-step guide on how to properly overclock a GPU on a Laptop, using MSI Afterburner:
- Install MSI Afterburner on your device. (Make sure you download the software only from its official website.
- Once installed, you will see different statistics on your PC screen.
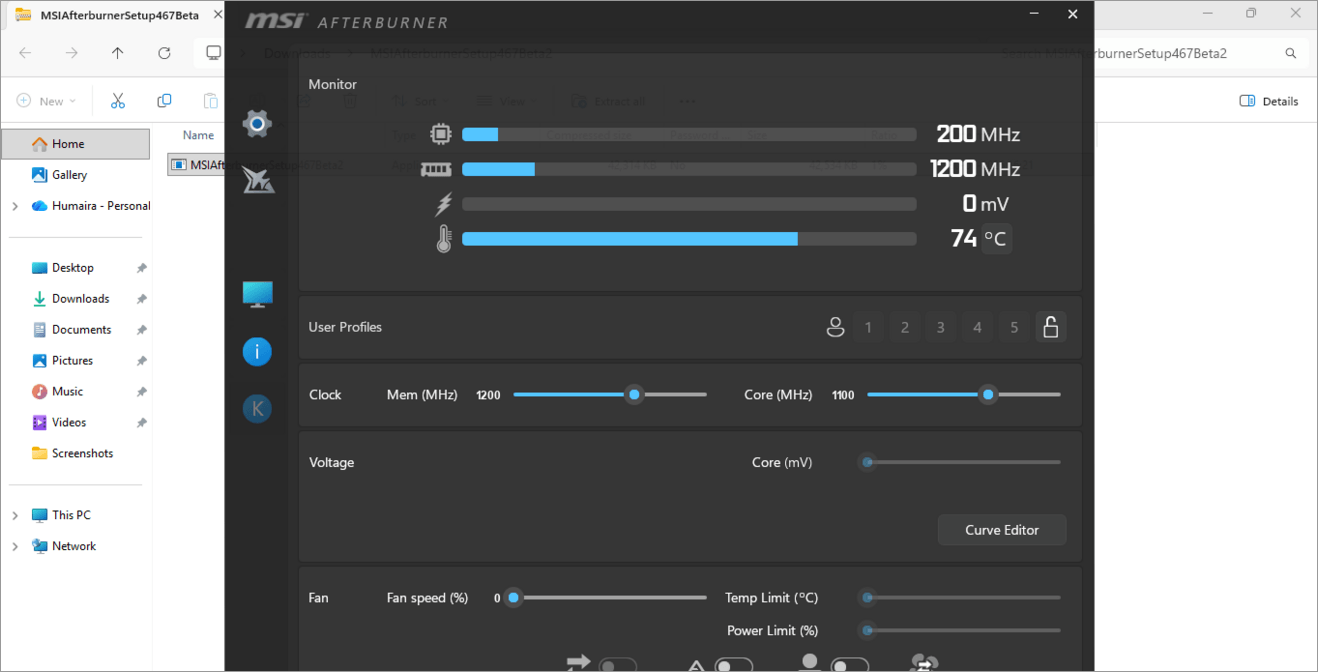
- You can take a screenshot of this page to keep a record of the original statistics.
- With MSI Afterburner, you can easily adjust the power, temperature, Clock and Memory, from its home page only. Start by pushing the Power and the Temperature limits to their maximum, and then select Apply.
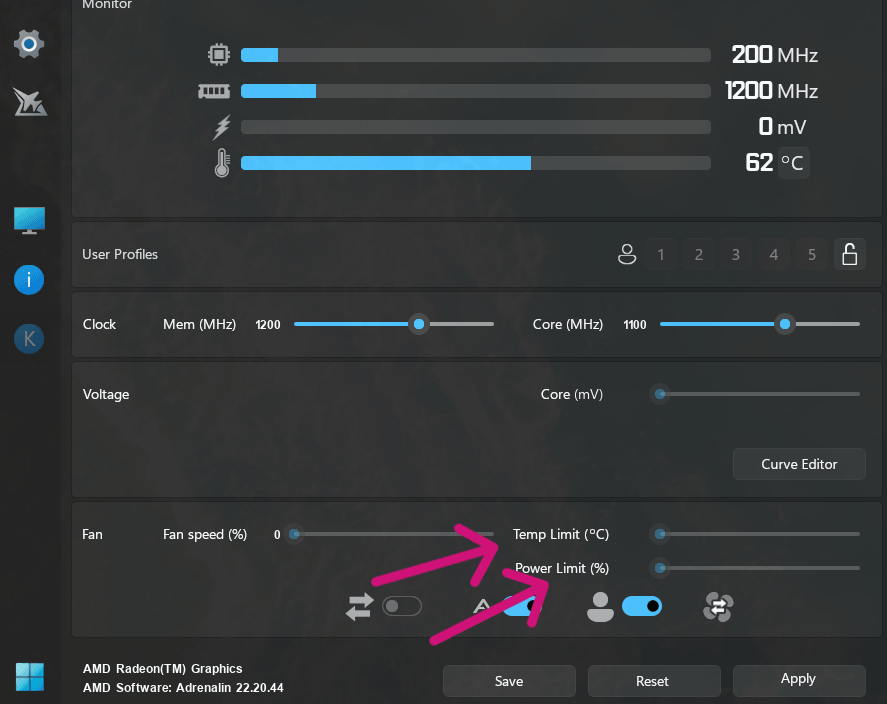
- If you are using a desktop, you can easily maximize the temperature and power limits. But while using a laptop, you may not be able to do so, because many laptops lock this feature in order to avoid excessive heat.
- Now increase the core clock speed in small amounts per step (10-30 MHz per step), and then select Apply.
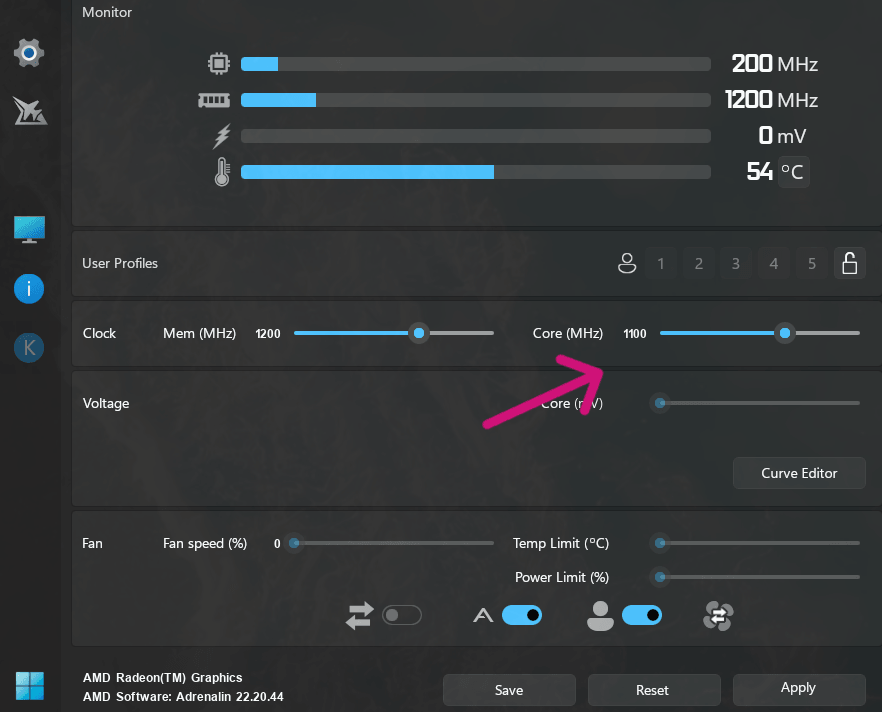
- Keep testing the device’s performance on every increase in the Core clock. Once you reach a desired point, click on Save.
- Next step is to overclock the core memory. You can raise the core memory in steps of 50 MHz each.
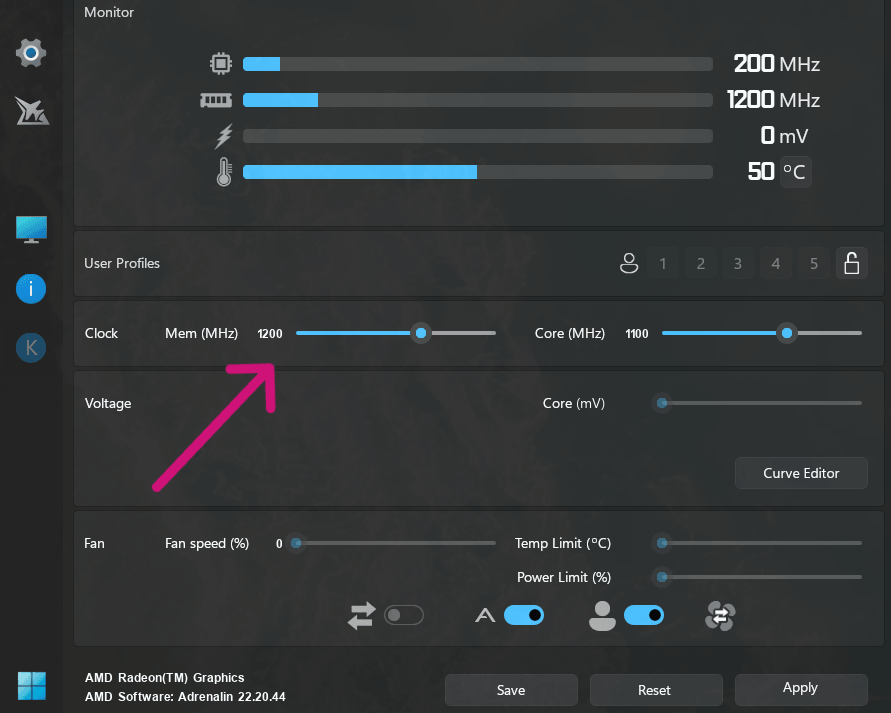
- Now test the PC’s performance. If the system crashes or freezes, reduce core memory in small steps of 10 MHz each until the issues are resolved.
While overclocking the GPU using MSI Afterburner, you can lock a voltage point by following these steps:
- In MSI Afterburner, press Ctrl + F.
- It will open the Voltage Curve.
- Now click on a voltage point (like 1000mV), and drag it up to another limit (like 2600 MHz)
- Then press L to lock this voltage.
Now the GPU will be running at 2600 MHz, while consuming only 1000 MHz power, thus producing less heat- this can be quite useful for overclocking laptops.
Beginner-Friendly GPU Overclocking Tools
Here are some tools for automated GPU overclocking that can help you avoid risks associated with manual overclocking:
#1) NVIDIA App’s Auto-Tuning
If you are using a NVIDIA GPU card, then follow these steps for quick, safe, automated GPU overclocking:
- Download the NVIDIA app
- Once installed, click on the GPU tab.
- Now choose Performance
- Go to Auto-Tuning
- Choose Start Scan
- Your device will now run tests for 10 to 20 minutes, it may crash and recover within this time to establish a stable core clock, memory and fan curve. That’s it. You don’t need to figure out safe clock and memory limits yourself.
#2) AMD Adrenalin’s Auto Tuning Panel
If you are using an AMD graphics card, then you won’t need to download any additional software for GPU overclocking. It can be done very quickly by following these easy steps:
- Open your desktop’s home page and right-click.
- Choose AMD Adrenalin Software
- Click on the Performance tab
- Choose Tuning
- Now click on Auto Undervolt + overclocking
- Go to Start tuning
- The application will now run stress tests (it may reboot during this time) and will apply a stable core clock, memory, and UnderVolt limit automatically, within 10-20 minutes.
#3) ASUS GPU Tweak III’s OC Scanner
This method is best for NVIDIA and ASUS cards. Here are the steps for doing an automated overclock using this method:
- First of all, download and install ASUS GPU Tweak III from the official Asus website.
- Once installed, open the Home page and click on OC scanner.
- Now select Start
- Go to Test and Apply
- After running some tests (for about 5-15 minutes), the system will set a stable voltage/frequency curve.
- Once done, click on Apply.
Best Stress Testing and Monitoring Tools
Some programs are specifically built for stress testing the system and monitoring the thermal performance of your graphics card. If you are going for GPU overclocking, you must run an actual benchmark and compare the numbers, rather than just guessing the performance.
Here is the list of some software that you can trust for this purpose:
- Furmark: A free and simple stress testing tool.
- 3D Mark: Not free, but a better and more advanced option for stress and stability testing.
- MSI Afterburner: Provides real-time metrics about the graphics card’s thermal performance. Some more popular software that provides monitoring tools are NZXT CAM, Nvidia App, and HWInfo.
- 3DMark Time Spy: This benchmark testing tool uses the DirectX 12 performance test to look after the GPU and CPU performance and FPS.
- Unigine Superposition/Heaven: These tests can be performed for stress and stability testing. They run a 15- to 30-minute test to check if the system crashes or if there are any artifacts.
Updated Drivers
Make sure your drivers are up to date. For best GPU performance, benchmarking and troubleshooting issues, you must get the latest GeForce or Adrenalin driver installed from the official website, otherwise, you may face stability or performance issues.
Safe GPU Temperatures While Overclocking
If you are new to GPU overclocking and don’t know how hot is too hot for your device, then go through this table to get a clear understanding of safe GPU temperatures while overclocking.
| Temperature | What it indicates |
|---|---|
| 30°C to 60°C | The device is not in use, or you may be using it for small tasks. |
| 65°C to 80°C | Safe GPU temperature while gaming in an overclocked device. |
| 85°C to 89°C | The device has become too hot. You must either reduce the overclock limits or amplify the fan’s speed to cool down the device. |
| 90°C to 100°C | This is the throttle point. The device will now reduce its performance to control the temperature. |
Safe and sustained temperature upper limit for different GPU brands
Safe temperatures can vary slightly for different brands of GPU:
| GPU Brand | Safe Temperature Upper Limit |
|---|---|
| NVIDIA GeForce | Up to 80° C |
| AMD Radeon | Up to 82° C |
| Intel Arc | Up to 78° C |
Overclocking a Laptop Vs. Desktop GPU
Since Laptops and Desktops are built differently, there is a significant difference in the performance of a Laptop, when compared to a desktop when overclocked.
Here is a detailed comparison table:
| Laptop | Desktop |
|---|---|
| Laptops have tiny spaces and strict power consumption limits | Desktops have more space with a robust power supply. |
| Laptops have tiny cooling fans, which indicates the possibility of quick thermal throttling. | Desktops are built with multiple fans and large heatsinks, which makes them more suitable for handling excessive heat. |
| If you are going to overclock the GPU of your laptop, you must increase the clocks in steps of tiny amounts, for example: 10 to 15 MHz each time, to check whether the device is performing well or not. If you see issues, reduce the clock speed a bit. | Desktops can safely handle large clock increases (like up to 50 MHz at a time). |
| Higher chances of hardware failure or permanent damage to the device. | There is comparatively lower risk in GPU overclocking of a desktop. |
Is GPU Overclocking Safe?
GPU overclocking is safe, as long as you adhere to the safety guidelines, like:
- Keep monitoring the device’s temperature.
- Do not use a damaged device that has issues with the power supply.
- Using Stress Testing and Monitoring tools is very important.
- Use trusted software for GPU overclocking.
- Do not raise the core voltage. Higher voltage may induce more heat quickly, and the device will throttle and will eventually deliver lower FPS.
- You must raise the core clock as well as the memory clock speed in steps of tiny amounts (10-20 MHz).
- If after overclocking, you see any issues with the performance of your device – like crashes or glitches – then reduce the clock speeds until the issues resolve.
- Make sure you have the latest versions of GeForce/Adrenalin drivers installed from the official website.
- Check your GPU’s power headroom before overclocking. You can maximize the power limit to 100% before overclocking, in order to be able to safely overclock to the maximum.
How to Troubleshoot Various Overclocking Issues
Here are some of the quick troubleshooting steps to follow:
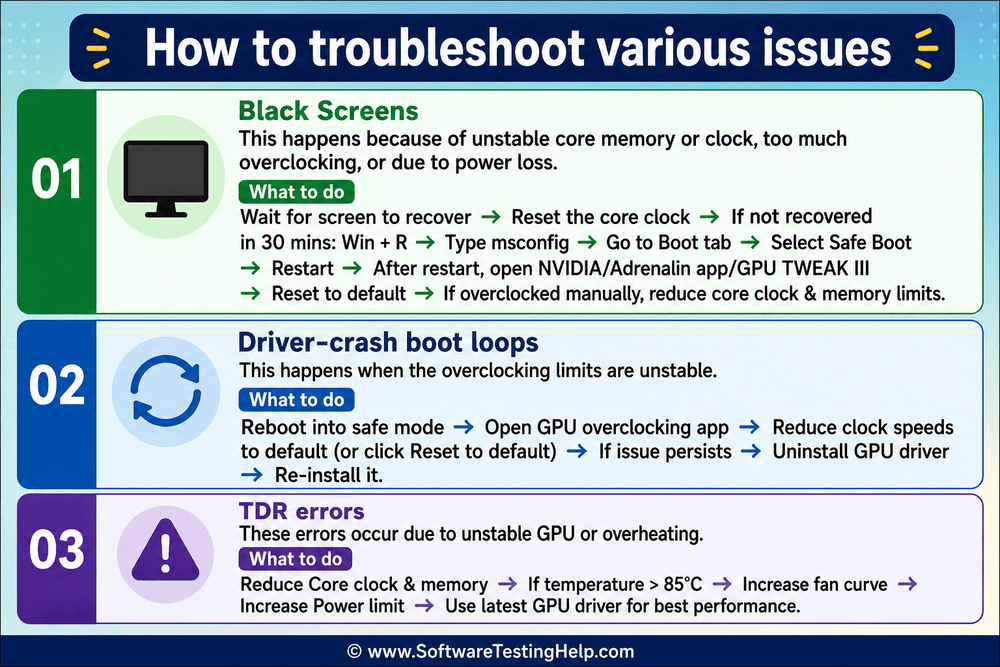
#1) Black Screens
This happens because of unstable core memory or clock, too much overclocking, or due to power loss.
While facing such an issue, you must:
- You will have to wait until the screen recovers. Then reset the core clock.
- If it doesn’t recover on its own within 30 minutes, then reboot the device by following these steps:
- Press Windows + R keys
- Type msconfig
- Go to the Boot tab
- Select Safe Boot
- Select Restart
- Once the device has restarted, go to the NVIDIA app or Adrenalin app, or GPU TWEAK III, and then select Reset to default.
- If you had done GPU overclocking manually, then open the overclocking app and reduce the core clock and memory limits.
#2) Driver-crash Boot Loops
This will happen when the overclocking limits are unstable.
What you need to do in this situation is:
- Reboot the device into safe mode.
- Open the GPU overclocking app, reduce the clock speeds to default (or click on Reset to default if you are using an automated GPU overclocking app).
- The issue will most probably get solved. If not, then go for uninstalling the GPU driver, and then re-install it.
#3) TDR Errors
Such errors occur due to an unstable GPU or overheating. In such a situation, reduce the Core clock as well as the memory. This will most probably fix the issue.
If the temperature is more than 85°C, then you must increase the fan curve. Increasing the Power limit will also improve the situation. Plus, if you are using an old version of the GPU driver, then it would be the one causing the issue. You must get the latest version of your GPU driver to get the best performance.
The ‘Silicon Lottery’ Concept in GPU
You may have heard the name of this concept. This means that each chip (of the same brand) may not perform the same under identical circumstances, there may be small variations in the semiconductor manufacturing process of each chip.
For example, suppose you bought a NVIDIA GeForce FX series chip, and your friend also bought the same chip.
Now, both of you would be using the same brand of desktop, but it is highly possible that:
- One chip crashes at +100 MHz speed, while the other may work well at even +200 MHz.
- One chip may stay stable at reducing 100mV volts, while the other may crash.
So, this is the lottery. Since all the chips produced by the company may not be the same, you may not get identical results as that of your friend.
That’s why users are advised not to follow the same Core Clock/Memory speeds as others. They must check the system performance and stability by increasing the steps in small amounts, and run actual benchmarks.
Frequently Asked Questions
1. Does overclocking increase FPS?
Yes. FPS (or Frames Per Second) increases a little, like 3 to 8 Frames per second, after GPU overclocking. FPS is also affected by the CPU and RAM.
But if the graphics card is being used at 100%, then overclocking the GPU won’t influence the FPS. Plus, make sure your device has a proper cooling system before you go for GPU overclocking for the purpose of increasing FPS.
2. Does overclocking hurt your CPU?
Yes, overclocking can hurt your CPU if you raise the core voltage, don’t monitor the device temperature, or get the application for GPU overclocking from an unreliable source.
Increasing the power supply to the system can degrade the electronics, and if the device doesn’t have a proper cooling system, then there are good chances of decreased performance or even hardware damage.
3. Is it safe to overclock your GPU?
Yes, it is safe to overclock a GPU, as long as proper guidelines are followed, for example:
– There must be a proper cooling system in the device. Too high temperatures for longer periods can damage the hardware.
– If you overclock the GPU to a too great extent, and there is not enough voltage, then the device may crash. You must increase the clock limits in steps of small amounts.
– If you see issues with the device after overclocking, like crashes, weird pixels, etc., then reduce the clock speeds a bit until the issues resolve.
4. Can overclocking make a PC slower?
Overclocking is done to improve the performance of a PC. But if proper guidelines are not followed, it can cause issues like a slowed-down PC.
If the temperature of the device goes too high, the device may automatically reduce the performance to cool down. Plus, if you have overclocked the device too high, then also you will see such issues.
5. Does overclocking void my GPU warranty?
Just overclocking would not void your GPU’s warranty. But if some physical damage is caused to the graphics card due to overclocking, if the chip has melted due to extreme heating, or if the warranty sticker is removed from the chip, then you won’t be able to claim warranty for your GPU.
Conclusion
If you are a gamer, a video editor, etc., then you can overclock the graphics card of your device to amplify its performance.
The main requirements for safe GPU overclocking are as stated below:
- First of all, the device must have a proper airflow and cooling system. I would say a 2-decade-old desktop is better for GPU overclocking, as compared to a thin laptop.
- The GPU overclocking software that you use must be reliable and should be downloaded from the official website only.
- GPU stress test and GPU temperature monitoring should be done for safe overclocking.
If you are using a laptop, then try going for UnderVolting. If the same click works on a lower volt, then it means lesser power consumption, less heat, lower chances of crashes/ damage to the device, and better performance.
Hence, I would recommend overclocking with underVolting for laptops, for a better experience.
Research Process: The total time involved to complete and publish this article is approximately 40 hours. This content was created through a structured research approach to ensure accuracy and reliability.
For more related guides, you can explore our range of tutorials below:
- The Best GPU for Mining Bitcoin & Ethereum Crypto
- Top Graphics Cards For Gamers And Video Editors
- TOP FREE GPU Benchmark Software For PC
- Top 18 Computer Stress Test Software To Test CPU
- How to Check Your GPU Temperature [Quick Methods]
Was this helpful?
Recommended Reading
-

Here you will explore the simple and quick methods on how to Check GPU Temp. You will also learn the ideal GPU temperature along with its advantages: A computer that is too hot is a computer that is unhappy. It's a good idea to keep an eye on the temperature…
-
Upgrade the graphic configuration of your laptop by comparing the top External Graphics Cards to select the best External GPU: Are your PC specs not good enough to play high-end graphic displays? Are you unable to watch 4K videos? Probably you are running short on a good graphics processor. Don't…
-
A detailed analysis of the Top Graphics Cards for Mining Bitcoin and Ethereum. Compare and pick the best GPU for mining based on your needs for high performance: GPUs or Graphic Processing Units are high-performance computer graphics cards specifically designed to alter and manipulate memory to accelerate image creation to…
-
Here we review and compare the top GPU Benchmark Software with features that test the performance of the Graphics Processing Units: PC benchmark software is used to test the performance of computers. The computer benchmark test allows you to test and compare the results of your computer processor, memory, and…


