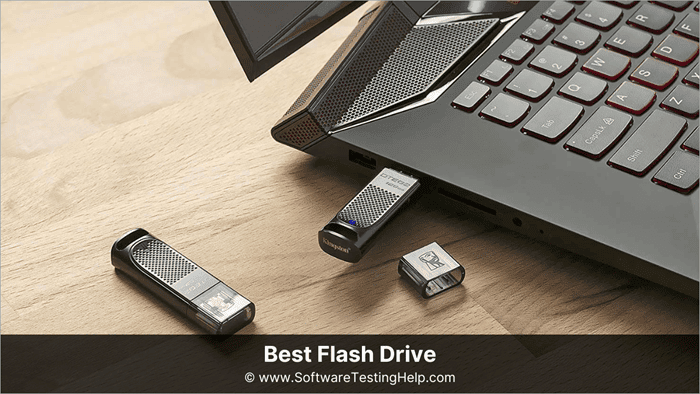
Explore the most prominent ways to repair Windows 10 from USB drive without any damage. Quickly fix boot errors, startup issues, and crashes to restore your PC efficiently in no time:
The Windows operating system will be available in all homes used by students for studies, gaming, and web search, grandparents, and small businesses for communication with clients, maintaining accounting details, and business activities.
The Windows operating system was developed keeping in mind compatibility with a variety of hardware and software configurations.
Table of Contents:
- Windows 10 Repair Guide: Ultimate Fixes to Try
- Quick Steps: How to Repair Windows 10 from USB
- Windows OS Repair: Possible Reasons
- What is Bootable USB Drive
- How to Repair Windows from a USB
- Steps to Follow if USB Repair Fails For Windows
- Alternative Windows Repair Methods
- Frequently Asked Questions
- Conclusion
Windows 10 Repair Guide: Ultimate Fixes to Try
It requires powerful hardware configuration settings for satisfactory performance, and should be frequently upgraded to its latest upgrades to maintain a high level of performance and prevent security vulnerabilities, or rely on the installation of third-party software to protect from malware and virus attacks.
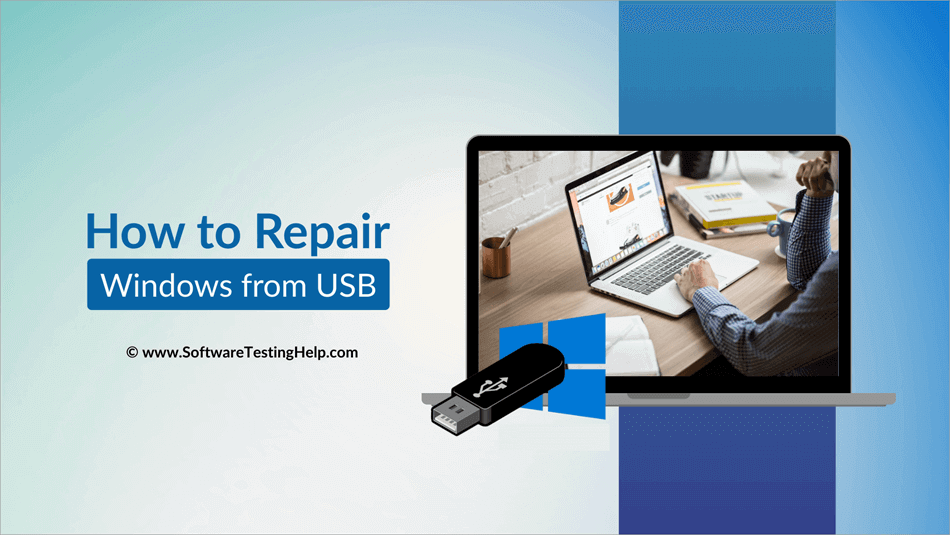
Windows operating systems are prone to repairs and require frequent maintenance. Let’s understand how to repair Windows using a USB drive.
Microsoft Windows operating system dominates the global market with 71% compared to macOS at 16% and Linux at 4% because of its presence on all the desktops and laptops, primarily for home use and moderate office use. There is a 67% global share of Linux in server operating systems, followed by Unix and Windows.
Quick Steps: How to Repair Windows 10 from USB
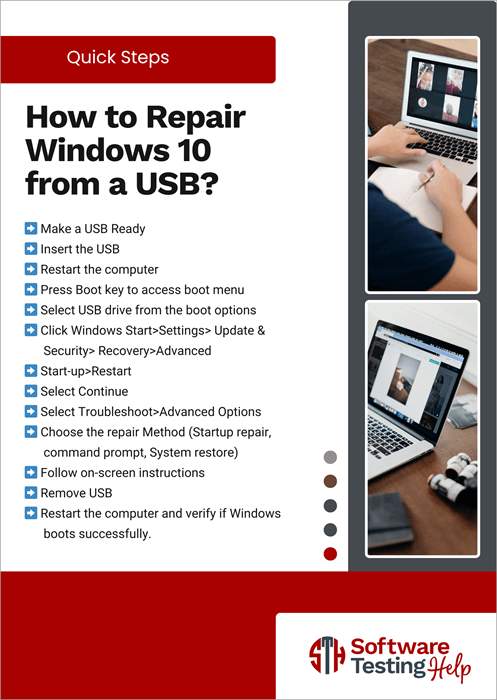
- Make a USB Ready
- Insert the USB
- Restart the computer
- Press the Boot key to access the boot menu
- Select the USB drive from the boot options
- Click Windows Start > Settings> Update & Security> Recovery >Advanced
- Start-up > Restart
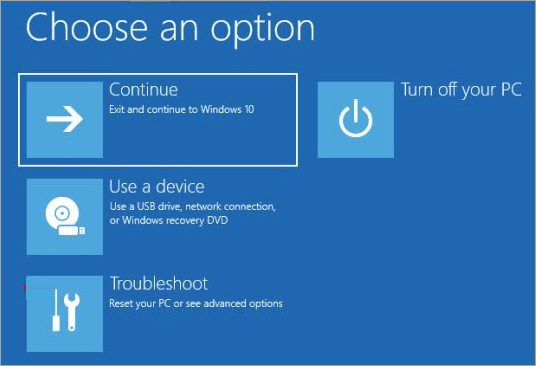
- Select Continue
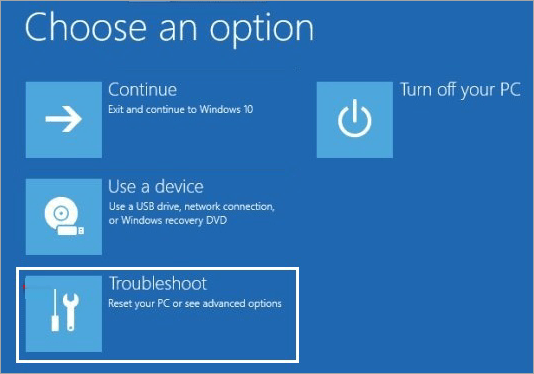
- Select Troubleshoot >Advanced Options
- Choose the repair Method (Startup Repair, Command Prompt, System Restore)
- Follow on-screen instructions
- Remove USB
- Restart the computer and verify if Windows boots successfully.
Here is the video guide on how to install Windows 10 from a USB:
Windows OS Repair: Possible Reasons
There are many reasons for the Windows operating system to undergo repairs, such as failing to boot or start up, low performance, and repeated errors that prevent normal functioning.
It’s because of corrupted or missing system files, failure due to out-of-date hardware components like drivers, libraries, and configuration files, conflicts because of the installation of unsupported software, or virus or malware attacks.
You can repair Windows by resolving errors, uninstalling software that conflicts and prevents normal functioning, installing antivirus tools to prevent malware attacks, and restoring functionality by reinstalling Windows because of missing or corrupted system files essential for normal functionality.
Below are the reasons for Windows repairs and a description of issues.
| Reasons for repairs | Description |
| Boot or start-up issues | Computer may either get stuck, go into a loop, or display an error while starting. Windows have automatic repair functionality; however, even that may fail to repair the issue, failing to start up the Windows operating system. |
| Low Performance | You may experience unexpected errors, system crashes, or delayed performance, indicating signs of Windows requires repairs. |
| Blue Screen of Death (BSOD) | Incorrect RAM memory, insufficient RAM settings in overclocking or memory tab under BIOS menu, or incorrect memory clock configured in DIMM (dual-in-line memory module) for the motherboard. Some of the computer hardware components, like faulty RAM, corrupt or missing PSU, HDD, SSD, processor, motherboard, and out-of-date drivers. The BSOD, or Blue Screen of Death, should be resolved to prevent further deterioration. |
| Infections/attack of a virus or malware | Windows may face malware or virus attacks in the absence of antivirus software. |
| Problem due to Hardware | Insufficient memory (RAM), or storage (HDD, SSD), out-of-date drivers, graphics card, etc. are hardware issues. |
| Software conflicts | Installation of software that is incompatible with the Windows operating system may result in conflict and impact normal functionality. |
| Corrupted System Files | Sudden shutdown without following the required steps may corrupt system files, thereby resulting in issues during normal working. |
What is Bootable USB Drive
In the absence of a computer hard drive, a portable way of repairing and installing the operating system is using a USB or a pen drive.
A bootable USB means starting your device through a USB drive instead of devices for internal storage. That begins with preparing a suitable environment for resolving issues, repairing or installing, and running diagnostics.
Preconditions for the repair of the Windows operating system:
It is essential to have the following conditions before Windows repairs
- You have administrative access to repair and install the operating system
- Your device has a BIOS (basic input/output system)
- You have UEFI (Unified Extensible Firmware Interface) already installed, which facilitates booting SD cards.
- Boot your computer using a universal serial bus (USB).
What is the Boot Sector?
A portion or section of a storage device, like (HD) hard drive or (SSD) solid state drive, that has a code command to initiate booting (starts to install) the process of installing the operating system of the computer.
Also Read => Comparison of SSD vs HDD
This is the first code/command that executes when your device’s power is on, guiding the computer to load the operating system or to start the computer.
How to Repair Windows from a USB
The following are the steps you will require to follow while repairing the Windows operating system from a USB.
Step 1: Make a USB drive ready
- Selection of USB: It is recommended to select a USB 3.0 with sufficient capacity to store and install the operating system. 16 GB of storage space on a USB should be available to accommodate updates and additional files for the operating system.
- Download disk image (ISO) file: The Disk image of the operating system should be downloaded from https://www.microsoft.com/en-in/software-download/windows10iso
- You can select an edition from the drop-down & click the confirm button to download the ISO file.
- Making a USB bootable: You can use any one of the software like Rufus, Ventoy, Etcher, Yumi, WinToUSB, or UNetbootin to download the ISO file and make a bootable USB.
Media Creation Tool for Windows
USB flash drive is an installation media that is used for preparing a clean installation of Windows, reinstalling Windows, or installing a new, fresh copy of the Windows operating system on your computer.
You need to prepare a media creation tool for the Windows 10 operating system:
- Go to https://www.microsoft.com/en-in/software-download/windows10 – Windows 10 download official site.
- Click the Download Now button under the Create Windows 10 installation media section.
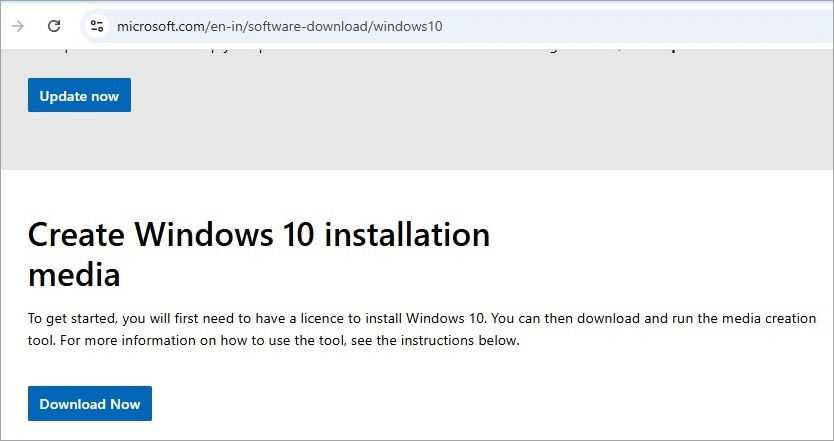
- You will find MediaCreationTool.exe in the download folder.
- Double-click on MediaCreationTool.exe to run.
- Follow the instructions/steps to create installation media.
Refer to the video below:
Step 2: Setting up the BIOS/UEFI
- Access BIOS/UEFI Settings: Start the computer and press F2, F10, F12, or the Delete key, depending on the manufacturer of the computer, to access settings for BIOS/UEFI.
| Manufacturer Name | Keys for BIOS/UEFL settings on Restart |
| ACER | F2 or Delete |
| ASUS | F2 or Delete |
| DELL | F2 or F12 |
| HP | Esc or F10 |
| LENOVO | F2 or Fn + F2 |
| MSI | Delete |
2. Select the Booting Option: Go to Boot Order or Boot section in BIOS/UEFI settings.
3. First Boot Device as USB: Select Boot order such that USB will become the first boot device. This will ensure USB is selected as a booting device instead of the hard drive.
4. Save & Exit Settings: Save changes in settings for BIOS/UEFI and exit the setup.
• You should stay alert as system will prompt you to click any key to start booting from external booting media such as USB.
• It is advisable to keep back up of data to prevent data loss, prior to proceeding with booting using USB.
Step 3: Boot from USB
- Restart the computer – Click the Windows (Start) key; the menu will appear. Click on the Power option, then select Restart from the available options, such as Sleep and Shut down.
- You can press the Windows icon + X keys simultaneously to go directly to the Shutdown & Sign out option, then select the Restart option.
- Press any key on the prompt to switch to begin booting using USB.
- Follow the on-screen instructions – A window will appear with instructions. Follow the said instructions like selecting your choices by selecting a radio button, or drop-down or both, and press the Next button.
Step 4: Accessing BIOS/UEFI Settings
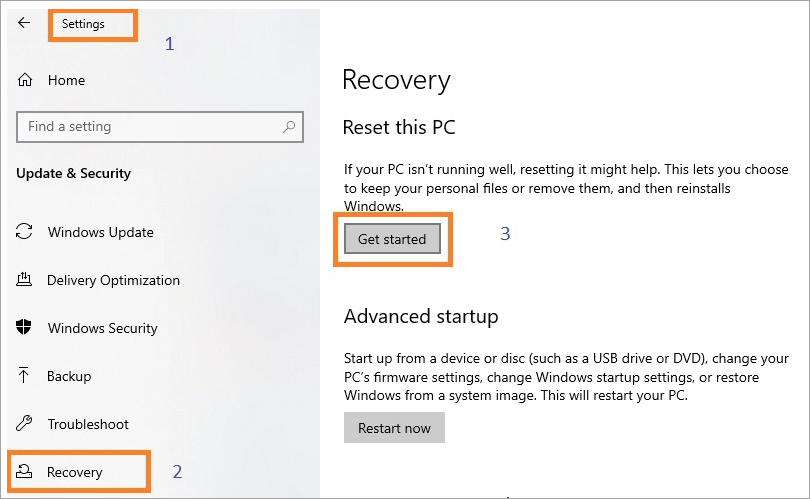
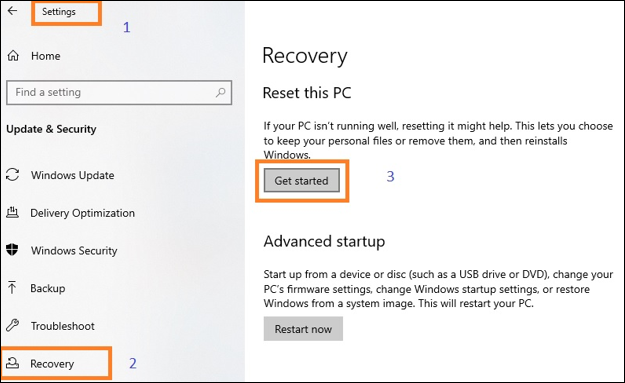
- Click on Windows (Start)
- Select Settings
- Click on Update & Security on the Settings dashboard
- Click on Recovery in the left pane
- Two sections will appear on the right panel–Reset this PC & Advanced start-up
- Click on the Restart now button under Advanced start-up
Recommended Reading => Complete Guide to Update BIOS on Windows
7. On clicking Restart now. Your computer will restart, and it will finally open the blue screen with multiple options.
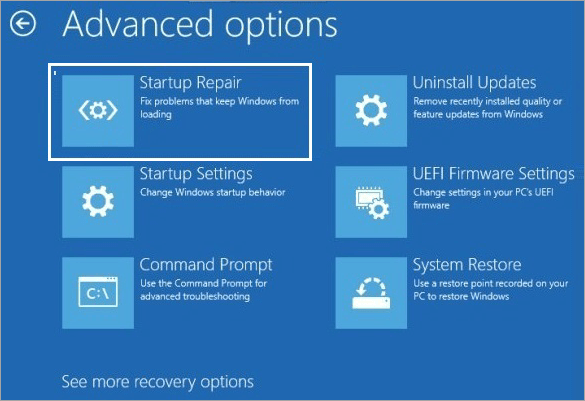
8. Click on the Troubleshoot option.
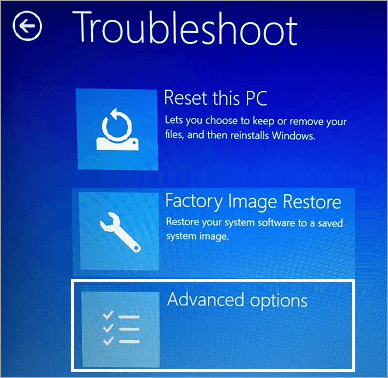
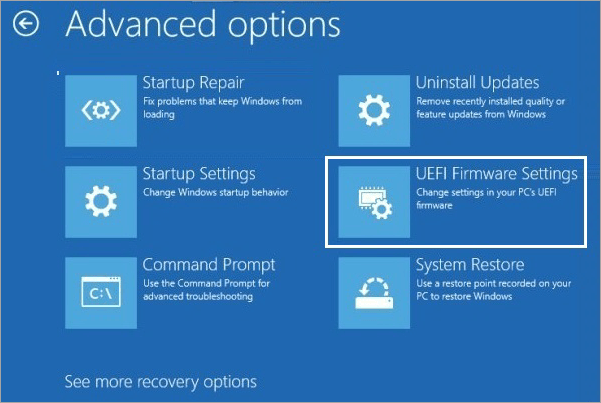
9. Under the Troubleshoot screen, select Advanced options.
UEFI Firmware Settings
10. Under the Advanced options screen, select the UEFI Firmware Settings option.
11. On clicking UEFI Firmware Settings, it will prompt you to restart to make changes in UEFI firmware settings
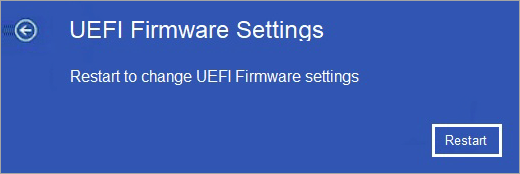
12. Click on the Restart button.
13. Once the computer is restarted, it will enter the UEFI/BIOS firmware settings.
Also Read =>> What Is Windows Boot Manager
Changing Key UEFI Firmware Settings
Below are the key UEFI settings for Windows 10.
Change 1: Enable Secure Boot
Secure Boot is the name of the security feature that prevents malware from loading during the Windows operating system’s boot process. It checks the digital signature and other boot components of the boot loader before allowing it to load.
It is required to enable secure boot for improved security requirements for new operating systems like Windows 11 or Windows 365.
Locate secured boot – You can enable secure boot in the boot or security section of the UEFI firmware settings.
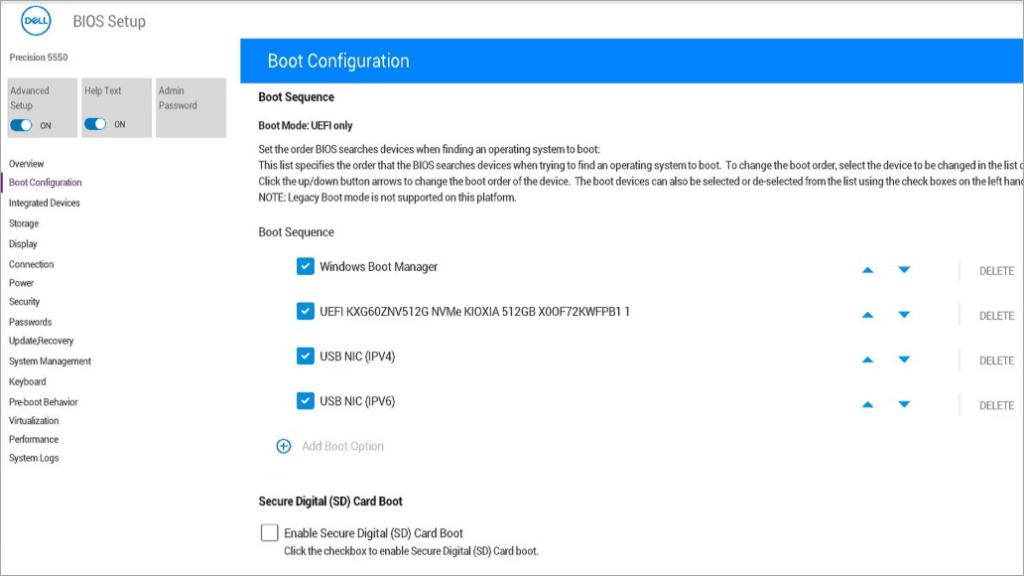
Change 2: Adjust boot order
The sequence or order in which your computer boots is decided by the boot order for various storage devices – DVD, USB, or Hard Drive. The first boot option will be the hard drive on which Windows is installed.
Locate Boot Order – You can fine-tune or adjust the boot order in the start-up or boot section of UEFI firmware settings
Change 3: Enable trusted platform module (TPM)
A hardware-based security feature using a security chip known as TPM is useful for storing sensitive information such as user credentials and encryption keys. You can enable TPM in UEFI firmware settings for features like BitLocker drive encryption to work correctly.
Locate TPM – You can locate TPM in the advanced or security section of UEFI firmware settings
Change 4: Disable Legacy Boot
If your computer is compatible, supporting both Legacy BIOS and UEFI, make sure that UEFI settings are enabled for optimal compatibility in case of Windows 10, as legacy boot is older and not as secure as UEFI.
Locate Legacy Boot – You should find the legacy boot option in the advanced or boot section of UEFI settings
Change 5: Disable fast boot
You can skip some of the hardware initialization steps and speed up the boot process, but is observed to face issues accessing UEFI settings. You can disable the fast boot feature to prevent issues.
Locate fast boot – You can disable the fast boot feature in the UEFI settings
Step 5: Go to Start-up Repair
You again go to Start-up Repair options as per the steps described below.
- Select Windows (Start) in the bottom left of your screen
- Click on Settings
- Under the Settings dashboard, select the Update & Security option
- Click on Recovery on the left pane
- Click on the Restart now button under the Advanced Startup section on the right panel
- Your computer will restart & Windows repair screen in a blue background will appear
- Click on Troubleshoot & under Troubleshoot, click on Advanced options
- Click on the Start-up Repair option

- It will prompt you to select a user account that has access privileges for system repairs.
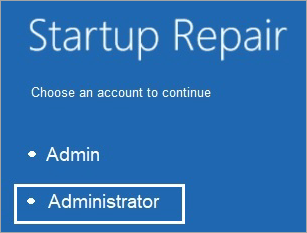
- Enter the password for the selected admin user account.
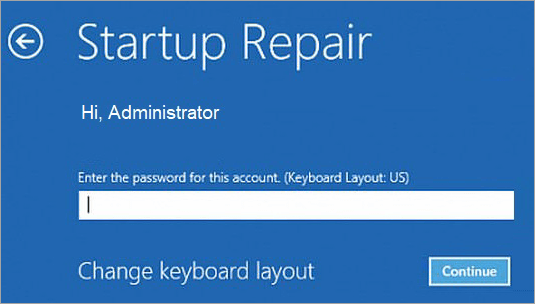
- Click on the Continue button, and Windows will diagnose the computer for any anomalies or corrupted/missing system files, if any.
Step 6: Follow the on-screen instructions.
Step 7: Remove the USB and then restart the computer.
Step 8: Verify if Windows boots successfully.
Note:
- You can check out the System Restore, Command Prompt, or Startup Repair options to repair the Windows operating system using a USB.
- With a missing or corrupted system file, you can repair the Windows operating system using a bootable USB drive. For this, change the boot order to USB in BIOS or UEFI to boot or repair using a USB drive.
Steps to Follow if USB Repair Fails For Windows
In case repairs using a USB drive fail, you can verify or try the alternatives listed below
1. Check if the USB is damaged
- Look for cracks or visual tampering on the USB-like portion you insert in your computer’s port, or casing of the USB, etc. Also, check if the USB plugged in is loosely connected.
- Your port, where you are trying to insert the USB, may not recognize the USB, or your computer port is damaged. You can try another port of your computer or try a port of another computer.
- Removing dust from your computer port(s) will help with connection issues with external storage devices.
- You can simply restart your computer in case the current settings got hung up, and restarting will help identify the USB inserted in a particular port.
- If you find the USB is not identified, go to BIOS settings and check if it is properly configured to recognize USB devices.
2. USB driver update or reinstall
- Open Device Manager
- Select the Windows (Start) icon in the bottom left corner of your screen
- Search for Device Manager, click to open it
- The Device Manager interface will open
- Look for Universal Serial Bus controllers (USB Controller)
- Expand it, and you will find a list of existing USB controllers
- Right-click on each USB controller, go to properties
- Click on the Drivers tab, & click on the Update Driver button as shown
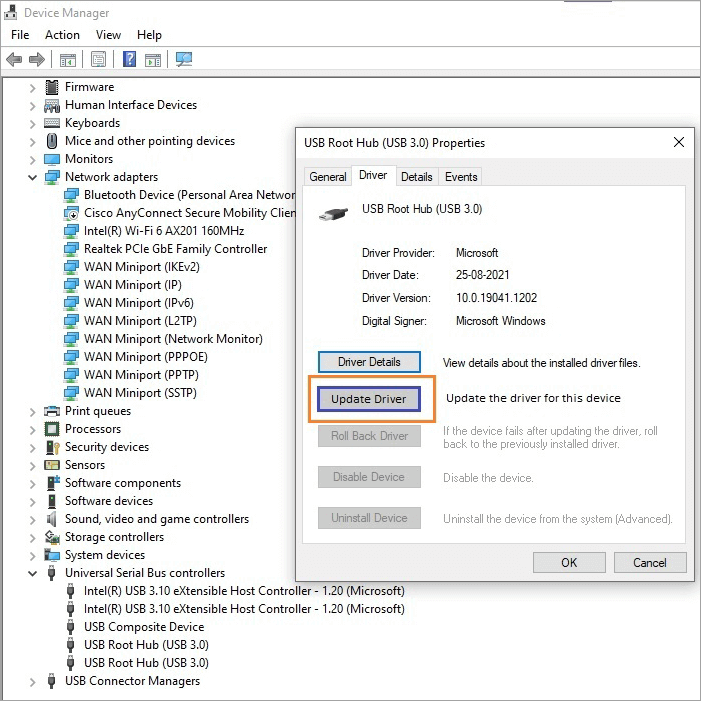
9. This will automatically search for the latest driver update
If the driver update doesn’t work, you can uninstall the drivers and restart the computer. On restart, Windows will try to reinstall drivers for USB controllers.
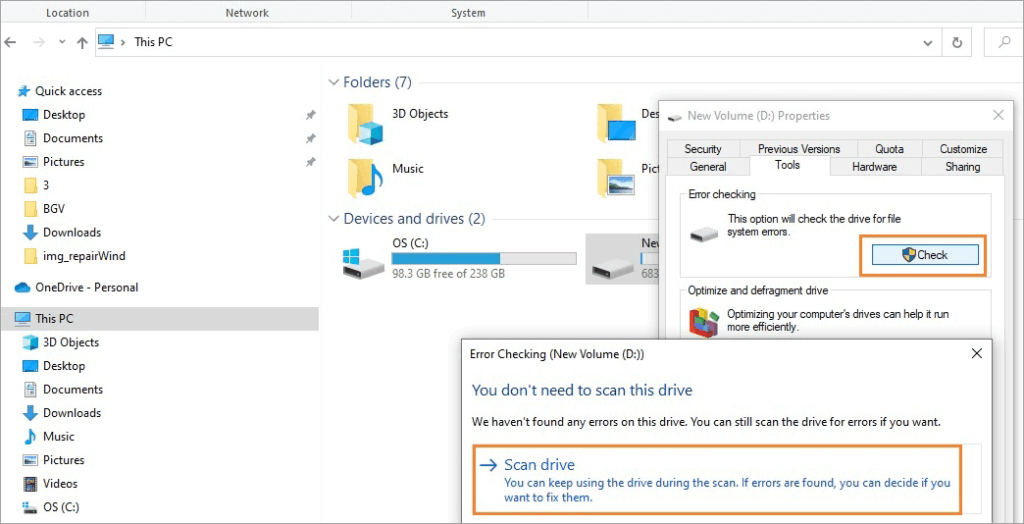
3. Run the built-in Error Checking tool
- Open File Explorer by typing explorer in the search text field
- Look for This PC, you will see drives and USB drives connected in the right pane
- Right-click on the USB drive connected & select “Properties”
- Click on the Tools tab, click the Check button under the Error checking section
- Select the Scan option/link and follow the instructions
Back up data captured on your USB drive. If it is essential for you, you can use data recovery tools like:
- EaseUS
- Stellar Data Recovery
- Recuva or
- Disk Drill
Alternative Windows Repair Methods
- Start-up Repair tool
- System Restore
- System File Checker
- DISM command
- Safe Mode
- Bootable USB tools
When to use System Restore?
After successful troubleshooting of repair issues, you install drivers, updates, and software, and then take a system restore where the computer’s registry, system files, and other settings are set to the previous state, replacing all the changes that have resulted in the issues.
When to use Start-up Repair?
When software-related issues cause failure of booting your computer, start-up repair will diagnose and resolve common boot problems like a damaged master boot record, wrongly configured boot configuration data, and missing or corrupt system files.
When to use Command Prompt?
Command prompt is used to fix various issues, such as troubleshooting and network configuration, using commands like ipconfig – to check your PC IP address, ping- to check connectivity to the network, netstat – to diagnose, resolve, and display network connectivity issues.
You can check and fix disk errors, manage disk partition, etc, using chkdsk command. sfc/scannow command to scan and resolve corrupted system files of Windows. Command prompts are also used for advanced administrative functionalities like privileges and granular-level control compared to the GUI.
How to access Command Prompt from the USB Repair Environment?
Precondition – You either have Windows installation media or a bootable USB drive
Step 1: Insert the Bootable USB in your computer’s port
- Insert the USB drive into the active port of your computer that recognizes the USB drive
- Restart your computer and keep pressing F12, F10, Esc, or Del keys based on your BIOS/motherboard/ manufacturer of your computer/laptop
- Select the boot device as the USB drive
Step 2: Open the Windows setup screen
- Once it boots from USB, the Windows setup screen will display on your screen
- Enter relevant information like language etc., requested & press Next
- Click the ” Repair your computer button to begin repairs
Step 3: Open the Command Prompt
- Keep the Shift key pressed when you click the Power option from the Start menu & select Restart
- You will find a screen with a blue background asking you to choose an option.
- Click on Troubleshoot, select Advanced options. Under Advanced options, select Command Prompt
When to consider a clean installation of the Windows operating system?
When there are issues related to malware, software conflicts, or persistent performance problems, consider a clean installation of the Windows operating system.
A clean installation will erase hard drive data, hence it is advisable to take a backup of important information. Post clean installation, you can reinstall drivers and applications in your computer.
Success Indicators for Windows Repairs
The Windows repair tool will display no error or discontinuity when subjected to Windows repairs, showing a successful completion message at the end.
- The error displayed before the repair will not display after the repair, which will ensure the issue has been fixed.
- There will be a visible performance improvement, like reduced freezing or delay, and faster boot time.
- The feature or malfunction, before repair, will start functioning as required as a sign of the success of repairs
- The system will be stable, will not freeze or crash occasionally after repairs
- The frequent issues observed will not occur after repairs.
Frequently Asked Questions
1. List reasons for repairs of the Windows operating system.
There are various reasons the Windows operating system may require repairs:
• Boot or startup issues
• Low or delayed performance
• Blue Screen of Death (BSOD)
• Virus or malware attack
• Software conflicts
• Hardware problems
• Corrupted or missing system files
2. What are the preconditions for repairs of Windows?
Some preconditions for Windows OS repairs are
• Have administration access to repair and install the operating system.
• Your device has a BIOS (basic input and output system).
• You have UEFI (unified extensible firmware interface) already installed, which facilitates booting SD cards.
3. What is the Boot Sector on a Hard Drive?
A section of a storage device, like an HD (hard drive) or SSD (solid state drive), that has code – command to initiate the booting (starts to install) process of installing the operating system of the computer.
4. What is a bootable USB drive?
In the absence of a computer hard drive, a portable way of repairing and installing an operating system using a USB or pen drive.
A bootable USB means starting your device through a USB drive instead of using internal storage, which begins with preparing a suitable environment for resolving issues, repairing, or installing and running diagnostics.
5. How to boot Windows from USB?
You will require a bootable USB drive that has all the required files for Windows installation, Access to the Computer’s BIOS or UEFI settings, to make boot order as USB drive the first boot device.
6. How many ways can we perform Windows repairs using a USB?
You can check out System Restore, Command Prompt, or Startup Repair options to repair the Windows operating system using a USB
7. How do I fix a corrupted Windows 10?
To resolve a corrupted Windows 10 operating system, you can follow any of the following methods:
Method 1. Run DISM & SFC
1. SFC – You can look for Command Prompt in the Start menu. Select the option to run as administrator, and type the sfc/scannow command followed by pressing the Enter key. This will scan and repair corrupted system files on your computer.
2. DISM – If the SFC command fails to repair files, run DISM/Online/Cleanup-Image/RestoreHealth followed by pressing the Enter key to resolve corrupt system files.
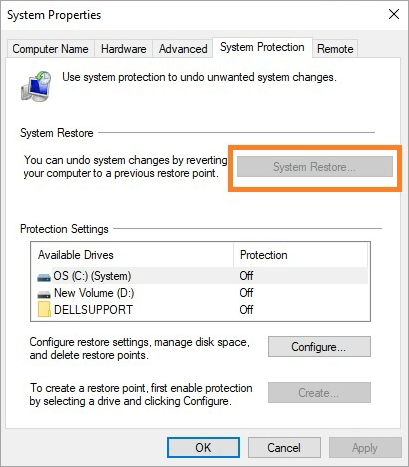
Method 2. System Restore
1. You can click on the Start menu, search for System Restore by typing in the search text field, select. Create a restore point; click on the System Restore button under the System Protection tab under the System Properties window & follow the instructions.
Method 3. Reset Windows 10
1. You can try to reset Windows by clicking Settings from the Start menu. Select Update & Security & Recovery from the left pane, & select the Reset this PC option.
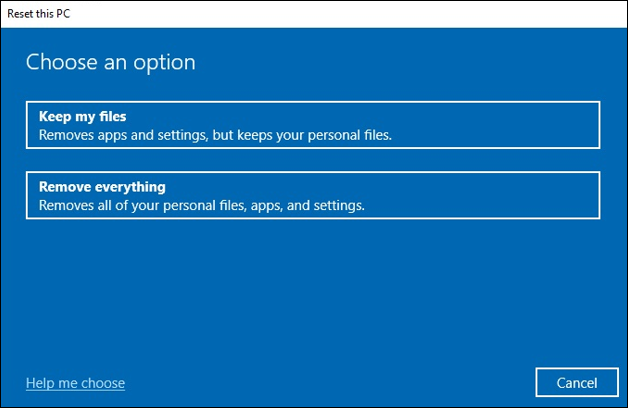
2. Followed by Get Started, you can select either the keep files or remove everything option.
Method 4. Reinstall Windows 10
1. If resetting Windows fails to resolve the corrupt file issue, try to reinstall Windows from a USB drive by creating bootable media.
2. You may format the drive and select a clean install.
Method 5. Advanced Troubleshooting
1. You may use the built-in Startup Repair tool to fix boot-related issues.
2. You can use the command prompt and run as administrator, and run chkdsk / r command & press enter to run the troubleshooting steps. You may boot your computer in Safe mode
8. How do I create a Windows repair disk from a USB?
You can create a Windows repair disk from a USB as explained below
Windows built-in tool – Create a recovery drive will create a bootable USB drive with recovery tools for repairing and troubleshooting issues encountered.
Create a Windows repair drive using these steps.
Select the USB drive with 16 GB storage space and take a backup of important data files.
Look for Recovery Drive in search & select – Create a recovery drive, follow as per on-screen instructions, finally click on the Create button to start copying recovery tools and system image file onto to USB drive. You can remove the USB drive once the process is completed.
9. Does Windows 10 have a built-in repair tool?
Yes, Windows 10 has built-in repair tools to fix issues, namely, System File Checker, Startup Repair, and other troubleshooting tools.
10. How to repair Windows 10 using a USB bootable media when Windows is stuck on a bluescreen?
You will require a bootable USB drive along with Windows 10 installation files, boot your system, and access options to repair within the Windows Recovery Environment section.
System Restore, Startup Repair, and the command prompt are some Windows built-in tools to resolve the repair issue.
Conclusion
Many computers come without CD drive making it difficult to install or repair the Windows operating system in case of errors, missing, or corrupted system files.
We can repair Windows using a bootable USB. It is required to configure the First boot device as USB in the boot order in UEFI/BIOS settings, and then use USB for repairs of Windows.
Was this helpful?
Recommended Reading
-

For maximum security of your Mac device from data leakage and data theft, opt for the best USB Security Software for Mac from this exclusive list: Digital transformation of businesses has undoubtedly increased efficiency in operations. Businesses can save much of their time, costs, and other resources, and have seen…
-
Learn how to Boot Windows 10 from USB by understanding the pre-requisites, method to create bootable USB, etc: Windows is one of the most used operating systems presently available in the market because of the user-friendly interface and the popular features it provides. Windows has a wide user base globally,…
-
Explore the methods to understand How to Create Windows 10 Recovery USB. Also, review the top tools to Create Windows 10 Recovery Disk: Losing data while booting a different version of Windows or resetting the system is a common issue faced by most users. But there is yet another risk…
-
Are you looking for the best thumb drive to transfer bigger files on your PC or laptop? Read this review of the Top Flash Drives to compare and pick the Best USB Flash Drive in the market: Transferring bigger files takes a lot of time and a bigger space. The…