


Learn how to remove or turn off Windows Defender temporarily or permanently on Windows 10/11. Discover the multiple methods to disable Microsoft Windows Defender safely with step-by-step screenshots.
Microsoft Windows Defender is a security add-on that usually comes with the Windows operating system.
This application acts as an antivirus for your computer system, protecting your computer system and your files against malicious actors like viruses, theft, spyware, and ransomware. It is considered one of the best antivirus options packaged with an operating system.
Table of Contents:
How to Disable Windows Defender: Safe Guide
There could be a valid reason for wanting to opt out of using Windows Defender, like conflicting with other installed system applications or the security features not being efficient enough for a specific computer. The person may prefer to use other antivirus applications rather than using Windows Defender.
But you must know that it is difficult to remove or uninstall Windows Defender because the application was not designed and developed to be uninstalled from the operating system.
Suppose you plan to use a third-party antivirus on your Microsoft Windows system. In that case, you will need to disable Windows Defender using the methods I will explain in this article.
Temporarily Remove Microsoft Defender Real-time Protection
Sometimes, you may just need this antivirus feature to be temporarily shut down so you can quickly install any other application that may be conflicting with Windows Defender.
If you want to disable the real-time protection on Windows Defender temporarily, you can follow these steps:
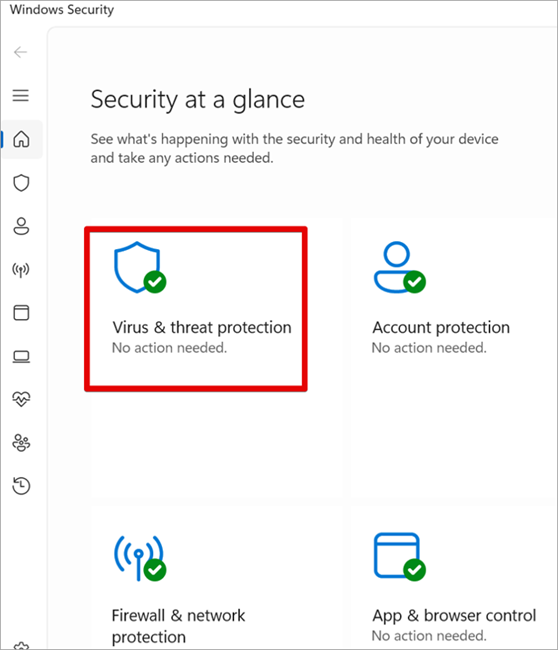
#1) Search for Windows Security.
#2) Click on Virus & threat protection.
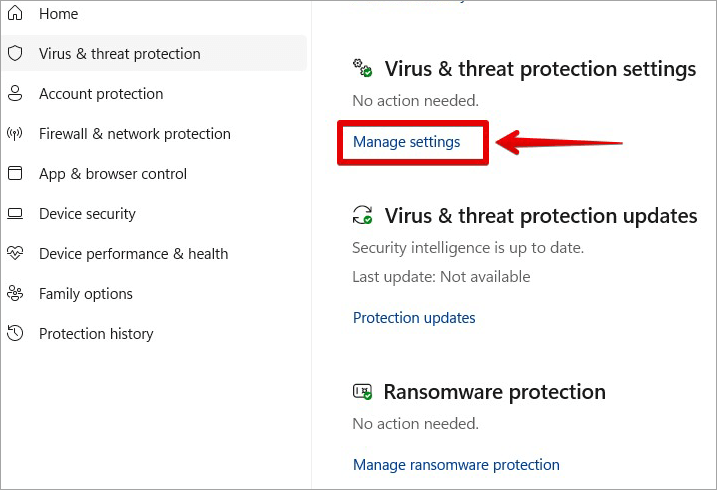
#3) Click Manage settings under the Virus & threat protection settings section.
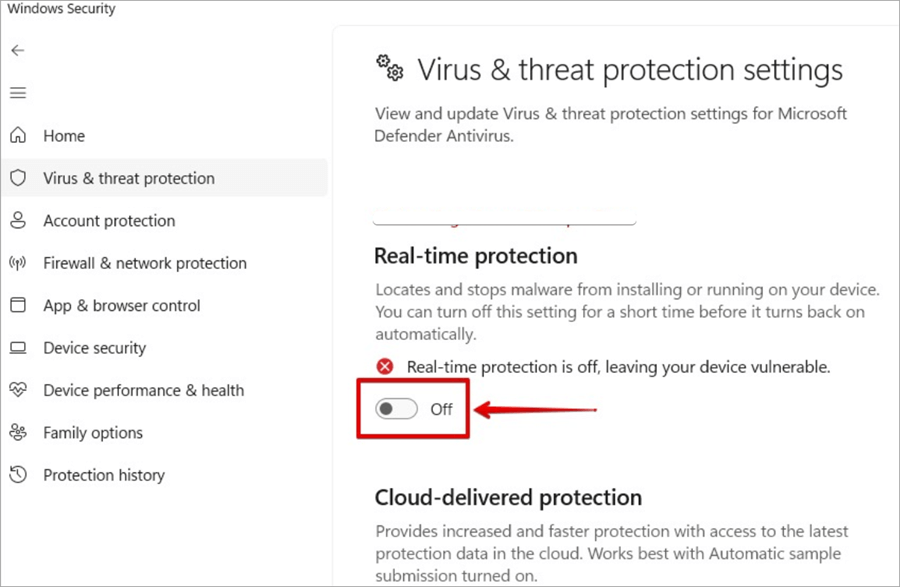
#4) Switch the Real-time protection button to Off. This will disable Microsoft Defender Antivirus temporarily.
Suggested Reading => A Detailed Review of TotalAV Antivirus
After completing the steps above, Windows Defender Antivirus will be disabled temporarily so that you can install any application or finish a specific task without any conflict.
Please note that after restarting the computer, Windows Defender Antivirus will be enabled again automatically because it was designed to run with your operating system. You can be toggling off the real-time protection switch if what you want to do is causing conflict, and it is temporary.
How to Turn Off Windows Defender: Easy Methods
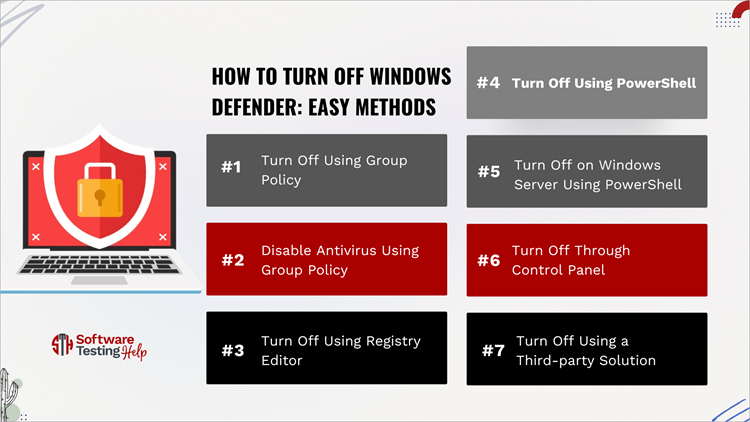
#1) Turn Off Using Group Policy
The Group Policy Editor can turn off Windows Defender Antivirus permanently. But before this can be done, the Tamper Protection feature will need to be disabled. The Tamper protection is a feature in the Windows Security that can protect it against changes you make outside the application.
If this feature is not disabled, once the Windows Defender setting is disabled via the Group Policy Editor and the system is restarted, the settings will be enabled again.
Also Read => Methods to Boot into Windows 10 Safe Mode
How to disable the Tamper Protection feature:
1. Search for Windows Security.
2. Click on Virus & threat protection.
3. Click Manage settings under the Virus & threat protection settings section.
4. Toggle the Tamper Protection switch to Off.
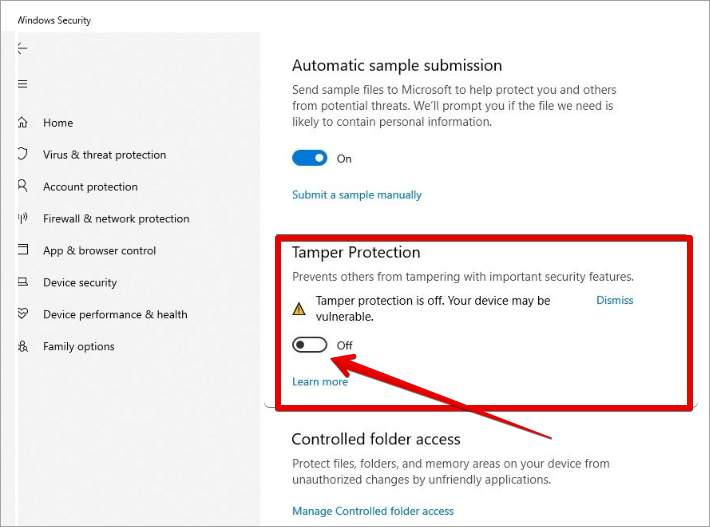
After disabling the Tamper Protection feature then you can follow the steps in using Group Policy to disable Windows Defender Antivirus.
#2) Disable Antivirus Using Group Policy
Follow these steps:
1. Run or search for gpedit.msc and click on it to launch the Local Group Policy Editor.
2. Navigate to this path on the Local Group Policy Editor: Computer Configuration => Administrative Templates => Windows Components => Microsoft Defender Antivirus
3. On the policy page, click and open “Turn off Microsoft Defender Antivirus”.
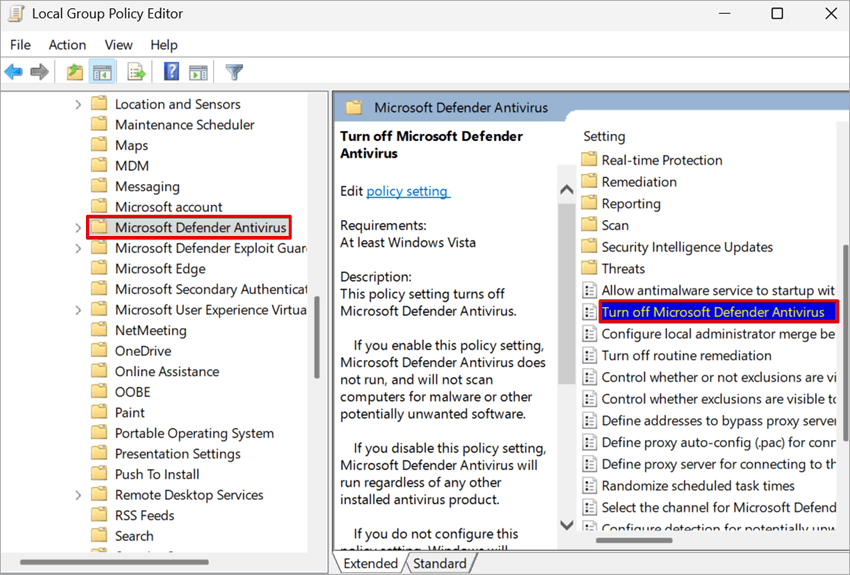
4. Select the Enabled option.
5. Click the OK button and restart your computer to permanently disable Windows Defender Antivirus.
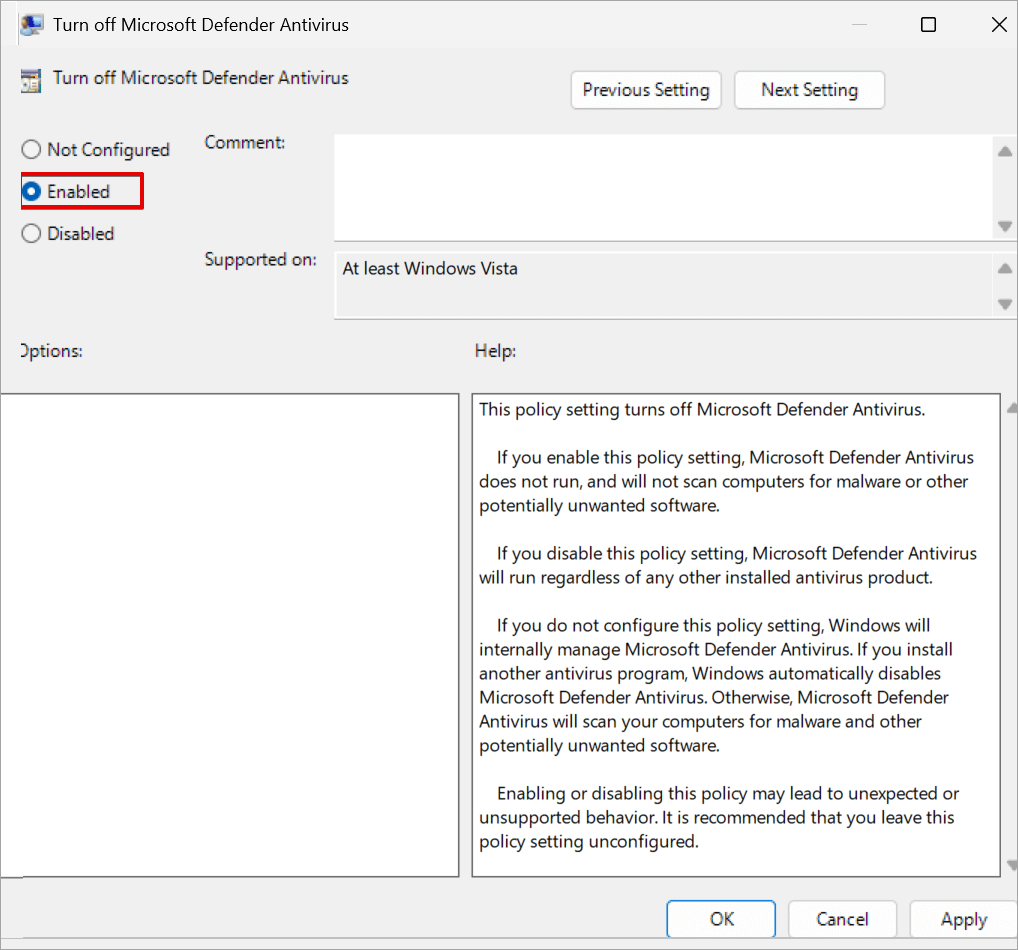
After completing the steps above, Windows Defender antivirus will be disabled permanently, but you can always undo the changes following the same process. On the policy setting, select the Not Configured option and click OK. It is also recommended to enable the “Tamper Protection” feature again.
#3) Turn Off Using Registry Editor
Caution: The method of using a registry to disable Windows Defender permanently can be dangerous because if you edit the registry incorrectly may cause significant damage to your computer system, so exercise great caution and try to back up your registry before using this method. Please note that the Tamper Protection feature can block these changes; you may need to disable it first before using this registry editor
Follow these steps to disable Windows Defender Antivirus using Windows Registry Editor:
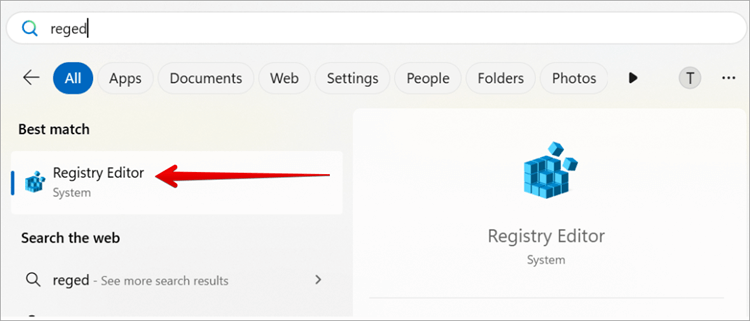
1. Open the registry editor by typing regedit in the search box.
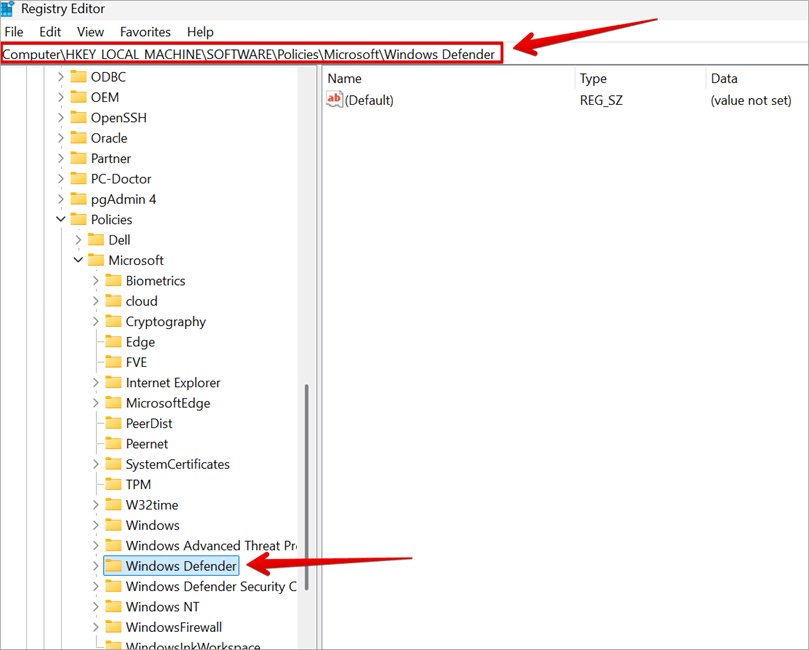
2. Navigate to this key:
HKEY_LOCAL_MACHINE\SOFTWARE\Policies\Microsoft\Windows Defender
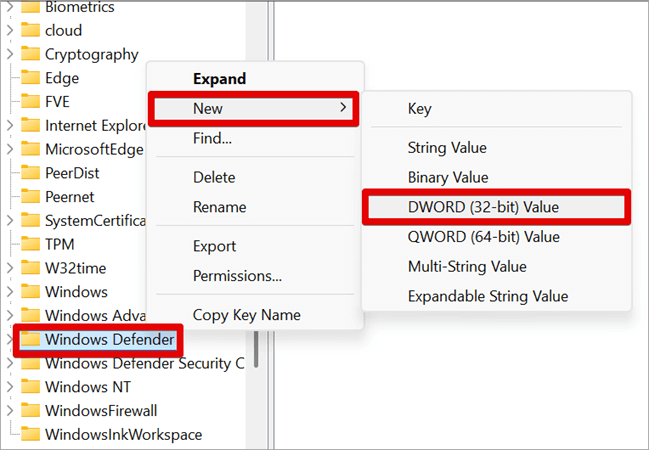
3. In the Windows Defender key, create a new DWORD value. Right-click on Windows Defender or the right pane. Select New => DWORD (32-bit) Value.
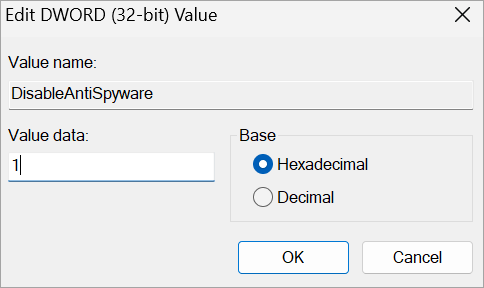
4. Give it a value name “DisableAntiSpyware”

5. Set the value date to 1 and click OK.
Restart your computer for the changes to take effect. If you want to enable Windows Defender back, just go to the same registry path, set the DisableAntiSpyware value to 0, or delete the key and restart your computer.
#4) Turn Off Using PowerShell
If you like working with commands to execute tasks, then you will be able to use PowerShell to turn off Windows Defender.
Suggested Read => PowerShell UI Automation tutorial
Follow the steps below:
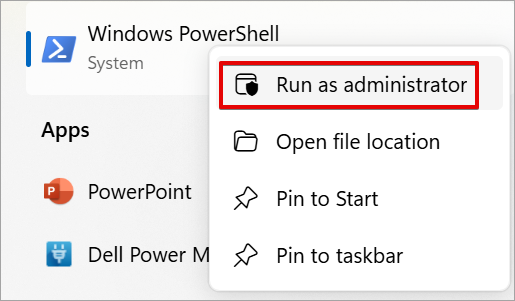
1. Launch PowerShell as an administrator.
2. Disable the Real-time protection feature on Windows Defender using this command: Set-MpPreference -DisableRealtimeMonitoring $true
3. Hit the Enter key.
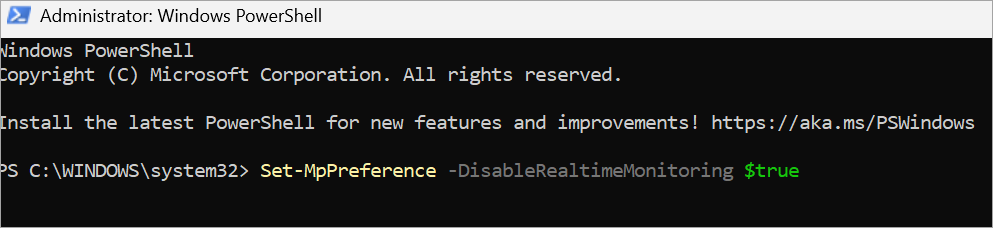
Please note that the above command is only temporary and can be reverted after a reboot.
4. You can re-enable the Real-time protection by using this command:
Set-MpPreference -DisableRealtimeMonitoring $false
5. But you can permanently disable Windows Defender using the following PowerShell command. But this can only be possible after the Real-time protection is set to OFF. This command will modify the Registry settings.
Set-ItemProperty -Path “HKLM:\SOFTWARE\Policies\Microsoft\Windows Defender” -Name “DisableAntiSpyware” -Value 1

6. The registry value can be reverted by using this command:
Set-ItemProperty -Path “HKLM:\SOFTWARE\Policies\Microsoft\Windows Defender” -Name “DisableAntiSpyware” -Value 0
#5) Turn Off on Windows Server Using PowerShell
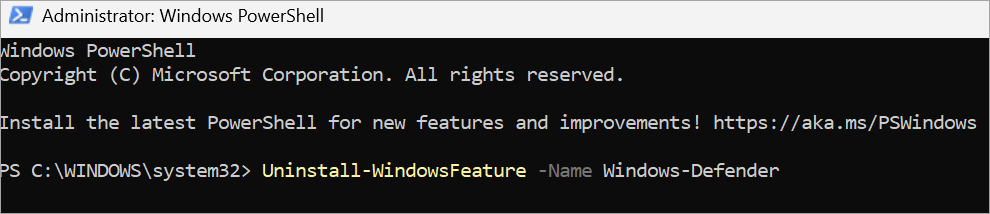
The following command can only work on a Windows Server, but will not work on Windows 10 or Windows 11.
1. Run the following command in your PowerShell. It will permanently remove or uninstall Windows Defender from the server.
Uninstall-WindowsFeature -Name Windows-Defender
Please note that Tamper Protection is not enabled on Windows Server, and there is no need to switch it OFF before running these commands.
2. Use this command to confirm if the security feature has been uninstalled from your system:
Get-WindowsFeature *defender*
3. After uninstalling, you still have the privilege of reinstalling using this command:
Install-WindowsFeature -Name Windows-Defender
Make sure you reboot your system after running these commands.
#6) Turn Off Through Control Panel
This step is very easy and straightforward; you just need to follow these few steps below:
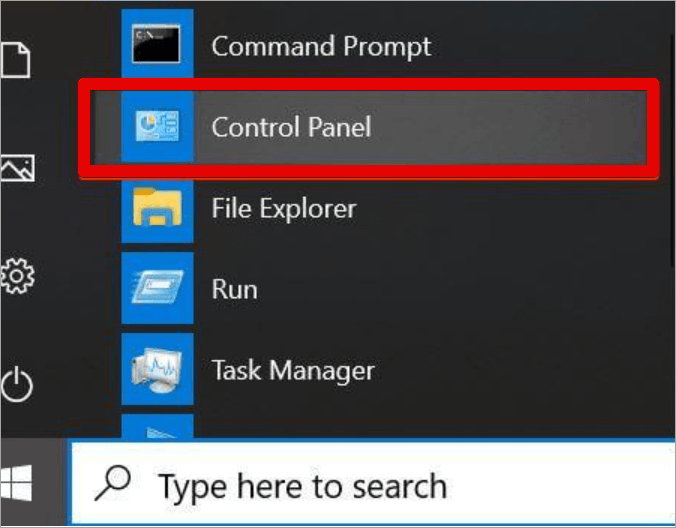
1. Open Control Panel
2. Navigate to System and Security => Windows Defender Firewall.
3. On the left panel, click Turn Windows Defender Firewall on or off.
Further Reading => Best Free Firewall for Windows
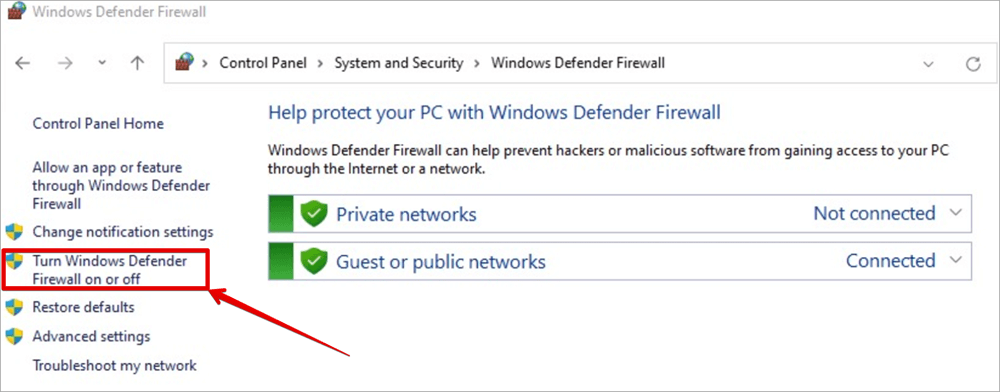
4. On the Customize settings, select Turn off Windows Defender Firewall for both Private and Public network settings.
5. Click OK to apply settings.

Please note: Turning off your firewall makes your system susceptible to attacks. So, make sure you have a third-party antivirus installed for protection.
#7) Turn Off Using a Third-party Solution
When you plan to install another anti-virus application, then there would be no need to disable Windows Defender because once you install the new antivirus, Windows Defender will be disabled automatically.
Further Reading => Avast vs Windows Defender: Detailed Guide
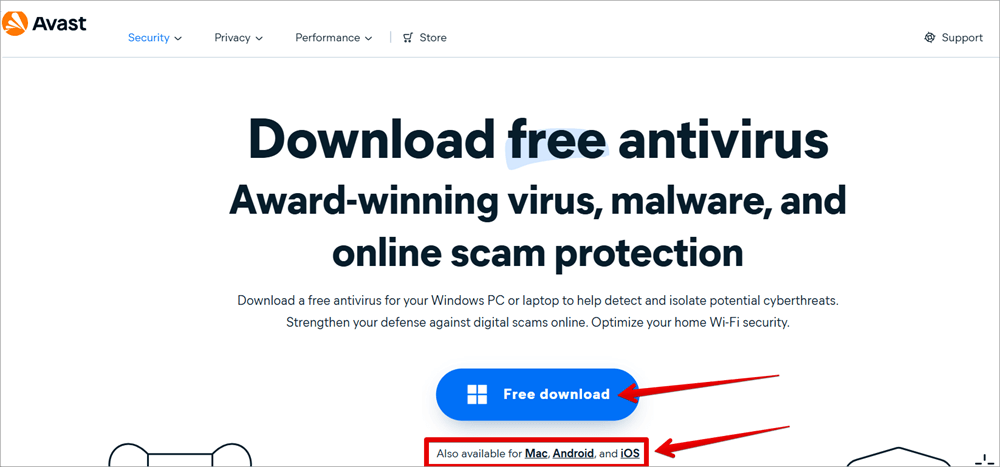
Follow these steps to turn off Windows Defender Antivirus using a third-party solution like Avast Antivirus:
1. Open the Avast antivirus download page.
2. Check the operating system version you want to install on your system.
3. Click the Download button, and after downloading, you can install it on your PC.
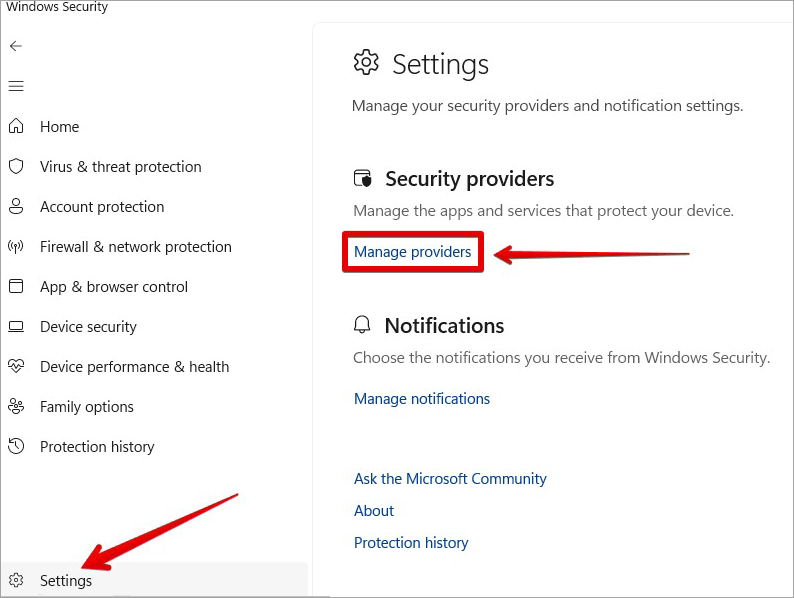
We are now going to check the current security provider on the system by following these steps:
1. Open Windows Security and click on Settings at the bottom of the page.
2. Click Manage providers under the Security providers section.
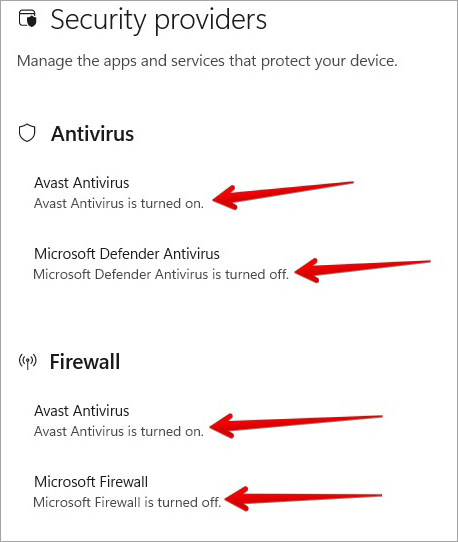
On the Security providers page, you will notice that under Antivirus, Avast Antivirus is turned on while Microsoft Defender Antivirus is turned off. You will also notice that under Firewall, Avast Antivirus is turned on while Microsoft Firewall is turned off.
What this means is that the security checks that Windows Defender offers are permanently disabled until we remove Avast Antivirus or disable it.
Further Reading => How to Fix When Avast Antivirus is Not Opening
Disable Windows Defender: Common Problems Faced
When you turn off Windows Defender, it is expected that you will experience some of the following issues:
- Since Windows Defender is designed and developed to protect your system, it will always go back to its initial default settings. The only solution to this is by implementing the above permanent methods that will prevent this from switching back to default settings.
- You will also experience some error responses since you are not using administrative privileges before making any changes. So to avoid this, you will need to conduct these changes with administrative rights.
- You are very prone and vulnerable to attack when you turn off Windows Defender. It is recommended to install a trusted third-party antivirus when you disable the default Windows Defender on your system. The antivirus will be able to protect your system against malware and cyber threats.
Uninstall Windows Defender: FAQs
1. How do I disable Windows Defender?
• Open Windows Security.
• Click Virus & threat protection.
• Under Virus & threat protection settings, click Manage settings.
• Under Real-time protection, toggle the switch to Off.
2. What happens if I turn off Windows Defender?
Sometimes, it can be difficult to install some software on a Windows computer because of a conflict with Windows Defender. This will always hinder the creation of a controlled environment for testing new software or security solutions.
When you disable Windows Defender, you will be able to install any applications without conflict, but this can result in another disaster, making your PC vulnerable to security threats.
3. How to check if Windows Defender is on or off?
At the bottom right of your screen, click on the icon ^ to expand all running programs. When you see the Windows Security Shield icon, it means your Windows Defender is running and active.
When you place your cursor on the Windows Security Shield, you may also see a caution sign, which indicates there are urgent things to attend to.
4. How to turn off Microsoft Defender temporarily?
Yes, by following the steps below:
• Open Windows Security.
• Click Virus & threat protection.
• Under Virus & threat protection settings, click Manage settings.
• Under Real-time protection, toggle the switch to Off.
5. How can I permanently disable or remove Windows Defender on Windows?
• Launch Group Policy Editor by running gpedit.
• Navigate to this location on the local group policy editor: Computer Configuration => Administrative Templates => Windows Components => Microsoft Defender Antivirus => Turn off Microsoft Defender Antivirus
• Select the Enabled option and click OK
• Restart your PC for the changes to take effect.
6. How to disable Microsoft Defender using cmd?
You can permanently turn off Windows Defender Firewall using the Command Prompt and following these steps:
• Open Command Prompt or Windows PowerShell as Admin
• Turn off the firewall for all network profiles by typing this command: netsh advfirewall set allprofiles state off. Press Enter.
7. How do I disable Windows Defender for a few minutes?
You can temporarily disable Windows Defender by following the steps below:
• Open Windows Security.
• Click Virus & threat protection.
• Click on Manage settings under the Virus & threat protection settings.
• Switch off the Real-time protection button.
8. How do I turn on Windows Defender?
• Launch the Windows Security settings.
• Click the Virus & threat protection.
• Toggle the Real-time protection switch to On.
9. Does Windows Defender need to be turned on?
You can disable the not secure warnings from the settings, and you can avoid this by purchasing an SSL Certificate so that all websites will redirect through the HTTPS protocol.
Conclusion
It is not recommended to use a system without an antivirus. The above methods of turning off Windows Defender can only be implemented when you want to temporarily install an application that conflicts with Windows Defender or you want to install a third-party antivirus; under no circumstances should you use your computer without an antivirus.
Ensure you only disable Windows Defender when it is important to do so; this antivirus has been developed and designed to provide enhanced security features that can protect your system from being compromised.
Was this helpful?
Recommended Reading
-

Review and compare the top best Antivirus for Mac with features, pricing to select the ideal virus protection for Mac: Computer viruses are small programs that perform malicious activities. Whether you own an office or home personal computer, you must install an antivirus app to protect against computer viruses. Antivirus…
-
This hands-on tutorial explains the step-by-step process to Disable or Turn Off Avast Antivirus either all shields at a time or one at a time: Installing an antivirus is very important to protect your computer from different types of malware attacks and viruses. That is why most people prefer to…
-
This article reviews the top Antivirus for Android with comparison. Check the details to choose the best Android antivirus app for you: An antivirus software (also known as AV software), is used to detect, block and remove all types of threats to a device. The threats may include viruses, malware,…
-
This in-depth review of the top free Antivirus Software compares their features and pricing to help you choose the Best Antivirus for Windows 10 & Mac: Installing a quality antivirus on your desktop computer or laptop remains a necessity, especially in the light of events around the world. We are…


