


Learn how to scan a document on iPhone in seconds from our step-by-step guide. Follow our troubleshooting steps and try these efficient methods to scan any document like a pro:
iPhone users, here’s good news for all – you don’t need to buy a scanner or visit a scan shop; you can scan your important documents from your iPhone only.
Yes, you heard it right! Many of the iPhone users are unaware of this feature – you can scan, save, share, or even sign a document after scanning with the built-in iPhone apps. No need to get a third-party application (unless you want more advanced features).
The built-in apps on iPhone – Notes, Files, and the Preview app – can be used for scanning documents.
How To Scan With iPhone: Complete Guide
The best part is that the iPhone scanner adjusts the document and the writing on it to make it look like a scan from a scanning machine.
Here is a video guide on how to scan documents on iPhone:
Quick Ways to Scan Documents on iPhone
If you want to know how to scan a paper on an iPhone, then let me tell you, there are 3 apps on your iPhone that can be used for this purpose.
Here’s a step-by-step guide on how to do this with each app.
#1) Using the Notes App
You can use the Notes app to scan a document on your iPhone.
(These steps are for iOS 26 users)
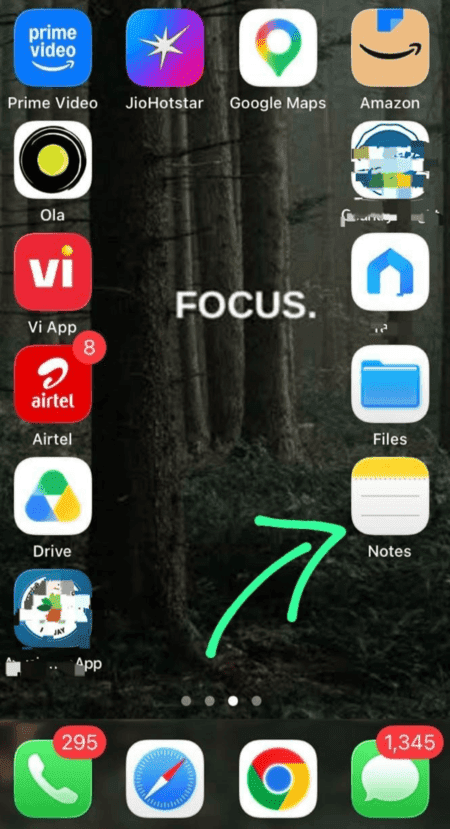
- Open the Notes app on your iPhone.
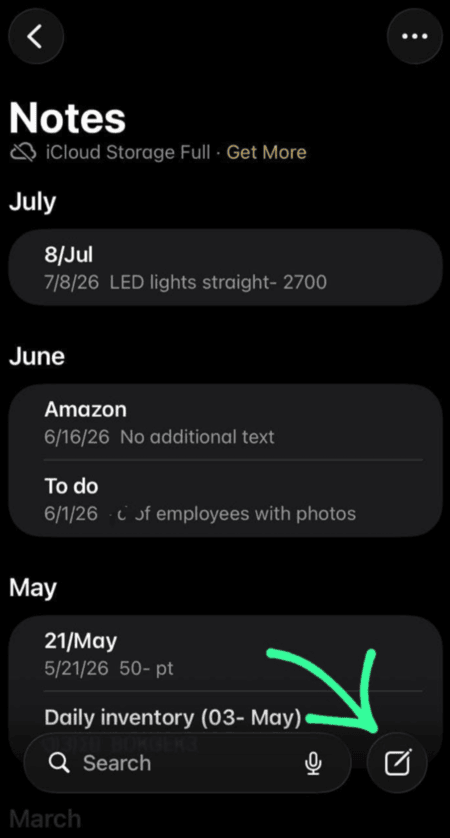
- Open an existing Note by tapping on it (or create a new one by tapping on the New Note icon).
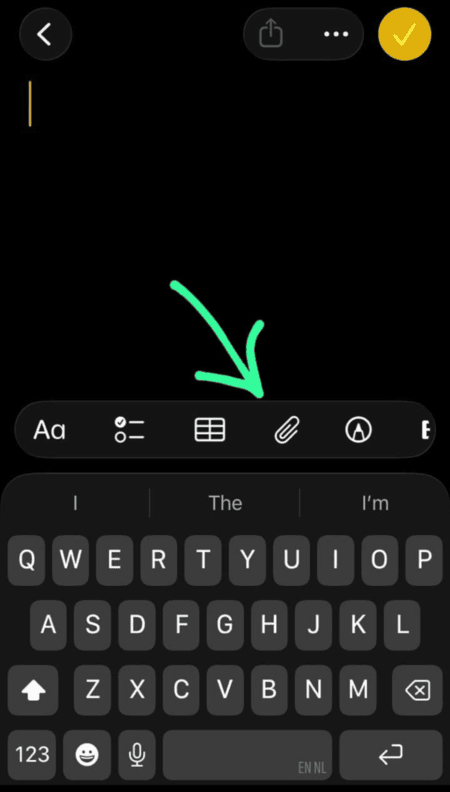
- Now tap on the Attachments icon.
- Select Scan Documents.
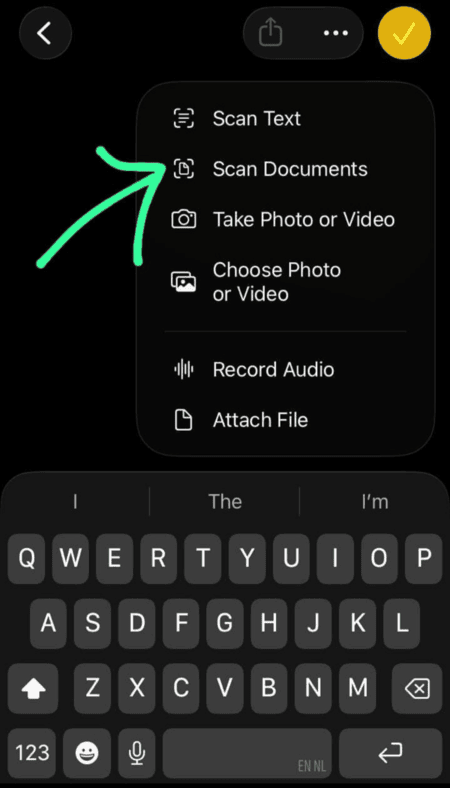
- Now place the phone in such a position that you capture a photo of the document. Make sure there is proper lighting, the paper is placed on a flat surface, and you hold the phone correctly for the best results. The phone will automatically scan the document by default.
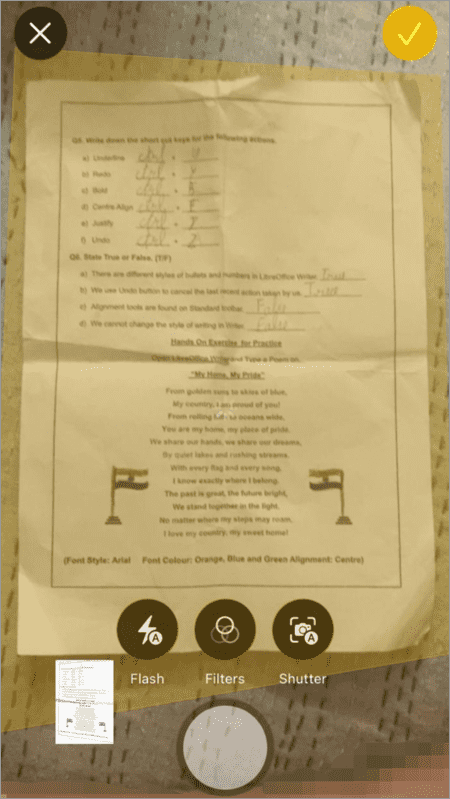
- You can tap on the Shutter option to manually select the part of the page that you want to scan.
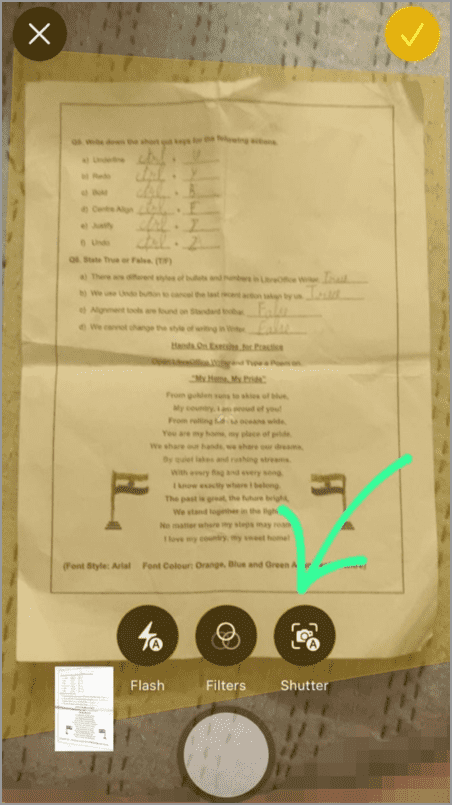
- As you can see in the image above, we have a Flash and a Filters option along with the Shutter. This implies that during capture in iOS 26, you can now select flash and an image filter before the auto-scan happens.
- Once the scan is taken, you can tap on it for preview and editing options.
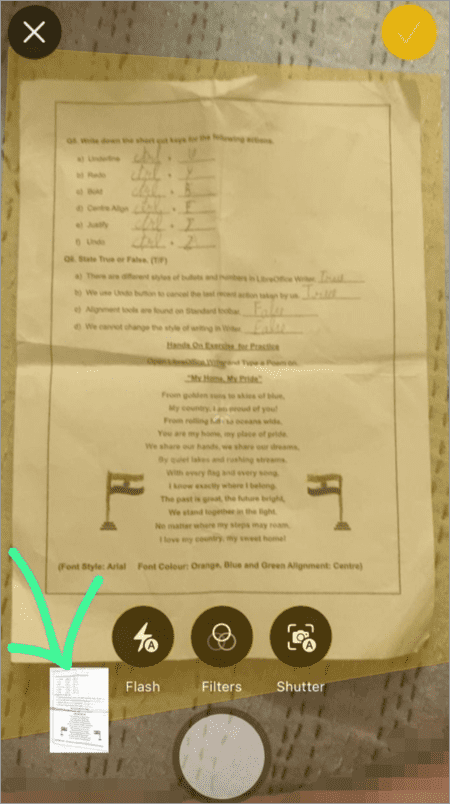
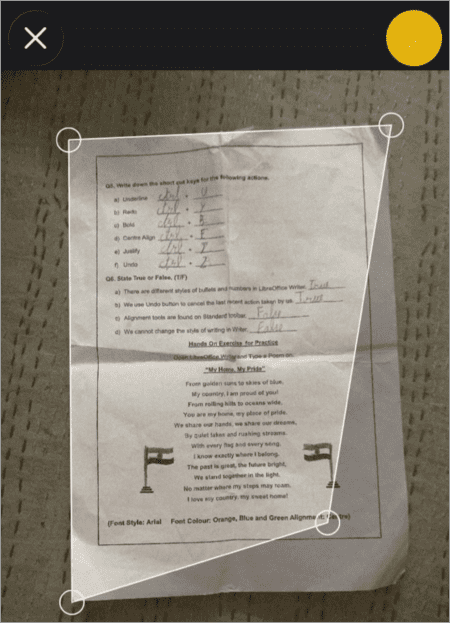
- Now you will see options to Adjust, Filter, Rotate, or Delete the scanned document. If the scanned image doesn’t have properly defined edges, then you can select the Adjust option to manually adjust the edges of the document.
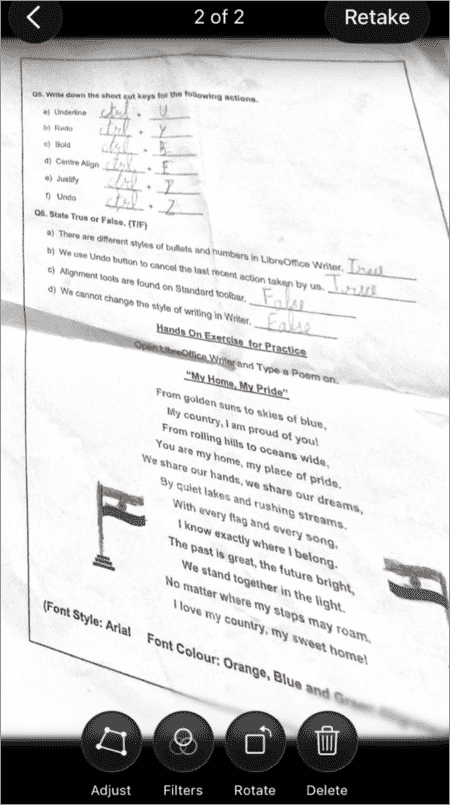
- Once you finish adjusting the sides of the document, tap on the ✓ icon located in the upper right corner of your screen.
- The scanned document will be saved in the Note.
The steps for scanning a document in the Notes app differ for iOS versions earlier than iOS 26.
Here are the steps for users of earlier versions:
- Open the Notes app on your iPhone
- Now either open a pre-existing Note or create a new one by tapping on the New Note icon.
- Tap on the Camera icon
- Now select Scan Documents
- Now hold your phone over the document
- After you take the picture, tap on Save.
- The scanned document will now be saved inside that Note.
| Scan Text: The Notes app in iOS 26 has this new feature – Scan Text. This allows you to get the PDF text typed in your Notes instantly, just by scanning a document. The Scan Text option is located right above the Scan Documents option. Just choose the Scan Text option, scan a document and get the document text typed in your Notes! |
Signing a document in the Notes app
Firstly, you would need to save a signature to add to your documents. Watch this short YouTube reel showing how to add or edit your signature in the Notes app.
Once you have saved the signature, you can add it to a document by:
- Open the document in Notes
- Tap on the + icon
- Select Add Signature.
If you don’t have a saved signature, you can still sign the document using these steps:
- Open the Notes app
- Now tap on the Note that has the scanned document
- Tap on the Share icon
- Now tap on the Markup icon
- Sign your document.
#2) Using the Files App
Using this method, you can scan and then save your scanned photos in the Files app.
Here are the steps for scanning a document using the Files app:
- Open the Files app on your iPhone.
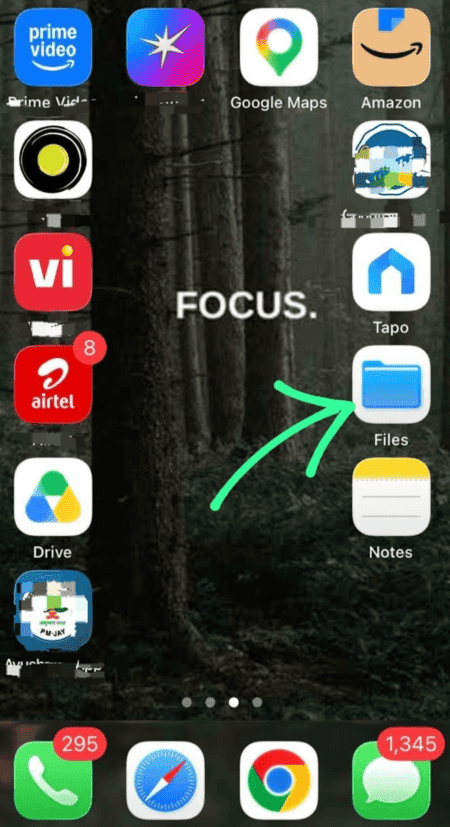
- Select Browse
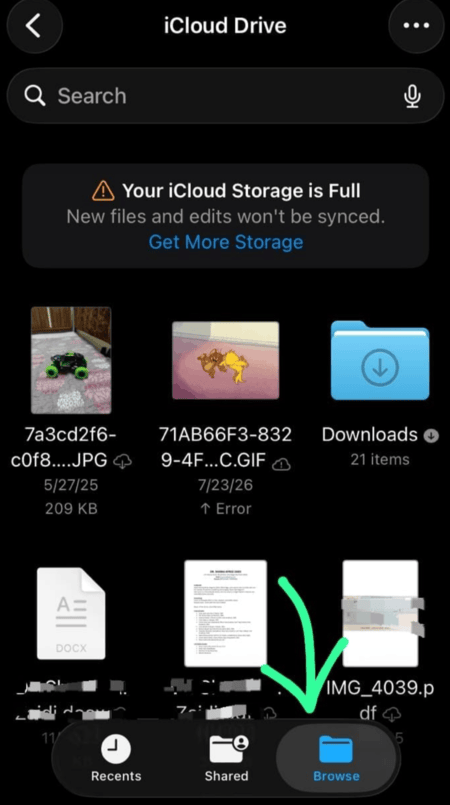
- Now you can select any folder to save the scanned document into. Then tap on the 3-dot icon.
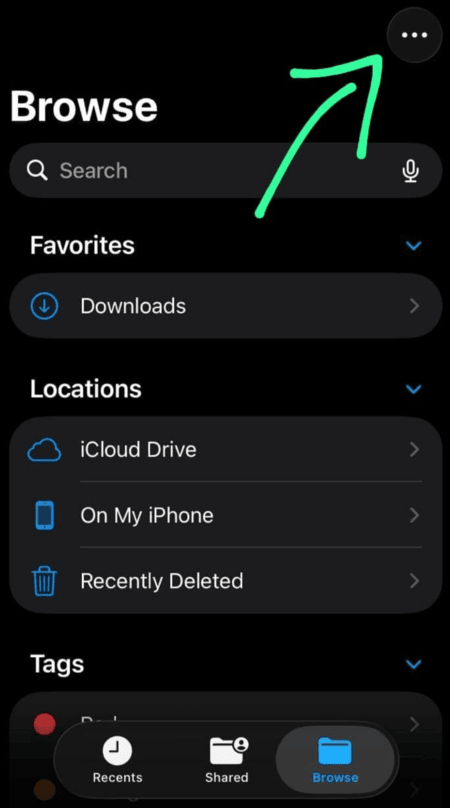
- A pop-up box will appear at the top. Select Scan Documents.
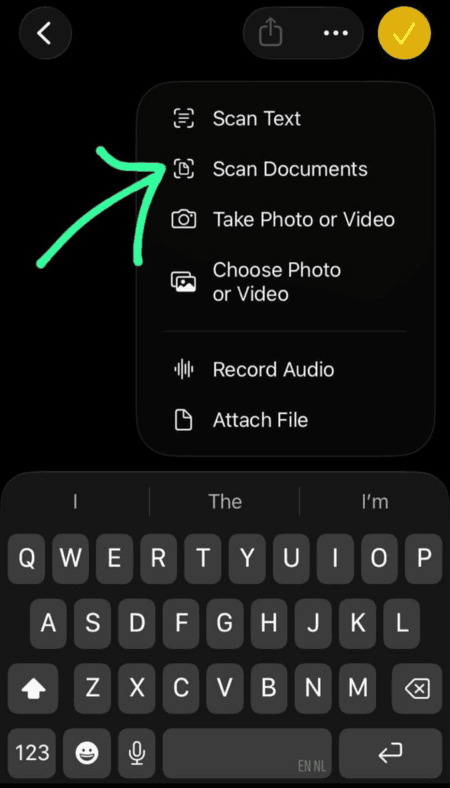
- Now put your page that needs to be scanned at a flat surface and hold your phone above it in a way that you can get a good photo with all sides.
- You can now apply filters, adjust the edges, rotate or delete the photo or take another one. Once done, tap on the Tick ✔️ icon.
- The scanned photo will be saved as a PDF in your Files app.
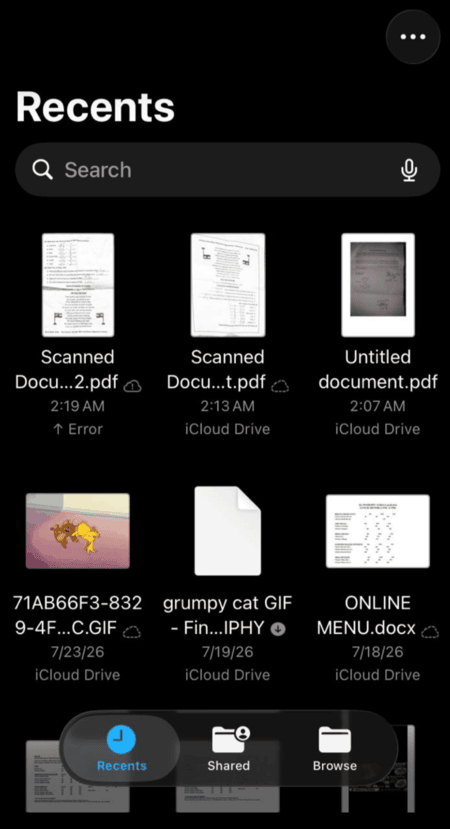
Multi-page Scan: The steps stated above can be used for scanning multiple pages. When you scan a document, the screen will direct you to scan another document. If you need to scan multiple documents, keep scanning them back to back, and press the ✔️ icon once you are done scanning all of them, then choose a location for the document and select Save.
How to sign the scanned document saved in the Files App:
- Open the Files app.
- Now open the folder in which you saved the scanned document and then preview the document by tapping on it.
- If you want to sign the document, tap on the Markup icon.
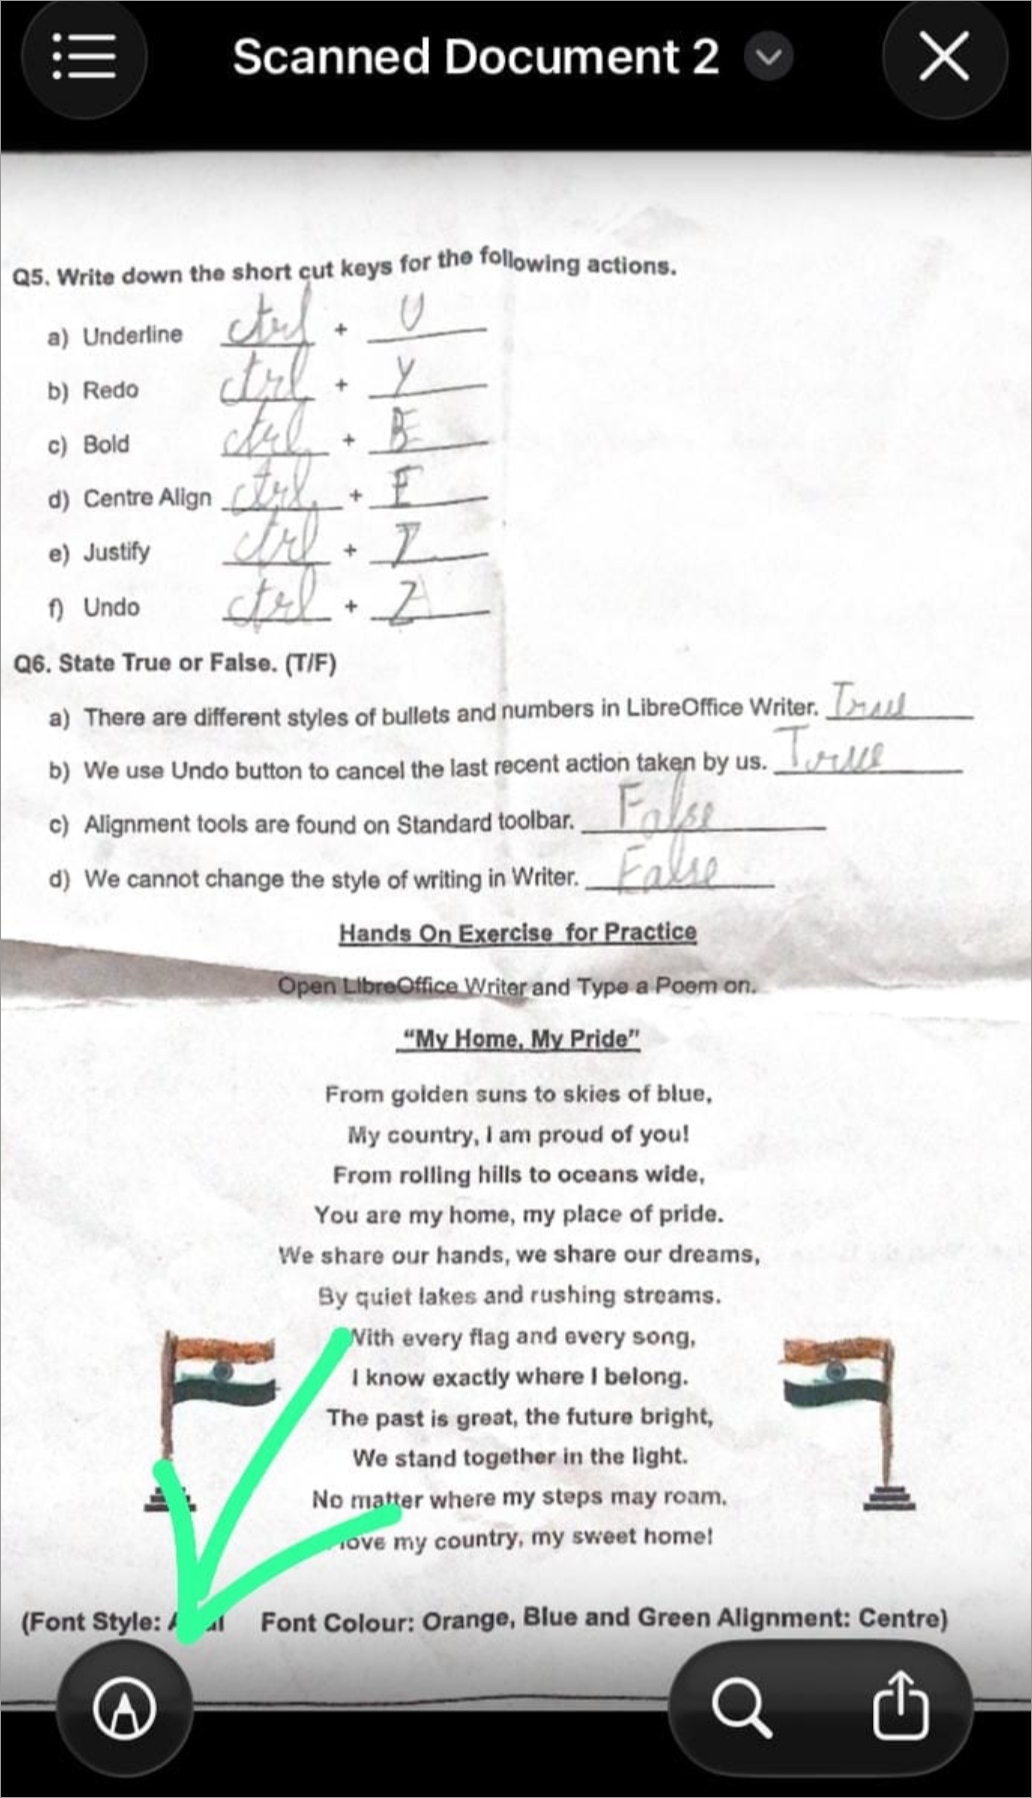
- Now sign the document after selecting a pen/marker of your choice from the box. (You can also remove certain stains or marks from the page using the Markup feature).
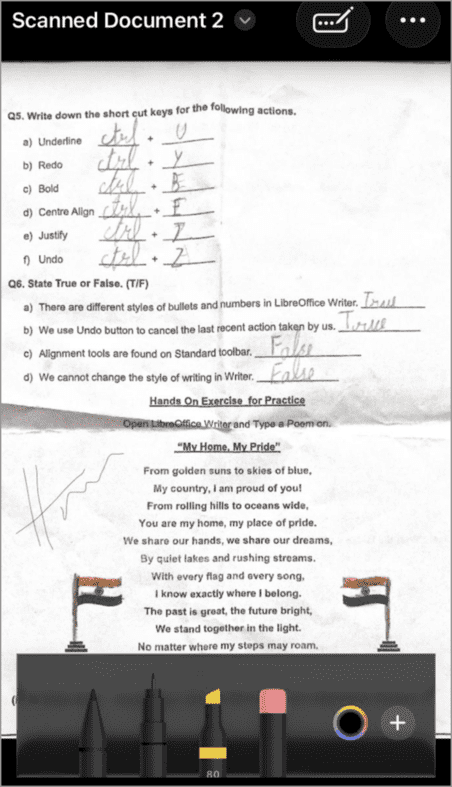
- Then tap on the 3-dot icon located in the upper right corner of your screen.
- Tap on Done.
#3) Using the Preview App
Preview app can also be used for this purpose.
Here is the guide to scan a document using this app:
- Open the Preview app. If you don’t have the app, you can install it from the App Store.
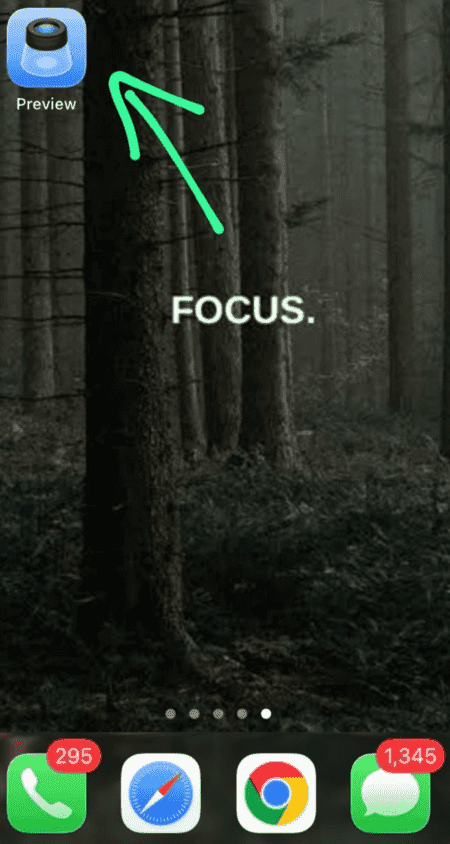
- Choose the option Scan Documents
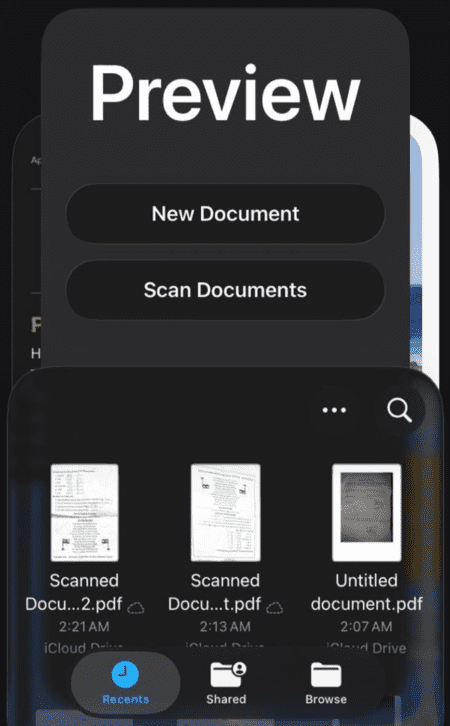
- Now click the picture of the document
- If you want to mark up, edit, or share the scanned document, you can choose the suitable option from the bottom of this page.
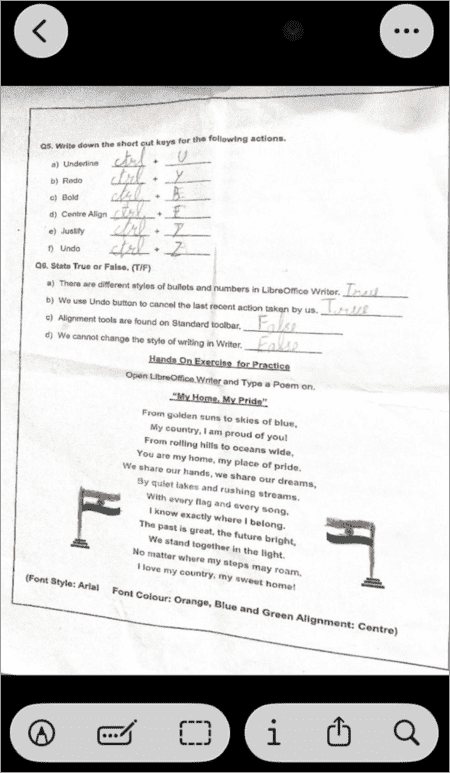
- Tap on the tick icon, and your file will be saved.
| Shortcuts for Scanning Documents: For scanning a document using the Files app, you can just long-press the Files icon on your iPhone Home Screen, and then select Scan Documents. Now you can start scanning. Similarly, for scanning a document using the Notes app, you can long-press the Notes icon, then select Scan Documents. You can create a Shortcut using these steps: Shortcuts app ➡️+ ➡️ Add Action ➡️ Type Scan Documents in the search bar ➡️ Tap on Scan Document ➡️Select Add to Home Screen. You can add a widget for scanning documents – Long-press on your Lock screen ➡️ Customise ➡️Add Widget ➡️Notes Scan |
Native Apps Vs Third-party Apps to Scan a Document on iPhone
The native iPhone apps deliver efficient results for scanning a photo. But for certain features you may need a third-party, more advanced app.
Learn more about the difference between the native iPhone apps and the third-party apps (for the purpose of scanning documents) through the table given below:
When native tools are enough vs. when you need an app for scanning a document:
| Native Apps | Third-party apps |
|---|---|
| A native app is a quick solution to scan a document | For regular scanning of documents and converting them into various formats, you would need a third-party app. |
| Native apps offer basic editing and markup tools | Third-party apps have more advanced tools for shadow removal, crease removal, etc. |
| If the document has any kind of marks (of being folded) or stains, then you can use markup or add filters to the document so that the marks become less visible. | When the document you want to scan has marks of folds or stains, then a third-party app can efficiently remove them. |
| You don’t need to download any app. | You would need to find a suitable, reliable app according to your requirements. |
| 100% reliable | Not all third-party apps are reliable. Some even sell your personal information to other parties. So read their terms before you upload any sensitive information into a third-party app. |
How to Scan Documents on iPhone Using a Third-party App
There are a number of third-party apps that offer document scanners, along with other useful tools.
Some of the recommended third-party apps for this purpose are:
#1) Adobe Scan
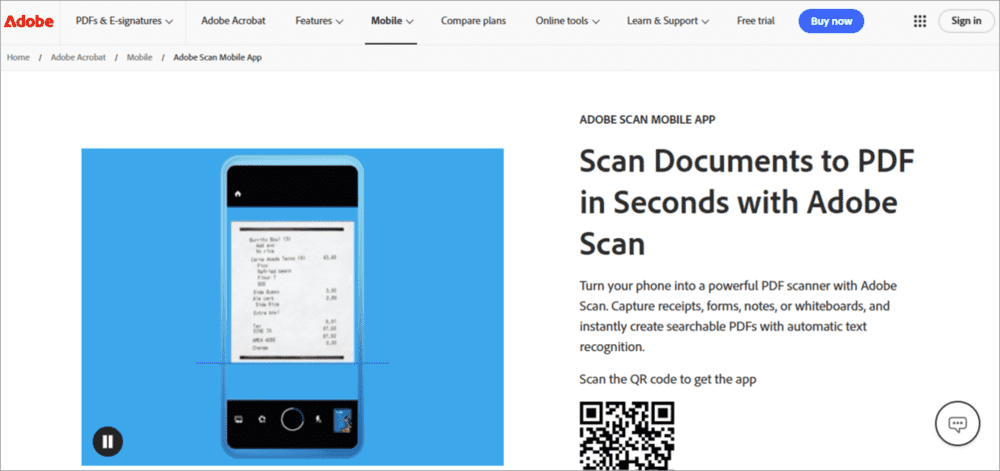
Adobe is an immensely popular name around the world. Its App Store application has 4.9/5 stars from 1.6 million ratings. It can be used to scan documents in bulk, convert them into PDFs, remove marks of thumbs, shadows, creases and stains, and much more.
The app delivers professional-looking results. It is free to use with some in-app purchases and is compatible with iOS 18 and later versions.
Price: The app is available for free.
For advanced features, there are 2 paid plans:
- Adobe Scan Plus: $4.99 per month or $19.99 per year
- Adobe Scan Premium: $9.99 per month
Website: https://www.adobe.com/in/acrobat/mobile/scanner-app.html
#2) TurboScan
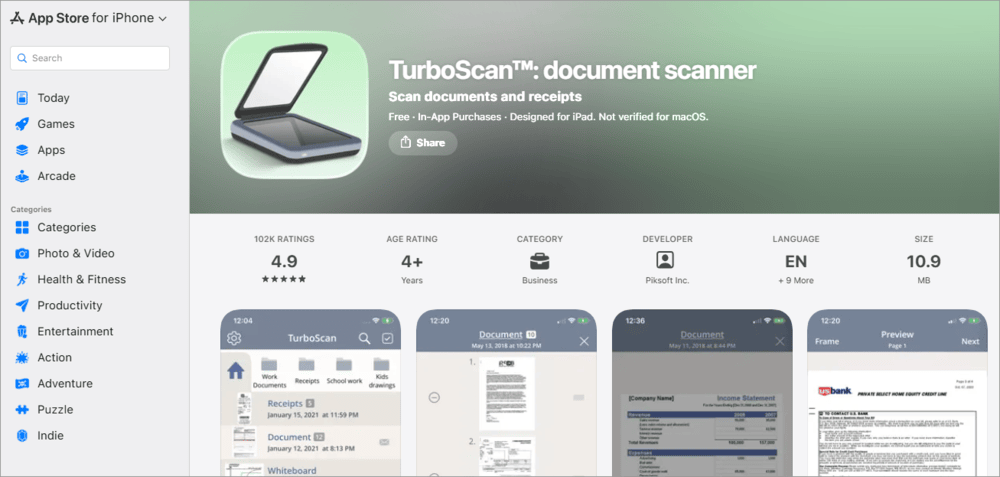
Another very recommended third-party document scanner is TurboScan. It scans your documents and allows you to save them as PDFs or JPG files. The platform has amazing user reviews and 4.9/5 star ratings on the App Store.
TurboScan precisely detects the document’s edges, straightens them, removes shadows, and more. The platform has mobile apps for iOS and Android users.
Price: The app is available for free. The premium version costs $19.99.
Website: https://apps.apple.com/us/app/turboscan-document-scanner/id1017559099
#3) Genius Scan
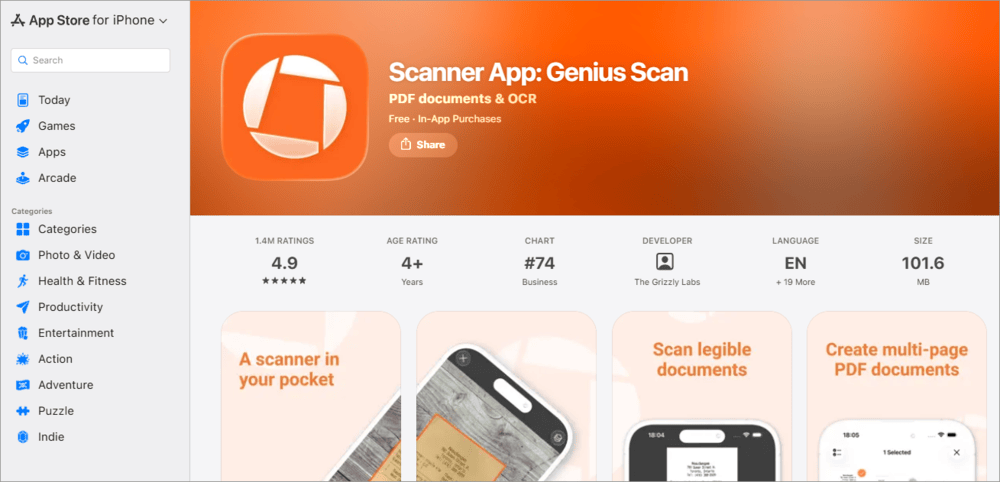
Genius Scan is a popular scanner app with more than 20 million users. It offers you tools for scanning a document, batch scanning, saving them as PDFs, sharing documents, organising them, Face ID locking, OCR, and more.
Price: Genius Scan is available for free. There are different in-app purchase options that cost $0.99, $4.99, $11.99, $39.99 and $49.99.
Website: https://apps.apple.com/us/app/scanner-app-genius-scan/id377672876
Use Continuity Camera to Scan From iPhone to a Mac App
If you want to get some documents scanned directly into your Mac, but are unable to get a picture with the Mac camera, then you can use this method to use the iPhone Camera to get your scanned documents saved into your Mac.
- First of all, make sure you are using iOS 26 and macOS 26, both devices are using the same Apple ID, connected to the same WiFi and Bluetooth is turned ON.
- Now open the Finder app on Mac
- Select any folder (where you want to save the scanned documents)
- Now do a right click anywhere on the screen (make sure you do it on the empty screen)
- Now choose the option – Import from iPhone
- Select Scan Documents
- Your iPhone’s Camera will automatically get started. Scan the documents and then tap on the Save option on your iPhone.
- The scanned files will be automatically saved on the Mac device.
Scan a Document on iPhone – Troubleshooting Common Issues
Here are some of the troubleshooting steps to implement while scanning a document on iPhone.
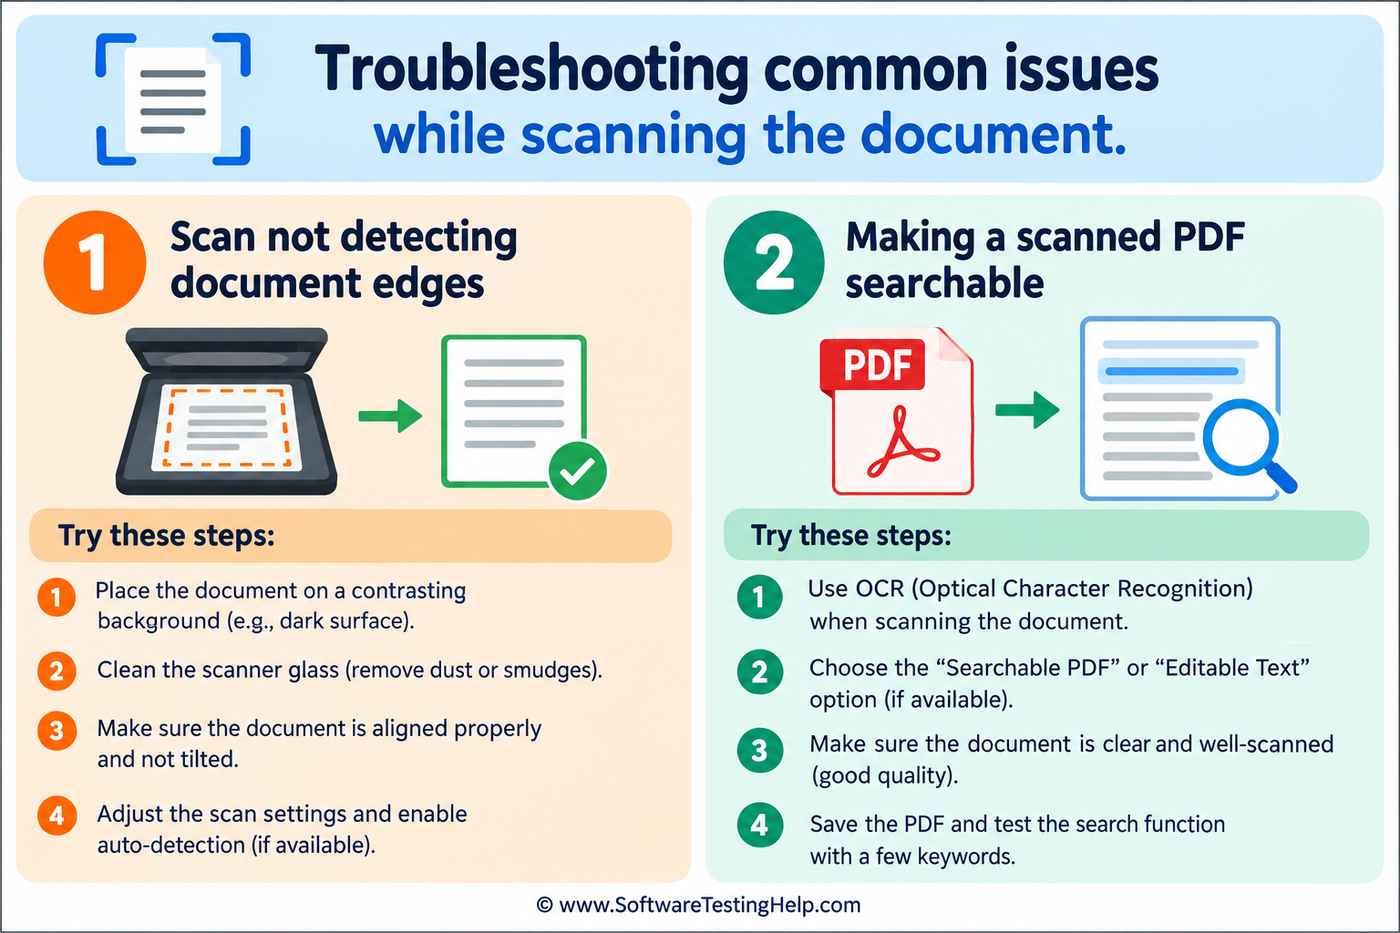
#1) Scan Not Detecting Document Edges
If your scan is not able to detect the edges of your document, it is because:
- You are not holding the phone properly. Make sure all the edges of the document are visible (on your phone) while taking the scan.
- If the automatic scan does not take a proper scan with edges, tap on the Shutter icon and adjust the shutter yourself.
- Make sure the document lies on a flat surface.
- Make sure the color of the background is in contrast with that of the page that has to be scanned.
- There should be enough lighting while scanning the document.
- If the problem still persists, you can try restarting the iPhone and check for software updates.
#2) Making a Scanned PDF Searchable
If you face issues while searching your scanned PDFs, then make sure you save them in a folder with less number of files and remember the name of your PDF.
By default, the scanned document gets saved with an anonymous name, which would usually be very hard to remember. I would recommend creating a new folder and then moving the scanned documents into it, so that you can easily access one whenever you want.
You can create a new Folder to save your scanned PDFs by following these steps:
- Open the Files app
- Open an existing folder
- Now tap on the 3-dots icon
- Tap on New Folder
Now you can move the existing scanned PDFs into this folder by following these steps:
- Open the folder that contains the file that you need to move to the new folder.
- Now press on the file for 2-3 seconds.
- Now select Move.
- Now choose the folder where you want to move that file.
Where do my Scans Save
| App | Location |
|---|---|
| Notes | The scanned document will be saved right inside the Note you choose. |
| Files | The scanned document will be saved in the folder you opened before you selected the option to Scan Documents. You can always find the scanned documents in the Recents folder. If you create a new folder for saving the scanned documents and move them to that specific folder, it will be easier to find them later. |
| Preview App | If you scanned the documents using the Preview app, you can now access them using these steps: 1. Open the Files app 2. Tap on Browse 3. Select On My iPhone 4. Tap on Preview |
| Continuity Camera | If you scan documents using this method, your files will be saved to your Mac device, right where you did the right-click. |
How to Reduce or Scan PDF File Size
Worried about low storage space? Don’t worry, you can reduce the size of your scanned PDF or compress the already scanned document right using the native iOS apps.
- While scanning the document, choose the Black and White filter. It reduces the file size by upto 80%.
- Compress the PDF using the Files app.
- Open the Files app
- Find the PDF that you want to compress and do a long press on it
- Select Quick Actions
- Tap on Compress
- This will save your PDF as a zip file.
- Compress the file using the Preview app.
- Open the Preview app on your iPhone
- Find the PDF that you want to compress and open it.
- Tap on the 3-dot icon
- Select Compress/Reduce File Size
- Now you will have to select a size for your file (Small/Medium/Large).
- Select one and tap on Save.
Frequently Asked Questions
1. How to scan an image to a PDF using an iPhone?
If you scan an image using the built-in Files app on your iPhone, it automatically gets saved as a PDF.
Here is the step-by-step guide for scanning an image and saving it as a PDF on your iPhone:
• Open the Files app
• Now tap on Browse
• Tap on the 3-dot menu icon
• Select Scan Documents
• Now scan your document
• Once done, tap on the ✓ icon.
• The file with the scanned document will be saved as a PDF file.
2. Where is the scan tool on iPhone?
Most of the iPhone users are unaware that there are 3 in-built iPhone apps, that they use very frequently, that allow users to scan documents, without having to download a third-party application.
These apps are:
• Files App
Files > Browse > 3-dot icon > Scan Documents > Scan > ✓
• Notes App
Notes > Open a Note > Attach icon > Scan Documents > Scan > ✓
• Preview App
Preview > Scan Documents > Scan > ✓
3. Where do I find my scan on my iPhone?
If you scanned a document using the Files or Preview app, then the scanned document would be there in the Recent folder of your Files app.
And if you used the Notes app for this purpose, then the scanned document would have been saved inside the note you selected while scanning the document.
If you can’t find it in the Notes app, then type Scanned document in the search field of the Notes app. This will show you the Notes that contain attached scanned files.
4. How to scan a QR code on iPhone?
To scan QR codes from your iPhone, you must first check whether the ‘Scan QR codes’ setting is enabled or not.
Follow these steps to do so:
• Go to Settings
• Select Camera
• Enable Scan QR codes
Now open your iPhone’s Camera. Put your phone at the QR code, and you will see the link to the website that is linked to this QR code. Tap on the link and you will be directed to the site.
Here is a shortcut to access the QR code scanner in iOS 26:
Swipe down on your screen ➡️ Tap on QR Scanner
If you don’t see the QR scanner option, you can add it quickly using these steps:
• Go to Settings
• Select Control Centre
• Now add Scan QR Code.
5. Is there a really free Scanned app for iPhone?
Yes. You can use the Files app, or Notes app or the Preview app to scan your documents on your iOS device for free. But if you are looking for a free third-party application for this purpose, then you can pick one from Adobe Scan, TurboScan, or Genius Scan.
Conclusion
Since the launch of iOS 11, iPhone users can scan a document with iPhone’s Notes app. iOS 13 allowed users to scan documents using the Files app too. With the launch of iOS 26, users can now scan documents with the productivity app named Preview.
Not only can you scan a document, you can edit, markup and sign the document with easy steps. And I must tell you, you will get quite satisfactory results.
But for more advanced tools and a scanner-machine like results, you can switch to a third-party app built for this purpose. It will offer you tools like scanning the document, clearing stains or marks from it, adjusting the written part so that written lines do not look like waves, and much more.
Research Process: Approximately 39 hours were spent on comprehensive research, review, evaluation, verification, and final preparation to ensure accurate and reliable information.
For more-related guides, you can explore our range of tutorials below:
- How to Scan Multiple Pages Into One PDF File
- Top 10 Document Management Software
- How to Combine PDF Files into One Document
- Top 15 Best Receipt Scanner Apps
- How to Edit a PDF File Online (A Step-By-Step Guide)
Was this helpful?
Recommended Reading
-

Most Frequently used Document Management System: With the ongoing process of Digitization, people wish to reduce their paper-based work and expect to have access to their important documents from anywhere and at any time. Document Management Systems are the best solution to make this task a much easier one. PDF…
-

In this step-by-step guide on how to combine PDF files we will learn to merge PDF files using various tools in Windows and Mac: What is PDF? PDF stands for Portable Display Format. It is the biggest revolution in the world of electronic documentation. When the world was confused and…
-
Usage of Arrays for Insertion of Multiple Documents on MongoDB. In our last tutorial on the MongoDB Beginners Guide Training series, we explored about Create and Insert Database in MongoDB. We also learned about insert () command that is used for insertion of one document at a time into the…
-
Here is a review of the top Document Management Integrations for NetSuite with Comparison. Select the best integrations you can use with NetSuite from this exclusive list: NetSuite is undoubtedly one of the most popular and powerful cloud-based ERP systems out there. Ever since its inception, the tool has been…


