Explore this quick guide to know how to set timer on iPhone camera and take stunning photos easily. Customize the duration and receive alerts with the clock app’s timer function in easy steps:
All iPhone cameras have a timer feature that makes it easier to take photos without leaving yourself or someone out of the shot. Set the camera to count up to 3 or 10 seconds before capturing the photo. This allows you some time to move into the view and pose for the photo.
This feature comes in handy when taking group photos and even personal photos when you want to capture yourself in the scene. With the self-timer iPhone function, you might not even need the iPhone stick or to stretch your arm trying to capture yourself and everyone else in a selfie photo.
Table of Contents:
How to Set the Timer on Your iPhone Camera

The camera timer is available for photo and portrait modes and not video mode.
Follow these steps:
Step #1: Open the camera app on your iPhone.
Step #2: Locate the camera settings: Access the settings by tapping the upward-facing arrow icon on the camera screen ![]()
Step #3: Swipe left and tap the clock icon ![]()
Step #4: Choose how many seconds you want the shot delayed, either 3 or 10 seconds. Tap the shutter button. The timer will start. You can stop the timer at any time by pressing the stop button.
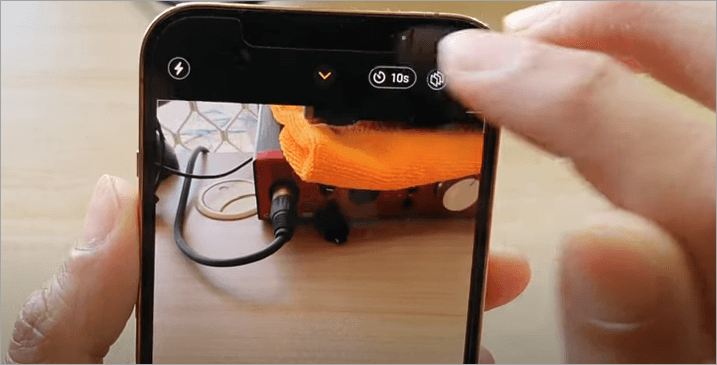
With iPhone 11, iPhone 11, and iPhone Pro Max, access the timer by launching the camera app and tapping the Chvron at the top of the viewfinder, which displays additional settings strip above the shutter button. It can also be accessed by swiping up from the camera mode menu at the bottom of the viewfinder. Tap the timer button and select 3s or 10s.
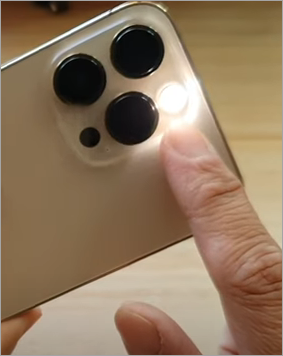
Tap the shutter button to start off the timer. A countdown will show on the camera screen and the LED on the back will flash with the countdown, which means everyone who is in the photo shot will see when the picture will be captured.
Further Reading => Why is My Flashlight Not Working in iPhone
iPhone 13/13 Pro: How to Set a Camera Timer
Look at this video for more details:
We’ll now resume the process. The camera captures the photos, which the device then stores; you can access them by opening the Photos app on your iPhone. Choose the photo taken.
Tap the Select option at the bottom and it will reveal 10 different burst images taken by the self-timer. This is quite an annoying feature for many users and some have expressed their frustration that it takes too much of device space and time spent trying to check and select a photo from the 10.
If this is the case, you can disable the Burst setting by tapping the Live Photos button at the top of the camera screen. The other option is to toggle on Flash or HDR just in case the photo requires any of those or both. It can also be disabled by toggling on the ‘Use Volume Up for Burst’ option on the camera settings.
Suggested Read =>> How to Increase the Resolution of the Image

You can also use third-party apps like the Self Timer for iPhone and iPad, which allows you to set either 2, 3, 4, 10, or 20 photos taken in sequence each time.
Otherwise, the Burst feature sometimes comes in handy and helps in case there are any movements during the photo taking or in case you want to pose differently and take multiple images. Here, you will not need to repeat taking photos over and over.
That said, if Burst is enabled, select the images you want to keep or skip the step to keep all the 10 images. Tap the Done option in the upper right-hand corner. In the next step, choose to either keep only the selected photos (by tapping the Keep Only # Favorites) or everything by tapping the Keep Everything option.
Further Reading => Learn How to Fix Blurry Pictures within Minutes
How to Turn off the Burst Mode
Here is how to Turn Off Burst Mode on iPhone (2024) – Quick Fix
Uses of iPhone Camera Self-Timer
- Allows time to get everyone in position when taking a group photo. With the timer, you do not have to rush group photos.
- Taking self or group portraits using the back camera: With the timer, you do not have to use the front selfie camera to take photos.
- Professional photography: The timer allows you to take images of better quality when using back cameras (which have more pixels than front cameras) than selfie front cameras.
- Landscape photography: The timer helps to eliminate camera shake, which can result in sharper and more detailed photos. Reducing shaking can result in sharper images in low-light situations.
- Stabilizing the shots in close-up photography: This way, together with the tripod, the timer can help to stabilize the shot, which aids in capturing fine details and minimizing motion blur.
- Creating time-lapse sequences.
More controls available for iPhone camera timer using third-party apps
Many third-party iPhone camera apps come with extra options to tweak the timer and delay photo taking and video recording.
The Halide camera app, for instance, has a timer that can be set to three-, ten–, and thirty-second options for delayed photos. ProCam app’s timer ranges from 1 to 60 seconds for delayed photos. The latter also allows a 1 to 60-second delay for video recording.
The Lens Buddy free camera app also offers over ten seconds maximum for delayed photos (up to a minute). The Self Timer app for iPhone and iPad is another option where you can adjust the delay to three, five, ten, fifteen, thirty, or even sixty seconds. It can take a series of 2, 3, 4, 10, or 20 photos per time, which makes it a better replacement for the default iPhone camera app.
Another option is using a remote Bluetooth camera shutter that must first be paired to the iPhone before the operation.
Suggested Read => Best Time Tracking Software
How to Fix Issues Related to iPhone Camera Timer
There are several things you can try to do to resolve issues with your iPhone camera timer:
- Enable Live Photos to work alongside the timer, which can be a solution to the Burst feature that takes a series of 10 photos per time. When Live Photos is enabled, it takes a single shot. To enable Live Photos, tap the circle icon on the top right-hand corner of the camera screen.
- Clean the back and front camera lens using a microfiber cloth: Try this solution if the photos are blurry.
- Check for damaged front and back camera lenses which can happen if the iPhone drops down or hit. Check if there is debris inside the camera lens or if the latter appears misaligned. Contact Apple support if this is the case.
- Check and stop apps that are running in the background. Sometimes the camera app may be barred from operating in the background, and this can result in an issue where it does not operate normally.
- Clear or provide more storage space. Apps may start misbehaving and photos taken via timer mode or other modes may not be saved due to storage running out. Storage running out may cause delays in timer response or general delays on the camera.
- Recharge the battery if the power is too low.
- If you are on Night Mode, it has separate timer settings. For instance, it adjusts the timer depending on the lighting conditions. The Night Mode can be turned on and off by tapping the moon icon on the top left corner next to the flash icon on the camera app screen. It can also be turned off by swiping up the camera preview which gives access to more motions (the Night mode is included in the settings strip revealed after swiping up). Slide on/off the Night Mode toggle.
The Night Mode helps take photos in low-light conditions and is automatically turned on when the user opens the camera app in low-light conditions. This automatic appearance of the Night Mode feature can be turned on/off as aforementioned.
Further Reading => How to Remove SOS Feature on iPhone
To take the photo with a timer on Night Mode, ensure it is togged on as explained above.
From the Night Mode settings, drag the slider in the row of options at the bottom of the screen (which appears once you swap up) left or right, and choose between Auto and Max timers.
Hold the phone steady until the photo is taken. You can place it on a tripod to increase stability. Align the crosshairs in the frame if the phone detects movement. You can also stop the photo while capturing by simply tapping the stop button below the slider.
Tips on Taking Photos with an iPhone Timer
#1) The camera timer is more helpful when you want better quality photos in low-light situations, e.g. at night.
Using the camera timer helps to reduce the shake that could result when you press the shutter. This shake results in poor-quality photos, especially at night and in low-light conditions. When taking photos at night, ensure the Night mode is on though it automatically switches on at night on some iPhone cameras.
Otherwise, touch the crescent moon icon, which looks like a circle with a crescent moon inside, on the camera screen. It turns yellow when the mode is activated. When the night mode is on, the camera will take multiple shots and combine them into one single better shot.
#2) A tripod, in addition to the camera timer, is needed to get a more natural selfie or group photo. It will help you frame the photo easily and afford more flexibility with photo shooting positions/locations. If you have a small iPhone tripod, position it above eye level for best results, e.g. by placing it on a table or sturdy surface. The GorillaPod can be secured on trees, etc.
A tripod also helps you reduce the camera shake or keep the camera still, which is most needed when taking photos in low-light situations.
Further Reading => How to Create a Poll on iMessage
#3) The 10-second camera timing option gives you a better chance for better selfies and group photos. You get more time to set up before the shutter goes off.
#4) You also need to carefully choose your spot first. Frame your photo before pressing the shutter button. If it is a group photo, let the rest pose before you can press the shutter. Thus it will be only you remaining after you press the shutter.
Choose a neutral background without shadows and light patches. If it is during the day, avoid situations that result in photo glares due to light from the sun. The sun should be off to one side or behind the camera.
#5) You can simply press the clock icon at the top of your screen and then tap ‘off’ to go back to the instant photo mode without the camera.
Further Reading => How to Find Downloads on iPhone
#6) 10 photos per burst is enough, but if you like it, you can utilize the camera timer much better by having different poses. The burst mode can be disabled by enabling the HDR mode, enabling Flash, or tweaking to On status the ‘Use Volume Up for Burst’ from the camera settings.
Otherwise, using third-party camera apps may be better for reducing or increasing the number of photos taken per burst.
If you still like the stock iPhone camera app that comes installed on your iPhone, then iPhone apps for cleaning storage and duplicate photos can help you automatically free the extra storage consumed by camera timer photos since each burst can capture up to 10 photo shots or more when using some third-party camera apps.
Suggested Read =>> Free Time Tracking Apps for Freelancers
Frequently Asked Questions
1. What is the function of the timer on a camera?
It has more than one function: first; it reduces camera shake when taking photos and therefore helps achieve sharper images in low-light conditions or with long (telepho) lenses. The timer will allow for some time to steady the camera before the shutter goes off. It also allows some time for the vibrations from the mirror flipping up (when the photographer is using single-lend cameras) to stop.
It can also allow for some time for the photographer to get into the photo shot and pose for a photo, to prepare the group, or to prepare the scene.
2. How does an iPhone timer work?
The iPhone camera timer is a semi-automatic photo-capturing mode with which a user can take delayed photos. With it, a user can set the time-lapse – for instance 3 seconds – after which the shutter goes on and the photo is taken. Pressing the shutter button starts the timer.
The model is used to allow for some time for the user to set up the scene or enter into the photo scene so he/she won’t be left out when taking group photos.
It is also used to achieve still (no shaking) conditions and therefore the photographer can take sharper and clearer photos. This mode also is helpful to those who want to take photos of higher quality when using back cameras that have more pixels than front selfie cameras.
3. What is the function of the self-timer button in the camera?
The self-timer is an automatic shooting mode that counts down one or a few seconds (depending on user choice) and takes a photo. The camera will shutter to capture the shot when the time lapses. It is available as a camera setting on phones and ordinary cameras. The user sets the time by which he or she wants to delay the shot, then presses the shutter button to start the timer, after which the shot is taken when the time lapses. In all common cameras and phones, it is possible to take photos without the self-timed delay.
4. Can I take a delayed photo on my iPhone?
The iPhone camera self-timer automatic shooting mode is used to take delayed photos on the iPhone. The setting is accessible from the camera app screen.
Tap the upward-facing arrow icon on the camera app screen, swipe left tap the clock icon, and choose by how many seconds you want the seconds to be delayed. You can delay the shots by 3 or 10 seconds when taking them on the iPhone.
5. How to use the timer on iPhone camera?
Open the camera app on your iPhone, tap the upward-facing arrow icon on the screen, swipe left, tap the clock icon, and choose to delay the shots by either 3 or 10 seconds.
You can also set it from the Control Center. Open the Control Center, swipe down from the top right, tap and hold the timer icon, and drag up or down to set the timer.
To start the timer, press the shutter button and set yourself for the photo! You also can stop the timer by pressing the Stop Now button on the screen, shown when the timer starts.
In case you do not want it to take 10 images at a go per timed session, tweak the Live Photo option by tapping the circle icon on the top right-hand corner of the camera screen.
6. Why does my iPhone take 10 pictures on the timer?
The Burst setting is enabled by default, which means the camera takes up to 10 photos in a series when you turn on the iPhone camera timer and press the shutter button. There is no way to disable the setting, but there are two ways to deal with the issue.
Enabling the Live Photo option to be used with the timer will have the camera take 1 shot instead of 10. Tap the circle icon on the top right-hand corner of the camera app to enable Live Photo.
Using third-party apps from the app store. Some apps have a timer but no bursts.
7. How do I set a timer on my iPhone camera?
It is done from the Settings of the camera app. Open the camera app on your iPhone. Tap the upward-facing arrow icon, swipe left tap the clock icon, and set the timer to 3 or 10 seconds as the delay time. Press the shutter button to start the timer. The photo shot is taken when the time is up and the shutter button will go off.
8. Can I make the iPhone camera timer longer?
The timer can be set for either 3 seconds or 10 seconds with the default iPhone camera app and there is no way to extend it beyond 10 seconds. You can check for third-party apps that allow for more flexibility.
To use Live Photos with longer exposure time, turn on Live Photos on the Photos app. Open the Photos app on your iPhone, tap the Live label below the top-left corner, and select Long Exposure from the options.
Open the camera app, and tap on the circle icon on the top right-hand corner of the camera app. This will enable the use of Live Photos with the camera app.
Conclusion
Setting an iPhone timer on a camera is easy. It allows you to take personal and group photos with ease and you do not have to use the selfie photo that has lower pixels or the selfie phone stick.
The setting is ideal for taking still photos of high quality, especially in low-light conditions. However, you can afford more settings using third-party apps to replace the iPhone stock photo app.
Time for review: 2 days
For more iPhone-related guides, you can explore our range of tutorials below:
- How to Ping iPhone from Apple Watch and Vice Versa
- How to Schedule a Text on iPhone
- How to Use Apple AirTag for Android Devices
- How to Fix If Your Apple CarPlay Not Working
- How to Request Desktop Site on iPhone
- How to Create and Send a Poll in iMessage on iPhone and iPad
Was this helpful?
Recommended Reading
-

Are you looking for the top Video chat cameras for your meeting room? Here are the best Video Conference Cameras that offer high-definition video with top-notch functionalities: Being present in a conference meeting is important and also making your appearance look better with clear recordings is also important. It's time…
-

Getting worried about the security of your business premises? Review of the top Security Cameras for Small Businesses along with comparisons and features: It's not possible to keep guards all the time. Instead, why not opt for decent Security Cameras for Small Businesses? Such cameras provide perfection for your security…
-
Are you struggling to get some clear images at night using your DJI Osmo or GoPro? If yes, then you need to get your hands on a good action camera flashlight. You know that even the best action cameras out there can be notorious for offering poor image quality due…
-
Do you want to prevent unwanted parking accidents efficiently? Evaluate and choose the top Car Security Cameras with a wide field of view and good video quality: Getting safety from fraudulent insurance claims or unwanted accidents is very important. To help yourself with this, it is highly important to take…
-
Have you considered upgrading your camera to a mirrorless camera? Explore these best Mirrorless Cameras with the latest photographic technologies for photographers of all levels to meet their needs: Mirrorless cameras differ slightly from any regular DSLR camera, which can easily reflect images into viewfinders with the help of mirrors.…
-
This tutorial explores the top Image Hosting Sites with features and other factors. Select a free or paid Photo Hosting Site for your requirements: Image Hosting Site is the service provided by the companies to upload the image on the server so that it can be displayed online. It will…
-
Through this tutorial, understand how to Increase the Resolution of the Image. Get to know more about Recommended Image Resolutions for various projects: A few times, I incorporated an exquisite image into my webpage, only to be disheartened by how small, grainy, and utterly unusable it looked. I am no…
-
A complete step-by-step tutorial to guide you on How to Resize an Image in Photoshop, along with simple steps to change the resolution: Resizing an image in Photoshop is a useful skill for both seasoned and novice users. Whether you’re working on a personal project or a client’s work, you’ll…