WSAPPX is a background process available in Windows 8, 8.1, 10, and 11. This section explains WSAPPX, why it runs in the background, and the most effective solutions to resolve WSAPPX high disk and CPU usage problems.
If you have opened Task Manager and noticed a process called WSAPPX using high CPU or disk, this is a very common issue among all Windows users. Many users get confused when they see WSAPPX running in the background, especially when it slows down the system.
In this guide, we’ll explain what WSAPPX is, why it appears in Task Manager, what causes WSAPPX high CPU usage, and whether it’s safe to disable or not.
Table of Contents:
- What is the WSAPPX process in Windows
- Ways to Fix the WSAPPX High Disk and CPU Usage Issue
- Method 1 : Disable Automatic App Updates in Microsoft Store
- Method 2: Restart Microsoft Store Services
- Method 3: Limit Background Apps
- Method 4: Update Windows
- Method 5: Check DiskLow disk space.
- Method 6: Run Windows Store Troubleshooter
- Method 7: Verify WSAPPX File Location
- Method 8: Scan System
- Method 9: Remove Bloatware and Background Apps
- Method 10: Change AppXSVC in Registry
- Method 11: Disable Windows Search Services
- How to Stop Store Apps From Updating Automatically
- Frequently Asked Questions
- Conclusion
What is the WSAPPX process in Windows

WSAPPX is a background process that runs in Windows 8, 10, and 11, and it manages to download and uninstall files in the system.
wsappx is a legitimate Windows system process responsible for installing, updating, and uninstalling Microsoft Store (Universal Windows Platform – UWP) apps. It runs in the background to manage app licensing and package deployment, appearing as AppXSVC or ClipSVC in Task Manager.
In simple terms, WSAPPX helps Windows install, update, and manage Store apps in the background. It is crucial for maintaining the Microsoft Store app ecosystem, ensuring apps are updated and correctly licensed.
The process frequently causes high CPU or disk usage when it is busy installing or updating multiple apps, or during scheduled license checks.
When expanded in Task Manager, it typically displays AppXSVC (AppX Deployment Service) on Windows 10/11, or sometimes ClipSVC (Client License Service).
It often runs automatically without user initiation. If it consumes too many resources, it is usually because it is working in the background.
Why does WSAPPX Drain CPU Resources
The WSAPPX process in Windows operating system is responsible for:
- Installing apps from the Microsoft Store
- Updating built-in Windows apps
- Managing app licenses
- Handling app deployment services
You will usually notice WSAPPX running when Windows is downloading or updating Store apps, and Apps are being installed after a Windows update.
It’s normal for WSAPPX to temporarily use high CPU or disk usage when Multiple Store apps are updating at once, A large app is being installed, and Windows has just been updated.
Once the task finishes, usage usually drops back to normal.
Some people often confuse WSAPPX as a virus, but it has no malicious code. Rather, it is a genuine Microsoft application. It just uses high CPU resources.
Ways to Fix the WSAPPX High Disk and CPU Usage Issue
High CPU usage from WSAPPX usually happens when Windows is installing or updating Microsoft Store apps. While this behavior is often temporary.
There are several steps you can take to reduce or stop excessive resource usage if it is slowing your desktop or laptop.
Method 1 : Disable Automatic App Updates in Microsoft Store
Automatic updates are the most common trigger for WSAPPX spikes. You can disable it:
Steps:
- Open Microsoft Store
- Click your profile icon
- Go to Settings
- Turn off App updates
This prevents apps from updating silently in the background.
Method 2: Restart Microsoft Store Services
Sometimes WSAPPX gets stuck due to a stalled Store service, so in such a scenario, you can restart your computer.
Steps:
- Press Windows + R, type services.msc
- Restart these services:
- AppX Deployment Service (AppXSVC)
- Client License Service (ClipSVC)
This often brings CPU usage back to normal.
Method 3: Limit Background Apps
Background apps frequently trigger Store-related activity, including
WSAPPX process. You can keep limited or required apps. This will limit the apps to run in the background seeking updates.
Steps:
- Go to Settings → Apps → Installed apps
- Select apps you don’t need running in the background
- Set Background app permissions to Never
Method 4: Update Windows
WSAPPX-related issues are sometimes caused by bugs in older Windows builds. Try updating all updates of your Windows operating system.
- Go to Settings → Windows Update
- Install pending updates
- Restart your system
Microsoft often fixes Store and deployment issues through updates.
Method 5: Check DiskLow disk space.
Low disk space can cause WSAPPX to repeatedly retry operations. Make sure at least 10–15 GB of free space is available. Run Disk Cleanup to remove temporary files, Usage and Free Space.
You can also increase or extend Virtual Memory. Virtual memory is a feature of Windows that allows users to allocate virtual memory to the system, which enhances the performance and functionality of the system.
Users can easily increase the virtual memory in their system by following some simple steps listed below:
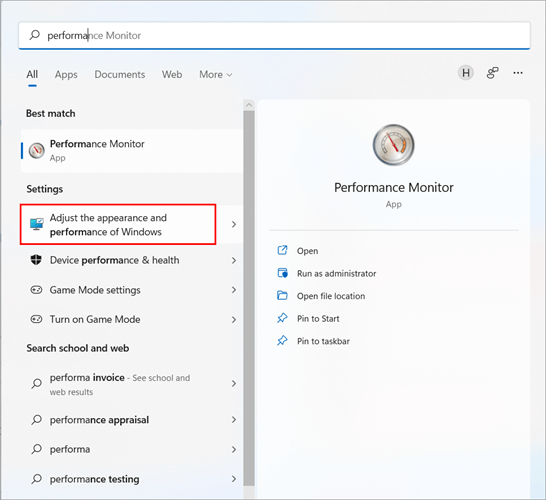
#1) Press the Windows button and search for a performance monitor and click on “Adjust the appearance and performance of Windows“.
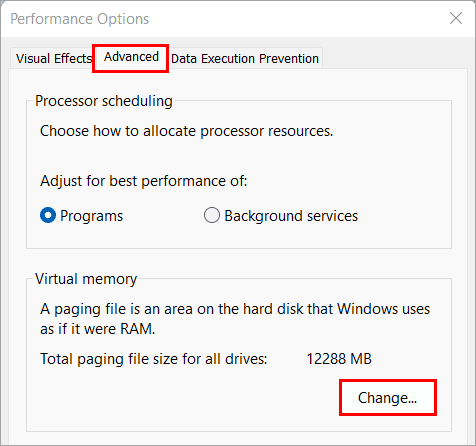
#2) A dialog box will appear as displayed in the image below. Click on “Advanced” and then under the Virtual label memory, click on “Change” as displayed in the image below.
#3) A virtual Memory Dialog box will open. Untick the label titled “Automatically manage paging size for all drives” as displayed in the image below. Click on “Custom Size” and mention the minimum and maximum values of virtual memory.
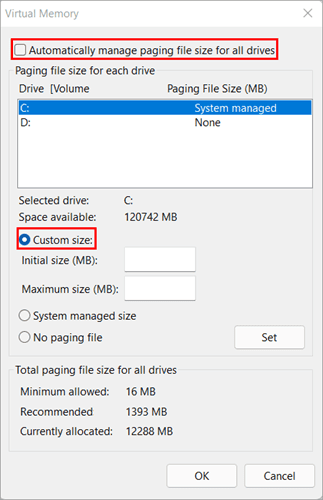
While mentioning the values for minimum and maximum virtual memory, set the initial size equal to your RAM and the maximum size as double your RAM.
Method 6: Run Windows Store Troubleshooter
Troubleshooters are useful features of Windows that allow users to run a full system check and find issues that can be related to both hardware and software. Windows offers a series of troubleshooters with advanced troubleshooters, which will allow you to find issues with the workflow and provide suggestions to fix them.
Follow the steps listed below to run troubleshooters in your system:
#1) Open the “Settings” in your system or press ‘’Windows + I’’ from your keyboard to open settings.
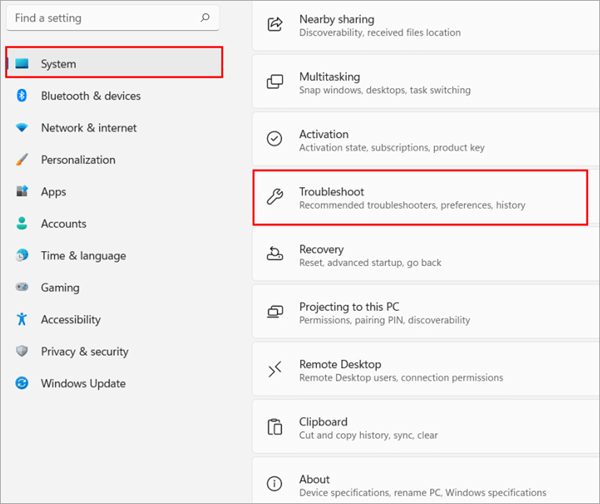
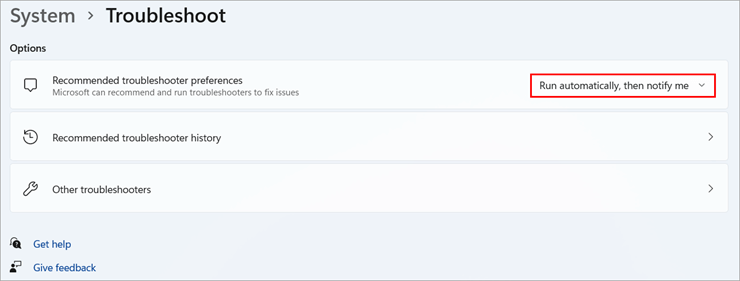
#2) Settings will open. Click on “System” and then click on “Troubleshoot” as displayed in the image below.
#3) Under the label Recommended troubleshooter preferences, switch it to “Run automatically, then notify me” as displayed in the image below. This will allow the system to run basic troubleshooters and then notify you about the suggestions and ask permission to implement them.
You can also click on other troubleshooters to find a list of special troubleshooters that can help you fix various system issues.
Method 7: Verify WSAPPX File Location
To ensure the process is legitimate:
Open Task Manager
Right-click WSAPPX → Open file location
It should be located in:
C:\Windows\System32
If it’s elsewhere, scan your system for malware.
Method 8: Scan System
The prime cause of high CPU usage in the system is the presence of some malicious code that runs numerous background processes and drains CPU resources. So whenever you face such issues of high CPU usage and system lag, it’s advisable to first restart the system, and if you cannot fix the issue, then run a system scan.
By running a system scan, you can locate malicious and junk files in the system, which are both responsible for a slow system. It’s advisable that you use an advanced system scanner rather than a system default scanner.
Suggested Reading =>> Vulnerability Scanning Tools
Method 9: Remove Bloatware and Background Apps
Bloatware is programs that are present in the system by default, but they can be removed to clear system space and usage. Common examples of this bloatware are news applications, calculators, and notification managers. This bloatware utilizes a considerable amount of system memory, which results in high CPU usage issues.
Various applications, like antivirus files, run the background process to scan the system and find files that disrupt the working of the system. When numerous such applications run simultaneously, then it results in a system lag. You can also observe such issues when you open numerous Google Chrome tabs at once.
Follow the steps listed below to remove bloatware programs from your system:
#1) Open Settings in your system or press “Windows + I” from your keyboard to open settings.
#2) Click on “Apps” and then click on “Apps & features” as displayed in the image below.

#3) Now check from the list of applications the ones you wish to remove and click on three dots, and then click on “Uninstall” to remove these applications from your system as displayed in the image below.

You can remove bloatware and other lagging applications from your system by following simple steps. You can also check the CPU usage of each application and then remove them, which would make it easier for you to remove the application that utilizes maximum CPU resources.
- Press Ctrl+Alt+Delete from your keyboard and you will be directed to a blue screen.
- From the list of tools, choose Task Manager and it will open in your system.
- The Task Manager will display the usage of each application, and then you can remove the applications from the settings.
Also Read =>> Comparison of Top PC Cleaner Tools
Method 10: Change AppXSVC in Registry
Registry plays a major role in running your system smoothly as it allows you to set certain default values to the programs which make changes in their working. By making changes in the registry of system services, you can fix the high CPU Usage system in your device.
Follow the steps listed below to change registry values in your system:
#1) Press Windows + R from your keyboard and type “regedit,” and press Enter as displayed in the image below.

#2) Enter the address as listed “Computer\HKEY_LOCAL_MACHINE\SYSTEM\ControlSet001\Services\AppXSvc” and then click on the file titled “Start,” and a dialog box will appear as displayed in the image below. Now, you have to change the value data to “4” and press Enter.

Now you need to restart your system, so the default changes are saved in your system.
Method 11: Disable Windows Search Services
Search for an application seems like a simple process, but it is a lot more complex and resource-consuming because, in this process, files are arranged and indexed first. This process of indexing files and then processing them requires a visible amount of CPU resources.
You can disable Windows search services as this will disable all search processes and indexing in the background, making it easier for users to minimize CPU usage.
#1) Press Windows + R from your keyboard and then type “services. msc” and click on “OK,” as displayed in the image below.

#2) Services windows will open, locate Windows Search and double click on it, and then the Windows Search Dialog box will open. You need to select the Startup type as “Disabled” and then click on “Apply” and “OK” to save the changes as displayed in the image below.

How to Stop Store Apps From Updating Automatically
Stopping Microsoft Store apps from updating automatically is a common fix for high disk or CPU usage caused by the wsappx process. The wsappx service (including AppXSVC and ClipSVC) is responsible for installing, updating, and licensing Windows Store apps, and it often triggers high resource usage in the background.
#1) Open the Microsoft Store app and select Settings by clicking the button in the top-right corner.

#2) Then, under the App Settings area of the next screen, uncheck the “Update apps automatically” or “App Updates” switch.

Frequently Asked Questions
How do I fix high CPU and disk usage?
There are various ways to fix high CPU and disk usage, and some of them are listed below:
1. Uninstall programs that utilize high CPU resources.
2. Check Startup programs
3. Disable Windows Search Engine.
What is WSAPPX’s high disk usage?
WSAPPX is a program that runs all the background processes for downloading, installing, and using the application in your system. These background processes in the system result in high disk usage.
Can I stop WSAPPX?
WSAPPX is a Windows Store service, so you cannot disable it because it manages the downloading and installing of applications.
How do I fix WSAPPX?
There are various ways to fix WSAPPX’s high disk usage, and we listed some of them below.
1. Extend Virtual Memory
2. Disable Windows Search Services
3. Make changes to the registry
Why is my disk usage always so high?
The most common reason for the high disk usage of your system is the number of background processes running in your system.
What causes high CPU and disk usage?
When numerous applications are opened simultaneously on your system, then it increases background processes, furthermore resulting in system lag and high CPU disk usage.
Can I Kill WSAPPX?
WSAPPX is regarded as a crucial system process by Windows. Therefore, if you attempt to terminate or kill it using the Task Manager, it alerts you that doing so may result in Windows becoming unstable and shutting down. In the Services utility, there is also no method to forcibly disable WSAPPX.
Can you disable WSAPPX in Windows 10/11?
The Windows Task Manager allows you to disable this Windows service. Just select it in Task Manager and click End task.
Is WSAPPX a Virus?
No, it is not a virus but plays a crucial role in Windows OS.
Conclusion
To conclude, WSAPPX is a legitimate Windows background process mainly associated with Microsoft Store app installation and updates, and while it can occasionally cause high CPU or disk usage, it is usually temporary and safe. If this process consumes lot of resources and slows down your system, then you can adopt the above-mentioned fixes to stop the WSAPPX process.
Research Process:
- The solutions shared in this guide are based on analyzing common user reports, Windows documentation, and real-world troubleshooting patterns observed across different Windows versions.
- By testing these methods in typical usage scenarios and comparing their effectiveness, we’ve outlined practical steps that help reduce WSAPPX resource usage without affecting system stability or essential Windows features.
- Total time taken to publish this guide: 40 Hours (Approx)
Was this helpful?
Recommended Reading
-

List of the Top Computer Stress Test Software: Best CPU, GPU, RAM, and PC Stress Test Software in 2024. Stress testing is a type of performance testing that validates the highest limit of your computer, device, program, or network with an extreme load. Stress testing will check the behavior of…
-
Here we review and compare the Top External Hard Drive with features to guide you to find out the Best External Hard Disk as per your need: Storage spaces have become the epitome of using a laptop or a PC device, and without an external hard disk, it's not possible.…
-

Review the top Budget CPUs with features, pricing, and comparison to help you select the best budget CPU for an enhanced gaming experience: Are you willing to assemble your PC? Updating your computer with the latest hardware components will make it perform better. The central processing unit is one of…
-
In this guide, you will find a review of the top CPU Temperature Monitor Tools, with features and cost comparisons to help you choose the Best CPU Temperature Monitor Software as per your Needs. It is very important to maintain the CPU temperature at optimal levels for optimal performance of…
-
The List of the Most Popular Data Mapping Tools for Mapping Data Perfectly: What is Data Mapping? Data mapping is the process of associating the source data with the target data. It is the process of mapping atomic data units from two different data units. Data mapping is used in Data…
-
Software Testing is critical for improving Software Quality. This tutorial lists Process Models and 10 Steps to improve Testing Process for delivering better Software Quality: A software product is developed to meet certain requirements given by customer but many times, it ends up as a defective product due to several…
-
This Tutorial on Data Mining Process Covers Data Mining Models, Steps and Challenges Involved in the Data Extraction Process: Data Mining Techniques were explained in detail in our previous tutorial in this Complete Data Mining Training for All. Data Mining is a promising field in the world of science and…
-
Read this review with features, pricing, pros, and cons to compare and select the best Disk Image Software as per requirement: Data is considered as one of the important elements of a system because if data saved on a system is lost, then users might have to face consequences. Therefore,…
-
List and comparison of the top free Disk Partition Manager Software to select the best Partition Software for Windows: System partitions play a very important role in modern computer devices. They can store data, keep system files away from user data and install multiple operating systems on the same device.…