Deeply understand how to change drive letter in Windows 10 or 11 with expert solutions. This step-by-step guide will cover partition roles, CMD commands, third-party tools, and procedures to change drive letter:
Assigning a physical drive of your device file system by a single drive letter ranging from A to Z can help effectively manage and organize files and system on your HDD, SSD, USB, or CD-ROM, making it easier to manage files across multiple computers and external drives.
It is convenient to configure network drives to access resources shared over the network with consistent drive letters. Personalizing drive letters as per your preference can provide consistency while plugging in external drives like USB sticks.
Table of Contents:
- Assign & Change Drive Letter in Windows: Easy Methods
- Quick Steps on How to Change Drive Letter
- Considerations While Changing Drive Letters
- Importance of Drive Partition
- Storage Drive Types & Assigned Drive Letters
- Ways to Change Drive Letter in Windows
- Assigning Drive Letter to Unallocated or Disconnected Drive
- Manage Drive Letters for Removable or External Drives
- Frequently Asked Questions
- Conclusion
Assign & Change Drive Letter in Windows: Easy Methods

It is easy to organize, access different storage devices, simplify access to all users while network mapping, and provide compatibility to access files without reinstalling older software programs when drive letters are changed.
Changing drive letters will adversely affect the functionality of a program or application installed on the path that depends on the drive letter.
Watch the YouTube video about How to Reassign Drive Letters in Windows:
You cannot change drive letter to A or B as they are reserved for floppy drives; drives with a boot partition, or read-only mode, will not allow you to change their drive letter or add new data to it, except by removing the restrictions of read-only before changing or adding data.
You cannot change the drive letters of drives that are in use and undergoing data transfer.
Suggested Read => Hard Drive Not Showing Up Error in Windows 10
Quick Steps on How to Change Drive Letter
Also Read => Basic CMD Commands for Windows 10
Considerations While Changing Drive Letters
A few considerations are essential to keep in mind while changing the drive letters are as explained below:
- Drive letters “A:” and “B:” are reserved for floppy disk, whereas “D:” drive letter is assigned and reserved for optical drives i.e. CD/DVD Drive, Drive letter “E:” is for external storage devices like USB flash drive letter “C:” is default storage location for installation of operating system, system files and application download, and temporary files and cannot be updated.
- Assignment of specific drive letters corresponding to changes in drive letters may affect the working of installed applications. It is essential to reconfigure or reinstall applications that will be affected post changes in the drive letter.
- Before any changes, it is advisable to take a data backup.
- In case you find the “Change drive letters and Path” option disabled, the volume for that drive may not be ready to make changes in the drive letter. You need to initialize to enable a change in the drive letter.
You can select different types of drives for your storage needs while selecting your Windows-based computer.
There are two schemes of partition used for storage devices – Master Boot Record (MBR) partition, used in old configurations were supported a maximum drive size up to 2TB, and with GUID partition table (GPT), used in modern configurations, allows more partitions supporting a maximum drive size beyond 2TB.
Importance of Drive Partition
- Organize Storage space for operating systems, can install multiple operating systems like Linux along with the default Windows, User data, and files into separate logical units.
- Application and data management, and simplified backups
- Easy data restore in case of data loss or system failure.
- Advantages of dual-booting and the facility to install multiple operating systems on separate partitions.
- Simple update, encrypted, and secure for sensitive data
- Restoration of the operating system with recovery partition options.
- Improved system performance.
Storage Drive Types & Assigned Drive Letters
Hard Disk Drives (HDDs) and Solid State Drives (SSDs) are the default and primary storage locations for personal files, applications, and the operating system. The drive letter assigned for this storage is “C:”
“D:” and “E:” as drive letters are assigned for Optical Drives like Compact Disc Read-Only Memory (CD-ROM) and DVD. External hard drives, like Universal Serial Bus (USB) flash drives, have “H:” as the default drive letter.
Recommended Reading => Comparison of SSD vs HDD
Ways to Change Drive Letter in Windows
Let’s discuss various ways we can change the drive letters in Windows.
#1) Using built-in tools like disk management that provide information such as statistics and allocated space for use for particular drives and partitions for each of these drives.
Changing drive letters for Windows 7 and 8
- Go to Windows (Start) and select the Computer Management option.
- Click on Disk Management.
- Right-click the drive you wish to change the drive letters for.
- Select option – “Change Drive Letter and Paths”.
- Click on the “Change” button in case you find a new drive letter in the dropdown.
- Click on the “Add” button for a new drive letter not available in the dropdown.
- Click the “Ok” button to save the new change in the drive letter.
Changing drive letters for Windows 10 and 11
- Right-click on the Windows (Start) icon in the bottom left corner of the screen.
- Select the Disk Management option from the list.
- You will find the Disk Management user interface displaying available drives.
- Right-click click drive you wish to change the drive letters.
- Select option – “Change Drive Letter and Paths”.
- Click on the “Change” button in case you find a new drive letter in the dropdown.
- Click on the “Add” button for a new drive letter not available in the dropdown.
- Click the “Ok” button to save the new change of drive letter.
#2) Using the command-line interface
- Type cmd in the search text field near the Windows (Start) icon at the bottom left corner of your screen.
- The command-line interface will appear.
- Type diskpart at the command line and press Enter.
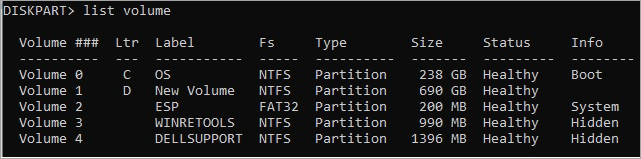
- Type the list volume command and press Enter.
- This will display a list showing available volumes, drive letter, partition of volume, size of partition, status, and information as shown below:
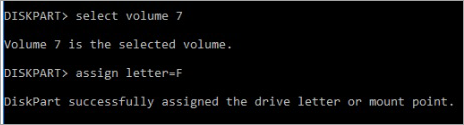
- Select the volume by which you wish to change the letter by typing select volume <volume number>, e.g., select volume 0.
- Assign a letter to the selected volume by typing assign letter = <letter>, e.g., assign letter = X, and press Enter.
- Type exit to come out of DiskPart
- Finally, press Enter.
#3) Select third-party software
There are various third-party software programs like MiniTool Partition Wizard, AOMEI Partition Assistant, EaseUS Partition Master
- MiniTool Partition Wizard (partitionwizard.com) offers multiple functionalities as listed below:
- Format or resize the existing partition,
- Create a new partition.
- Convert the partition between FAT32 and NTFS.
- Change the disk between GPT and MBR disks.
- Dynamic disk changes from basic without any data loss.
- Migration of the system or cloning of the disk for upgrading or backup of the hard drive.
MiniTool Partition Wizard is also used to recover lost partitions, deleted or lost files from difficult to access or formatted, or damaged exFAT/NTFS/FAT drives, and from specified folders or bin, or desktop of your Windows computer.
- AOMEI Partition Assistant (diskpart.com) is another online tool that provides features as listed below:
- Manage partitions for personal or home use.
- Various functionalities on partitions like merge, shrink, move, resize, or extend without losing data.
- Disk conversion from type MBR to GPT disk type for enhancing disk space by more than 2TB.
- Optimize your operating system and speed up your computer by removing junk files.
- The tool supports Windows versions that include 7, 8, 8.1, 10, and 11.

- EaseUS Partition Master (easeus.com)
This tool is used to convert an MBR-type disk to a GPT disk type for upgraded Windows 11, copy the operating system and data to another SSD and HDD, and manage partitions for individual users for home use.
It is used to delete all the disk partitions, wipe data from disk partitions, hide or unhide partitions, and convert primary, logical, dynamic, and basic disks. Check the system error of your files, make the partition active, rebuild the MBR, and change the size of the cluster.
Also Read => Windows Partition Manager for Windows 10 & 7
Assigning Drive Letter to Unallocated or Disconnected Drive
What is a Disconnected or Unallocated Drive?
Drives that are not assigned to any files or partition due to multiple reasons like out of date drivers, infected with virus or malware, corrupted file system (FAT32 or NTFS), failed infrastructure or hardware, or disconnected external drives such as memory card, USB flash drives, SSD or portable Hard Drives – due to incorrect removal resulting in data corruption or unallocated drives.
- Right click Windows(Start) & select Disk Management from the list.
- Disk Management user interface will appear.
- Right-click the particular drive you want to update.
- Select option – Change Drive Letter and Paths from the other options.
- Click the Add option.
- Select the available drive letter from the drop-down.
Manage Drive Letters for Removable or External Drives

Given below is the step-by-step process to manage Drive Letters for external or removable drives:
- Right-click Windows (Start) & select Disk Management from the list.
- Disk Management user interface will appear.
- Locate/Search for a removable or external drive within the disk management interface.
- Select option – Change Drive Letter and Paths from the other options.
- You can select the Add option to add a drive letter not available in the drop-down.
Suggested Reading => Best External Hard Disk
Frequently Asked Questions
1. What is the purpose of drive letters in a Windows machine?
The internal and external storage devices like SSD, CD-ROM, Hard Drive, USB flash drive, and memory card, can be accessed easily with the help of drive letters in Windows.
2. What is the default letter assigned for the operating system in Windows?
Drive letter “C:” is assigned to install the operating system in a Windows machine.
3. What is the benefit of using drive letters?
Users can easily manage and navigate files or applications on different drives without remembering a complex path.
4. Unlike Windows, what method is used to handle drives and partitions in Linux?
Linux operating system uses the ”mount points” method to manage partitions and drives.
5. What letters are default assigned in a Windows machine?
Drive Letters “A:” and “B:” are reserved for floppy disk, whereas the “D:” drive letter is assigned and reserved for optical drives i.e. CD/ DVD Drive.
Drive letter “E:” is for external storage devices like USB flash Drive letter “C:” is the default storage location for the installation of the operating system, system files, installed applications, and temporary files.
6. What is the difference between MBT and GPT?
Master Boot Record (MBR) partition used in old configurations supported a maximum drive size up to 2TB, with the GUID partition table (GPT) used in modern configurations allowing more partitions supporting a maximum drive size beyond 2TB.
7. List scenarios when it is not advisable to change drive letter in windows.
You cannot change the drive letters of your “C:” drive (system drive) when the system is running.
When the “Change drive letters and Path” option is disabled, you need to initialize the volume for that drive.
8. Why do drive letters start from “C:” and not “A:” or “B:”?
Floppy disks are obsolete nowadays. Drive letters “A:” and “B:” were reserved for floppy disks; hence, you will find drive letters starting from “C:” and not “A:” or “B:”
9. How many Drive letters in Windows are available for change?
You can have from A: to Z: – 26 drive letters for change, “A:” and “B:” are reserved for floppy disk, and floppy disk storage is obsolete now.
10. Why “diskpart” command used in Windows?
Diskpart command is used for managing partitions, volumes, and disks in Windows.
11. Is it safe to change drive letters?
It is not advisable to change drive letters; however, the following precautions should be taken while changing drive letters.
• Drive letters “A:” and “B:” are reserved for floppy drives, and you will not find them in the latest drive configurations. Drive letter C: is reserved for the operating system, system files, temporary files, and applications download, E: is reserved for external drives like USB flash drives.
• You need to initialize the volume for a particular drive to prevent changes in the drive letter by disabling the option to Change drive letters and path.
• The drive that you want to change letters should not be in use, or a program/application installed on the drive path should not be running, and should be accessible.
• The applications installed on the drive after changing the drive letter may not be functioning, hence these application programs should be reinstalled.
12. How to change the drive letter from “E:” to “D:”?
You can use the disk management tool to change the drive letter
• Right-click Windows (Start) & select Disk Management from the list.
• Disk Management user interface will appear.
• Find the “E:” drive you wish to change from “E:” to “D:”.
• Right-click the particular drive “E:” you want to update.
• Select option – Change Drive Letter and Paths from the other options.
• Click Change & select new drive letter “D:” from the drop-down.
• Click the OK button to save the new drive letter for a particular drive.
Conclusion
Drive letters manage files across multiple computers and external drives.
In this article, we discussed restrictions while changing disk letter, the importance of partition in drive, default drive letters for different storage drive types, third-party tools that help in changing drive letters, and other important features & ways with which we can change drive letter in windows.
Was this helpful?
Recommended Reading
-

Here we learn the causes of the Hard Drive Not Showing Up error in Windows 10 and explore various ways to solve hard drive not detected error: The data is the most crucial thing in today's world, and you can understand how frustrating it can be when one day your…
-

Unlock the true potential of your computer with simple speed tests. Learn how to test hard drive speed with the top tools in the market to boost productivity and maximize performance: Your computer's hard disk drive is an essential hardware component. It is a nonvolatile storage device that keeps your…
-
List and comparison of internal and external Hard Drive for gaming to help you select the best gaming hard drive: Are you willing to play more games but facing problems storing them? Storage can be a bigger concern when it comes to keeping your favorite games on your PC or…
-
Read our review of the top External Hard Drive for PS4 and compare their features, etc. to identify the best PS4 Hard Drive: Are you thinking about playing your favorite games on your favorite gaming console? A gaming experience in a PS4 is amazing. But, what's the use if you…