Looking for ways to resolve the Windows 10 automatic repair loop issue? Explore the troubleshooting steps for PC auto repair and learn the fix for Automatic Repair Loop in Windows 10:
Graphical user Interface, Multitasking, Networking, Compatibility, and Security are some of the built-in features, Microsoft has taken seriously during the design of an operating system – Windows with over 70% of the global market share as of March 2023 and 60.97% of Windows 10 as on October 2024 – statistical survey conducted by web traffic analysis website StatCounter.
In this article, we will discuss one of the unique built-in features of the Microsoft Windows operating system – Automatic repair – where the system will analyze and resolve the critical issues preventing your computer from starting or restarting the operating system.
Table of Contents:
Windows Automatic Repair Not Working: Explore Possible Solutions

There are various critical problems like faulty system file-related updates, corrupted or missing system files, and issues with a boot manager that may occur when you use Windows-based computers – an attempt to resolve these issues and recover your computer system automatically without human intervention.
What is Windows Automatic Repair?
Windows automatic repair is similar to recovery mode in Linux (Ubuntu) and macOS where the system automatically scans the boot configuration, device drivers, and critical system files for problems and repairs the system to restore to working condition, on multiple failed attempts of restarting the computer.
The automatic repair initiates within the Windows Recovery Environment (WinRE) when the system boot fails repeatedly. During automatic repair, the system scans system files and repairs corrupted files, boots damaged sectors, and restores or reinstalls missing entries of registry system files and crucial system components.
If the problem persists, multiple ways exist to resolve it, such as accessing WinRE advanced options – like System Restore, repairing Start files, and full system reset to troubleshoot the problem.
How to fix the “Preparing Automatic Repair” loop with Command Prompt:
What is a Windows Automatic Repair Loop?
It is observed that the built-in capability of automatic repair can resolve common boot issues, but cannot resolve complex issues such as corrupted data, hardware failure, or out-of-date drivers. Windows automatic repair often keeps on repeating an attempt to resolve the issue and thereby goes in the loop without any success.
Causes for Automatic Repair Loop
There are multiple reasons for the Windows 10 automatic repair loop to occur, some of which are explained below
- Missing or corrupted system files can cause an automatic repair loop
- Out-of-date drivers
- Damaged boot sector (that has instructions executed when the computer boots or starts) – a first sector on the hard disk known as the Master Boot Record
- Faulty RAM, bad sectors of the hard drive, or hardware components can result in an automatic loop
- Incompatible or failed Windows updates may cause issues while booting
- Incorrect BIOS configuration can prevent Windows from starting
- Unexpected Power surges or shutdowns may damage or corrupt the system files and may result in an automatic repair loop
- Malware or virus infection may prevent Windows from booting
Essential Considerations
- It is essential to take a backup of your data stored on your computer before attempting any of the repair tasks as it may reset your configuration and clear content in your drives.
- Please note that you may not be allowed to resolve many tasks without having administrator privileges.
- While attempting the repair task, you should understand the location and commands used and the meaning of error messages. Otherwise, seeking a technician who can resolve the issue is advisable.
How to Fix Automatic Repair Loop in Windows
The key steps to enable automatic repair are listed below:
Advanced Start-up Option Access while restarting your computer and key in F8 to enable advanced start-up options windows, Select Troubleshoot from the options available, Select Advanced Options, and Click on Start-up Repair to access automatic repair functionality.
There are multiple ways you can resolve the automatic repair loop in Windows 10. You can attempt any one of these or more than one based on the severity of the issue.
Remove Peripheral Devices
There are various devices, such as input, output, storage, and networking devices we plug into our computer to enhance the functionality of our computer. These devices may conflict with the configuration of your computer or the operating system version being installed.
You can try disconnecting peripheral devices that are not necessary and are causing conflict with the functioning of your computer. Some of the external devices that we plug in with our computers are:
- Input devices such as Bluetooth keyboard, mouse, camera, scanner, etc.
- Output devices like printers, speakers, monitors, and projector.
- Storage devices like Hard disk drives, Solid state drives, USB drives, Compact disks, DVDs, etc.
- Networking devices like adaptors, modems, and routers
Verify Random Access Memory (RAM)
- Press CTRL + Shift + Esc simultaneously
OR, Press the Windows icon key
OR, Click on the Windows icon at the left bottom of the monitor
- Type Task Manager in the search text field
- Task Manager window will appear
- Go to the Performance tab
- Click on the Memory label on the left pane
- You will find Memory in use on the right pane

Alternatively, you can find out the Total Physical Memory available in your computer as listed below:
- You can use the command prompt by typing cmd on the search text field
- Press enter to open a command prompt
- Type systeminfo and press enter
- You will find all the details about your device infrastructure details
- Check for Total Physical Memory to verify the RAM of your computer

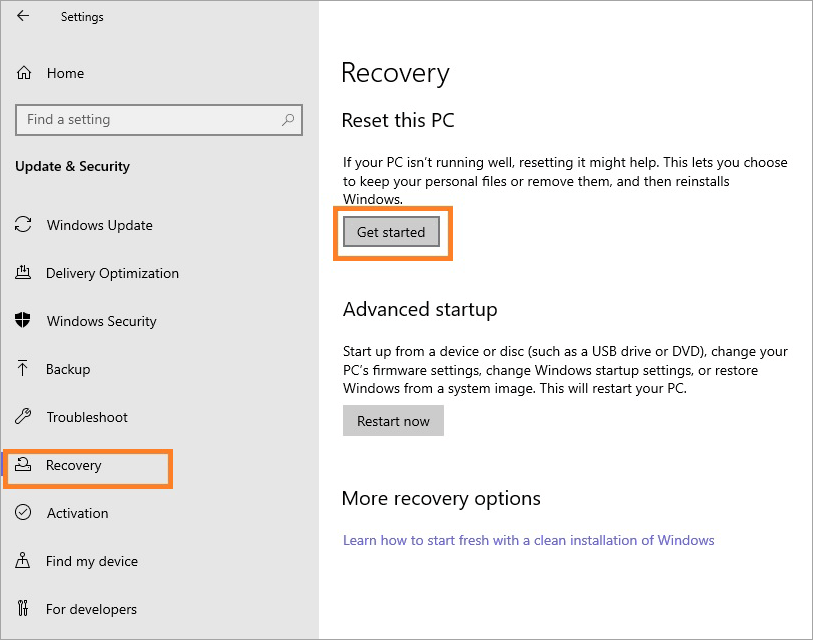
Reinstalling Windows
- Go to the Windows icon on the left bottom of your monitor
- Go to Settings to open Windows Settings
- Click on the Update & Security icon
- Click on Recovery on the left pane
- You will find Reset this PC section on the right pane
- Click on the Get Started button
- You can select one option based on your need
- You may keep all the files in your computer to reinstall without losing data
- Or, remove everything during reinstalling Windows – you may lose your data
- Follow the steps by clicking the Next buttons.
Suggested Read => Pre-requisites and various methods to Reinstall Windows 10
System Restore
You can restore your operating system to your previous configuration, i.e. working state, by replacing corrupted system files and drivers, and resolve the automatic repair loop by following the steps given below:
- Go to the Windows icon on the left bottom of your monitor
- Go to Settings to open Windows Settings
- Click on the Update & Security icon
- Click on Recovery on the left pane
- Go to the Advanced Start-up section
- Click on the Restart Now button
- Blue screen will appear known as Windows Recovery Environment (WinRE)
- There will be three options – Continue, Troubleshoot & Turn off PC
- Click on Troubleshoot
- Select Advanced options from the Troubleshoot screen
- Click on the System Restore option from the Advanced Options screen
- The system will access operating system files and try to restore the system.
- Restart your computer
Sfc & chkdsk command
Two effective built-in commands or tools for Windows repair are system file check and check disk explained steps to follow for each tool
- Click on Windows Icon in the left corner of the monitor
- Select the Power icon and click on the Restart option
- Keep the F8 button of your keyboard pressed till you see Windows troubleshooting windows
- Click on See Advanced repair options
- Click on Troubleshoot and then select Advanced options
- Open command prompt –
- Type chkdsk /r diskname (c, d)
- Press enter to begin scanning and repair errors for the selected disk
- Next step, type sfc/scannow and press enter
- This will scan the system file for integrity
- Type exit to close the command prompt window
- Restart your computer
Check for file system errors
System file error refers to problems related to file access and storage. The reason for system file errors can be a faulty Windows update, a bad or corrupted drive sector, or a lost certificate.
There are multiple ways to validate system files for errors or issues, such as
- Running CHKDSK command
- Scanning for Malware
- Restoration of a system to its previous setting
- Performing clean boot
- Checking System files
Disable the automatic repair loop
Finally, if everything fails and still automatic repair loop persists, you can follow the steps to disable the automatic repair loop
- You may have a USB drive or installation disk for the Windows operating system
- Once the system boots installation windows and selected language preferences
- Click Next button, followed by clicking on Repair your computer
- Select Troubleshoot and click on Advanced options
- Select the option to run as an administrator by highlighting the command prompt and clicking it.
- Type bcdedit / set {current} recoveryenabled No
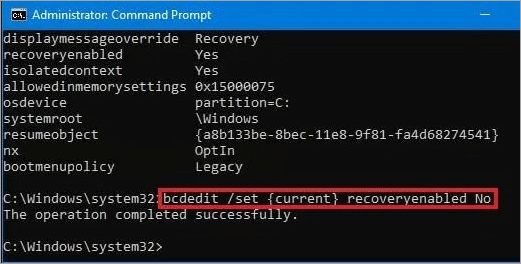
Note – You should be an expert in resolving system errors and configuration as disabling automatic repair could be risky and may leave you with a non-bootable system
Running DISM Tool
Windows automatic repair looping may result due to corrupted system files. DISM or system file checking tool with the help of local Windows image replaces corrupted system files and resolves this issue. The steps are listed below:
- Click the Windows icon to look for and select the Power option from the menu
- Click on the Restart option of the Power option
- Keep the F8 keys pressed till the computer restarts.
- You will find the Advanced repair option window appears.
- You will find options like Continue, Troubleshoot, etc.
- Click on the option labeled Troubleshoot
- Under Troubleshoot, Select the Advanced Options button
- Select an option – Startup Settings
- Click on Restart option
- Keep the F5 key pressed while the computer restarts.
- F5 key will enable your computer to start in safe mode with networking
- With the computer restarted in safe mode
- Go to the Start menu and right click and look for Windows PowerShell (Admin)
- Type in the Windows PowerShell window, below the command
DISM /Online /Cleanup-Image /RestoreHealth
- Press enter
- DISM tool to begin processing and scanning your computer for malfunctioning system files.

- After the DISM tool completes the processing
- Restart your computer and open your command prompt
- Type sfc/ scannow command and press enter.
Note: on restarting your computer, if you keep the F5 key pressed down, the computer will start in safe mode with networking, whereas else if you keep the F8 key pressed, the computer restarts and takes you to the advanced repair option window. This will ensure your system has recovered from the automatic repair loop and has resolved issues.
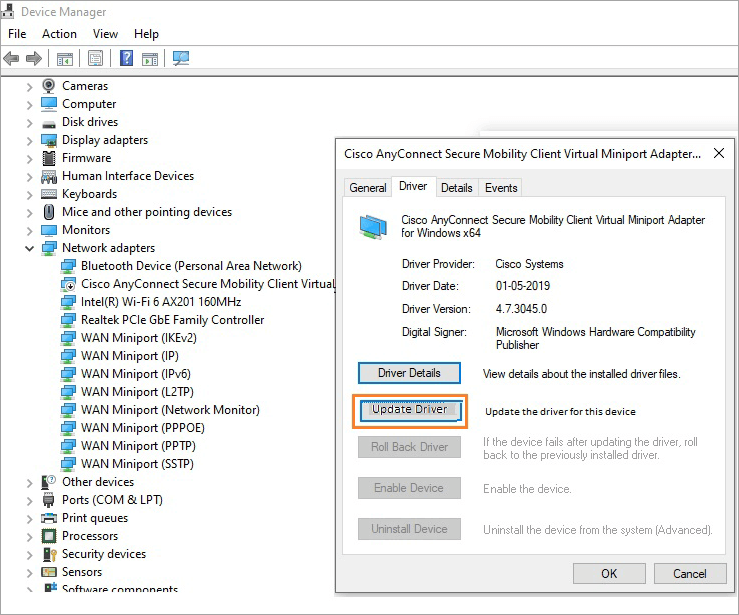
Driver Update
Windows automatic repair looping continues until you update out-of-date drivers or drivers with corrupt or missing files preventing them from running. You can follow the steps for driver update as listed below for Windows 10.
- Click on the Windows icon on your screen and search for Device Manager
- Click on Driver Manager to open it
- Look for Network Adapter in the list
- Right-click Network Adapter
- Select Update Driver option
- You can select Search automatically for drivers, and click Okay
- Windows will search and install the latest drivers available.
- You can restart your computer
- This will update the latest driver version on your computer and stop automatic repair looping in your computer.
Hard Restart Windows PC
A hard restart in Windows PC is to force restart your unresponsive computer. You can follow the steps listed below to restart your computer:
- You can click on the Windows icon (Start) at the bottom left of your monitor.
- Click on the Power option and select on the Restart button.
- It may take some time when some background processes are running.
- You can wait until these processes that are running end or you can kill these processes from
- When your computer is unresponsive or gets hanged, you may keep the Power button on your keyboard pressed for a few seconds until your computer shuts down completely. You can press your power button to restart your computer.
Delete the Wrong Registry
The system administrator has access to permissions to modify, grant, or restrict and customize your system and extend their capabilities. These capabilities are achieved by creating Windows registry keys. Windows Registry is a complex set of configuration details in key-value pair format for users, software, and hardware that are installed in Windows for seamless running of your computer.
It’s crucial to understand and analyze which registry key can be deleted safely without harming your computer.
You can access Windows registry settings via the Windows registry editor, as explained below:
- Press the Windows icon + R keys simultaneously
- Type regedit in the search text field and press enter
- The registry user interface will appear
- Look for HKEY_LOCAL_MACHINE
- Take a backup of registry keys
- Select particular registry sub-keys and values
- Right-click and select the delete option to remove from the system
Registry files are located in the following path on a Windows computer:
| Default folder Name & locations | Description |
| C:\Windows\System32\config | This directory contains the main system registry hives, including SYSTEM, SOFTWARE, SAM, SECURITY, and DEFAULT |
| HKEY_LOCAL_MACHINE\SYSTEM\CurrentControlSet\Services | Contains information about services offered and drivers available in Windows |
| HKEY_CURRENT_USER | Will have currently logged-in user specific settings |
| HKEY_USERS | Will have registry information for all the user profiles on the system. |
Boot in Safe Mode
You can restart your computer in safe mode in the following ways:
- Press the F8 keys continuously while restarting. This will allow advanced boot options window.
- Press the Shift keys down while you click the Restart option under the Power option in Windows (Start) menus.
- Select Windows Settings -> Update and security -> Recovery -> Advanced Startup -> Restart now
FAQs on PC Auto Repair
1. How to stop or disable automatic repair in Windows 10
Follow the below steps to disable or stop automatic repair in Windows 10
• Select the command prompt and select Run as administrator
type bcdedit
• Check value for the identifier is current under the Windows Boot Loader section
• The check value for recoveryenabled is Yes.
• Type bcdedit / set {current} recoveryenabled no
• Press Enter to disable automatic repair in Windows 10
2. My computer gets stuck preparing for automatic repair.
The reason for the computer getting stuck can be the presence of malware, corrupted
drivers, or system registry file damage.
3. What does Automatic repair do in Windows 10 computers?
Automatic repair carries out fixing minor boot issues and corrupted system files.
4. How to boot my computer in safe mode?
Keep the F8 button on the keyboard pressed when your computer is restarted. This will
bring you to the advanced boot options screen. Select the Safe Mode option.
5. What are the reasons why for computer keeps repeating automatic repair?
There are some of the reasons for keeping the computer’s repeat automatic repair such as a corrupted disk or bad sectors, error while running SSD or hard drive, and master boot record (MBR) damage.
6. How to prevent repeating automatic repair loops?
The repetition of the automatic repair loop can be prevented by one of the activities like restoring the system to its previous state, executing CHKDSK to check the utilization of the disk, configuring disable automatic repair, system boot in safe mode, and resetting BIOS/UEFI or check the order of booting.
7. What keys to press to boot the computer in safe mode?
Keep pressing down the F8 key during the starting up of a computer. This will allow access to advanced boot options in Windows-based computers.
8. What is the Windows registry?
Windows registry has configuration data that are used by Windows during its operation such as
• User profile
• Installed applications on your computer
• Users access permissions for creating types of documents,
• Current ports being accessed
• Congratulations on the application icons, folders, and property sheet
• Current system hardware installed
Conclusion
Windows automatic repair is a built-in feature in Windows 10 and 11 that will initiate the system to automatically repair and resolve the issues related to system files, such as missing or corrupted files, damaged boot sector, faulty RAM, and incorrect BIOS configuration.
Automatic repair looping occurs when the system is not able to resolve the issue itself. In this article various ways you can fix Window’s automatic repair loop.
Was this helpful?
Recommended Reading
-

This tutorial discusses the reasons for losing data permanently and different methods to Recover Deleted Files on Windows 10: The data is any form of information that is provided to the system. It can be anything ranging from a password to a notepad file. Data is a key element in…
-
This tutorial explains different methods to take a screenshot on Windows 10 and other versions. Select a suitable method to screenshot on Windows: Screenshot means taking an image of the content on the screen. It could be a part of the screen or the entire screen, and some additional tools…
-
Discord won’t open on PC? Find out why Discord won’t open on your PC and resolve the issue in 10 simple step-by-step solutions quickly. If you are experiencing the issue of Discord won’t open on your PC, you are not alone. Many users have reported problems such as the application…
-
Here we learn the causes of the Hard Drive Not Showing Up error in Windows 10 and explore various ways to solve hard drive not detected error: The data is the most crucial thing in today's world, and you can understand how frustrating it can be when one day your…
-
Learn how to Boot Windows 10 from USB by understanding the pre-requisites, method to create bootable USB, etc: Windows is one of the most used operating systems presently available in the market because of the user-friendly interface and the popular features it provides. Windows has a wide user base globally,…
-

Get to understand the prime reasons that cause mouse freezing in Windows 10. Here is a set of potential remedies to easily resolve and fix the mouse keeps freezing issue: Imagine a situation where you want to send an important assignment to your boss that is expected for review before…
-
Explore effective and efficient Windows 10 PC Performance Enhancement Tweaks to optimize the performance of your system: Nowadays, everybody needs a powerful system that can perform numerous operations at a time and also provide them with the best gaming experience possible. Users even expect their system to work smoothly, but…
-
Struggling with performance issues in Windows 10? Read this in-depth guide containing various methods to Optimize Windows 10 performance: If you have a system with the best hardware, including advanced RAM, processors, and SSDs, but still you feel that your system is not performing well or is not fast enough,…