This tutorial explains how to create and manage TOSCA Workspaces. You will also learn about the Import, Export, and Checkout Process for TOSCA objects.
In our precious TOSCA Series For Beginners, we discussed the overview of the TOSCA automation tool to help beginners get started with it in our previous tutorial.
In this section, you’ll learn how Tosca Workspaces work, how to create and manage them, the concept of checkout in version management, and collaborating with teams, as well as the import and export of TOSCA objects.
Table of Contents:
What is a Tosca Workspace?
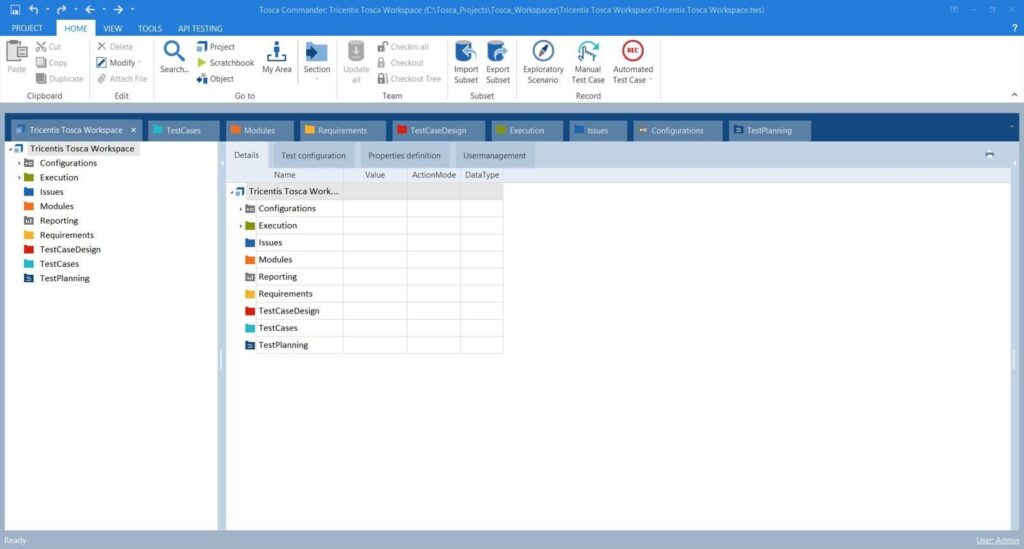
The Tosca Workspace is the basis of all automation projects in Tricentis Tosca. From building test cases to handling modules and running tests, everything is done within the scope of a workspace.
Knowledge of the differences between single-user and multi-user workspaces, along with repository links and check-in/check-out methods, will help you in your test automation endeavors.
Types of Workspaces in Tricentis Tosca
There are mainly two types of workspaces in TOSCA.
- Single User Workspace
- Multi-User Workspace
Single User Workspace
Unrestricted access for one user, which means only one user/tester can use it. This is a sort of single license.
When Should Single User Workspace Be Used?
The Single User Workspace would be most appropriate when teamwork is not necessary.
- Common use cases include:
- Learning about Tosca Automation
- Preparing for Certification
- Conducting Practice Sessions
- Creating a Proof of Concept (POC)
- Doing personal automation projects.
- Creating initial frameworks before switching to Teams.
Advantages of Single User Workspace: There are several advantages to having a Single User Workspace for a lone tester or a novice Tosca user.
The following are among the advantages:
- Quick and easy to set up with minimal configuration.
- Nobody requires a database server here.
- Fast access to local project data.
- Perfect place for studying Tosca concepts and automation.
- Less complex than other environments.
- Allows you to try something out without messing up common projects.
This is an ideal environment for those who have just started working with Tosca or running small-scale automation projects.
Multi-User Workspace
This type of access is for the test team members. As multiple users can use the workspace at a time, this type of workspace has the Checkout concept.
Features of Multi-User Workspace
The Multi User Workspace facilitates collaboration and includes internal controls that enable change management across users.
The main features of a Multi User Workspace are:
- Integration into a central repository.
- Multiple users can collaborate on a single project.
- Allows check-ins and checkouts for version control.
- Helps in managing test assets centrally.
- Aids in updating across users synchronously.
- Helps in large automation projects within enterprises.
- Has integration with databases like SQL Server and Oracle.
Now we will see how to create these workspaces.
Key Differences Between the Single User and Multi User Workspace
| Feature | Single User Workspace | Multi User Workspace |
|---|---|---|
| Repository Type | Local repository | Central shared repository |
| Collaboration | Not supported | Fully supported |
| Number of Users | One user | Multiple users |
| Check-In/Check-Out | Not available | Available |
| Database Requirement | Usually SQLite | SQL Server, Oracle, or other supported databases |
| Setup Complexity | Simple | Moderate to advanced |
| Best For | Training, learning, small projects | Team-based and enterprise projects |
| Version Control | Limited | Built-in collaboration controls |
Which workspace should you choose?
- Choose a Single User Workspace. If you are new to Tosca, trying out automation techniques or undertaking a single-user project, opt for a Single User Workspace.
- Choose a Multi User Workspace. If you are working on a project that requires the input of several testers who need to share their test-related material, then go for a Multi User Workspace.
A Multi User Workspace is the recommended option in most enterprise-level automation projects due to its collaborative capabilities.
How to Create and Manage a Workspace
Steps to Create a New Single-User Workspace
1. Launch TOSCA Commander
2. On the top menu, select “Workspace -> New”

3. Select type “None (Creates single user workspace)” for the repository in a pop-up window.
4. Give it a path where the workspace project data will be stored.
5. Enter a preferred name for the new workspace.
6. Press the “Ok” button.

7. Wait for the result.
8. Press the “Close” button.

This is how the workspace is created. Now we will see how to open the created workspace.
Open an already created Workspace:
1. Launch TOSCA Commander.
2. On the top menu, select “Workspace -> Open”.

3. After that, select the workspace in which you have to work by following the path defined in the project, i.e., the path that was given while creating the workspace.
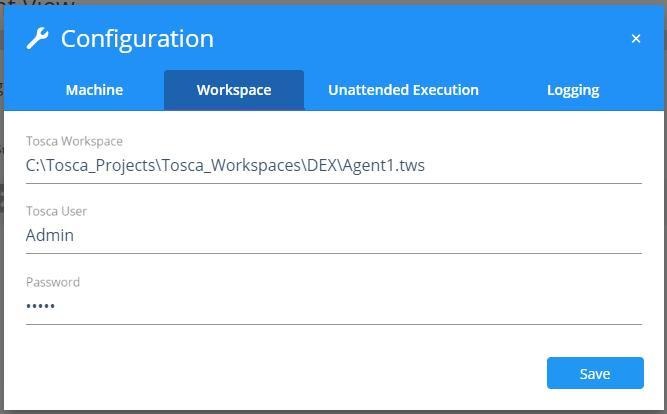
In the above example:
C:\Data\Documents\TOSCA\TOSCA_Workspaces\Test\test.tws (name of the workspace and the user has to be entered. Here “Test” is the workspace name and “test” is the username)
4. The workspace file extension is .tws. Select the workspace file (test.tws) and click on the “Open” button.
5. Enter the username and password to log in to the respective workspace.

Steps to Create a Multi User Workspace
A Multi User Workspace is used when multiple team members need access to the same automation project through a shared repository.
To create a Multi User Workspace:
- Open Tosca Commander.
- Select Create New Workspace.
- Choose Multi User Workspace.
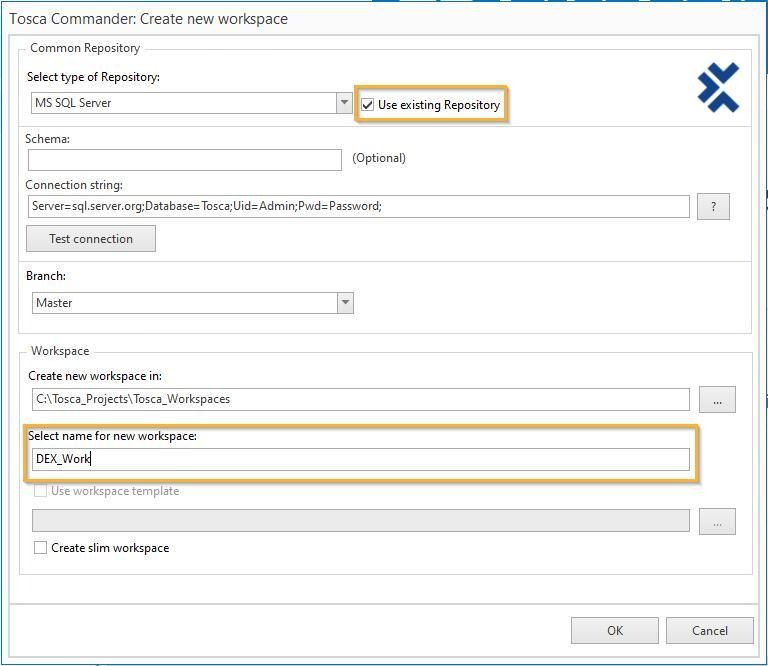
- Enter a workspace name and select a local workspace directory.
- Provide the repository connection details.
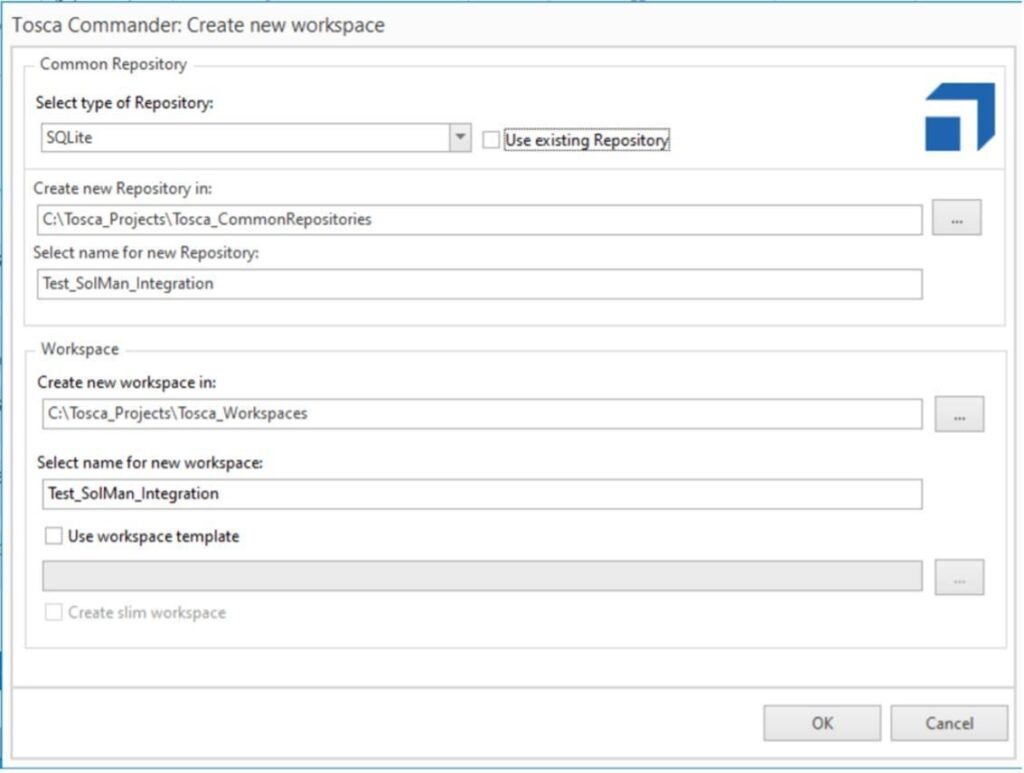
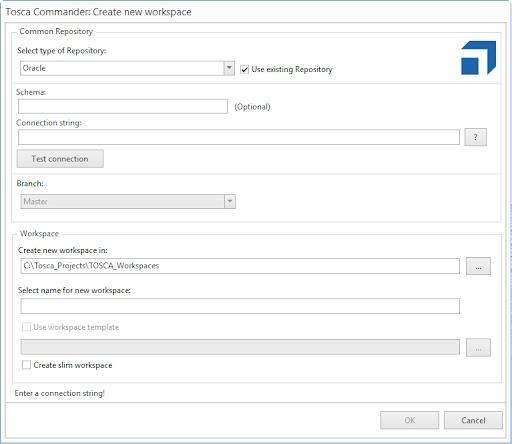
- Select the repository database type (such as SQL Server or Oracle).
- Enter authentication credentials if required.
- Verify the connection settings.
- Click Finish to create the workspace.
After creation, Tosca downloads the necessary project information from the central repository and synchronizes the workspace with the latest project version.
Common Tosca Workspace Issues and Fixes
Despite the fact that the Tosca Workspaces are intended to be an environment where test automation will take place without any trouble, at times, users will encounter various challenges. Knowing about these common challenges and knowing how to solve them can greatly improve the efficiency of your project.
Repository Connection Errors
Challenges related to connecting to the repository database are some of the most frequent problems faced by users while dealing with the Multi User Workspaces of Tosca.
How to fix repository connection errors:
- Verify the server name for the repository and the database details.
- Make sure the database server is active and available.
- Check the validity of usernames and passwords.
- Confirm whether or not the user has access to the repository.
- Ensure that there is connectivity between the workstation and database servers.
- Look at firewall rules that may inhibit database communications.
- Rerecord the connection to the workspace and verify.
Best Practice: Always test repository connectivity before creating or reconnecting a Multi User Workspace.
Check-Out Conflicts
In a Multi User Workspace, there might be check-out conflicts when more than one user tries to make modifications to the same object or when an object stays checked out by another team member.
How to resolve check-out conflicts:
- Find the user who checks out the object.
- Communicate with the user to ensure the check-in is done.
- Synchronize the workspace to get the current version of the repository.
- Don’t modify objects that are checked out by others.
- Object Ownership Guidelines as per Project Governance.
Best Practice: Check in completed changes promptly to reduce repository locking and collaboration bottlenecks.
Workspace Synchronization Problems
A problem arises when the workspace is not able to pull any of the latest modifications from the repository or shows old project information.
How to fix synchronization issues:
- Conduct a manual synchronization of the workspace.
- Make sure that all changes to the repository have been committed properly.
- Relaunch Tosca Commander and re-establish the connection with the workspace.
- Ensure a stable network connection.
- Flush the workspace cache if required.
- Create a new workspace.
Best Practice: Synchronize workspaces regularly, especially before starting new automation tasks.
Quick Troubleshooting Table
| Issue | Possible Cause | Recommended Fix |
|---|---|---|
| Repository Connection Error | Incorrect server details or credentials | Verify connection settings and permissions |
| Check-Out Conflict | Object locked by another user | Coordinate check-in and synchronize workspace |
| Synchronization Failure | Network or repository issues | Re-sync workspace and verify connectivity |
| Slow Workspace Performance | Large repository or resource limitations | Optimize repository and improve system resources |
Checkout Concept in TOSCA
The checkout concept applies only to multi-user workspaces where multiple users work in the same workspace simultaneously. There is a high possibility of data getting overwritten in this type because multiple users are involved.
So, to avoid overwriting data, i.e., created by other test experts/testers, all elements to be used and changed must be checked out first.
What Is Checkout in TOSCA?
Elements in the database (objects) can be changed or deleted only after checkout. When elements are checked out by one particular user, all other users can not change those checked-out elements.
Checkout
- Checkout of a folder or a single element.
Checkout Tree
- Checkout of a folder including all subfolders and all elements.

Update all
- Changes of other users are updated.
Checkin all
- Checkin of all new and checked-out elements.
Checkin Tree
- Checkin of a folder including all subfolders and elements.

Checkout Status
Check out status is indicated by colored icons left of the element in the tree structure. Details are given in the image below.


We explained the checkout concept above. Now, let us see the practical aspects of the concept.
How to Perform Check-in and Check-out in TOSCA
If you want to create a new folder in the existing folder structure, use the checkout command to checkout the existing folder where you need to create this new folder. In this case, only the new folder will be checked out. If you want to change or use other folders at the same level, then use the command Checkout Tree.
You can make all changes done in your workspace permanent in the main database by clicking the button or using the command Checkin all.
When you start your work in the morning, launch the TOSCA Commander, open your workspace, and the first thing to do is to click on the button Update all. By doing that, you will get all the work updated by others in your workspace.
It is essential to get all the updates before you make any changes in your workspace. Your saved work will only be seen in every user’s workspace when you activate Checkin all, and all others activate Update all.
Checkout

Checkout Tree

Checkin all (TOSCA provides Checkin all icon in the top menu bar)
Update all (TOSCA provides Update all icon in the top menu bar)
How to Perform Import and Export of TOSCA Objects
TOSCA provides import & export features, it helps to transfer data from one project to another. Data from a single user project can be copied to a multi-user project and vice-versa.
All objects in TOSCA Commander™ can be exported in subsets using the command Export Subset.
Subsets are XML files; these are actually compressed data files which are having file extension .tce. If you want to call the objects from one project to another, TOSCA Commander™ automatically exports all the objects that are necessary to restore the selected objects in another project.
The import of a subset in TOSCA Commander™ is done through the context menu of the project root element. The import process does not overwrite any existing data. It always adds data to a separate folder in the project. Subsets allow unrestricted data transfer between the single user and multiuser projects. The use of subsets is possible for all user groups.
The import subset and export subset options are available either on the project root element or on a component folder. Just right-click on the root folder or any component folder, and in the context menu, you will find Export Subset and Import Subset options.

Frequently Asked Questions
1. What is a Tosca Workspace?
A Tosca Workspace is the environment where users create, manage, and execute test automation assets in Tricentis Tosca. It serves as a connection point between the user and the repository, allowing access to Modules, TestCases, Requirements, Test Data, and Execution Lists.
2. What are the types of workspaces in Tosca?
There are mainly two types of workspaces in Tosca:
• Single User Workspace – Makes use of the local repository and intended for personal use.
• Multi User Workspace – Accesses the repository from a remote location.
3. How do I create a workspace in Tosca?
Creating a workspace in Tosca involves:
• Opening the Tosca Commander.
• Selecting the option for Creating New Workspace.
• Selecting whether to create a Single User or Multi User Workspace.
• Entering the Workspace Name and local directory.
• Setting up any repository if needed.
• Confirming the connection details.
• Clicking on ‘Finish’ to create the Workspace.
4. What is the difference between a repository and a workspace in Tosca?
The workspace is a place where users work on Tosca projects locally, while the repository is a central place that stores all the assets, including modules, test cases, and test data.
Workspace—Repository
User working environment–Central data storage
Local access point–Stores project assets
Used by testers and automation engineers–Shared across projects and users
Connects to repository data–Maintains project information
5. What is check-in and check-out in Tosca?
The Check-in and check-out feature is version control, which is used in multi-user workspaces.
• Checkout locks the objects for editing purposes.
• Checkin saves the modified content to the repository for availability for other users.
6. Can multiple users work in the same Tosca Workspace?
No, users should not operate within the same Tosca workspace. However, several users may connect to the same Multi User repository for working in the same project but different local workspaces.
7. Which databases are supported for Tosca repositories?
Depending on the Tosca version, typically, some of the most popular database systems that may be used for repositories include the following:
• Microsoft SQL Server
• Oracle Database
• IBM DB2
• SQLite (most often for Single User Workspaces)
The choice of the database system depends on scalability and performance considerations.
8. When should I use a Single User Workspace?
A Single User Workspace is best suited for:
• Learning Tosca
• Training and certification practice
• Proof-of-concept projects
• Individual automation development
• Small projects managed by a single tester
9. What are the benefits of a Multi User Workspace?
There are many pros to using Multi User Workspace, which include:
• Team Collaboration
• Repository Management
• Checking-in & Checking out
• Versioning
• Automation Asset Governance
• Scalability for Enterprise Automation Efforts
This is the best choice for automation teams that are larger than two people.
10. How do I fix repository connection issues in Tosca?
Fixing a repository connection problem usually involves steps such as:
• Making sure that there are no issues with your repository server or database.
• Making sure your username and password are correct.
• Ensuring that your database server is up and running.
• Verifying network connection.
• Making sure your access is not restricted.
• Testing the connection again.
• Recreating or reconnecting your workspace.
Conclusion
In this tutorial, we discussed the TOSCA workspace, the check-out concept, and some guidelines for using the checkout process. We also discussed import and export features in TOSCA.
We hope you got a good idea of how to create and manage workspaces in the TOSCA Automation Tool.
Check out our tutorials below for more Automation Tool guides.
- Top 10 Popular Robotic Process Automation RPA Tools in 2026
- Top 11 Workflow Automation Software Tools for 2026
- Sikuli GUI Test Automation Tool Tutorial
- Best Software Testing Tools 2026 [QA Test Automation Tools]
- FireFlink AI-Powered Scriptless Automation Testing Tool Review
- Top 20 Best Automation Testing Tools in 2026 (Comprehensive List)
- SeeTest Automation Tutorial: A Mobile Test Automation Tool Guide
Was this helpful?
Recommended Reading
-

This tutorial explains how to create and execute manual as well as automation test cases in TOSCA, along with the requirements, modules, and reports in TOSCA. In the previous tutorial of this Easy TOSCA Guide for Beginners, we explored how to create and manage workspaces in Tricentis Tosca in detail.…
-
Rational Robot is an automated functional, regression testing tool for automating Windows, Java, IE and ERP applications under windows platform. This article should be a good start for those who wants to learn Rational Robot test automation tool. Read on for Rational robot tutorial with trial version download and resources.
-
This article provides an introduction to the TOSCA Test Automation Tool. This article covers the major components of TOSCA and details the TOSCA Commander and Workspace. Tosca has emerged as one of the most commonly adopted enterprise test automation frameworks due to its capability to offer automation without requiring extensive…
-

Here is an in-depth tutorial on the process of browser automation through Geb Tool for your benefit: Geb (pronounced "jeb") is the answer to any kind of browser automation challenges. It is a very effective tool to perform automation testing over the web. Geb originated out of the need to…