


The most practical tutorials on Sikuli GUI automation testing tool:
In part 1 of this “Introduction to Sikuli tutorial series”, we have discussed Sikuli, how it works, and how to create a simple Sikuli project.
In this 2nd part, you are going to learn some advanced concepts like – how to create a Sikuli Maven project and how Sikuli can be used with Selenium WebDriver to automate web pages.
This part is essential because there is no built-in method to open a website/web application in Sikuli. So whenever you’re executing a Sikuli script, you need to make sure that the website is already opened in a browser. It is an overhead task.
Create A Sikuli Maven Project

To overcome this, Sikuli can be used together with Selenium WebDriver. Selenium contains a method to open a website in a browser. After opening the website, we can run Sikuli scripts on that website.
Installing Eclipse Maven Plugin
Step #1: Open Eclipse, Go to Help -> Install a new Software. Click on the “Add” button and add the following URL.
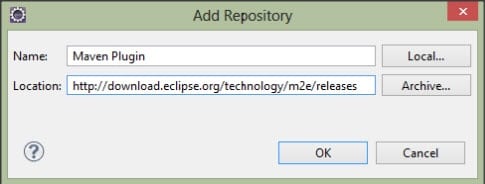
Click on the “OK” button.
Step #2: Check All the checkboxes listed, click “Next” and install the Maven plugin.

Installing Apache Maven
Step #1: Download the latest version of the Maven from here.
Step #2: Extract the downloaded zip file and put it under somewhere in your machine. Copy the bin folder path of Maven, and append the path in the environment variable. (It requires a JAVA_HOME variable in the environment variable. Please set the JAVA_HOME variable in your environment)
Step #3: Check whether the maven is installed correctly. Open the command prompt and type “mvn -version”. It should return to something like this:
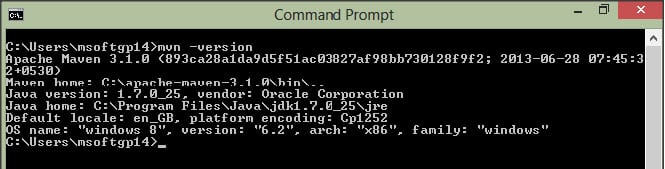
It indicates Maven has successfully been installed on your machine.
Install Sikuli Script Jar In Maven Repository
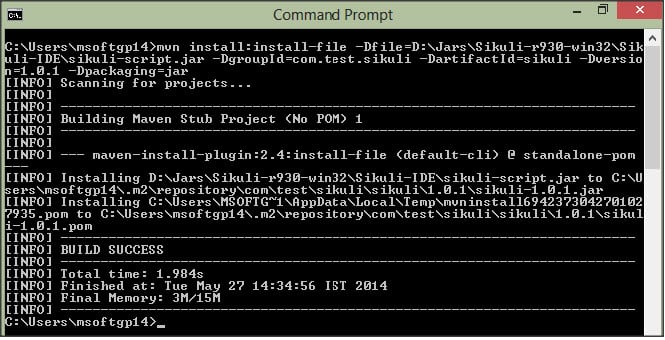
As I mentioned in part -1, we’ve already got sikuli-script.jar, next we need to install sikuli-script.jar in the maven repository. By using the following command, we can install sikuli-script.jar in the Maven repository.
Mvn install: install-file -Dfile=D:\Jars\Sikuli-r930\win32\Sikuli-IDE\sikuli-script.jar -DgroupId=com.test.sikuli -DartifactId=sikuli -Dversion-1.0.1 -Dpackaging=jar
Creating The Sikuli Maven Project
Step #1: Open Eclipse and create a new Maven Project.
Step #2: Add the following dependencies to your POM file.
<dependency>
<groupId>com.test.sikuli</groupId>
<artifactId>sikuli</artifactId>
<version>1.0.1</version>
</dependency>
<dependency>
<groupId>junit</groupId>
<artifactId>junit</artifactId>
<version>4.11</version>
</dependency>

Step #3: Create a package inside src/test/java and create a class inside the package. Now you can start writing the Sikuli script inside this class.
Sikuli Example Program: Open A File In Windows Explorer
Step #1: Create a Sikuli Maven Project, as explained above.
Step #2: Take the screenshot of the required elements and put it inside the Maven project.

– file.png
Step #3: Create a class with the name “Test1”, and paste the following code inside the sikuli class.
package com.test;

import org.junit.Test;
import org.sikuli.script.FindFailed;
import org.sikuli.script.Screen;

public class Test1 {

@Test
public  void openFileTest() throws FindFailed, InterruptedException {
// TODO Auto-generated method stub
Screen s=new Screen();
s.find("file.png");
s.doubleClick("file.png");
System.out.println("File icon clicked");

}
}
Executing The Sikuli Maven Project From the Command Line
Step #1: Open Command Prompt and cd to the project directory.
Step #2: Execute the above project from a command prompt using the following command.
mvn clean test -Dtest=Test1

Selenium Vs Sikuli

Integrating Sikuli With Selenium WebDriver
Step #1: Create a new Java Project in Eclipse by clicking the New -> Java project.
Step #2:
- Right-click on the Project Go to Build Path -> Configure Build Path.
- Switch to the Libraries Tab.
- Click on “Add External Jars” and Add Selenium library jars and Sikuli-scritp.jar

Step #3: Create a package inside src/ folder and create a class under that package.
Step #4: Take All required screenshots of web elements and save them inside the project.
Step #5: Copy the following code inside that class.
package com.test;

import org.openqa.selenium.WebDriver;
import org.openqa.selenium.firefox.FirefoxDriver;
import org.openqa.selenium.support.ui.WebDriverWait;
import org.sikuli.script.FindFailed;
import org.sikuli.script.Screen;

public class OnlinePainting {

public static void main(String[] args) throws FindFailed {
// TODO Auto-generated method stub

WebDriver driver=new FirefoxDriver();
WebDriverWait wait=new WebDriverWait(driver,20);
driver.manage().window().maximize();
driver.get("http://www.thecolor.com/Coloring/a-puppy-with-a-kitten.aspx");
Screen screen=new Screen();
screen.wait("1398665726055.png", 20);
screen.click("1398666382715.png");
screen.click("1398666248846.png");
screen.click("1398666729252.png");
screen.click("1398666188894.png");
screen.click("1398665763634.png");
screen.click("1398666592027.png");
screen.click("1398666610951.png");
screen.click("1398666308624.png");
screen.click("1398666326406.png");
screen.click("1398666570749.png");
screen.click("1398666703708.png");
screen.click("1398666382715.png");
screen.click("1398666857321.png");
screen.waitVanish("1398665763634.png");

}
}
Step #6: Right-click on the project and select RunAs -> Java Application.
Before Execution:

After Execution:

Conclusion
- Sikuli scripts can be easily integrated with Selenium WebDriver to automate flash websites.
- Sikuli can automate Windows and all other applications.
- It uses a visual match, so we can automate almost anything we see on the screen.
- It provides extensive support to Flash objects. i.e. we can automate Adobe Flash player components. (Audio player, video player)
- Sikuli scripts can be created as a Maven Project and can be run from the command prompt.
- Hence, Sikuli is the most friendly tool for automating challenging flash/windows applications.
Feel free to post your queries in comments.
=> Check ALL Sikuli Tutorials Here.
Was this helpful?
Recommended Reading
-

Overview: Hi Testers!! In this tutorial, you will learn a very interesting topic i.e. integrating your selenium scripts with JMeter and measuring the performance. Below are the topics covered in this session: Integrating Selenium with JMeter. Using WebDriver Sampler Plugin. => Click here for The Complete Free Training On JMeter…
-

Cucumber Selenium WebDriver Java Integration with Example: In the last tutorial, we discussed the Cucumber tool, its usage, and different features. Moving ahead in our free Selenium online training series, we will discuss how to set up a cucumber project and will discuss the integration of Selenium WebDriver with Cucumber.…
-
In our last Selenium tutorial, we learned a build tool named “Apache Ant”. We also broadly discussed its applicability and importance besides the practical approach. In this Selenium Testing tutorial, we will learn Maven - a build automation tool that is distributed under Apache Software Foundation. It is mainly used…
-
This tutorial Explains How to Use The Maven Surefire Plugin to Manage our Dependencies and Select & Execute Particular Test Scripts or Suites Using TestNG: Here is a perfect guide for you on the Integration of Maven and TestNG using the Maven Surefire plugin and how to execute the script…


Hi Vijay ,
Please write a complete series of tutorials about using Sikuli with Katalon Studio. I’ve one question “How can we select a checkbox out of multiple checkboxes” using Sikuli.
Regards,
Sher Hassan
@micky – yes .. we can automate captcha. But you should not reload the page. Otherwise captcha image will be changed.
Thanks for posting 2nd part of Sikuli GUI automation tool and explaining how to use it with Selenium.
Starting ChromeDriver 2.37.543627 (63642262d9fb93fb4ab52398be4286d844092a5e) on port 20028
Only local connections are allowed.
Mar 21, 2018 11:28:20 AM org.openqa.selenium.remote.ProtocolHandshake createSession
INFO: Detected dialect: OSS
*** classpath dump
0: /C:/Program%20Files/Java/jre1.8.0_161/lib/resources.jar
1: /C:/Program%20Files/Java/jre1.8.0_161/lib/rt.jar
2: /C:/Program%20Files/Java/jre1.8.0_161/lib/jsse.jar
3: /C:/Program%20Files/Java/jre1.8.0_161/lib/jce.jar
4: /C:/Program%20Files/Java/jre1.8.0_161/lib/charsets.jar
5: /C:/Program%20Files/Java/jre1.8.0_161/lib/jfr.jar
6: /C:/Program%20Files/Java/jre1.8.0_161/lib/ext/access-bridge-64.jar
7: /C:/Program%20Files/Java/jre1.8.0_161/lib/ext/cldrdata.jar
8: /C:/Program%20Files/Java/jre1.8.0_161/lib/ext/dnsns.jar
9: /C:/Program%20Files/Java/jre1.8.0_161/lib/ext/jaccess.jar
10: /C:/Program%20Files/Java/jre1.8.0_161/lib/ext/jfxrt.jar
11: /C:/Program%20Files/Java/jre1.8.0_161/lib/ext/localedata.jar
12: /C:/Program%20Files/Java/jre1.8.0_161/lib/ext/nashorn.jar
13: /C:/Program%20Files/Java/jre1.8.0_161/lib/ext/sunec.jar
14: /C:/Program%20Files/Java/jre1.8.0_161/lib/ext/sunjce_provider.jar
15: /C:/Program%20Files/Java/jre1.8.0_161/lib/ext/sunmscapi.jar
16: /C:/Program%20Files/Java/jre1.8.0_161/lib/ext/sunpkcs11.jar
17: /C:/Program%20Files/Java/jre1.8.0_161/lib/ext/zipfs.jar
18: /G:/selen/chii/bin/
19: /G:/selen/selenium-java-3.11.0/client-combined-3.11.0.jar
20: /G:/selen/selenium-java-3.11.0/client-combined-3.11.0-sources.jar
21: /G:/selen/selenium-java-3.11.0/libs/byte-buddy-1.7.9.jar
22: /G:/selen/selenium-java-3.11.0/libs/commons-codec-1.10.jar
23: /G:/selen/selenium-java-3.11.0/libs/commons-exec-1.3.jar
24: /G:/selen/selenium-java-3.11.0/libs/commons-logging-1.2.jar
25: /G:/selen/selenium-java-3.11.0/libs/gson-2.8.2.jar
26: /G:/selen/selenium-java-3.11.0/libs/guava-23.6-jre.jar
27: /G:/selen/selenium-java-3.11.0/libs/httpclient-4.5.3.jar
28: /G:/selen/selenium-java-3.11.0/libs/httpcore-4.4.6.jar
29: /G:/selen/selenium-java-3.11.0/libs/okhttp-3.9.1.jar
30: /G:/selen/selenium-java-3.11.0/libs/okio-1.13.0.jar
31: /G:/selen/sikulixsetup-1.1.0.jar
*** classpath dump end
[error] RunTimeINIT: *** terminating: libs to export not found on above classpath: /sikulixlibs/windows/libs64
how can i resolve this error,plz send me the link of sikuli jar file which is suitable for my project versions
Hi,I am using Sikuli in selenium with C#. I am facing an error as below:
Sikuli4Net.sikuli_UTIL.SikuliActionException: ‘Result: FAILorg.sikuli.script.Pattern cannot be cast to java.lang.String’.
Below is my code
using System.Collections.Generic;
using System.Linq;
using System.Text;
using System.Threading.Tasks;
using OpenQA.Selenium;
using OpenQA.Selenium.Support;
using NUnit.Framework;
using OpenQA.Selenium.Chrome;
using Sikuli4Net.sikuli_JSON;
using Sikuli4Net.sikuli_REST;
using Sikuli4Net.sikuli_UTIL;
namespace Chart1
{
class Program
{
static void Main(string[] args)
{
APILauncher launcher = new APILauncher();
launcher.Start();
IWebDriver driver = new ChromeDriver();
driver.Navigate().GoToUrl(“https://www.google.com/”);
Screen screen1 = new Screen();
Pattern pattern1 = new Pattern(“C:/>TestBase/GoogleBase.PNG”);
screen1.Click(pattern1, true); //FACING ERROR HERE
}
}
}
Please help in getting this resolved.
any solution I am also facing same issue..Please let me know the solution it helps me
did u get any solution??
we can open the browser through sikuli.Follow the below steps:
Step1. select the browser image and use doubleClick function.
Step2: select the address bar and type the url on it and enter using type()
unable to use images when i exported the jar file but in eclipse it is working fine.
Hi,
Thank you very much for tutorial. I have one question, can we use Siluli for Kibana kind of web sites? Where we need to deal with more graphs and its validations. Please provide some insight.
How to get dynamic text from image using sikuli and java?
I’m working on desktop automation using Sikuli with C#, I’m unable to input value to a textbox also facing issue in selecting value from a drop down button.
Please suggest a way to resolve this issue.
can u please tell how to actually integrate the sikuli with c code? i installed sikulisharp frm nuget packages , now what? i need to add reference right? which one and how? any link of the same will be greatly appreciated.
i am also automating desktop app with sikuli
we at our team using this tool for more than a year now. it’s good except few limitations.
what is dependcy for sikuli to be used in pom.xml file so that it can be used by all the member in the team?
How to handle the IE10 Download popup using Sikuli?
If intereseted, now you can run sikuli directly on non-rooted Android devices.
Thanks for sharing your experiences. Can we automate captcha with Sikuli..?
Hi sir ,Thanks for the tutorial . Can I click on wordpad and enter some text in it .If so Please provide me the codes please.
Can you share the images that you screenshot in above scripts?
Which testing tool is used for locating Image inside the characters. Please send me email to me
Awesome man , hope you would become father of tetsing
Is there anyone who can help me write an autobot for the aviator and zeppelin game on the betting sites?
Can we use sikuli without triggering mouse event, because, each time I need to wait for the action to complete before I take the control of the mouse. If I have 10 test cases, and each test case, if I use sikuli, then I need to wait until the actions are completed. Anyother way to handle this.
Thanks
Geetha
You can start a website by using app.open() to open the browser you want to test and type in the URL. It’s important to remember that Sikuli supports typing in keys. So you can do a lot of stuff with shortcut keys. As for using sikuli and Jenkins. Try this site http://technicaltesting.wordpress.com/2012/05/07/setting-up-a-jenkins-slave-for-sikuli-based-tests/.
Please mail (subbrao.spi@gmail.com) me Sikuli Doc either in pdf or word doc
We use Sikuli extensively to automate our mobile websites via iOS Simulator and GenyMotion Android emulators. It is absolutely a fantastic tool, an automated and speedy black box tester.
It is an unusually powerful tool when scripted in it’s native Jython – but just the API with Java alone makes it so clunky and complicated just to click something from what I see here.
For instance, the ‘find’ operation is inherent and implied with ‘click’ in Jython, so you just click something. You don’t import several things, explicitly find the image, then explicitly click the image, etc.
Can i get a tutorial to automate testing for a installation wizard.(i mean a wizard which shows offers to users)
Hi STH team
Thanks for sharing such nice posts. These are really helpful in my testing career as I leaned lot of things from this blog. plz share selenium articles as well.
if there is any video regarding image inside text locating tool please mail me the link
Thanks for such a useful information.
Our testers are using this at a daily basis. It really is a useful testing tool.
Regards,
Kvsc
How to identify an correct image when the images are identical. Example: We have the search icon more than once in a web page.
Please help me.
Well explained really helpful article to learn and install sikuli for testing purpose.
How to take screenshot using sikuli while automating a Desktop application?
Our testers are using this at a daily basis. It really is a greate test tool! The only problem we run up is to let Jenkins kick start the Sikuli test suite. Any one knows a solution for this?
Is this tutorial working with selenium 4?