


Dive deep into this comprehensive FireFlink review to explore all about FireFlink’s test automation capabilities. Analyze if FireFlink is the absolute solution to streamline your testing process:
FireFlink- an advanced, Extreme Test automation platform that empowers QA Automation and is an all-in-one solution with a simple interface that enables effortless automation for everyone (Note:) Dear QA Testers! Good news for you).
While exploring the diverse automation testing tools understanding the specific advantages, and limitations is also essential through a thorough review of the testing tools adopted in an organization so that the organizations can identify the most & ‘Go-to’ tool to enhance their testing strategy and meet quality assurance objectives efficiently when selecting the best tool for their project.
Table of Contents:
- FireFlink – A Perfect Scriptless(AI) Automation Tool
- Navigation Panel on FireFlink Platform
- Users Tab
- Roles Tab
- Licenses Section
- Analytics Section
- New Project
- FireFlink: Test Development
- Test Execution Section
- Integrations
- Mobile Automation Using FireFlink
- Web Services or API Testing on FireFlink Platform Through REST API
- Scriptless API Automation Testing Using FireFlink:
- Frequently Asked Questions
- Conclusion
FireFlink – A Perfect Scriptless(AI) Automation Tool

There are several test automation tools in the market. However, most tools only support testing for web, mobile, or desktop applications. Investing and maintaining multiple tools for testing web, mobile, API, or desktop applications complicates the testing process.
FireFlink platform offers unique benefits that enhance test coverage, streamline test scripting and debugging, boost productivity, and reduce testing costs. It also enables the automation of any application, be it web, Android, iOS, API, or desktop applications, without compatibility concerns.
- In comparison with other tools, you can gauge the learning curve from the images below.
- Supports multiple platforms.


FireFlink stands out by offering innovative solutions to frequent testing tool challenges:
- Hyper-automation allows for swift test script creation.
- Provides comprehensive testing capabilities across multiple platforms.
- Utilizes NLP for simplified test scripting.
- Features efficient management of test cases and scripts.
- FireFlink comes with pre-built integrations with popular tools for enhanced collaboration.
- The FireFlink Finder tool helps in identifying UI elements efficiently.
- Offers a customizable platform for tailored reporting and analytics.
- Reduces the need for programming knowledge, broadening user accessibility.
- It features an intuitive UI for straightforward report generation and analysis.
- Avoids strict indentation requirements, simplifying script development.
In summary, the FireFlink platform is a mother of AI tools in the Testing world and is a must-have test automation tool because it easily integrates with existing third-party tools, making it a flexible choice.
Unlike other testing tools with limited integrations, the FireFlink platform ensures organizations can maximize their investments while streamlining testing, reducing redundancy, and enhancing team collaboration.
Now, let’s dive into the details of the FireFlink platform.
Prerequisites: An account with FireFlink. (To sign up and purchase a license, please visit our official website if you do not have an account).
Note: The word ‘Platform’ refers to the ‘FireFlink automation tool’ throughout this documentation.
#1) How to Create Project: Projects Tab
Steps to navigate to the Projects Menu:
- Once the user has logged into the platform, they will see a project selection dropdown.
- The “All Projects” option will be displayed by default in the Project Selection dropdown.
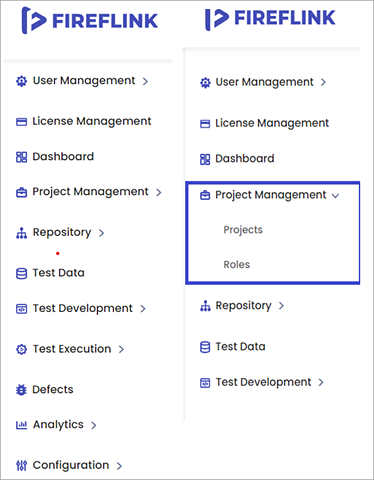
- Upon accessing the left navigation bar, the user will be directed to the Projects tab. From there, the FireFlink user can access three distinct sections: Projects, Users, and Roles, all under the All-Projects level.
The Project Menu’s purpose is to help create and modify project items, specifications, and structures.
Steps to Create a New Project -> Navigate to Home icon -> Projects Menu -> Projects tab
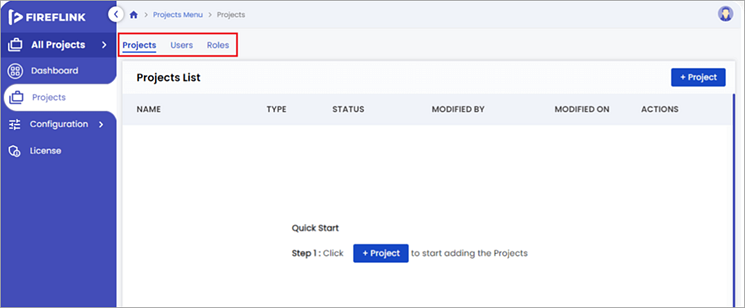
Create a Project: +Project button: The button labeled ‘+ Project’ is utilized for creating a new project. It is located in the top right corner of the screen. When clicked, a pop-up window titled “Create Project” is displayed.

In the above image, the “Project pop-up” comprises three fields – Name, Type, and Description.
1. Name: This field consists of the name of the project. It is a mandatory field.
2. Type: The type of the project can be selected from the dropdown. It is a mandatory field. FireFlink provides a variety of Project Type selections.
3. Description: The user can describe the project.
Likewise, different types of Automation Projects can be created by selecting the ‘Type’ field within Fireflink, i.e.,
- “Web Service” Project Type
- “Mobile” Project Type: Android, iOS, Android & iOS
- “Web & Mobile” Project Type
- “Salesforce” Project Type

#2) Project Levels in FireFlink
The projects section dedicates itself to multiple projects, i.e., “All-Projects & Individual Projects.”
- All Projects Level
- Individual project level
Reasons for 2 levels?
- All-Projects Level: All Projects lists are lists of different projects that can be managed under one platform.
- Individual Project Level: This is to manage the resources only within this particular project.
For example, the images for all projects and Individual projects are shown below, respectively
All-Projects view: Project Lists
The projects list is a tabular display that comprises six fields. Its purpose is to serve as a dashboard that provides a comprehensive overview of all the projects. (Name, Type, Status, Modified By, Modified On, Actions)


Individual project view: “SS-Training-Luma” is an Individual Web Project within the FireFlink platform.
After creating the new project, the left panel of UI changes and lands on ‘Test Development’.

#3) Project Status
Status displays the status of each project- Open, Closed, and Archived.
Open: As soon as the project has been created, the status of the Project will be Open. A user can change the status from Open to Close from the Edit Project option. (Users cannot Archive or Delete any projects that have Open status).
Closed: Only closed status projects can be archived. A user can Archive a project just by clicking on the “Move to Archive” option, which is available in the More icon under the Action Column. (Users can delete the closed Projects & may not delete open projects, so first close and then delete).
Archive: A closed Project can be archived, and the archived project is not seen under the Project Selection dropdown (The user can delete the Archived project, Once a closed project is archived, can be reopened but unable to recover if deleted the project).
We can also view the details of the project by hovering over 3 vertical dots & clicking on ‘Details’


Users Tab
Navigate to Home icon -> Projects Menu -> Users tab
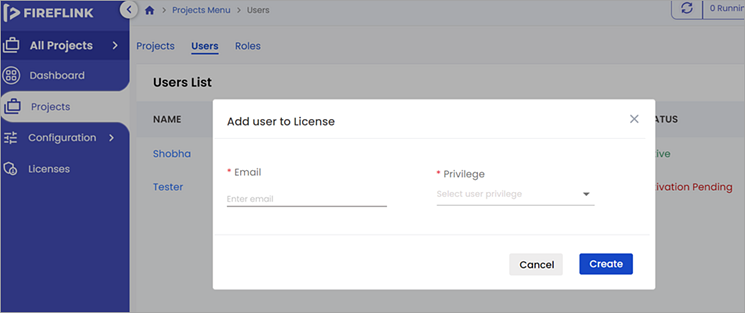
Over 1 team member can work on the same platform within the same project. “+User” CTA will add more team members to the projects with different privileges
User Privileges: These are the privileges on the FireFlink Platform: Super Admin, Admin & User. Maximum 2 Super Admins can be in a 1 project.
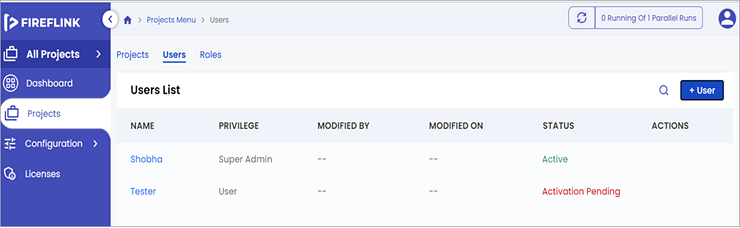
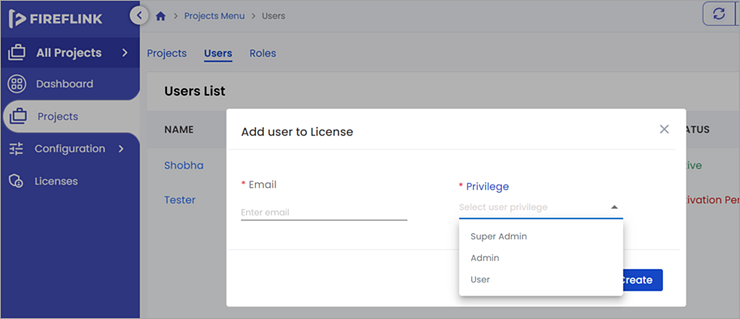
User Status
These are the user status on the FireFlink platform:
- Active
- Disabled
- Activation Pending
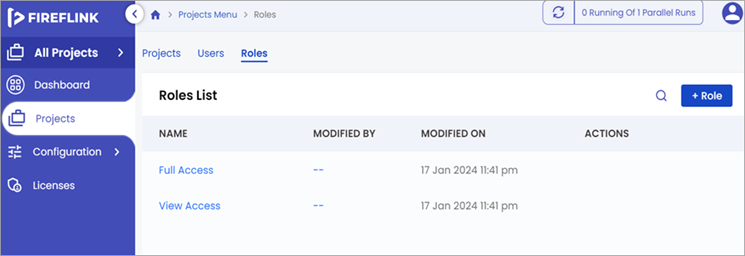
Roles Tab
Navigate to the Home icon -> Projects Menu -> Roles tab
Roles (User roles) tab is to control the access permissions.
This section allows users to manage roles by creating, editing, and deleting them from the various privilege options. When the user selects the Roles tab from the Projects menu, they will see a list of all available roles.
Roles created at the All Project level can be used at the Individual Project level. However, roles created at the Individual Project level cannot be used at All Project Levels.
Click on the +Role Button. Create Role Pop-up will be displayed.
- Fill in the Mandatory Fields – Name, Project Permission. The description is Non-Mandatory.
- Click on the Create Button.
- Created Role is displayed in the Role List

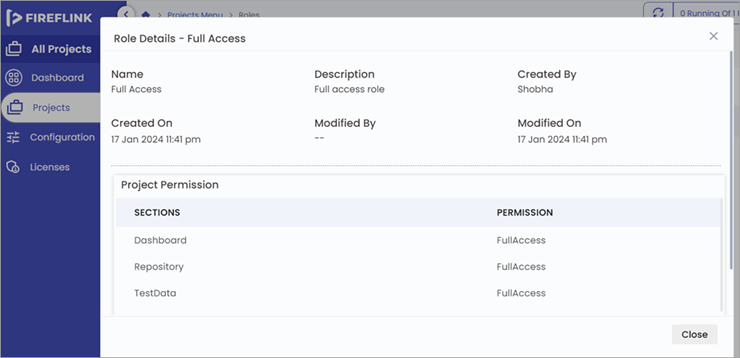
Name: Role name provided during role creation will be displayed.
Description: Description provided during role creation will be displayed.
Created by: The name of the user who created the Role will be displayed.
Created on: Date and time on which the project is created will be recorded.
Modified by: The name of the user who modified the Role will be displayed.
Modified on: Date and time on which changes are made will be displayed.
Project Permission: This table is displayed in which the user can see the provided accessibilities for each section.
Roles Lists
The roles list serves as a dashboard that summarizes all the roles and is presented in a table format with four fields, which are:
Name: Name of the role that is hyperlinked to the role details pop-up.
Modified by: The name of the user who has modified the project will be hyperlinked to user details.
Modified On: The modified time of the Role along with the date is recorded.
Actions: This field is not displayed automatically. The user has to hover the cursor over the particular user to see three options:
- Edit: All fields here are editable. Users can modify it according to their requirements.
- Delete: The user cannot delete the Role which is in use, i.e. which is assigned to any user.
- More: Users can utilize this functionality for utilities.
- Details: Role details are displayed.

Pre-defined access are:
- Full Access: For Team Leads, Senior QA
- Execute Access/View Access: For PO (Product Owners), Developers, New Joiners
We can create custom roles as well.
How to assign these roles to My Users
Roles section allows users to create, modify, and remove roles specific to the selected Project.
To assign roles, go inside the project created, Project Menu / Project on side menu /
Whenever we have created users, their privileges should be edited in the ‘All Projects’ level only. ‘All Projects’ level roles available at ‘All Projects. ‘Individual Project’ level roles are only for individual projects only, specifically for that project.
For example, if 3 users are there in a project, how will these users work on a specific project?
Firstly, the users should have an account on FireFlink/Register to the platform then the free trial license will be granted to them which allows them to access all the features available on FireFlink, although certain limitations apply. These limitations/restrictions include a maximum of 1 parallel run, a storage limit of 2 GB, a maximum of 3 active users per license, and a restriction on creating only 100 scripts.
Secondly, once registered need to sign in to the platform and switch to their respective unique license. provided, the respective project’s super admin had added that user then the respective project will be displayed under the user’s account under the user’s License section.

Licenses Section
For more information on Licence management, i.e., How to Buy a license, Upgrade & Renew license. please refer to the official website.

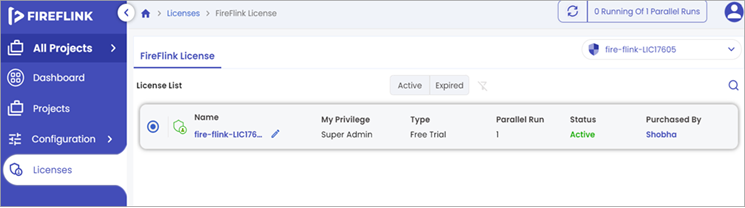
License Management:
FireFlink provides you with options to manage your licenses. Here you can perform actions like buying a new license, upgrading an existing license, and renewing the license.
Under License, we have three types of licenses:
- Free Trial License
- Cloud Professional
- On-Premise
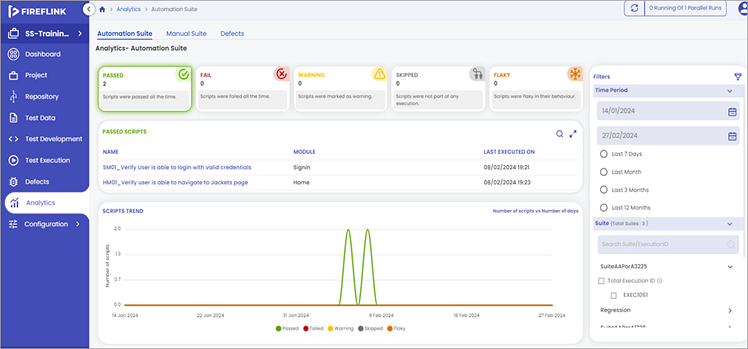
Analytics Section
Analytics is a powerful tool that provides a systematic and computational analysis of test suites or suite statistics within FireFlink.
It allows users to gain valuable insights and information about the automation suites created. By analyzing the data, users can uncover patterns, trends, and performance metrics related to their test suites. This information can assess the effectiveness of test automation, identify areas for improvement, and make data-driven decisions to optimize testing processes.
With analytics, users can gain a deeper understanding of their suite data and leverage it to enhance the overall quality and efficiency of their testing efforts.
Prerequisites: To generate an analytics view, it is important & necessary for the users to execute the test suites (both automation and manual) at least once. When the users execute the test suites, the system will automatically generate the analytics.
It is important to make sure that the test suites have been executed to obtain accurate and insightful analytics. By performing the execution, users can leverage the power of analytics to gain valuable insights and metrics that can drive informed decision-making and enhance their testing processes.
Analytics view of Automation Suite:
Analytics view of Manual Suite:

Analytics view of Defects:

New Project
Steps to set up a new project on the FIREFLINK platform:
Test Case Template:
Step 1: Log in to FIREFLINK
Step 2: Create a New Project (Manual Testing, Test case Template)
Step 3: Add a New Process (Project Modules, Suite, Run, etc)
Step 4: Record Actions- (How to capture the elements, Export)
Step 5: Enhance Actions (Optional).
Step 6: Save and Test.
Step 7: Schedule Automation (Optional).
Step 8: Save and Finish.
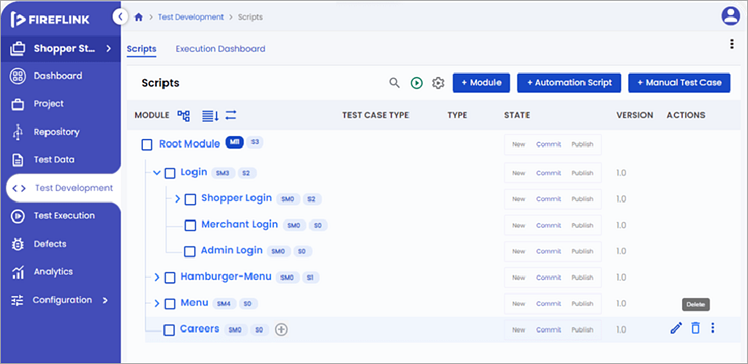
FireFlink: Test Development
[Converting Our Manual Test Cases to Automation Scripts]
Test Development in the FireFlink platform includes creating and developing tests of various software applications such as Web, Android, iOS, and Web services/API scripts and executing the tests with efficiency.
The main advantages of Test Development in FireFlink are:
- To maintain all scripts in one place and ensure a systematic approach in an organization.
- The process begins with creating a “Module” before creating individual scripts.
- A single module can contain multiple scripts and sub-modules.
- Sub-modules can further contain additional sub-modules and scripts.
- Within each script, NLP steps can be added using the steps page.
- Once all steps are added, the script can be executed by clicking on the “Run” icon.
Pre-requisite: The user first needs to create the project.
Navigation: Individual Project -> Left Navigation Panel -> Test Development
Modules within FireFlink:
Need of Modules?
Since FireFlink provides a highly maintainable testing approach, users are required to add a module before initiating the automation scripts development process. Users have the option/flexibility to include manual test cases.
- A module is like a container that contains many sub-modules and scripts in it.
- The user should create a ‘Module’ before creating the scripts.
- Users can create many modules in the “Test-Development” section.
- Also, it is mandatory to have the sub-module inside a module, the user can create scripts inside a module.

- Initially, before creating any of the Modules, only the “Root module” is present in the “Parent Module” dropdown.
- We can Edit, Delete, and Update these parent modules by hovering the mouse on a respective Module. (To do that, please follow the on-screen instructions).


- Before deleting, a ‘Warning message’ will be displayed.

Sub-module
A Module nested within another Module is called a “Sub-Module”.
A user has the flexibility to create multiple sub-modules within a module.
A sub-module can contain any number of modules and scripts.
The main purpose of the sub-module is to provide convenience in organizing the scripts so that users can easily identify and group them for better management.
Although the Sub-module creation is not mandatory, it is mandatory to create a “Module” before creating the “Sub-Module”.


Cloning a Sub-Module
FireFlink offers to clone the sub-modules by clicking on the More icon present under the ‘Action’ Column of a Sub-Module row. We get the Clone option. The cloned sub-module will be named “Sub-Reg Module – Copy” as shown below.

Icons available within Test Development:
- Expand All
- Collapse All
- Show all Scripts
(a) About NLP(Natural Language Processing)
(b) Fireflink Client (Not Required for Manual Testing)
(c) Concepts of Variables
(d) Types of NLPs
(e) Elements and NLPs are different
(f) How to Create Automation Scripts (Web application)
- Brief intro on Mobile(Android & iOS) application
- Brief intro on Web service/API application
- Repository
- Fireflink Client
- Control Panel & Ports
- How do you create a Step Group in FireFlink
- Nested Test Group
- Levels of Run (ie, Different types of Execution)
- Pre-Post Conditions (Script level, Module level, Root module level)
(g) Synchronization
Brief notes on how to achieve Synchronisation
- Static Wait
- Implicit Wait
- Explicit wait
(h) Configuration
- How many Platforms Fireflink supports
- Dependencies
- Parametrized StepGroup (static & dynamic)
(i) Dataprovider/ Data Driven Testing
- DataProvider.xlsx
- Conditional statements
- Negative Scenarios
**End of Test Development Section**
Test Execution Section
#1) For Regression purposes, we mainly go for an Automation
- Regression Suite under Test Execution (Private & Public Access)
- Tagging
#2) Different ways to run our Suites
- On Demand
- On Schedule
- Poll SCM(Source Code Management)
===***===End of Test Execution==***==
#3) How to raise defects for Automation Suite
#4) Analytics
#5) Configuration
Integrations
#1) Cloud Platforms
- Browserstack
- SauceLabs
- Lamda test
#2) Defect Management Tools
- JIRA
- GitLab
- GitHub
Suggested Read =>> Bugzilla Tutorial: Defect Management Tool
- Slack
Mobile Automation Using FireFlink
#1) Types of Applications Explained
- Standalone
- Client-Server application
- Web Application
Types of Client Applications
- Native App
- Web App
- Hybrid App
#2) Android Studio
- ADB
- Virtual Device
- Apk
#3) url-usage:
- App Package
- App Activity
#4) Suite creation for Mobile Automation
- Single Thread Multi-Channel
- Appium Inspector,
- Fireflink
Web Services or API Testing on FireFlink Platform Through REST API

Application Programming Interfaces (APIs) allow users to access digital resources, such as data, content, algorithms, and media through web URLs. REST stands for Representational State Transfer.
A REST API is also known as a RESTful API or RESTful web API. It is an application programming interface (API) that complies with the design principles of the representational state transfer (REST) architectural style.
A representation of the request’s status is transmitted from the server to the client when a RESTful API is used.
Note: ‘FireFlink Client’ is not required for Manual testing. Needs to launch it for Automating the Scripts.
Scriptless API Automation Testing Using FireFlink:
By saving an API request as a test step, FireFlink adds an automation test step directly into the existing automation test script.
Some advantages of using FireFlink for Webservices (or API testing) are:
- Mapping Manual test cases to Automation test scripts.
- Simplified UI to configure Test Data, Pre-Post Conditions, and dependencies.
- Single Script can contain or is capable of performing both UI and API tests.
- Script and Suite level Results analysis can be done with platform-wise stability reports.
- API-based Automation Scripts to Optimize Test Execution.
- Multiple alternatives for users for faster Suite Execution.
(a) Examples
For testing Webservices or APIs on the FireFlink platform used are: Swagger Docs and ShoppersStack
(b) Auto steps
We have just 1 NLP and no list of NLPs for Webservices /APIs. Come to “Webservice tab” on FireFlink platform.
(1) Create Project, Module (ex: ‘Pet’ API), Scripts, come to Web Service, Query Parameter, Header (ex-Cache, Content-type), Authorization (To get access to Backend /databases we need auth), Response Body, Response Header and status code
(2) Assert: Used for Validation in FireFlink.
Example:
JSON Object: Id.Name
Assert results in Fireflink: ResponseBody. Category. Name
(c) POST, GET, PUT, DELETE
Tool allows to create of detailed test cases, including setting up different request methods (GET, POST, PUT, DELETE), and adding headers, parameters, and payloads. You can also save and organize test cases for easy reuse.
(d) Automating Scripts/Automating the Steps (POST, GET, PUT, DELETE)
(e) Config Checks: Select the Right Machine & Run
(f) Test Execution: Auto on Schedule or manually.
Automating POST, GET, PUT, and DELETE steps using Fireflink ensures consistent API behavior and helps catch issues early in the development life cycle. This automation minimizes the manual effort, speeds up testing enhances the overall reliability of your API testing.
Automating POST, GET, PUT, and DELETE methods involves setting up of series of test cases that can be executed automatically to verify the functionality of HTTP methods.
Step-by-Step guide to automating these steps using FireFlink or any other similar API testing tool:
#1) Setting up the environment: Start by creating New Project or test suite on FireFlink, which will organize all your API tests in one place, then Define Base URL.
#2) Automating POST request: Create POST method endpoint where you want to create a resource. Add Assertions, and make sure the response status code is ‘201 created’. Then Automating/Schedule this POST request to run automatically at certain interval.
#3) Automating GET Request: Create GET method endpoint to retrieve the data and add necessary query parameters. Add assertions, and make sure the response status code is ‘200 OK’. Then Automating/Schedule GET method request after POST method request to verify the newly created data can be retrieved.
#4)Automating PUT request: Create a PUT method request to update existing data, add headers, and include updating data in the request body.
Add Assertions, and make sure the response status code is ‘200 OK’ or ‘204 No content’. Validate that the data was updated correctly by checking the response body. Then chain the PUT method after GET method request so that can be made sure data is updated after it is been retrieved.
#5) Automating DELETE request: Create DELETE method endpoint to delete the data and add necessary headers. Add assertions, make sure the status code response is ‘200 OK’ or ‘204 No Content’. Also validate data is no longer exists by performing GET request and expecting the response status code ‘404 Not Found’.
#6) Chaining the requests together: In FireFlink we can chain these requests methods together to run in sequence. For example, start with POST, followed by GET endpoint, then PUT method endpoint, and lastly the DELETE requests.
Adding Dependencies, make sure that each request can use the data from the previous request like using the ID of created data from POST request in subsequent GET, PUT, and DELETE requests.
#7) Running Automated Test Suite: ToExecute Automatically, set up the test suite to run automatically on schedule (ex: Daily or for each code commit)or manually trigger when required.
Then Monitor the Reports by reviewing the automated test results in FireFlink’ s reporting dashboard. If any tests fails, investigate the cause and adjust the API tests as required. Also, the same test suite can be utilized for Smoke testing schedules.
#8) Integrating with CI/CD Pipeline: Linking FireFlink with CI/CD tools like Jenkins, GitLab CI(also BrowserStack and SuaceLabs ) to run these API tests automatically during build and deployment stages.
Additional Tips:
- Notifications: FIREFLINK can inform you by employing e-mail or Slack when your automation runs.
- Monitoring: Check the control panel for logs along with analytics on your automation.
- Error Handling: Set up error handling in situations where something fails throughout automation.
Frequently Asked Questions
1. What is FireFlink in testing?
FireFlink is a high-speed test automation platform, which is the future of agile software testing. It is a revolutionary advancement in the testing industry because it is a scriptless, end-to-end test automation platform for Web, Android, iOS, and API tests.
2. How to download the FireFlink client?
Follow this process: Click on the “Download Client” button in the right corner. Select an Operating system (Windows, Mac, Linux) and click on the “Download Client” button. FireFlink Client file should be downloaded on the user’s local machine.
3. What is NLP in FireFlink?
NLP stands for Natural Language Processing, which is in simple English words we can define the scripts and FireFlink already has many built-in NLPs using which we can craft our automation scripts/suites.
4. How many manual suites can be created in FireFlink?
1. Automation Suite
2. Manual suite
5. Does the FireFlink platform support defect tracking?
Yes. FireFlink Offers everything, one-stop/end-to-end solutions from Automation script development, Manual test case management, and defect tracking under one roof.
6. Is it possible to write the automation scripts in FireFlink to an existing manual test case?
Yes, it is possible. You can check here for creating automation test scripts.
For more information please refer official FireFlink documentation.
Refer to this video to understand how to write test cases in FireFlink:
Conclusion
FireFlink represents a paradigm shift in the realm of automation tools. By prioritizing ease of use, scalability, and integration capabilities, it empowers organizations to embrace automation fully.
Whether it’s accelerating testing cycles, improving software quality, or automating critical business workflows, FireFlink stands as a versatile and powerful solution in the hands of both technical and non-technical users.
In the ever-evolving landscape of software development and testing, FireFlink lights the way to efficient, scriptless automation.
This introduction summarizes FireFlink, highlighting its key features, advantages, and use cases. Further exploration into each feature and use case can provide deeper insights into the tool’s capabilities and benefits.
Was this helpful?
Recommended Reading
-

This article will provide a detailed overview of the automation testing process—a comprehensive, step-by-step manual for commencing automation testing on your project. In many organizations, quality is the first preference. If you find yourself in such an organization and formal test automation has not been done yet, you could be…
-
This article reviews and compares the top Accounts Payable AP Automation Software to help you choose the best AP Automation tool: Accounts Payable is the amount an organization owes to its vendors or suppliers for the goods and services it receives from them. Thus, it is vital for the smooth…
-

Comparison of the top ETL automation testing tools to provide your enterprise with accurate verification and data transformation acceleration: ETL, which stands for Extract, Transform, and Load, is an integral data warehousing process that allows businesses to aggregate data from multiple sources to be stored in a central repository. The…
-
IT Automation Software is an application that has functionalities to develop, manage, and monitor automated processes for IT enterprises. Because IT processes are scattered across multiple environments, tools, and technologies, this is a difficult task to manage. IT Automation Tools will help you manage them easily. Process automation software is…
-
Review and compare the top Record to Report Automation Software for businesses to get better control over the complete financial close process: Organizations today face a lot of pressure with financial close and reporting processes. This can be attributed to the stricter regulations that many businesses today must comply with.…
-
Select the best AP & Invoice Automation software by reviewing and comparing the top tools for AP & Invoice Automation for Dynamics: AP or Accounts Payable is the money that a business enterprise owes to its suppliers. Most businesses appoint a team of professionals to look after the accounts payable…
-
Comparison of the Best RPA (Robotic Process Automation) Tools in the market: In any organization, there are a lot of tasks that are repetitive and time-consuming in nature. While doing these types of tasks, there is always a huge possibility for error occurrence because of repetition. Hence, in order to…
-
Here is the review and list of top Financial Close Automation Software, along with a comparison, to perform the financial close process: A financial close is a recurring accounting management process with the help of which accounting teams adjust and verify account balances at the end of a designated period.…


