


Here is the Ranorex Studio Hands-on Tutorial #1 (Click here for Tutorial #2).
Ranorex Studio is a powerful test automation tool for everyone, including non-coders, to record automation tests step-by-step for desktop, web and mobile applications.
Maintaining software quality is an important goal for any software system. In today’s world, everything is expected to be fast and efficient enough. The time crunch is seen almost everywhere. In such cases, manual testing does not seem to yield sufficient results, this is where test automation comes into the picture.
Table of Contents:
Ranorex Tutorial

Test automation is considered to be an important solution. There are hundreds of tools available in the market to automate test cases. Depending on the requirements of a software product, the tools need to be chosen accordingly. Ranorex Studio is one such automation tool.
Overview
Ranorex Studio is a very powerful tool to automate tests for web applications, as well as standalone and mobile applications.
It is simple enough to use that even non-coders will be able to create tests without hurdles.
It supports all technologies (.Net, Java, Flex, HTML) and can be used for different browsers (IE, Chrome, Firefox) and mobile applications (Android, iOS).
The main component of this tool is Ranorex Studio, which includes the Ranorex Recorder, object repository, Ranorex Spy, code editor, and debugger in a single environment.
In this tutorial, we will cover the most important topics which include Ranorex License, Studio, Recorder, Spy, Repository, Creating the First Project, Creating a Recording Module, and Executing the Test.
Let’s take a look at each of them in detail.
System Settings and Ranorex License
Before starting to work with Ranorex, we need to download and install the tool on our machine. A trial version of the tool is always available on the website.
One needs to register on the official website with a business email id. A link to download and install the trial version will be sent to the registered business email id. If a business email id is not available, then you should contact the sales team and they will help you in downloading the trial version.

[Figure 1]
However, in order to make use of all the features of Ranorex Studio beyond 30 days, one needs to buy the license. Ranorex offers two types of premium licenses:
- Node locked
- Floating
Both the licenses all have the same features except that a floating license can be shared by more than one user and also be used on virtual environments (Virtual machines and terminal servers).
There’s also an addition to the Premium license, called the Runtime license. This allows a user to run tests on more than one machine at a time using the same license.
The system settings for this tool are very simple and the user need not worry much about the necessary components because the Ranorex Studio package itself installs most of the software required for its working. The wizard to install the tool is very simple and easy to understand. One just has to follow the step-wise instructions in the wizard.
This tool supports almost all Windows operating systems, both 32-bit and 64-bit editions.
Ranorex Studio
Once the tool is launched, it will automatically open Ranorex Studio.
It looks as below:

[Figure 2]
The studio offers three views:
- Project View
- Module View
- File View
To put it in simple terms:
Project view displays all the files of a current project.
Module view displays all the modules of the current Project.
Fileview offers a variety of operations in the open file.
You will see them in detail while we proceed further.
Ranorex Recorder
Like every other test automation tool, this tool allows the user to record test steps as actions on the application under test and then play it back later. The recorded steps can also be modified and fine-tuned. The recordings can be maintained with the help of the Ranorex object repository.

[Figure 3]

[Figure 4]
The Ranorex editor helps in fine-tuning the test steps recorded based on object recognition.
Ranorex Spy
Every test automation tool needs to have an object recognition tool. Object recognition is a process of identifying the objects (here UI elements) on the screen.
One of the prime parameters that defines how good an automation tool is based on its object recognition property and how well it interacts with the object under test. For the same purpose, this tool is having has Ranorex Spy which recognizes the UI elements of the object under test. It gives a hierarchical representation of the element.

[Figure 5]
The spy is easy to use and displays the XPath of the UI element. Ranorex XPath is similar to expressions. It has many parameters like adapters, attributes, and values. The adapter says what kind of application it is. Attributes and values identify the element type.
<adapter>[@<attribute>=<value>]
/Button[@controlname=’Enter’]
It is also possible to identify a specific type of control or element by changing the XPath. “or” and “and” conjunction can be used in XPath to zero down a particular element.
For Example, identifying all the buttons with the text “Enter” can be done by the below mentioned path.
/form[@controlName=’FirstForm’]//Button[@text=’Enter’]
The above path will highlight all the buttons with the text “Enter” in the form “FirstForm”.
Ranorex Repository
The Ranorex repository creates logical mapping of UI elements. All UI elements of the application under testing can be found in this repository. The repository is automatically created for each test project. This is represented by the .rxrep file.
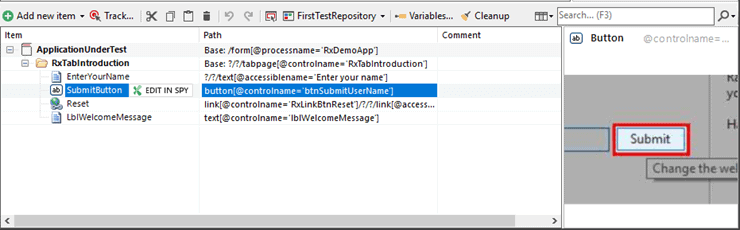
[Figure 6]
The repository has two columns: Item and Path. Item is the UI element of the application and Path is the logical mapping of the UI element. These repository elements can also be used within the code file and recordings. Since each repository automatically generates a .Net source code file, the objects can be used easily to test automation code.
Creating the First Project
As we have seen about the different features that this tool offers, let’s start creating a test project. As soon as we install and launch Ranorex, the home page looks something like the one below.
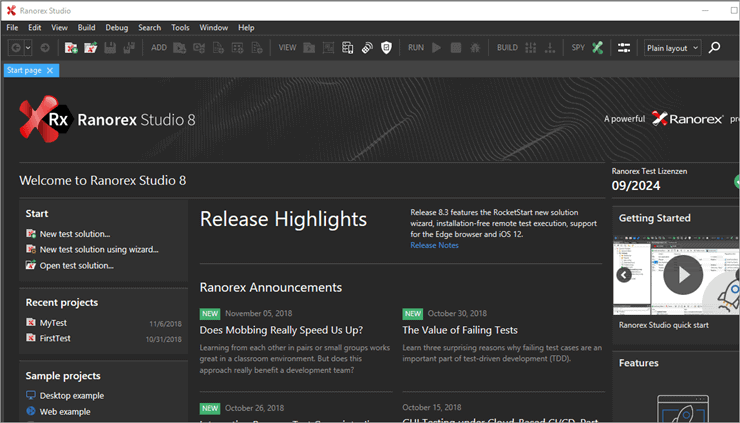
[Figure 7]
All the latest updates about this tool and other information will be available there.
We can start the new solution by either clicking on the “New Test Solution” under Start on the page shown above or “New test solution using the wizard.” It is highly recommended that first-time users choose the “wizard” option.
New Solution Steps:
- Click on “New test solution using wizard…”
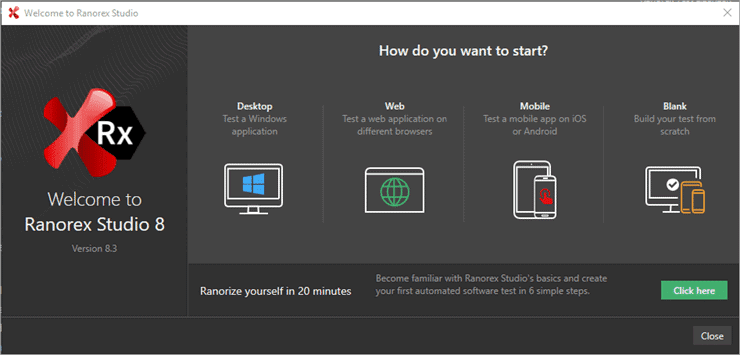
[Figure 8]
- Choose Desktop, Web, or Mobile depending on your application. Choose “Blank” for a cross-platform application.

[Figure 9]
- Enter a name for the test solution and choose the appropriate path to save the solution files.
- Click the arrow to display additional options. The project name defaults to the solution name.
- Choose C# or VB.Net depending upon the test automation language that you prefer.
- Click Create directory for a solution to create a directory in the folder that you entered above.
- Click Add solution to source control if you wish to use a source control tool such as Git, Subversion, or TFS.
- Click Continue.
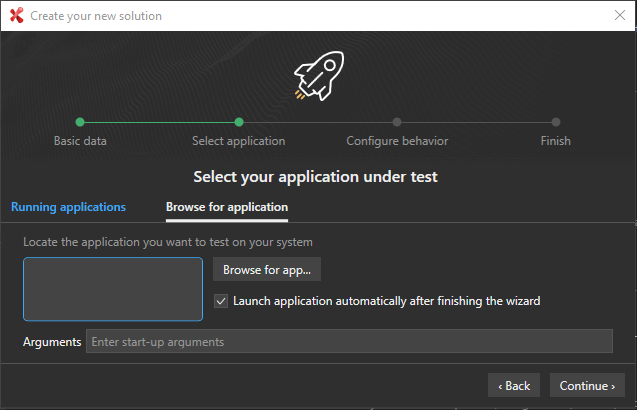
[Figure 10]
- Choose your application under test from the list of running applications. Or, if your AUT isn’t running, choose “Browse for application” to find the executable. Notice the checkbox to launch the AUT automatically after the wizard finishes.
[Figure 11]
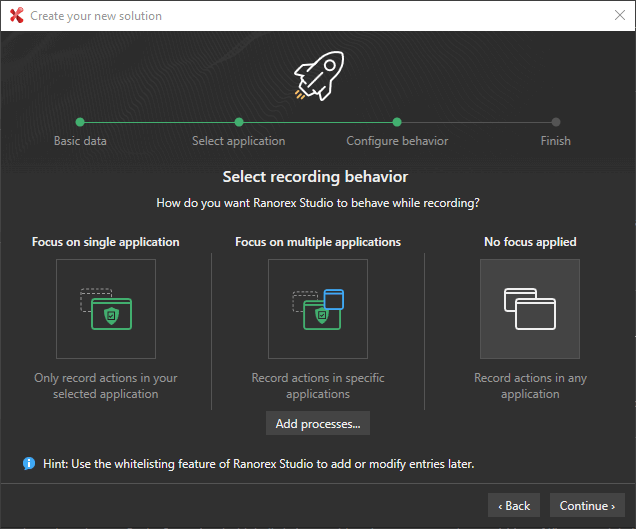
- You can now configure the whitelisting process. Choose “focus on single application” if you want Ranorex Studio to interact with just your AUT. Choose “focus on multiple applications” to interact with the AUT and additional processes that you select. Choose “no focus applied” Ranorex Studio to interact with all running processes.
- Click continue. Once the solution is created, the project view, module view, and file view (test suite) windows are displayed.
[Figure 12]
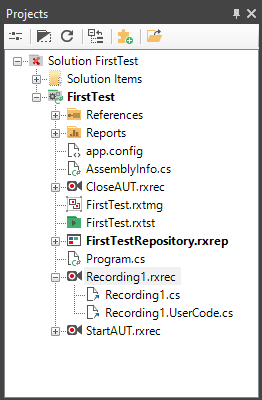
A few observations from the above snapshot:
If you observe the project view, there are many files that are already created by default.
- A Ranorex project has been identified by extension.rxtst.
- “Recording1.rxrec” is the recording file in which all the actions can be added.
- “FirstProjectRepository.rxrep” is the Ranorex repository file which is a logical representation of all the UI elements of an object under test.
- The recording file will usually have two files under it, the .cs file and.UserCode.cs file.
- A user code file is usually used when the features provided by the recording module are not enough.
- .cs file cannot be modified by the user, even if done, it will be rewritten by Ranorex in the next run
- The test suite view already has a Recording1 module. You can start recording by simply clicking on that module.
Creating a Recording Module
Given below are the steps involved in creating a recording module:
- Make sure your AUT is running!
- Double click on the Recording1 module file
- A new tab opens in the test suite in the test suite view.
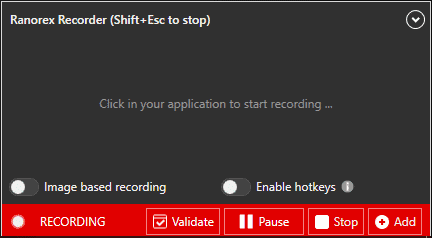
- Click on the Record button to start recording. Ranorex Studio minimizes the taskbar and the Recorder Controls appear.
[Figure 13]
- Perform test actions by clicking on the UI elements. Once all the actions are performed, click on the Stop button in the recorder.
- The recording module will now be populated with the actions performed.

[Figure 14]
- A range of options are available to modify each step. It can be done just by right-clicking on that particular step.

[Figure 15]
Each step is represented in the Action table and each of them is connected to a repository item. The repository item represents a unique UI element. There is also a Comment Column in the recording module. Any comments that we want to add can be written here and that will be reflected in the Report. Comments can be added at every step.
In the recording module, there is a whole range of menu options like Cut, Copy, Delete, Undo, Redo, etc. Also, if you want to reorder the steps, you can easily do this by selecting that particular step and clicking on the Move up or Move down buttons in the Menu.

[Figure 16]
Executing the Test
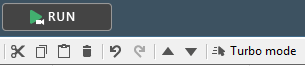
To play the test, just click on the Run button in the test suite view. After clicking on Run, the tool will start building all the assemblies and the test solution. This is followed by the sequential execution of all the recorded steps.
![]()
[Figure 17]
Note: Turbo Mode: There is a button called Turbo Mode in the test suite view. Once this is enabled, it skips all delays between test steps unless a delay is being explicitly added. This mode is there to speed up the test execution. But there are drawbacks to this model.
Sometimes, skipping delays can cause problems, for instance when a test has to wait until a window is opened or if a window takes some time to pop up. In these cases, manual entry of delays may be required.
[Figure 18]
Conclusion
All the basic components of Ranorex have been explained in detail in this tutorial. Once these areas are understood clearly, then automating test cases becomes very easy.
To Summarize, below are a few points:
- Ranorex Studio is a licensed tool for automating test cases for web applications and standalone and mobile applications.
- This tool supports all technologies like .Net, Java, HTML, etc.
- The Ranorex Studio workspace encompasses all the other components.
- Ranorex Spy is an object recognition tool that identifies the hierarchy of UI elements.
- Ranorex Recorder allows the recording of test steps and replaying the same.
- The repository will have all the UI elements and their unique logical path.
Ranorex Tutorial #2: In the upcoming tutorial, we will look into the details of the usage of UserCode files, test cases & test modules, understand Ranorex Report, ways to edit XPath, and integration of Ranorex with Visual Studio.
We would love to hear from you. Please leave your feedback/queries in the comment section below.
Was this helpful?
Recommended Reading
-

Katalon Studio is a wonderful free tool for test automation. We have provided a detailed Katalon Studio tutorial for your benefit: Test Automation is one area where there is always a constant quest for betterment, simplicity, robustness and ease of use. Some tools can help create robust, light and maintainable…
-
Learn Sikuli automation step by step. Explore Sikuli, image-based GUI testing, commands, practical uses and examples, installation and limitations. Sikuli is a visual image-based GUI automation software that automates the application through visual recognition of objects on the screen. It comes in handy for automation of desktop applications and interfaces…
-

An in-depth look at Appium Studio for Eclipse: This tutorial is a part of our Appium Studio tutorial series. Perform end-to-end Appium/Selenium test automation directly from within the Eclipse and Easily develop, automate, analyze and debug your tests on physical devices and browsers. Here is a Video tutorial: Overview of…
-
Rational Robot is an automated functional, regression testing tool for automating Windows, Java, IE and ERP applications under windows platform. This article should be a good start for those who wants to learn Rational Robot test automation tool. Read on for Rational robot tutorial with trial version download and resources.


Imperative! Some of the points are really explained well in detail manner. It have many components like Ranorex studio, Ranorex spy, Ranorex recorder: these all components and its features are firming under the completely integrated test environment.
Hi Thank you for considering my request to cover Ranorex tutorials.
This is really helpful.
Hi ,i am Akash Raval,
i have some Question regarding Ranorex studio. soon as possible reply
Thanks for the tutorial. This is very helpful, I am supposed to learn Ranorex in a week for a new project. and this definitely gives a good start.
Thank you very helpful in my project. I am currently using Ranorex tool in my project.
Thanks for sharing this. This shows that, in future we will have many options to build automation scripts other than selenium which requires descent knowledge of coding.
Thanks for sharing?.
How to use python in Ranorex studio
Thanks for your inputs … this is really helpful but can you please share more details on windows Desktop based automation through Ranorex . Thanks again..!!!
how can some one get live training
when the updated or the next part of the tutorial will come?
(Ranorex Tutorial #2: In the upcoming tutorial, we will see in detail about the usage of UserCode file, test cases & test modules, understand Ranorex Report, ways to edit Xpath and Integration of Ranorex with the Visual Studio.)
Hey Team, Thanks for uploading this tutorial, It will really helps me , as I’m new for Ranorex automation. My new company is using Ranorex tool. So, I’m so Thankful to you.
In Ranorex studio how we do google login whem we do mobile app testing