


Discover how to automate mobile applications using the Selendroid Test Framework tool along with simple examples. Also, understand the process to automate user interactions over Android:
Until now, millions of apps have already been developed using Android as a platform, and the count still keeps on increasing day by day.
The catch is, how do we validate every app? As we will be requiring dedicated resources such as manpower and real devices (say, e.g. mobile), etc., again, it is a time-consuming task. On the other hand, the Android version, application (.apk) version, device dimension, etc., are not consistent.
Hence, it becomes very difficult to define test exit criteria as we cannot define the complete testing scope, thereby exact testing effort estimation cannot be done.
Table of Contents:
Automate Mobile Applications Using Selendroid Test Framework Tool

To overcome the device dependency, emulators are being developed, which can provide a real-time environment where we can test the application without worrying about the Android version, devices, and their versions. Still testing applications (.apk) over an emulator is a manual activity and a time-consuming task. Hence, the idea of automating mobile testing is evolving.
To perform mobile automation, a test automation framework is developed, which enables the automation of Android-based applications by using a scripting language.
There are many automation frameworks developed, such as Selendroid, Appium, Robotium, and Espresso.
What is Selendroid?
Selendroid is an amazing Android mobile application test automation framework tool with several important features. Selendroid is a very powerful automation tool that can interact with multiple devices simultaneously and an application can be tested without any modification or change using Selendroid.
It is also called “Selenium for Android” for testing native and hybrid mobile apps and mobile web.
Why Selendroid?
- It is open-source (free to use)
- Supports Selenium as a scripting language
- Supports web driver compatible languages such as Java, C#, Perl
- Supports all Android Versions
- Works on both an emulator as well as a real device
- Works on native, hybrid, and web-based applications
- Effective while executing native applications as well as cloud-based applications, as it supports Selenium Grid
- It supports object recognition using object properties
- Easy to implement
- Hardware devices can be plugged in and unplugged from the PC during test execution without restarting or stopping the test. Selendroid will recognize the new devices automatically. This feature is known as “Hotplugging”
Simple Architecture of Selendroids
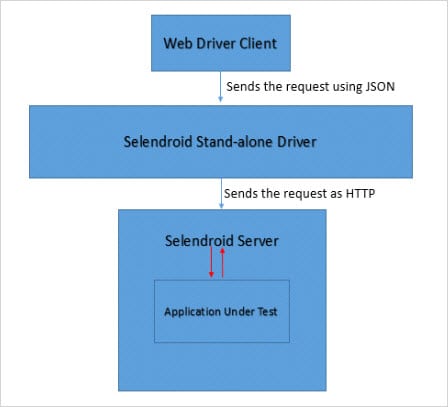
Selendroid Components
Selendroid – Client
Basically, it is a java client library. From this component, the HTTP & WebDriver request is being sent using JSON to the Selendroid Standalone server.
Selendroid – Standalone
This component manages different devices as well as the .apk’s by installing the Selendroid-server and the app under test. Http requests (to be executed over a real device/simulator) are being sent from the Selendroid standalone server to the device and the apk is under test.
Selendroid – Server
This server runs on the device along with the application under test. There is a two-way communication between the server as well as the application under test.
AndroidDriverApp
It is a built-in Android driver as well as a Web View app to test the mobile web.
Another test framework called APPIUM works similar to Selendroid.
Here is a small comparison between them.
| Feature | Selendroid | Appium |
|---|---|---|
| Support for Lower android version(<4.1) | Yes | No |
| Hot plugging | Yes | No |
| User Agent Testing | No | Yes |
| Support for iOS based application | No | Yes |
| Environmental Requirement | For Android – Mac, Linux, Windows(any version) | For iOS – Mac OSX 107. For Android – Windows 7+, Linux, Mac OSX 107. |
Pre-requisites:
To start with, the Intended audience should be very well aware of the use of selenium, any IDE tools such as Eclipse etc. Basic concepts of programming include Java, C etc, and must be aware of using Maven and other TESTING tools.
- Install Intel x86 Emulator Accelerator (not mandatory) to view the simulator from here
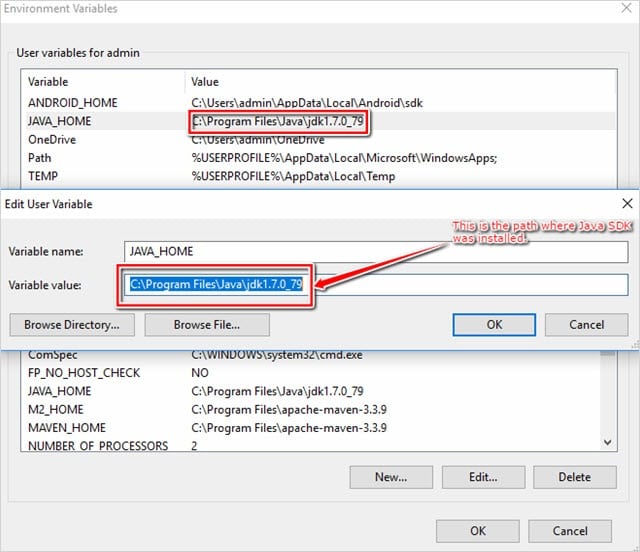
- Java SDK and JRE are already installed in a test environment. Alternately, you can download the same from here
Note down the SDK Path while installing.
Set the environmental variables present over My Computer -> right click it -> Properties -> Advance System Setting
- Eclipse is already installed on your machine. If not, you can also download the same from here
- Selenium jar files are to be downloaded. You can download the same from here as well
- TestNG jars are already downloaded
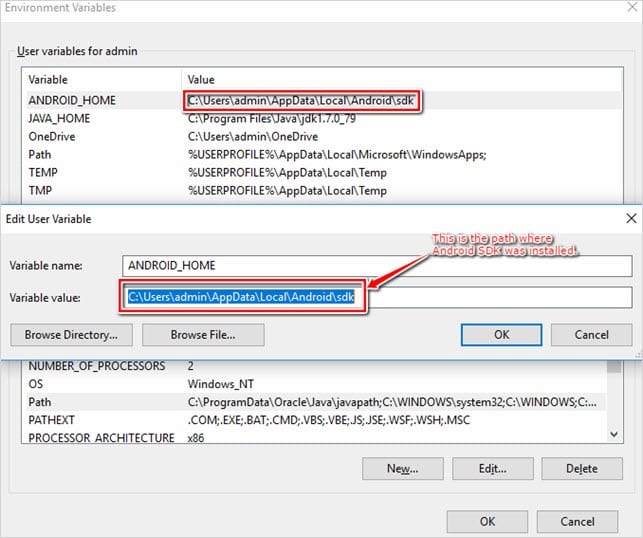
- Android SDK to be downloaded and installed. You can also download the same from here
Note down Android SDK Path while installing
Once downloaded the ANDROID_HOME should be set to the environmental variables present over:
My Computer -> right click it -> Properties -> Advance System Setting
- Selendroid jar files are to be downloaded. You can also download the same from here
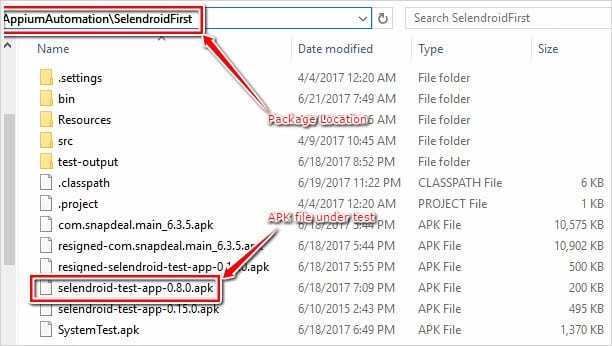
Remember to download the Selendroid standalone jar file from the above location. Usually, the name is like selendroid-standalone-0.9.0-with-dependencies.jar. Also, download one sample APK file, say selendroid-test-app-0.8.0.apk, from the above location
Note:
- We can also use Maven repository to give reference to all the jars, or else you have to download them manually and attach them to the build path (Over Eclipse Project)
- Devices/Emulators – In Android, all the installed applications will have the .apk extension. There are other ways you can download apps, such as APK Info, which will inform you about the list of applications installed on your Android device and their actual names, size, etc.
Environmental Setup
#1) Keep the APK that needs to be installed in the proper location
In my case, I kept it over G:\\Jars\\selendroid-test-app-0.8.0.apk
#2) Next, keep the application open in the project folder
In my case, it is D:\AppiumAutomation\SelendroidFirst
#3) Connect the real device to the PC
Make sure the USB Debugging mode is enabled, and you are also allowing external apps to get installed through the USB connection.
Tips:
- Please refer to the USB debugging settings required for the mobile, say Redmi Note 3, from here
- Allow external applications installed using USB, say Redmi Note 3 from here
#4) Open the command prompt on Windows
Navigate to the folder where the Selendroid standalone jar, as well as the downloaded apk file, is present.
Now specify a similar command and press Enter in the command prompt
E.g. java –jar selendroid-standalone-0.15.0-with-dependencies.jar -aut selendroid-test-app-0.8.0.apk
Or java –jar selendroid-standalone-0.15.0-with-dependencies.jar
APK File: selendroid-test-app-0.8.0.apk
Note: When the above command is executed, make sure that the APK is signed and also the real device is connected to the PC and debugging is enabled over the device.

Check the following points over the command prompt to make sure the environment is ready for automation:
- Verify for the message “Device Specified with the valid number”
- Verify for message “server is started in default port, say (4444)…”
- Verify for message “Session being created…”
Again, we can always reconfirm whether a server is started or not using the following URL over any of your web browsers.
e.g. http://localhost:4444/wd/hub/status

#5) Inspecting the APKs
- You can use Real Apps by connecting real mobile devices
- You can use any offline APK files downloaded
Selendroid Inspector is useful in debugging/inspecting the web elements of an APK.
Once the device is identified and started, we can view the APK (in virtual mode) and find the references, which is useful for writing the scripts, using the following URL over any of your web browsers.
E.g: http://localhost:4444/inspector
Here we have the screenshot of the application under test and we have the facility to inspect the element as well.
Or you can always use uiautomatorviewer to find the objects from the application under test.
The default path for this is mentioned below:
C:\Users\admin\android-sdks\tools
C:\Users\admin – This is the location where I have installed Android SDK’s but it can be different as per the location specified during its installation.

Writing First Script Using APK Files Over Real Devices
Objective:
- Start the server (on default port say 4444)
- Create a session
- Install the app (.apk file) over the connected real device
- Automate the text field with some data
- Automatically click on the button
package SelendroidFirst;
import io.selendroid.client.SelendroidDriver;
import org.apache.http.HttpResponse;
import org.apache.http.client.HttpClient;
import org.apache.http.client.methods.HttpGet;
import org.apache.http.impl.client.HttpClientBuilder;
import io.selendroid.common.SelendroidCapabilities;
import io.selendroid.common.device.DeviceTargetPlatform;
import io.selendroid.standalone.SelendroidConfiguration;
import io.selendroid.standalone.SelendroidLauncher;
import org.openqa.selenium.By;
import org.openqa.selenium.WebDriver;
import org.openqa.selenium.WebElement;
import org.testng.annotations.AfterSuite;
import org.testng.annotations.BeforeSuite;
import org.testng.annotations.Test;
import java.net.MalformedURLException;
import java.net.URL;
import org.openqa.selenium.remote.*;
import static org.openqa.selenium.remote.CapabilityType.BROWSER_NAME;
import static org.openqa.selenium.remote.CapabilityType.PLATFORM;
import static org.openqa.selenium.remote.CapabilityType.VERSION;
public class RealDevices{

public SelendroidLauncher selendroidServer = null;
public WebDriver driver = null;
public void conf() throws Exception
{
//**Configuration**//
SelendroidConfiguration config = new SelendroidConfiguration();
config.addSupportedApp("G:\\Jars\\selendroid-test-app-0.8.0.apk");
SelendroidLauncher selendroidServer = new SelendroidLauncher(config);
selendroidServer.launchSelendroid();

//**Creating capabilities**//
SelendroidCapabilities sc = new SelendroidCapabilities(); sc.setAut("io.selendroid.testapp:0.8.0");
sc.setEmulator(false);

//**Instantiating new Selendroid driver**//
WebDriver driver = new SelendroidDriver(sc);

//**Sending data to the text field**//
driver.findElement(By.id("my_text_field")).sendKeys("Selendroid Test");

//**Clicking on the button**//
driver.findElement(By.id("visibleButtonTest")).click();
Thread.sleep(10000);
}
Using Selendroid to Automate Mobile App User Interactions

Selendroid is an amazing testing tool that has several important features. Use the Selendroid framework to automate user interactions over a mobile application.
It is a very powerful automation test framework tool that can interact with multiple devices simultaneously. An application can be tested without any modification or change using Selendroid.
In this section, let us see how to use the Selendroid framework to automate user interactions over a mobile application (.apk files).
The app under test is a recipe app, which a user can access to view, rate, and perform other things. You can run this app both online as well as offline.
Expectations From the Script
- Start the server and install the apk file (if not installed previously)
- Launch the application
- Access the menu list and navigate to a particular category
- Perform advanced searches to filter out recipes within the category
- Add a review comment to the recipe
- Verify the added review comment
- View a list of all recipes created by the author of the current recipe
Application Setup
We need to create a user on the BigOven app, which would be required while adding ratings. The user credentials will be useful as we log in to the step of automating the script.
To start with:
1) Make sure that the Selendroid server is started using the following command.
E.g. java –jar selendroid-standalone-0.15.0-with-dependencies.jar –aut 250000RecipesBigOven.apk
Note: 250000RecipesBigOven.apk is the application under test.
2) Make sure the physical device is connected to the PC, and any test environment with USB debugging mode is enabled.
3) Make sure that the required Selendroid and selenium jar files are already imported and attached to the libraries.

The first step would be creating a new Package

Mentioning the package name

The next step would be to create a TestNG test case under the above package.
Creating a new TestNG Class
1) Open the eclipse project
2) Right-click on the package name. Here is the SelendroidFirst
3) Click on TestNG -> Create TestNG class
Specify the Class Name to say ‘BigOven’
Selendroid Script
Now paste the following code over the newly created class ‘BigOven’:
package SelendroidFirst;

import io.selendroid.client.SelendroidDriver;
import io.selendroid.client.TouchAction;

import org.apache.http.HttpResponse;
import org.apache.http.client.HttpClient;
import org.apache.http.client.methods.HttpGet;
import org.apache.http.impl.client.HttpClientBuilder;

import io.selendroid.common.SelendroidCapabilities;
import io.selendroid.common.device.DeviceTargetPlatform;
import io.selendroid.standalone.SelendroidConfiguration;
import io.selendroid.standalone.SelendroidLauncher;

import org.openqa.selenium.By;
import org.openqa.selenium.WebDriver;
import org.openqa.selenium.WebElement;
import org.testng.annotations.AfterTest;
import org.testng.annotations.BeforeMethod;
import org.testng.annotations.Test;

import java.util.List;

public class BigOven{

    public SelendroidLauncher selendroidServer = null;
    public static WebDriver driver = null;

    @Test(groups= {"Example"})
    public  void BigOven() throws Exception
    {

//**Configurations*//
SelendroidConfiguration config = new SelendroidConfiguration();config.addSupportedApp
("D:\\AppiumAutomation\\SelendroidFirst\\250000RecipesBigOven.apk");
SelendroidLauncher selendroidServer = new SelendroidLauncher(config);
selendroidServer.launchSelendroid();
SelendroidCapabilities caps = new SelendroidCapabilities();
caps.setAut("com.bigoven.android:3.3.1");
WebDriver driver = new SelendroidDriver(caps) ;
caps.setEmulator(false);

//**Access Recipe list of particular category**//
driver.findElement(By.id("left_image")).click();
List<WebElement> kg1=driver.findElement(By.id("kitchen_grid")).findElements(By.id("grid_item_layout"));
for(WebElement kg2:kg1)
{
if(kg2.findElement(By.id("bottom_text")).getText().equals("Browse By Category"))
{
kg2.click();
break;
}
}
Thread.sleep(2000);
List<WebElement> kg4 = driver.findElement(By.id("select_dialog_listview")).findElements(By.id("text1"));
for(WebElement kg3:kg4)
{
if(kg3.getText().equals("Breakfast"))
{
kg3.click();
break;
}
}

//**Viewing Recipe Details page**//
driver.findElement(By.id("menu_refine_search")).click();
List<WebElement> bs = driver.findElement(By.id("layout_search_by_ingredients")).findElement
(By.id("buttons_layout")).findElements(By.id("search_ingredients_button"));
Thread.sleep(2000);
System.out.println(bs.get(0).getText());
bs.get(0).click();
Thread.sleep(2000);

//**Adding Rating Review to a particular recipe**//
List<WebElement> bl = driver.findElement(By.className("android.widget.ListView")).findElements
(By.id("recipe_title"));
for(WebElement bi : bl)
{
System.out.println(bi.getText());
}
bl.get(0).click();
Thread.sleep(2000);
driver.findElement(By.id("recipe_rate_text")).click();
Thread.sleep(2000);
driver.findElement(By.id("username_edit")).sendKeys("xxxxxx@xxxx.xxx");
driver.findElement(By.id("password_edit")).sendKeys("xxxxxxx");
driver.findElement(By.id("login_button")).click();
Thread.sleep(2000);
driver.findElement(By.id("review_comment")).sendKeys("Review Comment added by testuser");
driver.findElement(By.id("add_item")).click();
Thread.sleep(2000);
driver.findElement(By.id("vp_reviews_layout")).findElement(By.id("vp_reviews_img")).click();
Thread.sleep(2000);
List<WebElement> rl = driver.findElements(By.id("review_info"));
List<WebElement> rc = driver.findElements(By.id("reviewer_comment"));
WebElement rle = rl.get(0);
WebElement rce = rc.get(0);
if(rle.getText().contains("Testuser12345")&& rce.getText().equals("Review Comment added by testuser"))
{
System.out.println("Review added successfully");
}

//**Viewing all the recipes added by the user**//
driver.findElement(By.id("vp_recipe_layout")).findElement(By.id("vp_recipe_img")).click();
Thread.sleep(2000);
String AuthorName = driver.findElement(By.id("recipe_author_name")).getText();
System.out.println("List of recipe created by Author: " + AuthorName);
driver.findElement(By.id("recipe_author_image")).click();
Thread.sleep(2000);

}
@AfterTest
public void afterClass() {
if(driver!=null)
{
driver.quit();
}
}
}
Once we have written the test script, the next step is to Run the Script.
Select the test case >> right-click >> Run As >> TestNG Test.

Here are a few snapshots of the application
Landing page:

Category list page:

Search refine page:

Viewing the Detail recipe:

Login over BigOven:

Adding Review Comments:

Viewing the added comment:

Now, once the test script is executed successfully, the next step would be viewing the execution result. In TestNG, we can do the same from the console, “Results of running class BigOven”.
View Console Results


You can see the test results from the following default location: In our case, it is SelendroidFirst >> test-output >> index.html
This is how we can execute the test cases. We can also create a testing XML file and then execute it, and also enhance the test result by using the TestNG reporting utility.
Conclusion
Selendroid is a very powerful automation test framework tool which can be used to test native, hybrid as well as a web apps on any Android device, as well as a simulator.
It supports Hotplugging, which means a user can have multiple devices tested at a time, hence parallel test execution is possible across multiple devices. It supports various kinds of interactions like long-press, touch actions, etc.
The only complexity with it is the environmental setup, which is also there in other frameworks. Once it is set up correctly, we can run our scripts without difficulties. Selendroid is an open-source framework that allows us to create automation test cases for mobile applications.
The best thing is that it supports Hotplugging. It supports the automation of several user interactions over mobile devices. But the development work and online support have almost stopped, so we might not get all the features instantly. Hence, we may face some problems while performing a few actions, like swapping. At times, we have to create our functions as well.
Feel free to share your thoughts in the comments section below!
Was this helpful?
Recommended Reading
-

Appium Studio Mobile Test Automation Tool Hands-on Review Tutorial: This is a series of 15+ text and hands-on video tutorials. (Scroll down to get the complete list of tutorials) Appium, the amazing open-source testing app, has now been made even better, thanks to Appium Studio. With Appium Studios, you can…
-
Rational Robot is an automated functional, regression testing tool for automating Windows, Java, IE and ERP applications under windows platform. This article should be a good start for those who wants to learn Rational Robot test automation tool. Read on for Rational robot tutorial with trial version download and resources.
-

Use this tutorial as a comprehensive guide to using the Robotium Android Application UI Testing Tool. Robotium is the Android Test Automation framework for testing native and hybrid Android applications. It provides a simple API to write UI automation scripts. However, several tools are available for testing Android applications. Robotium…
-

Here is an in-depth tutorial on the process of browser automation through Geb Tool for your benefit: Geb (pronounced "jeb") is the answer to any kind of browser automation challenges. It is a very effective tool to perform automation testing over the web. Geb originated out of the need to…


Is there any advantages over Appium?
Multiple Android target API support (10 to 19)