


Here’s How to Install and Setup Appium on Windows with First Program to Get a Kick Start on Appium:
Appium is an open-source test automation tool used for testing mobile applications. It allows users to test various types of mobile applications (such as Native, Hybrid and Mobile Web) using a standard WebDriver library.
There are three types of Mobile Apps:
- Native: Native apps built using iOS, Android, or Windows SDKs. They are platform-specific. They are built to work on a platform and/or device.
- Hybrid: Hybrid apps are web applications developed using HTML, CSS, and wrapper of a native application on top of UIWebView for iOS and “webview” for Android Apps.
- Mobile web apps: Mobile web apps are the apps ones accessed using mobile browsers.

List of Tutorials in The Appium Series
Tutorial #1: Appium Tutorial For Beginners (This Tutorial)
Tutorial #2: Introduction To Appium: What is Appium and Its Architecture
Tutorial #3: Download, Install And Setup Appium for Windows
Tutorial #4: Configuring Mobile Device With System In Appium
Tutorial #5: Automate Native App On Android Device Using Appium
Tutorial #6: How To Automate Web Apps On Chrome Browser In Android Device
Table of Contents:
Why Is Appium A Popular Tool For Automating Mobile Apps?
Appium is a “cross-platform tool” i.e. it allows you to write tests on multiple platforms (iOS, Android, Windows) using the same APIs. Using Appium, you can also run automated tests on actual devices like tablets, mobile phones, etc.
It is the most widely used tool for regression testing of Mobile Apps on mobile phones and tablets. Appium makes mobile app regression testing easy, especially for large mobile apps that are updated frequently with new features and functionalities.
Setting Up the Appium Tool on Windows
Prerequisites: This is a shortlist of software and hardware required for automating mobile app testing using Appium:
- Your PC should have JDK, Appium Server, Eclipse, Android SDK installed
- Apk: Mobile Application to be automated by our Case ContactManager.apk
- Testing Device: In this case Moto G
- Jars: Java-client jars and Selenium Jars.
- USB driver for Testing Device: In this case Moto G
Step #1: Install the Java Development Kit (JDK)
Step #2: Set up Java Environment Variable Path
Step #3: Download and install Android SDK here and update the APIs
To update the API, Open Eclipse -> Click on Window in the Eclipse Menu and -> Select Android SDK manager
Update the APIs as shown in the below screenshot:

Step #4: Now we need to install Appium for Windows. Go here to download Appium for Windows.
Step #5: Install Node JS from here: Node JS download
Step #6: Set the ANDROID_HOME path as well as JAVA_HOME path
Specify the path for tools and platform-tools present in the Android SDK path.

These folders will be present in adt-bundle-windows-x86_64-20140702\sdk
Now we need to update the Environment variable (Refer below Screenshot)
(Note: Click on any image for an enlarged view)
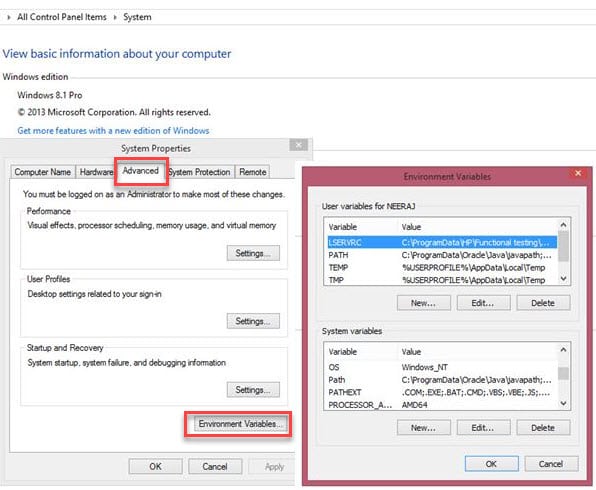
Update path with tools and platform-tools (folder present in Android SDK).
The entry in Path will look as below:
C:\Program Files\nodejs\;%ANDROID_HOME%\tools;%ANDROID_HOME%\platform-tools
Step #7: Access adb
Press Win+R keys combination
Type CMD. Now in CMD type ‘adb’. adb will be accessible
Preparing Mobile Devices For Automation With Appium
Connect your Mobile Testing device via USB to your PC. Enable Developer Mode on Mobile Phone before automating the app.
Steps to Enable Developer Mode/Options on Android Phone or Tablet:
1) Open Settings, Tap on the “About” option, Tap on “Software Information”, Tap on “More”.
2) Tap on “Build number” 7 times to enable Developer options.
3) Go back to Settings and make sure that the “Developer options” setting is there.
4) Tap on Developer options and turn on the USB Debugging option from the menu on the next screen.
 c
c5) Download and install USB Drivers for the Mobile Testing device on PC.
6) In the adb terminal type, “adb devices”
C:\Users\NEERAJ>adb devices
List of devices attached
TA93305G0L device
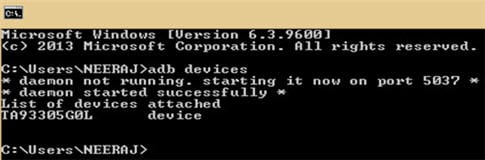
This will display a list of devices connected to the system. We will be using App Contact Manager.apk as a sample app to automate. Download and install Contact Manager.apk on the device.
Start Automating Android Apps Using Appium
Now run the appium.exe on your PC.

Appium needs to run and pass the following parameters and Device Name in Android Settings.
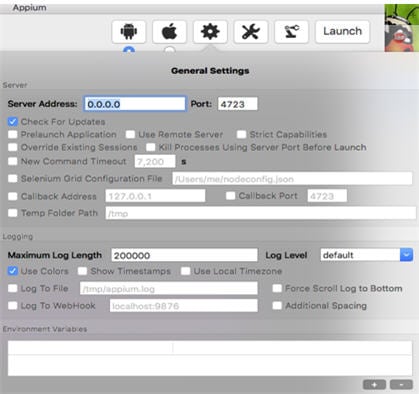
Note: Don’t change the port number or anything in the general settings icon. When the Appium Server starts, the Server address, as well as Port address, will be set by default. The port address will be 4723 by default
In Android Settings, the user needs to set the APK path where the APK is located, check the app path, package and launch Activity.
- Connect your Android phone to your PC and turn on USB debugging mode.
- Open Command prompt.
- Type command adb logcat.
- Open the app on your Android phone. Immediately press CTRL + C in command prompt
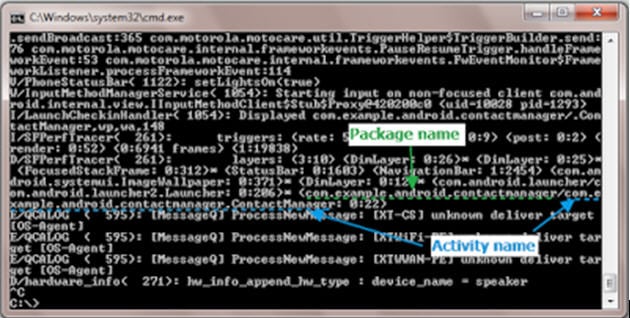
com.example.android.contactmanager is package name and com.example.android.contactmanager.ContactManager is the activity name of the Contact Manager app.

In the above screenshot, we have populated all the needed information in the Appium i.e package, launch activity, Mobile Device Name.
How To Locate Elements Using UIAutomatorViewer?
1) To automate the app first we will need to find the elements of the app that we will need to interact
for that, we will use UIAutomatorViewer
2) Connect the device in which the app is installed to the PC
3) Go to Terminal.
Type: Adb Devices
C:\Users\NEERAJ>adb devices
List of devices attached
TA93305G0L device
This will show the list of devices connected to your PC.
4) Open the app that you want to automate on your Mobile Device.
5) Open UIAutomatorViewer and go to the following path
adt-bundle-windows-x86_64-20140702\sdk\tools

6) So make sure your app is launched and the UIAutomaterViewer is launched by clicking on the Device screenshot.
7) This option will take a screenshot of the app with all the detailed information of all the elements visible on the app.
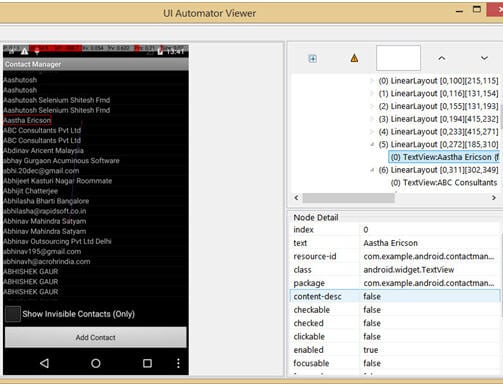
Click on the Add Contact Button for our Test Scenario
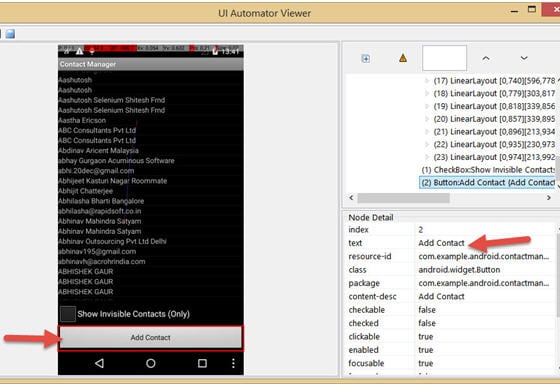
From the above screenshot, you can use locator By.name(“Add Contact”)
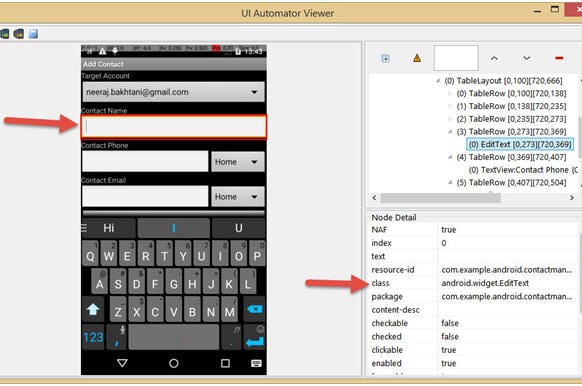
From the above screenshot you can take By.className(“android.widget.EditText”)) as our locator for Contact Name
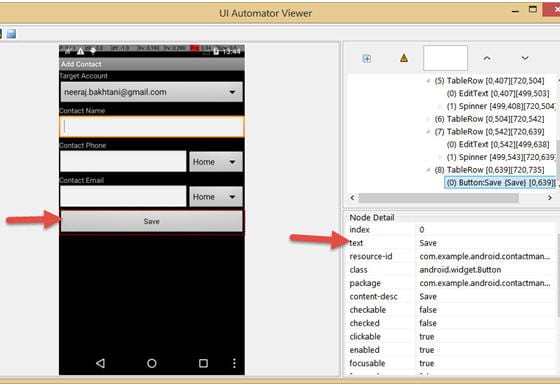
By.name(“Save”) can be used as our locator for the Save Button
First Program For Automating An App On Appium
Run the below Script, the Contact Manager application will be launched on the real device and all the logs will be displayed in the Appium console showing you all the actions getting invoked by the above script.
importjava.io.File;
importjava.net.MalformedURLException;
import java.net.URL;
importjava.util.List;

importorg.openqa.selenium.By;
importorg.openqa.selenium.WebDriver;
importorg.openqa.selenium.WebElement;
importorg.openqa.selenium.remote.CapabilityType;
importorg.openqa.selenium.remote.DesiredCapabilities;
importorg.openqa.selenium.remote.RemoteWebDriver;
importorg.testng.annotations.*;

public class appium {

 WebDriver driver;

 @BeforeClass
 public void setUp() throws Exception {

//location of the app
 File app = new File("C:\\Users\\NEERAJ\\Downloads", "ContactManager.apk");

 //To create an object of Desired Capabilities
 DesiredCapabilities capability = new DesiredCapabilities();
//OS Name
 capability.setCapability("device","Android");
 capability.setCapability(CapabilityType.BROWSER_NAME, "");
//Mobile OS version. In My case its running on Android 4.2
 capability.setCapability(CapabilityType.VERSION, "4.2");
 capability.setCapability("app", app.getAbsolutePath());
//To Setup the device name
 capability.setCapability("deviceName","Moto G");
 capability.setCapability("platformName","Android");
//set the package name of the app
 capability.setCapability("app-package", "com.example.android.contactmanager-1");
 //set the Launcher activity name of the app
 capability.setCapability("app-activity", ".ContactManager");
//driver object with new Url and Capabilities
 driver = new RemoteWebDriver(new URL("http://127.0.0.1:4723/wd/hub"), capability);
 }

 @Test
public void testApp() throws MalformedURLException{

System.out.println("App launched");
 // locate Add Contact button and click it
WebElementaddContactButton = driver.findElement(By.name("Add Contact"));
addContactButton.click();
 //locate input fields and type name and email for a new contact and save it
 List<WebElement>textFields = driver.findElements(By.className("android.widget.EditText"));
textFields.get(0).sendKeys("Neeraj Test");
textFields.get(1).sendKeys("9999999999");
textFields.get(2).sendKeys("testemail@domain.com");
driver.findElement(By.name("Save")).click();
 //insert assertions here
 }
 }
Setup Appium with Eclipse IDE
Software Required for Appium:
- JDK, Appium Server, Eclipse, Android SDK
- Jars: Java-client jars and Selenium Jars.
- Apk: Application to be automated
- Real Device: In this case SAMSUNG Note3
- USB driver for Real Device: In this case SAMSUNG Kies
Step 1: Install the Java Development Kit (JDK)
Step 2: Setup Java Environment Variable Path
Go to the Terminal and type:
Open .bash_profile
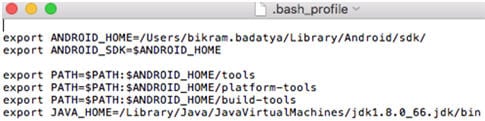
Set the ANDROID_HOME Path as well as JAVA_HOME Path
Step 3: Install Android SDK / ADB on MAC
We need to install Tools, Extras and the corresponding API Level packages (in this case Android 4.4.2 API 19).
(Note: Click on any image for an enlarged view)

Step 4: Download and install Appium Server

Note 1: No need to set anything in the general settings icon. When the Appium Server is installed, the Server address, as well as the Port address, will be set by default. The port address will be 4723. The user can change the server address if required.
Note 2: In Android Settings, the user needs to set the APK path where the APK is located, check the app path, package and launch Activity.

How to Find .Apk File Package Name and Launcher Activity Name:
There are so many ways to find out the Package name and Launcher Activity Name of an application. This terminal is used to get the Package and Launcher Activity name.
Go to the terminal and type:
aapt dump badging <apk_File_Path><apk_File_Name.apk>
Hit “Enter” for the below screen:
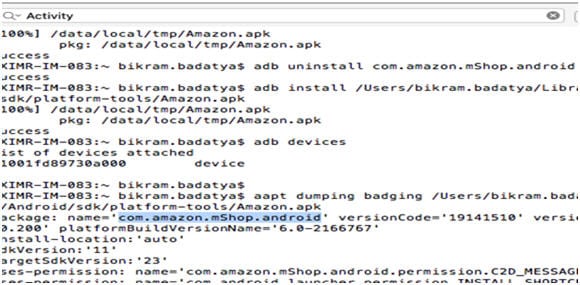
If a user specifies the package name in Appium Server, then Launcher Activity Name, wait for Activity names to be displayed automatically.
Launcher Activity Name is:
“com.amazon.mShop.android.home.HomeActivity.”
Steps to Enable Developer Mode / Options on Android Phone or Tablet
Step 1) Enable Developer Options
1) Tap on the Main Menu icon.
2) Go to Settings.
3) Scroll down to About phone and tap on it.
4) Scroll down to the bottom, tap on ‘Build number’ Seven (7) times. (Your build number may vary). After the third tap, the user can see a playful dialog “You are a developer”. Keep on tapping until the dialog is displayed.
5) You will notice the Developer Options on your screen now.
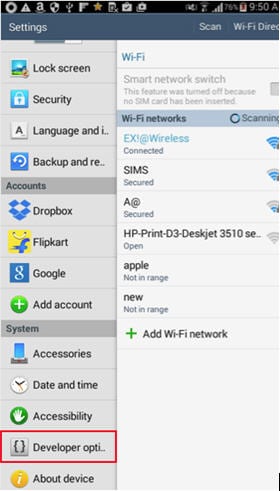
Step 2) Switch On USB Debugging
1) Go to Developer Options.
2) Select USB Debugging.

3) It may display the Pop-Up message and if it does, just click OK.
Step 3) Download and install USB Driver for Corresponding Real Device. In this case SAMSUNG Kies.
How To Locate Elements Using UIAutomatorViewer?
1) The first step before locating any element on the device is to connect the device to the computer.
Follow the steps below to check the device connectivity:
- Go to Terminal.
- Type: Adb Devices

This will display a list of devices connected to the system.
2) On a real device, open the app that has to be automated (Here amazon app is automated)
3) Go to the following directory to open UIAutomatorViewer:
Users -> Library -> android -> sdk -> tools -> uiautomatorviewer.bat
EX: users/bikram.badatya/Library/Android/sdk/tool/
4) In UIAutomatorViewer, click on Device screenshot.

5) Upon clicking on the Device screenshot, the device image along with the detailed information will be displayed on the left side of the UIAutomator window.
6) Upon clicking on any element on the page, relevant information about that element will be displayed on the right side.
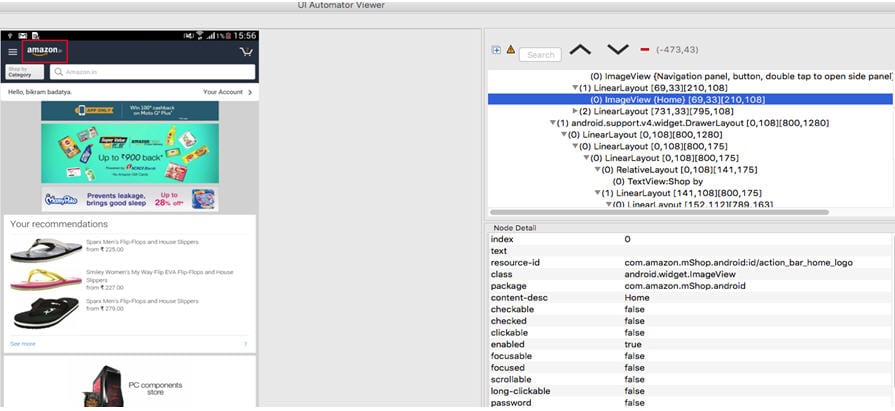
7) Click on the Main Menu button to display all properties.
Appium Test to Launch Amazon App
1) Launch the Appium Server.

2) Android Settings.
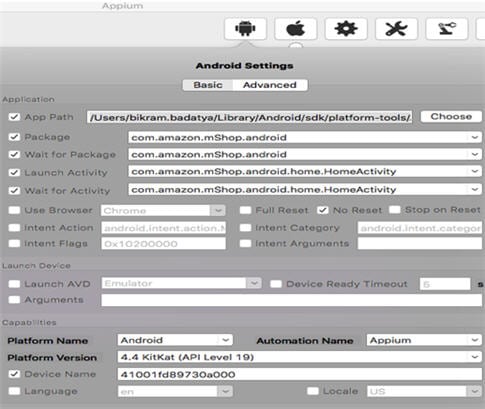
3) General Settings for Server Address and Port address:
4) Click on the launch button.
Code snippet to launch Amazon Application:
package com.AppiumDemo;
//Library to create the path to APK
import java.io.File;
//Library used to verify if URL is malformed
import java.net.MalformedURLException;
//Library used to create URL for the Appium server
import java.net.URL;
import java.util.concurrent.TimeUnit;
//Libraries for import selenium WebDriver
import org.openqa.selenium.By;
import org.openqa.selenium.WebDriver;
//Libraries for configuring Desired Capabilities
import org.openqa.selenium.remote.DesiredCapabilities;
//Library for import TestNG
import org.testng.annotations.Test;
//Libraries for import Appium Drivers
import io.appium.java_client.MobileElement;
import io.appium.java_client.android.AndroidDriver;
public class LauchAmazon {
private static AndroidDriver&amp;amp;amp;amp;amp;amp;lt;MobileElement&amp;amp;amp;amp;amp;amp;gt; driver;
//static WebDriver driver;
@Test
public void setup() throws MalformedURLException, InterruptedException{
// Path to &amp;amp;amp;amp;amp;amp;lt;project folder&amp;amp;amp;amp;amp;amp;gt;&amp;amp;amp;amp;amp;amp;lt;Amazon&amp;amp;amp;amp;amp;amp;gt;
File appDir = new File(&amp;quot;//Users//bikram.badatya//Library//Android//sdk//platform-tools//&amp;quot;);
//Path to &amp;amp;amp;amp;amp;amp;lt;project Folder&amp;amp;amp;amp;amp;amp;gt; to Amazon apk File&amp;amp;amp;amp;amp;amp;gt;
File app = new File(appDir, &amp;quot;Amazon.apk&amp;quot;);
//To create an object of Desired Capabilities
DesiredCapabilities capabilities = new DesiredCapabilities();
//To set Command Timeout in appium server.Its optional you can set in appium Server itself.
capabilities.setCapability(&amp;quot;no&amp;quot;,true);
capabilities.setCapability(&amp;quot;newCommandTimeout&amp;quot;, 100000);
// Name of the OS: Android, iOS or FirefoxOS
capabilities.setCapability(&amp;quot;platformName&amp;quot;, &amp;quot;Android&amp;quot;);
//set the name of the connected device.you have to give same name in both server and the code
capabilities.setCapability(&amp;quot;deviceName&amp;quot;,&amp;quot;41001fd89730a000&amp;quot;);
//Mobile OS version. My device is running Android 4.4.2
capabilities.setCapability(&amp;quot;AndroidVersion&amp;quot;,&amp;quot;4.4.2&amp;quot;);
//set the package name of the app
capabilities.setCapability(&amp;quot;appPackage&amp;quot;, &amp;quot;com.amazon.mShop.android&amp;quot;);
//set the Launcher activity name of the app
capabilities.setCapability (&amp;quot;appActivity&amp;quot;,&amp;quot;com.amazon.mShop.android.home.HomeActivity&amp;quot;);
// Name of mobile web browser to automate. It should be an empty string, as we are automation an app.
capabilities.setCapability(&amp;quot;browserName&amp;quot;, &amp;quot;&amp;quot;);
//driver object with new Url and Capabilities
driver = new AndroidDriver&amp;amp;amp;amp;amp;amp;lt;MobileElement;(new URL(&amp;quot;http://0.0.0.0:4723/wd/hub&amp;quot;), capabilities);
driver.manage().timeouts().implicitlyWait(30, TimeUnit.SECONDS);
driver.findElement(By.xpath (&amp;quot;//android.view.View[@content-desc='Hello.Sign inSign inHello. Link']&amp;quot;)).click();
driver.manage().timeouts().implicitlyWait(60, TimeUnit.SECONDS);
driver.findElement(By.xpath (&amp;quot;//android.widget.EditText[@index='0']&amp;quot;)).sendKeys(&amp;quot;xxxx@gmail.com&amp;quot;);
driver.manage().timeouts().implicitlyWait(30, TimeUnit.SECONDS);
driver.findElement(By.xpath (&amp;quot;//android.widget.EditText[@bounds='[101,188][499,231]']&amp;quot;)).sendKeys(&amp;quot;yyyzzz&amp;quot;);
driver.manage().timeouts().implicitlyWait(30, TimeUnit.SECONDS);
driver.findElement(By.xpath (&amp;quot;//android.widget.Button[@content-disc='Submit']&amp;quot;)).click();
driver.quit();
}
}
Once the above Script is executed, the Amazon application will be launched on the real device and a list of messages will be displayed in the Appium console.
Important commands
1) To kill the adb server:
adb kill-server
2) To start the adb server:
adb start-server
3) To set JAVA_Home Path as well ANDROID_Home Path
open .bash_profile
4) To get package name and android Launcher name in apk (another way)
aapt dump badging <path to the apk>.apk name
Ex- aapt dump badging
/users/bikram.badatya/Library/Android/sdk/platform-tools/Amazon.apk
5) Install apk on real device
adb install <apk path>.apk name
6) Uninstall apk on real device
adb uninstall <app_package_name>
Ex– adb uninstall com.amazon.mShop.android
Limitations of Appium
- It does not support the Android API level less than 17
- Toast messages are not supported
- Script execution on IOS platform is very slow
- Gesture support is limited
Challenges Faced While Working With Appium
#1) To get the launcher activity name, which is required to launch the application, many methods can be followed like an extra apk named “apkInfo” needs to be installed, certain lines of code have to be written, etc. However, in this document, the following command is used to get the launcher activity name.
i.e. aapt dump badging <path to the apk>.apk name
#2) During setup in the Android SDK manager we need to focus on the following packages that have to be uninstalled. Otherwise, the application will not launch

#3) Especially on MAC we need to setup Java_HomePath and Android HomePath in .bash_profile so that it is not required to set up again and again.
#4) Launching the application using an emulator consumes more time compared to a real device. Hence, the use of a real device is recommended.
Further reading =>> Popular Appium Interview Questions
Conclusion
With emerging trends and more demand for Mobile Apps, all major companies are migrating to get their business on mobile apps. Thus to release quality mobile apps, automation testing of mobile apps is the latest trend in the industry.
Appium, because of its simplicity and ease of use, is one of the leaders and most widely used tools all over the globe for automation testing of mobile apps for iOS and Android.
About the author: This post was written by STH team member Neeraj. He is a passionate software tester currently working as a Senior Software Development Engineer in Test and enjoys testing web and mobile applications.
Click here to read more on Mobile Automation Using Appium Studio Tool.
Was this helpful?
Recommended Reading
-

We have provided a Mobile App Testing Platform pCloudy Hands-on Review: Mobile is the key to the digital world in today’s era. The rise of Mobile Internet has ensured that we are all going to make the most of our digital decisions on a Mobile device (primarily using an App).…
-

Mobile Device Testing is a Process for Testing a Device for Quality. Read This Comprehensive Tutorial to Gain In-depth Knowledge About Mobile Testing: Before exploring Mobile Device Testing, let's get to know about Device Testing. Device Testing is the process by which a Device is tested for its Quality to…
-
Beta testing is perhaps one of the most important steps in mobile application development. Unlike standardized iOS, mobile devices running on Android significantly differ from each other, not just by the installed version of the operating system, but by the type of programming language, screen resolution, hardware etc. That is…
-
Steps involved in creating Appium Tests for an Android App: Step by step procedure involved in the creation of Appium tests for an Android App is explained precisely for your easy understanding. Snapshots of each step are available for your reference along with few video tutorials. And this tutorial is…


Hi…Do u have only this post available from Appium space?
If a person from manual testing background, want to enhance his career in automation space, Is this the right place to enhance him in an automation space?
Hi,
Can you please tell me how to scroll application while using WebDriver instead of android driver.
Whats the code.
Hi Kuljeet,
Here is the code for scrolling …
public static void Scroll(int ScrollAmount)
{
double scrollCounter = ScrollAmount / 100;
if (AppiumDriver.executionOS == “iOS”)
{
IJavaScriptExecutor js = (IJavaScriptExecutor)AppiumDriver.Instance;
js.ExecuteScript(“window.scrollBy(0,” + ScrollAmount + “)”);
}
else //Android
{
AppiumDriver.Instance.Context = “NATIVE_APP”;
System.Drawing.Size dimensions = AppiumDriver.Instance.Manage().Window.Size;
Double screenHeightStart = dimensions.Height * 0.5;
Double screenHeightEnd = dimensions.Height * 0.2;
int scrollStart = Convert.ToInt32(screenHeightStart);
int scrollEnd = Convert.ToInt32(screenHeightEnd);
for (int i = 0; i < Convert.ToInt32(scrollCounter); i++) { AppiumDriver.Instance.Swipe(0, scrollStart, 0, scrollEnd, 2000); // break; } //driver.findElement(By.name("YourText")).click(); } }
We have to automate native app for ios,android and we have web application too.How we can manage automating all, is it possible to do this with using single tool or we have to automate everything separately?
Very neat and detail !! Following two would be a good addition 1. Appium Setup is most tedious thing, is there a way to dockerise / simplify the same? 2. How to run appium tests on Jenkins esp. for nightly jobs?
Please tell me how to automate an iOS App. using Appium.
Because i’m unable to find the objects elements to create script in iOS environment.
Is there any tool for that like “UI Automator Viewer” for Android.
Thanks,
Sandeep
You can use “object spy” from appium studio to identify the elements.
Nice insights describing the learning about the Appium for the beginners. One more tool I would like to suggest for Mobile app testing through automation is TestingWhiz. This is a code-less test automation tool for web, database, cloud, mobile apps, etc.
very hands on guide. can you share more on appium
How to automate mobile application if another finger scanner is attached to mobile device?
take the scenario of mobile enrollment application where scanner is attached to mobile device.
Please share us about appium on mac setup.
hi,
when we automate the mobile app,we need app source code? where we get the source code?how to use this code while automating the mobile app.plz give the info….
thanks for sharing appium details….
hi, you don’t need to use the app source code for automation purpose as you have the inspector to identify each and every element.
Thanks !
Helpful Article !! Thanks for providing detailed information.
when i am trying to use text attribute with name locator it throws exception that Locator Strategy ‘name’ is not supported for this session.
you have done gud work for sharing this appium tutorial for beginners..It is exactly what i was looking for.
Thank You . keep going .
hello, how to install node, when it download click on .exe file command prompt is open, which command I try to install.
Not getting the Andriod SDK file on the link mentioned under #3) of “Setting up the Appium Tool on Windows”.
Rather getting Andriod Studio link.
Please help as I am stuck here.
This tutorial is good but it still lacks the latest trends and updates. We recommend you to update the post.