Is your Alexa flashing red and refusing to work? Learn how to fix the Alexa Red Ring on your Echo device in minutes and get back to normal instantly with our troubleshooting guide:
Amazon Echo devices that Alexa can control use different light indicators to identify their state, errors, or notifications. These light signals are confusing to a person who does not know their meaning.
Besides, there are sometimes multiple options for resolving these issues on your device, and the easiest may sometimes not be the best.
Table of Contents:
- Why is My Alexa Red: Quick Fix to Get it Working
- Alexa Red Ring: Meaning and How to Fix
- How to Solve Alexa’s Red Light Flashing
- Alternative Solutions to Red Light Flashing on Alexa
- Methods for Wiping Various Alexa Devices
- Fix for Red Light Blinking on Third-Party Devices
- Replace a Faulty Microphone to Solve Red Light on Alexa Devices
- Alexa Warranty Repair and Replacement
- Requesting Repair Through Support
- Other Alexa Light Indicators and Their Meanings
- Problems and Troubleshooting Steps for Light Flashing on Alexa
- Frequently Asked Questions
- Conclusion
Why is My Alexa Red: Quick Fix to Get it Working

Hence, this tutorial guide explores the meaning of various Alexa light indicators, especially the red, green, and yellow lights, and goes further to explain them in detail. It also offers several troubleshooting methodologies and solutions that you can use in any type of your Alexa-enabled devices.

Alexa Red Ring: Meaning and How to Fix

When your Alexa device has a solid red light, it means that the microphone has been turned off. As a result, at that state, the Alexa device cannot hear your voice commands when you direct it to do anything.
Why it Happens:
Your device’s microphone can experience various issues, such as becoming blocked, malfunctioning, or physically detaching from the hardware.
The microphone may appear muted or unresponsive due to a host of software errors and connectivity problems, aside from deliberate user muting.
When the microphone is muted manually, intending to keep privacy or accidentally, the red light will be displayed. In other instances, the microphone may be muted due to software glitches or connection problems as well.
When it happens, the microphone being muted instantly triggers this light, and it stays on until the microphone is unmuted.
Here is the video guide on how to resolve if your Echo Show is not responding to voice commands
How to Solve Alexa’s Red Light Flashing

Step 1: Find the microphone button on your device. For this reason, on Echo Dot (3rd, 4th, 5th Gen): this is a small, circular button on the top of the device, typically marked by a microphone icon with a slash through it. By pressing it, one can turn the microphone on or off.
- On Echo Show (5, 8, 10, 15): Echo Show devices also have the microphone button on the top edge of the device, typically by the camera. On a bigger screen, it usually is a physical button, which switches to red when it is muted.
- On Echo Studio: The microphone button is placed on the upper surface, next to the volume buttons. When the microphone is turned off, it illuminates red.
- On Echo Flex: This is a small button located on the top front side of the device, which is also labeled with the same icon of the microphone. Pressing the mute button turns on a red light.
- On third-party devices that work with Alexa: Each device has a different location depending on the manufacturer, but most have a top or front button that has a microphone symbol. Refer to the device manual in case of doubt. (CNET)
Step 2: Tap and hold the microphone button once to unmute.
Step 3: Wait for a couple of seconds until the red light goes out.
Step 4: Testing: It involves issuing a voice command to Alexa.
- Say, “Alexa, what time is it?”
- In case there is no response, the microphone could be faulty or have the problems we are going to highlight in the various sections.
Alternative Solutions to Red Light Flashing on Alexa
1. Reboot the device: Unplug the device and wait 30 minutes, and plug it in.
2. Software Updates: To ensure that the firmware of your device is updated, use the Alexa app to update software on different types of Alexa devices.
Here are the steps to update the various Alexa devices:
A. If your device is an Echo Dot 3rd, 4th, or 5th Gen, use the following steps:
Step 1: Ensure your Echo Dot connects to Wi-Fi.
Step 2: Tap the Alexa application button to open the application on your iPhone or Android phone.
Step 3: Tap Devices -> Echo and Alexa -> Your device -> About option.
Step 4: Inspect the software version on your device. For Alexa devices, usually when an update is provided, it will automatically update most of the time, but you can also restart the device intending to update it.
Benefits of using this procedure to resolve Red light issues: This method, unlike some others in this tutorial guide, will also correct any software issues that may lead to the microphone not functioning or the red light being left on. It also ensures compatibility with new aspects of Alexa.
B. If your device is an Echo Show 5, 8, 10, or 15, use the following procedure:
Step 1: Slide the screen down from the top, and the settings menu opens.
Step 2: Software updating: Check the availability of any software updates to your device.
Step 3: Tap the Install Update option if it has an update.
Step 4: The update will involve the automatic restart of the device.
Benefits of using this procedure to resolve Red light issues: This procedure also fixes and resolves audio and display problems that can cause Alexa not to respond. It will also enhance the stability of features such as calls, Drop In, and notifications.
C. If your device is an Echo Studio, use the following procedure:
Step 1: Make sure that the device is connected to the Wi-Fi.
Step 2: Press Alexa app -> Devices -> Echo -> Alexa -> Your Echo Studio -> About.
Step 3: You will see the device show the firmware present. The updates are generally automatic, although a reboot of the device can activate an immediate installation. (MakeUseOf)
Benefits of using this procedure to resolve Red light issues: This methodology, unlike others, will also update sound drivers in high fidelity. It also offers a remedy for software bugs that leave red or other colored rings.
D. If your device is an Echo Flex, use the following procedure:
Step 1: Make sure that there is Wi-Fi connectivity.
Step 2: On the application, go to Devices -> Echo -> Alexa -> Your Echo Studio -> About.
Step 3: The updates are usually automatic; however, a quick restart can also trigger the automatic firmware update.
3. Factory Reset only in case of need: The last option is to perform a factory reset to fix unremovable problems. A factory reset will bring your device back to the default settings and erase all custom settings, accounts, and personal information.
It is typically invoked when you have tried everything possible to fix your device, but it is stuck at the boot or at the stage where the device won’t connect via Wi-Fi or other light indicators.
Methods for Wiping Various Alexa Devices
A. If your device is Echo Dot 3rd, 4th, 5th Gen, use the following procedure to factory reset:
Step 1: For 25 seconds, press and hold the Action button (the small, circular button with a central dot).
Step 2: Wait until the light ring shows orange, after which it shows blue, and then it goes off.
Step 3: Release the button. The machine will be restored to factory settings.
Benefits of using this procedure to resolve Red light issues: This method will also fix the chronic red or other light ring overrun problem with software bugs. It, in addition, erases all your personal records and enables you to configure the device as a new one.
B. If your device is an Echo Show (5, 8, 10, 15), use the following procedure to factory reset:
Alternative A: Managing a factory reset directly from the device screen.
Step 1: Slide the screen downwards at the top right corner of the screen and tap on Settings.
Step 2: The second step is to go to the device options – reset to factory defaults.
Step 3: Confirm the reset. The screen will black out and reboot.
Alternative B: Physical Buttons (Echo Show 5/8).
Step 1: Press Mute and Volume Down at the same time until the screen on the device switches off.
Step 2: Wait for the device to start again and show the setup screen.
Benefits of using this procedure to resolve Red light issues: It will remove software bugs that are difficult to get rid of and restore normal lighting ring functionality. The method is also notable when the touchscreen or Alexa application is not responding.
C. If your device is an Echo Studio, use the following procedure to factory reset:
Step 1: Hold the Action button and press it for 25 seconds.
Step 2: Wait until the light ring is switched off, then cycle orange.
Step 3: Release the button. The device will reboot and be ready to set up.
Benefits of using this procedure to resolve Red light issues: The glitches of audio or connection are cleared. The method is also handy when the machine cannot identify voice instructions even after unmuting.
D. If your device is an Echo Flex, use the following procedure to factory reset:
Step 1: To activate the action button, press and hold the button for 20-25 seconds until the light ring is switched off.
Step 2: Press the button again; the device will go to setup mode.
Benefits of using this procedure to resolve Red light issues: This method reboots the system with microphone problems or network issues. It also deletes personal information and past account connections, resulting in a fresh new device.
Fix for Red Light Blinking on Third-Party Devices
Step 1: Check the guide or application of the manufacturer to reset.
Step 2: You will generally press a reset button (or a set of buttons) for a few seconds.
Step 3: Maintain the reset by app of the device in case prompted to do so. (CNET)
Benefits of using this procedure to resolve Red light issues: The procedure makes the device compatible with the Alexa ecosystem following chronic failures. It also gets rid of configuration problems, which can cause voice commands or light signals to not work as expected.
To use Alexa properly, unmuting the microphone brings Alexa to full functionality and the capability to hear your voice commands and respond.
Here is the video guide on how to mute and unmute Alexa Devices

[Via onesmartcrib.com]
Remember, you can also increase the sensitivity of your Alexa’s mic by optimizing the configuration before thinking about replacement or repair.
Face the mic towards the listener, do not block the mic, and also try speaking louder. Also, do not stay far away: It is recommended to stay about 8 inches away from the echo device to make sure you give it clear commands.
Amazon also recommends training Alexa to hear your voice better by creating a voice profile, but it takes time to do so.
Navigate on your Smartphone to the Alexa app -> Click or tap on the little hamburger button on the top left -> Settings -> Alexa Account -> Recognized Voices (make sure the feature is toggled to On position) -> Your Voice -> Begin.
Replace a Faulty Microphone to Solve Red Light on Alexa Devices
This method may be helpful in cases where the device mic has suffered:
- Physical Damage or Obstruction: In case the microphone hardware is damaged, covered by debris, or not functioning properly internally, the gadget will realize that it cannot receive voice commands. It can also display a red light error with any of the device models.
- Software Glitches: The Alexa software is prone to misinterpretation of microphone input, which leads to the device thinking that the microphone is muted. This causes a solid red light, although the mute button has not been pressed.
- Connection Problems with Third-party Microphones: The red light can be displayed on the third-party Alexa devices that have external or modular microphones due to a loose connection or a problem with the driver.
Behavior of Device When This Occurs: When the above happens, Alexa cannot respond to voice commands, like in cases of other issues. The red light is solid, and this means that the microphone is not on. In other devices, when the user tries to unmute using the physical button, some devices fail to do so when the microphone hardware is defective.
Guide to resolving Alexa’s red light issue through microphone replacement.
1. First, the physical obstructions or damage are to be checked:
- Step 1: Clean the dust, dirt, or debris on the microphone area.
- Step 2: Wipe using a soft, dry cloth.
2. Restart the Device
3. Update Software
4. Factory Reset (if needed)
Support: Alexa provides support to customers on a 24-hour daily basis.
How to get a repair through support?
If the red light persists despite the precautions, the microphone requires expert repair or replacement.
Here are some advantages and hints of microphone replacement when solving red light blinks on Alexa:
- Boosts Complete Performance: Recovers red light problems because of the failure of hardware.
- Enhances Voice Recognition: Replacing a faulty microphone guarantees that commands are well heard.
- Cosmetic: A home solution is less expensive than the alternative of sending the machine to be repaired.
- Lifecycle: The Alexa device will be in the market longer.
Instead of replacement, however, it may be necessary to contact support. But when should you do so?
- When your gadget is within the warranty.
- In case you do not feel comfortable opening the device.
- In case microphones are not replaceable, or they are manufacturer-specific.
- If repairs or replacement aren’t possible, take it for service, but check if the equipment is under warranty for repair and replacement.
We therefore consider a few details about the warranty for Alexa devices as provided by Amazon.
Alexa Warranty Repair and Replacement

These warranties cover the following aspects:
- Failure in Materials and Workmanship: Amazon offers a one-year limited warranty in case of unsuitability of material and workmanship when used by an ordinary consumer. It applies to such devices as Echo, Echo Plus, Echo Show, and other Alexa-enabled devices sold either by Amazon or official retailers.
- Replacement or Repair: In case your device has been determined to be defective, Amazon can replace or repair it at its own choice.

However, these warranties have their exceptions. It does not cover accidental damage arising from misuse, neglect, fire, or other external damage; unauthorized repairs by yourself or unauthorized service providers, which may nullify the warranty; cosmetic damage, e.g., scratches or dents, or any other cosmetic defects that do not impact functionality.
But you may win an extension for the warranty if you haven’t opened the device or repurposed it, used unauthorized repairs, installed unapproved accessories such as a charger, or have retained evidence of purchase, and when you have registered your device.
Here are the actions to be followed in case of a red light error on your device caused by malfunctions.
This is in case your Alexa device is not working:
- Troubleshoot: Use the troubleshooting instructions provided by Amazon to troubleshoot.
- Check Warranty Status: Follow the instructions on the Manage Your Content and Devices page of Amazon to check the warranty status of the device.
- Get Amazon Support: In case of any problem that cannot be solved by troubleshooting, contact Amazon Customer Service.
Requesting Repair Through Support
There are instances when you may need repairs:
- Communicate with Amazon Customer: Call Amazon Customer Service to negotiate solutions regarding repairs.
- Offer Information: Have the serial number and description of the problem of your device ready.
- Repair Period: Repair periods are determined by the type of problem and access to parts. Amazon will give an estimated time for the assessment.
Other Alexa Light Indicators and Their Meanings
Here are some of the common Alexa light indicators along with their meanings:
Blue light indicates processing or listening. A teal blue light may also come up when the device is ready for you to issue voice commands to it, and here, you do not need to say the wake word to activate it.
Orange light indicates a setup or wiring problem. When the device is in setup mode or has connectivity problems, it uses an orange light.
Purple Light indicates Do Not Disturb/ Wi-Fi Problem. The purple color shows that the Do Not Disturb feature is on, or there is a problem with the Wi-Fi connection.
White Light indicates volume Modulation. The volume is adjusted; this is evidenced by a white light.
When the device is starting up, it will show a spinning teal and blue color. It will turn to an orange color if it is ready for setup but has not been set up.
Step-by-Step Solutions for the above problems where yellow lights appear due to device malfunctions:
Step 1: Apply Active Calls or Drop Ins. Say, “Alexa, end the call, or Say Alexa, stop the Drop In.
Step 2: Reboot the Device: Unplug and remove it after 30 seconds, and reconnect it.
Step 3: Update Software: It is crucial to ensure that the furniture is updated to the latest Alexa app and device.
Step 4: Reset (when required): In case the problem remains, press the button with the reset option and keep it for 15-25 seconds until the ring with the light changes to orange.
Step 5: Replacement: In case of failure of the method, remove the technician to check the malfunction of other parts and replace under warranty, OK with warranty problem or request replacement under warranty.
Problems and Troubleshooting Steps for Light Flashing on Alexa
Enlisted below are certain common problems along with the troubleshooting steps to fix the red light flashing on Alexa:
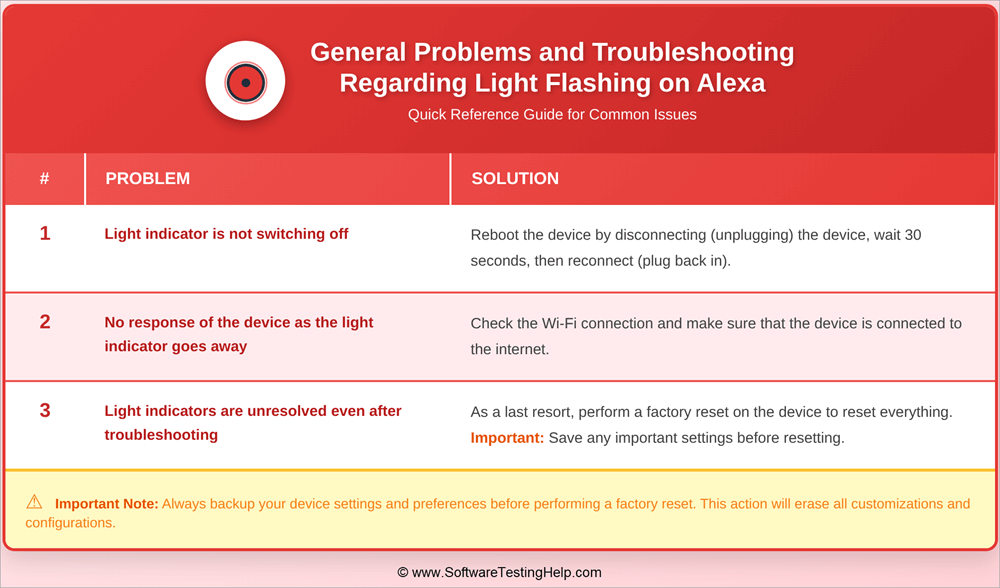
Problem 1: The light indicator is not switching off
Solution: Reboot the device by disconnecting (unplugging) the device after 30 seconds, then reconnecting (plugging back in).
Problem 2: No response from the device as the light indicator goes away
Solution: Check the Wi-Fi of the device and make sure that the device is connected to the internet as well.
Problem 3: The Light Indicators are unresolved even after troubleshooting
Solution: As a last resort, do a factory reset on the device to force a reset of everything on the device. It is important to always save any settings that are important in advance before resetting.
Frequently Asked Questions
1. Why is my Alexa blinking red?
The red light means that the mute button on the microphone is on. Click the microphone to unmute yourself.
2. What is meant by the yellow light of Alexa?
The yellow light represents messages or notifications that are not read. Get my notifications, Alexa, what are you trying to tell me?
3. What is the best of turning off the Drop In on Alexa?
In the Alexa app, go to the Devices section, which is located under the Echo and Alexa option, then choose the specific Echo device, go to Communications, and toggle off the drop-in.
4. What is meant by my Alexa device flashing orange sometimes, and what do I do so that this does not happen?
An orange light is a pointer that the device is in setup mode or that there are problems with connectivity. You may also experience such a flash if there are some mechanical issues that make the device erroneously enter setup mode or have WiFi issues.
5. What is the meaning of the purple light showing on Alexa devices?
Purple light means that the device is in Do Not Disturb mode, or that the mode is turned on, or that a Wi-Fi connection problem exists. Read our guide on how to resolve these issues to stop the color flashing.
6. What is the best way of increasing or decreasing volume on an Alexa device?
Press the volume buttons of your gadget or use a voice command by saying, “Alexa, volume up/down.”
7. Why is there an unexpected behavior of Alexa not responding to voice commands?
Make sure that the microphone is not muted, the device has a Wi-Fi connection, and that the Alexa device is not in Do Not Disturb mode.
8. What is the way to restart my Alexa device?
The method of restarting Alexa devices is as different as the Alexa device models. See the manual or the Alexa app on how to do so. Restarting these devices with a voice command like “Alexa, restart” is not possible on most of them. One easy way is to restart via the device settings or simply use the app.
Conclusion
It is also important to know what the many light indicators of your Alexa device are supposed to signify to troubleshoot it and achieve optimum performance.
When you get used to these indicators and use the solutions offered, you can have a smooth Alexa experience.
Research Process: The total time involved to complete and publish this article is approximately 40 hours. This content was created through a structured research approach to ensure accuracy and reliability.
For more quick AI Tools-related guides, you can explore our range of tutorials below:
- Amazon Alexa vs. Google Home: Which is the Best Assistant
- Alexa Not Connecting to the Wi-Fi Internet – Quick FIX
- Top 10 Streaming Devices (Review And Comparison)
- Most Popular IoT Devices
- Why is My Alexa Green: How to Fix it
Was this helpful?
Recommended Reading
-

Through this tutorial, you will identify and understand some effective ways to Fix Alexa not Connecting to Wi-Fi Issues: I have a third-generation Amazon Echo and I use it for various things, like a speaker for my TV, alarm, smart devices in my house, and so on. Sometimes it goes…
-
Get to know all about the several aspects of Amazon Alexa vs Google Home to identify the one which best suits your requirements: Recently, smart technology has become a hot topic for simplifying your home life. You may wish to add simple security features, such as weather updates and timers,…
-
Enjoy a seamless Alexa WiFi connection with our expert guide. Troubleshoot and learn how to connect Alexa to WiFi in minutes without the Alexa app and fix all common issues: The introduction of AI-powered devices has revolutionized the world in recent years. These devices have several merits and demerits. While…
-
Is your Alexa blinking yellow light? Here is a complete troubleshooting guide with step-by-step fixes and simple solutions to put an end to Alexa's yellow light blinking issues: The light ring (or light bar on the Echo Show devices) is blinking yellow, and likely, you have noticed that. This is…