


A step-wise guide to help you understand how to allow Chrome to access the network in your firewall or antivirus settings. Discover the proven methods to fix Chrome network access issues in minutes:
Google Chrome is one of the best web browsers currently used worldwide. This is because of its security features, speed, and different extensions that can enhance browsing capabilities and productivity.
Sometimes, when using Chrome to load a website, you may get this response: “Allow Chrome to access the network in your firewall or antivirus settings.” This means that the firewall settings are blocking Chrome from establishing a network connection.
Table of Contents:
Enable Chrome Network Access: In-Depth Guide
Although it is recommended that you be careful when giving security access to Chrome browsers, in this article, I will show you how you can allow Chrome to access the network in your firewall or antivirus settings.
Suggested Reading => How to disable Google Chrome Software Reporter Tool
Why is it not recommended to give Chrome full access through a firewall?
Before you give Chrome full access through the firewall or antivirus settings, you must confirm why the network connection is being denied access. Perhaps malware infected the browser.
You can install a security extension that can scan your browser for any infected malware before you allow Chrome to access the network in your firewall or antivirus settings.
Allow Chrome to Access the Network via Firewall
Follow the steps below to allow Chrome to access the network in your Firewall:
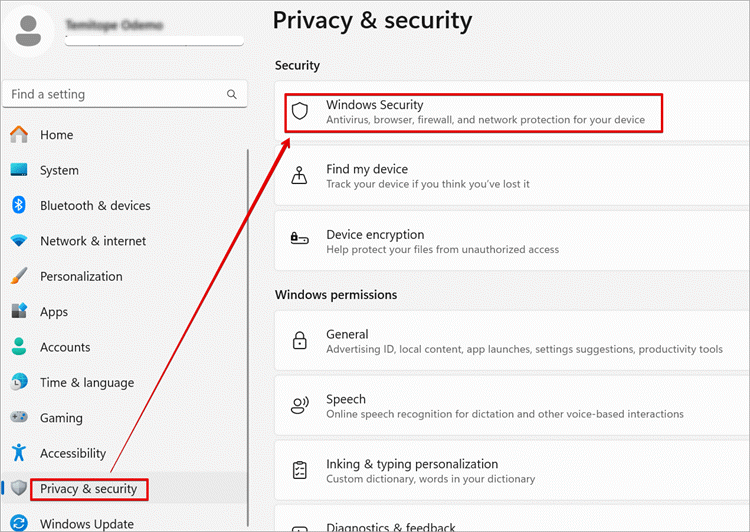
#1) Open Windows Settings and in the left sidebar, click Privacy & security.
#2) In the right pane, click Windows Security.
Suggested Read => Complete Guide to Firewall
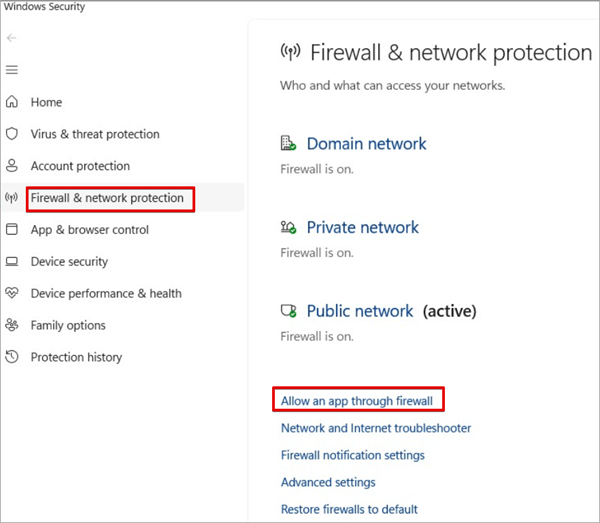
#3) Click Firewall & network protection.
#4) The Windows Security window will open. Click on Allow an app through firewall.
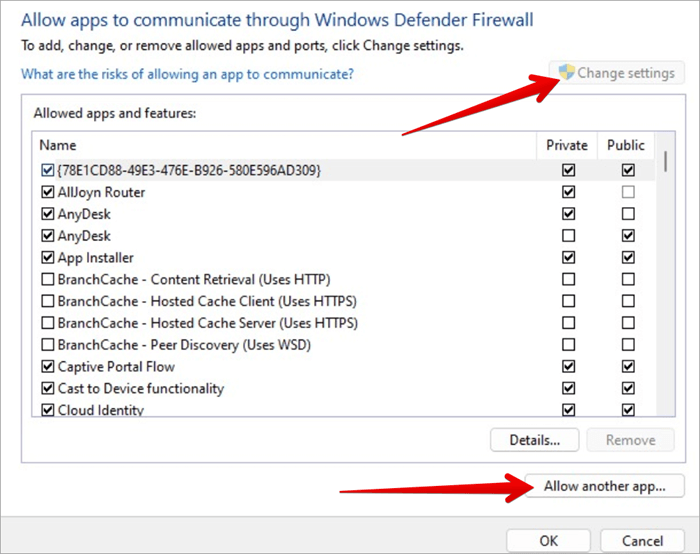
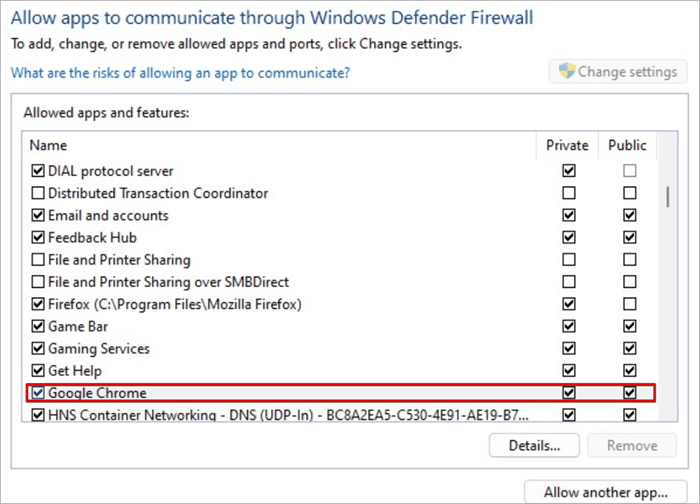
#5) Confirm if Chrome is already listed in the Allowed apps and features window.
#6) Click the Change settings button.
#7) Click on the Allow another app button
In the Add an app window, browse to the path where you can find the Chrome executable file on your computer.
On my system, the Chrome .exe file is located here:
C:\Program Files\Google\Chrome\Application
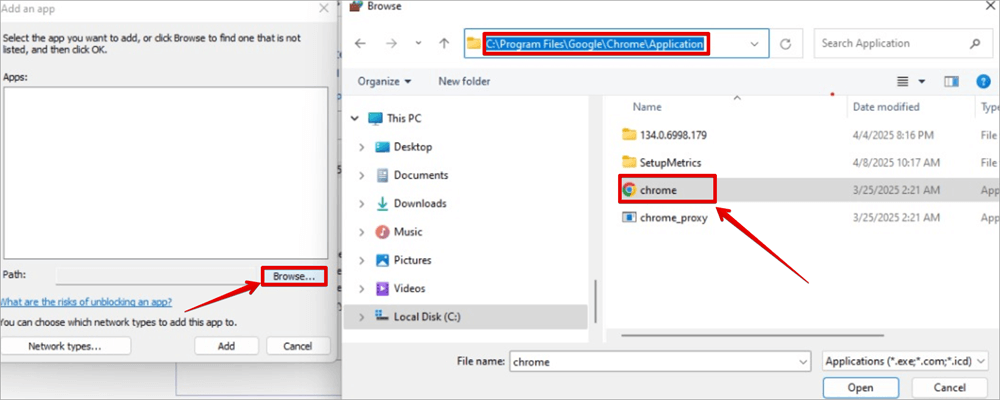
#8) After the Google Chrome file is selected, click on the Add button.
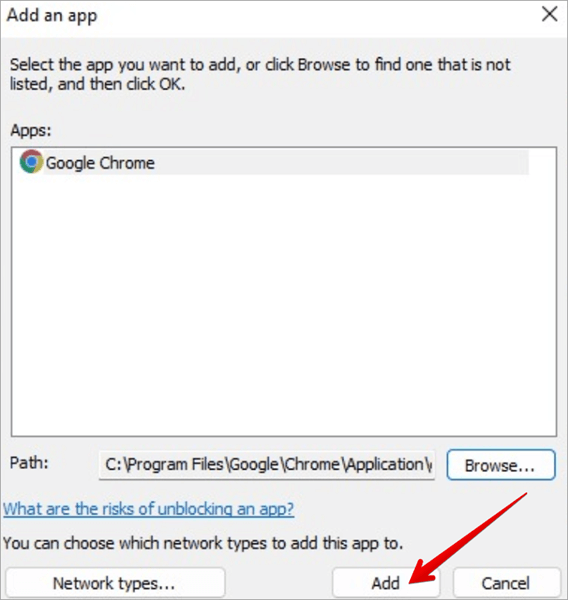
#9) Confirm you can see Google Chrome on the list of Allowed apps and features.
#10) Confirm the Private and Public boxes are checked. Click Ok.
After doing this, try to open the webpage again and see if you encounter the access issue again. But if this step does not work, then you will need to check the antivirus you are using and try to make an exception for Google Chrome.
Here is the video on how to do firewall settings that might block the connection in Windows 10/11
Security or Firewall Settings might block the connection in Windows 10/11 [Solution]
How to Set Inbound and Outbound Rules on Windows Firewall
What are Inbound Rules
Inbound rules are set to check the internet or intranet traffic that is entering your computer. These rules are essential for particular applications, services, or protocols that will need uninterrupted communication via the firewall.
For example, a web server may run on your system, and an outside resource may need access to it; then you will need to create an inbound rule to allow traffic from those resources to communicate with your web server services.
What are Outbound Rules
Outbound rules are set to check or control the traffic that leaves your system or network. These rules are set to control how data can be sent out from your computer to the internet.
For example, you may want Microsoft Edge to be restricted from accessing the internet while allowing Google Chrome access to online resources. This rule is a very good way to protect your system and network from being compromised by malicious software.
Ways to Create Inbound Rules
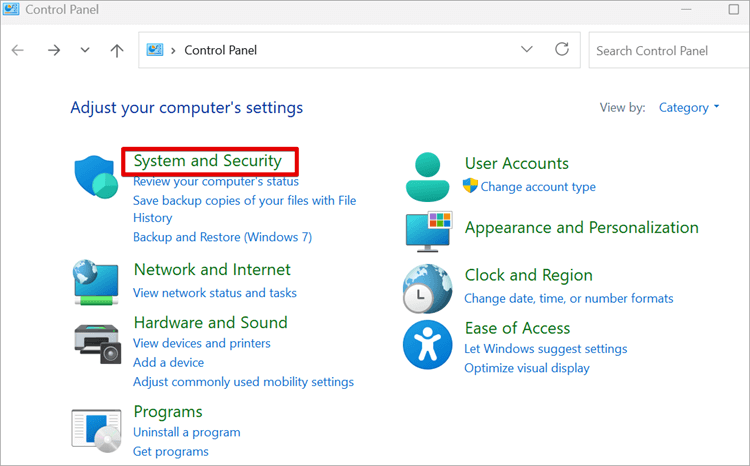
#1) Open the Control Panel and click on “System and Security”.
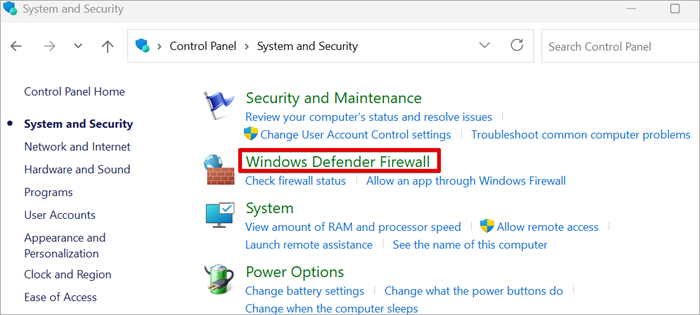
#2) Click on “Windows Defender Firewall”. On the left pane, click “Advanced Settings”; this will open the Windows Firewall with Advanced Security window.
Further Reading => Steps to Disable Windows Defender
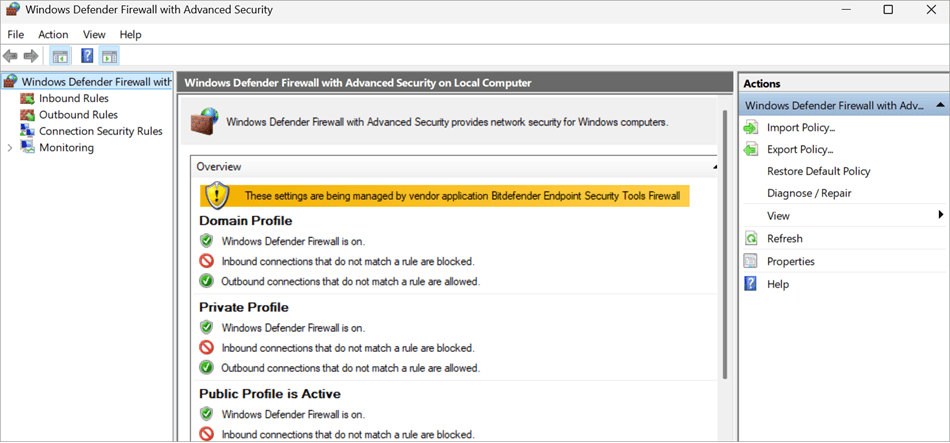
#3) On the left pane of the Windows Firewall with Advanced Security window, click on “Inbound Rules“.
#4) On the right pane, click on “New Rule” to open the New Inbound Rule Wizard.

On the Wizard page, you will see different types of rules you can create:
- Program: This rule controls connections for a program or service on your system. The ones that need access or should be blocked.
- Port: This type of rule is based on port numbers, like ports that belong to services like HTTP and HTTPS. This rule controls connections to a TCP or UDP port.
- Predefined: This rule controls connections for a Windows experience. You can select different predefined rules.
- Custom: This rule helps you to have more control by stating the specific conditions you want.
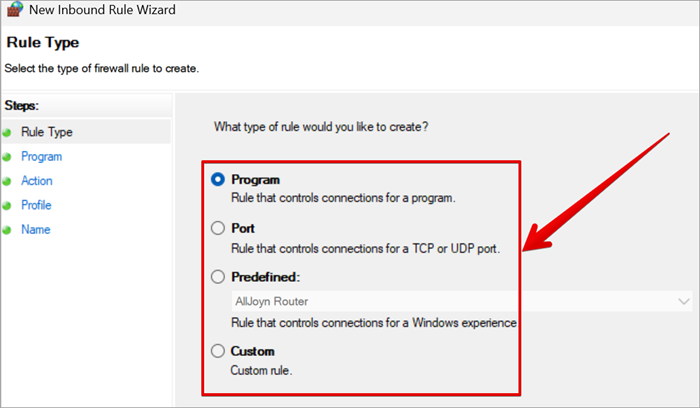
Follow the prompts from the wizard after selecting a rule type and clicking Next.
Further Reading => Understand Why Chrome is Using so Much Memory
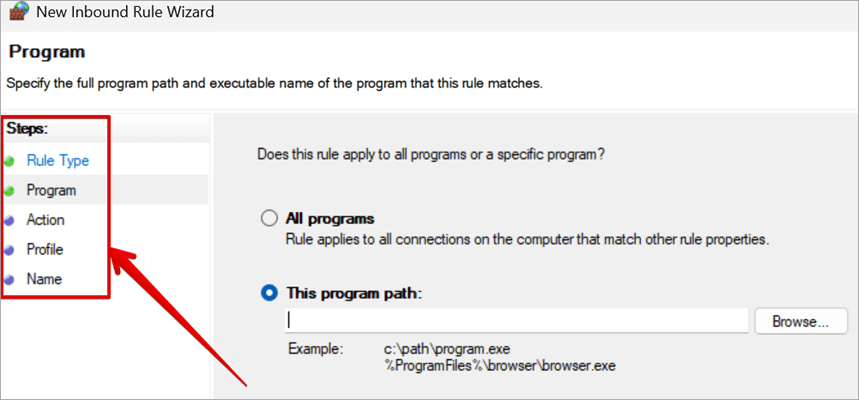
#5) If you select Program, then you will need to specify the path of the executable file on the program path, or you can just select All programs. You will also notice on the left side the Steps that will be carried out on the wizard.
#6) On the Action page, you can either select Allow the connection, Allow the connection if it is secure, or Block the connection.
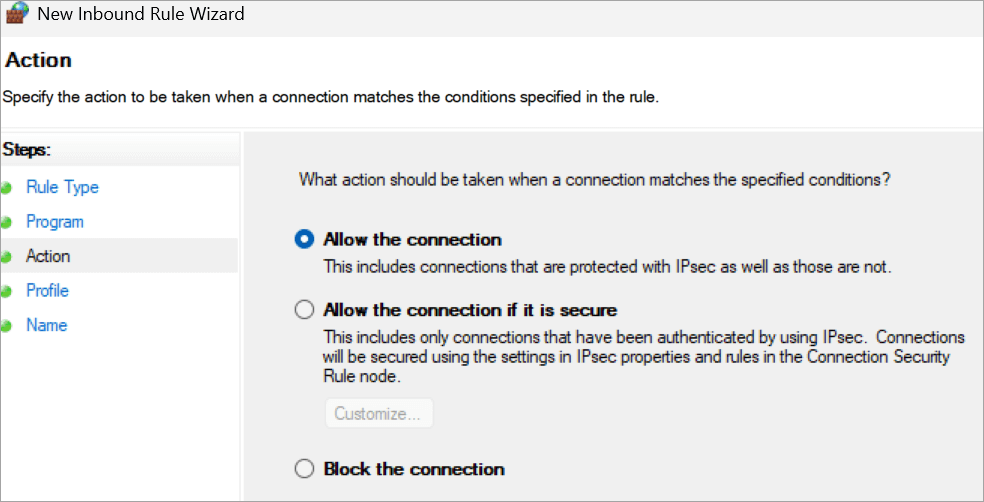
You will also need to specify if the rule will apply to domain, private, and public profiles.
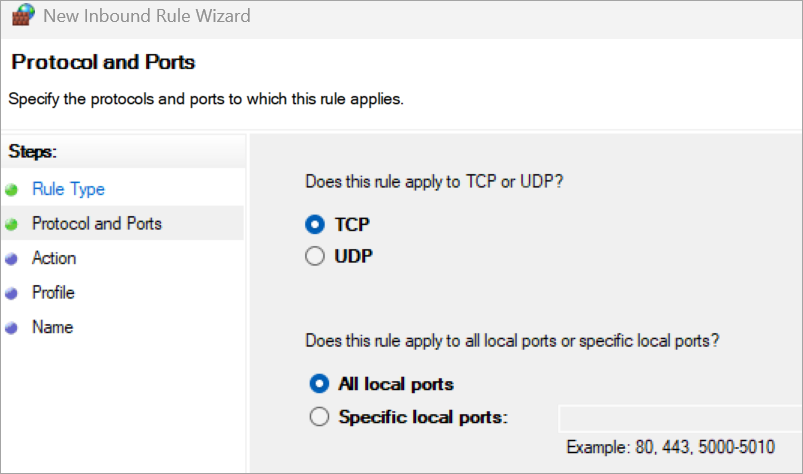
#7) If you select Port, then you can indicate whether the rule applies to TCP or UDP and select All local ports or insert a Specific local port number. You will also notice on the left side the Steps that will be carried out on the wizard.
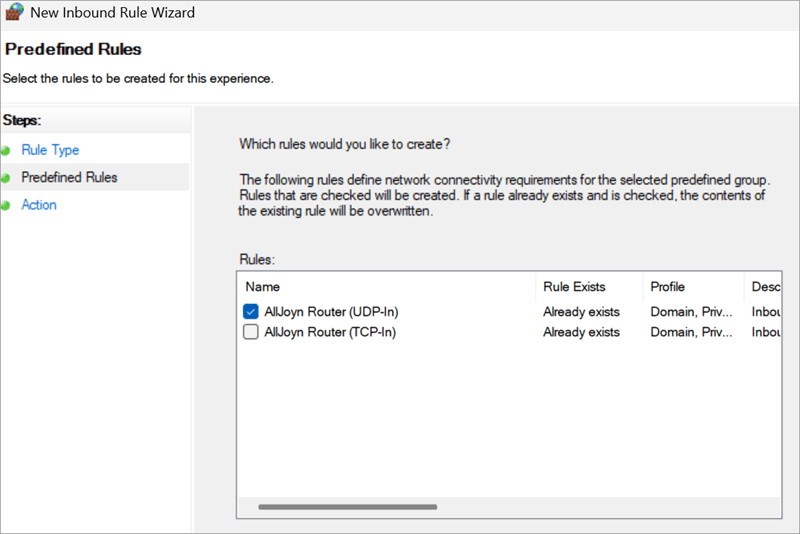
#8) If you select Predefined, then you will be able to select one of the predefined rules that can be created for the inbound task. You will observe what each of the predefined rules stands for.
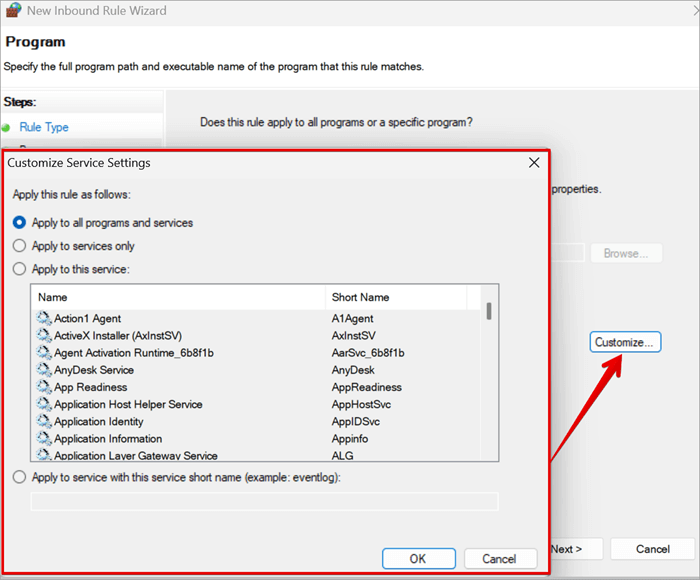
#9) If you select Custom, then you can define specific conditions for your service using the Customize Service Settings.
How to Create Outbound Rules
The process of creating outbound rules is similar to inbound rules:
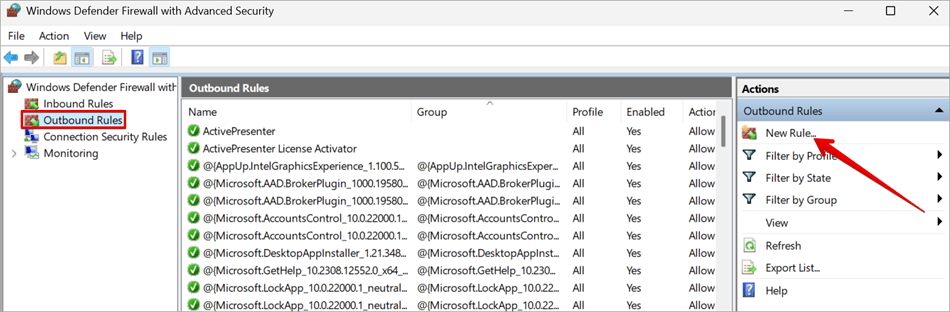
#1) On the left pane of the Windows Firewall with Advanced Security window, click on “Outbound Rules“.
#2) On the right pane, click on “New Rule” to open the New Outbound Rule Wizard. Follow the same steps for creating inbound rules as explained earlier.
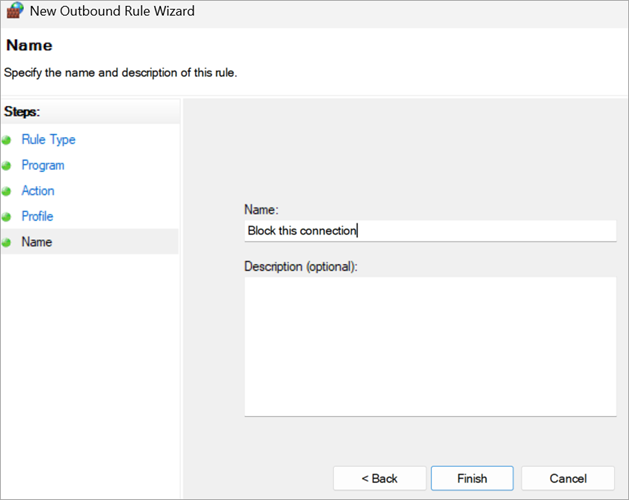
#3) Always provide a name and description for a new Inbound or Outbound Rule, then click “Finish”.
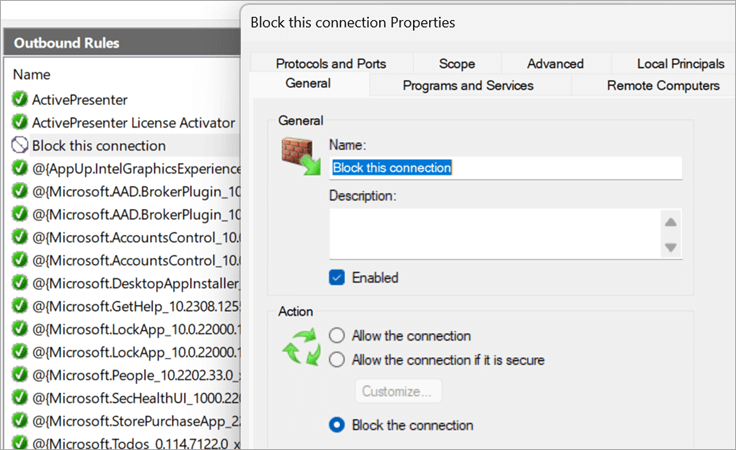
Steps to Modify Existing Rules
When you double-click on the rule, the properties will open, where you can check the rule properties and make necessary changes, and click OK.
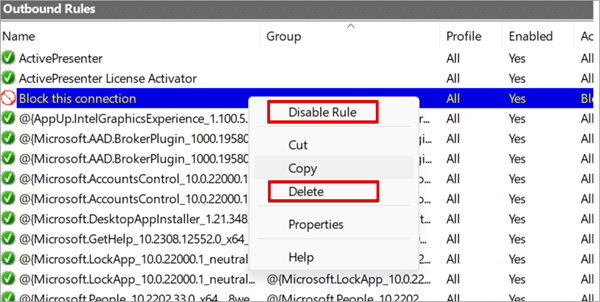
Methods to Delete or Disable a Rule
If you no longer need a specific Inbound or Outbound Rule, then you can delete it:
#1) Select the rule and right-click on it. You will see the options of Delete and Disable Rule.
#2) Click on “Disable Rule” or “Delete” and confirm your action when prompted.
How to Make an Exception for Chrome in an Antivirus
Sometimes, the antivirus installed on your system may be the reason for the Google Chrome network access blocker. But you can have an exception set up for this, though the way you can set exception settings depends on the antivirus you are using.
You can always refer to the antivirus documentation if the exception configuration is not straightforward.
Below is the process for configuring an exception on the Avast Firewall:
Further Reading => Top Antivirus Apps for Android Smartphones
Steps for Allowing Access in a Third-party Firewall
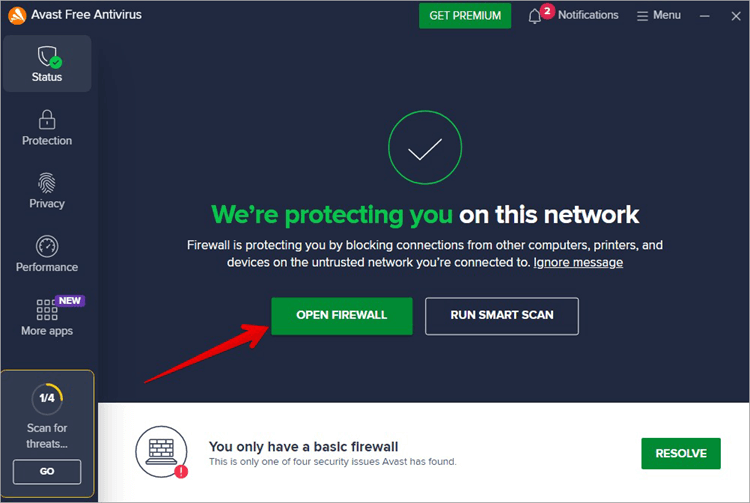
#1) Download and install your choice of antivirus. We are using Avast Antivirus as an example in this article.
#2) Open Avast Antivirus and click OPEN FIREWALL.
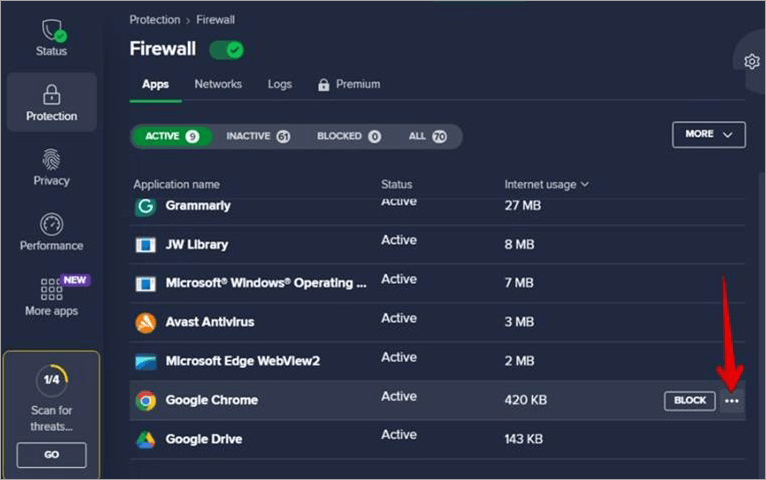
#3) On the Firewall page, search for Google Chrome in the Application name list.
#4) Click the three dots icon on the right-hand side.
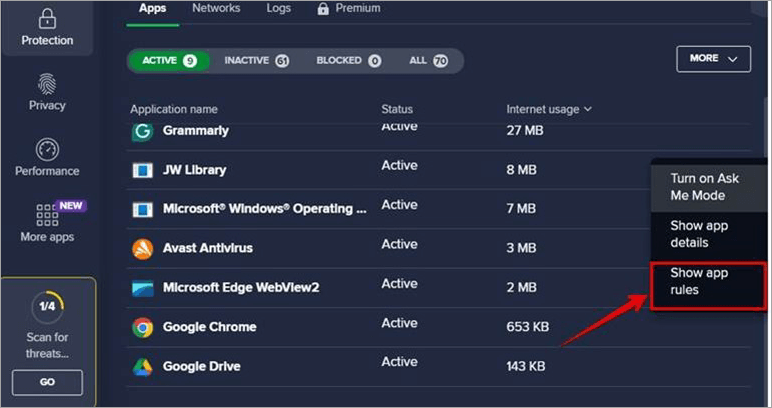
#5) Select Show app rules from the drop-down menus. This is where you will set the exception for Google Chrome.
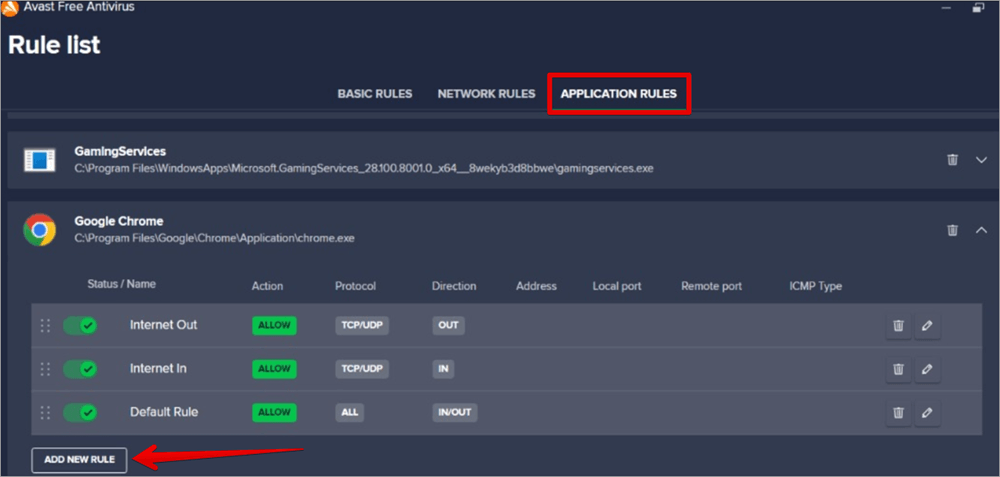
#6) At the top of the Google Chrome Rule list, click on APPLICATION RULES. You will see the current rule list for Google Chrome, which can be adjusted to suit what you want.
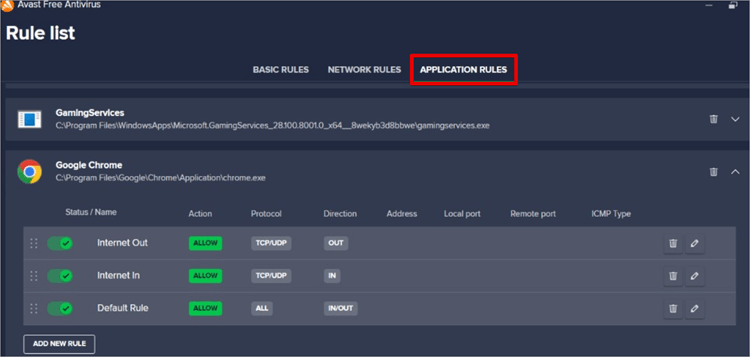
#7) If you need to create a new rule, click on the ADD NEW RULE button. This feature will help to create a custom rule for Google Chrome.
Suggested Reading => How to Completely remove McAfee from Windows
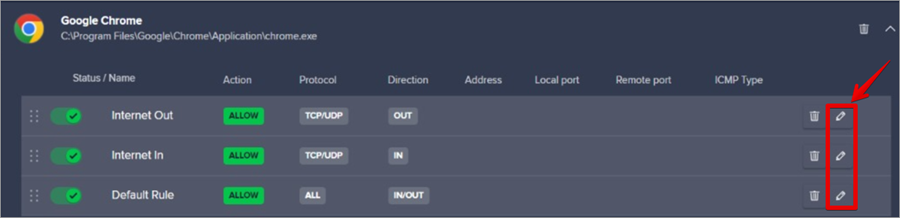
#8) If you want to adjust the rule, click on the edit button, and you can set up the appropriate action for Google Chrome.
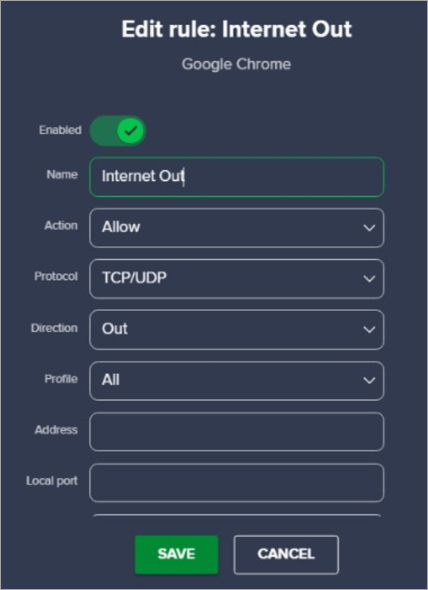
#9) On the Edit rule for Internet Out, Select Allow under the Action drop-down. This means that you will be able to access the internet with Google Chrome, but when you select Block, it means you will not be able to access the internet using Google Chrome.
#10) Click SAVE.
Suggested Reading => Best Malware Removal Software
Ways to Troubleshoot Chrome Networking Problems
You can further troubleshoot this Google Chrome network issue if it persists by doing any of the following:

#1) Update Google Chrome: Sometimes, when you update your Operating System, the network protocols may also be updated and may no longer be compatible with your current browser. The little solution trick could be to update your system’s current Google Chrome version.
#2) Remove Conflicting Applications: We have some Antivirus applications or network management tools that can deny network access to Google Chrome. If you have any VPN or Network proxies set up, confirm they are not blocking network traffic. The best option is to disable or completely remove this application that is conflicting with your Chrome app.
#3) Check and Review Firewall Logs: When you check and review the Firewall logs, you will be able to see the suspicious reason behind any blocked traffic. The log review will reveal any adjustment that needs to be made so that your browsing section can continue.
#4) Reset Chrome Settings: Resetting the Google Chrome default settings may be the last solution. This will remove all custom configurations disrupting or conflicting with the firewall rules.
Benefits of Well-Configured Firewall Access for Chrome
#1) Reduced Network Issues: When your firewall is properly configured with Google Chrome in mind, you will have no internet disruption, and you will be able to access websites and stream online content without any interruption. This will lead to more positive, efficient, and enjoyable browsing.
#2) Improved productivity: You will be more productive on any task you are carrying out on the Chrome browser, without any firewall-related issues popping up at intervals, disrupting the job process.
#3) Improved Network Security: When your firewall is properly configured, this will help protect or block any illegitimate traffic to disrupt the operation. When this is done, it will be able to balance optimal performance with secure access to any environment.
Tips for Maintaining Security
It is highly recommended to follow several best practices in maintaining your Google Chrome browser.
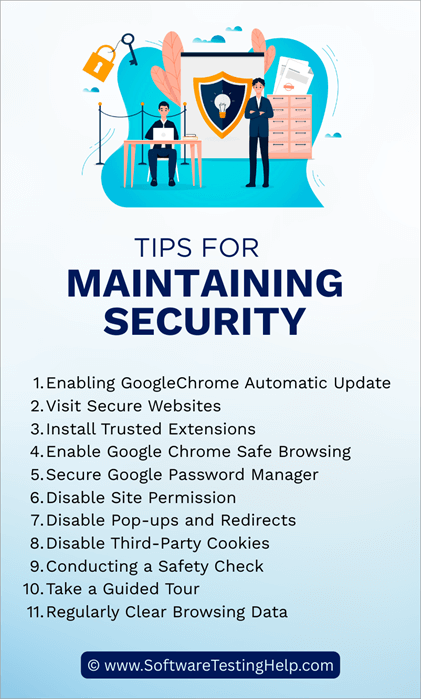
Follow the tips below for maintaining security on your Chrome browser:
#1) Enabling Google Chrome Automatic Update: One of the major things to do is to ensure you regularly update your Chrome by enabling the automatic updates feature. When you ensure your Chrome has the latest security patches, it will be able to fight and protect against emerging threats.
#2) Visit Secure Websites: Always browse websites that are secure with SSL and route through HTTPS. It is always safe to avoid clicking on malicious links or downloading from sources that are suspicious and untrustworthy. When you do this, you will reduce the risk of your system getting infected with malware.
#3) Install Trusted Extensions: Make use of trusted extensions like ad blockers built by Google or other trusted software development organizations can be used to enhance the security of your Google Chrome when using it for browsing online.
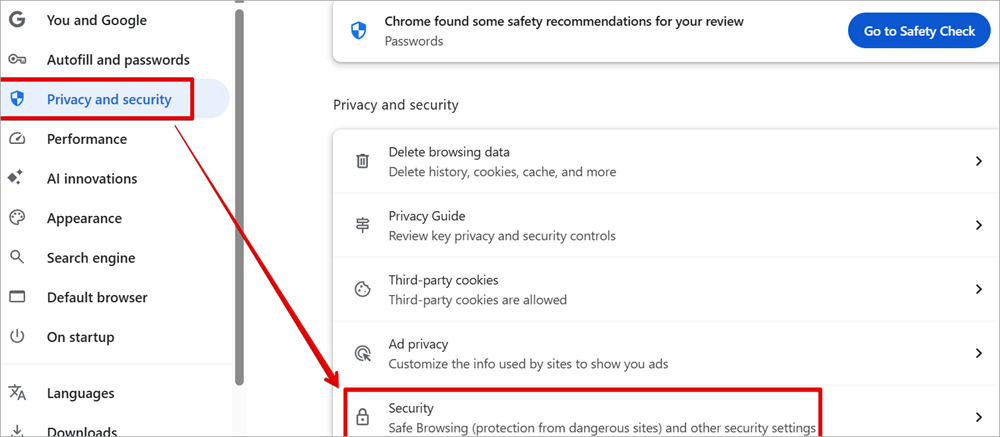
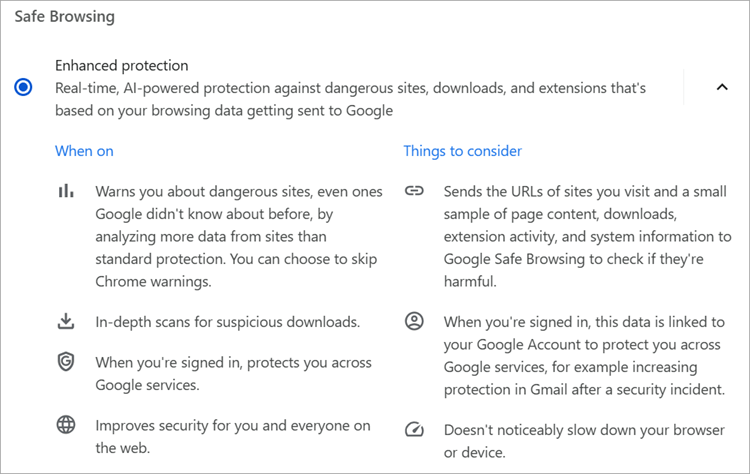
#4) Enable Google Chrome Safe Browsing: When you enable the safe browsing feature, it helps to add another layer of protection when browsing websites that may be malicious.
This feature can help you flag suspicious content to Google and help you reduce the risks of infecting your system and spreading it to other people. This security feature can keep your browsing experience safe and secure.
Open Chrome settings > Privacy and security > Security
Select Enhanced protection.
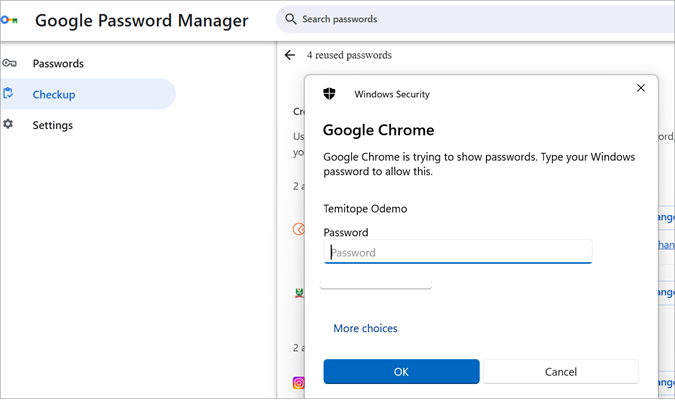
#5) Secure Google Password Manager: Ensure you create login credentials for your Google Password Manager. You can further enhance the security by using two-factor authentication for the password manager.
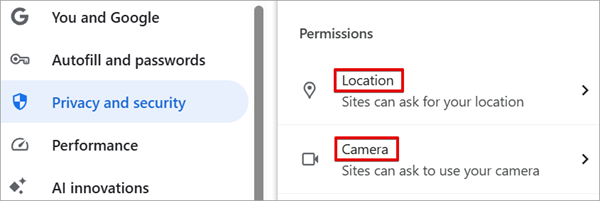
#6) Disable Site Permission: You can disable access to your location and camera on your system to any website you may be visiting.
Open Chrome settings -> Privacy and security -> Site Settings
Disable access for location and camera.
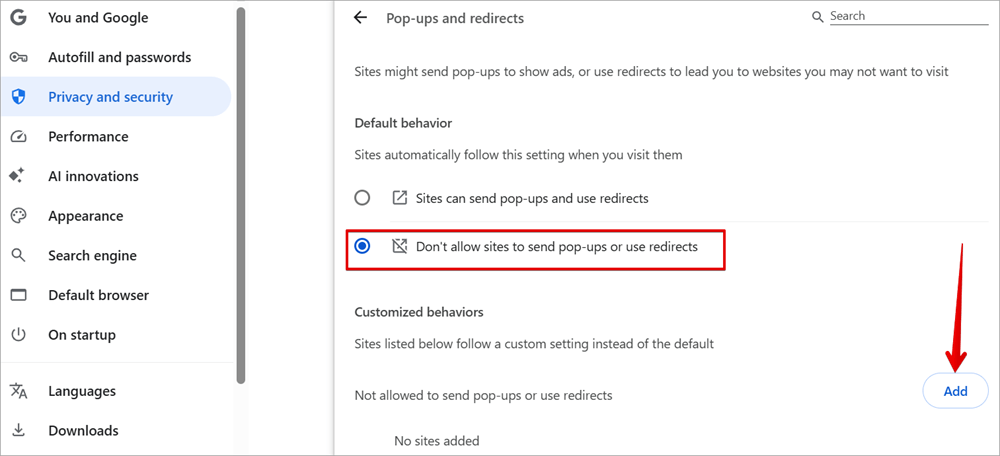
#7) Disable Pop-ups and Redirects: While browsing online, you may accidentally find yourself on the wrong website, and suddenly you will start getting different pop-ups and getting redirected to strange websites, which are malicious and dangerous.
If you try to close them, another will be opened, and before you blink, countless pop-up windows will have been opened on your system, and you may be confused. Google Chrome has a feature that you can use to only allow pop-up windows from sites you trust.
Open Chrome settings -> Privacy and security -> Pop-ups and redirects.
Select the option Don’t allow sites to send pop-ups or use redirects
You can also decide to add a custom website, and this will be part of the customized behavior for this feature.
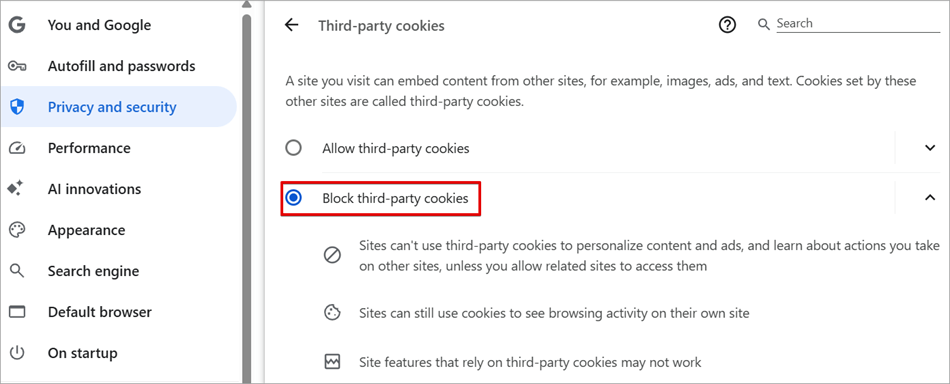
#8) Disable Third-Party Cookies: Cookies can help store information about your internet browsing history right inside the browser. Big organizations make use of these cookies to track your browsing history and use it to serve you their products. To protect your privacy, you may decide to disable this feature so that your browsing will not be tracked.
Open Chrome settings -> Privacy and security -> Third-party cookies
#9) Conducting a Safety Check: This feature is like a security overview of Google Chrome, telling you the safety status at a glance on the Chrome browser you are using. Informing you if Chrome is up to date or not, and giving you safety recommendations that you can quickly implement.
Open Chrome settings -> Privacy and security -> Safety Check
Click on Go to Safety Check.

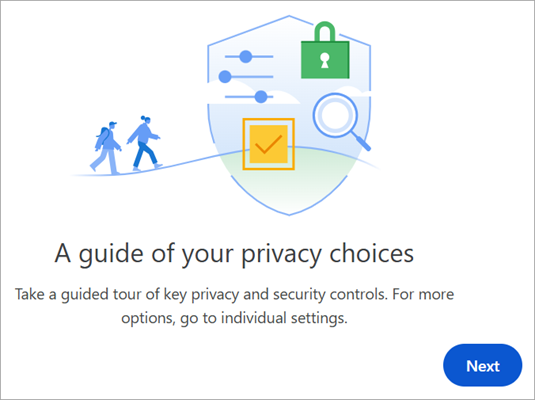
#10) Take a Guided Tour: You can take a guide to your privacy choices. This tour will help you with how to go about your privacy and security controls, and when it is not properly configured, they can cause harm or a threat to your privacy.
#11) Regularly Clear Browsing Data: Always clear your browsing data, including cookies, browsing history, credentials, images, files, and much more. Remember that the data saved on your browser can be used against you by malicious actors.
FAQs on Chrome Access Network via Antivirus Settings
1. How do I allow network access through a firewall?
On the search box type Windows Defender Firewall in the Search box. Click Windows Defender Firewall, and then click Allow an app or feature through Windows Defender Firewall.
Click the Change settings button and select the app you want to give network access to. If there is another app, click on the Allow another app button, then click OK.
2. How do I unblock a website using Chrome firewall?
• Launch the Chrome app.
• Click on the three vertical dots at the top right.
• Click on Settings.
• Click Privacy and Security.
• Select Site Settings.
• Unblock a web application or website.
3. How do I turn on the network firewall?
• Search for Windows Defender Firewall
• Click Windows Defender Firewall
• On the right panel, click on Turn Windows Defender Firewall on or off
• This will now enable the Firewall.
• If you have an antivirus installed, the Firewall settings will be managed by the antivirus.
4. How do I allow a website through my firewall?
Open Windows Defender Firewall and click Allow an app or feature through Windows Defender Firewall. Click Change Settings and select the website you need access to, and click OK.
5. How to fix Access Denied on Google Chrome?
• Launch the Google Chrome App.
• Open your Website.
• On the top left of the web address box, click on the View site information icon.
• Click Site settings.
• Under Privacy and Security, you can change the permission settings.
6. How do I turn off the firewall blocking?
• Open the Computer Settings
• Click Windows Security
• Click Firewall & Network Protection
• Select an active network profile
• Under Microsoft Defender Firewall, toggle the button to OFF
7. How to check proxy and firewall on Chrome?
• Open your Chrome browser.
• Click on the three dots icon at the top-right corner.
• Click Settings from the drop-down menu.
• On the settings page, click on System.
• On the right pane, click on Open your computer’s proxy settings.
8. How do I unblock a Firewall?
• Open the Computer Settings.
• Click on Privacy and security -> Windows Security on the left pane.
• Click on Firewall & network protection and select the network.
• Under Microsoft Defender Firewall, toggle the button to Off.
9. How do I stop Chrome from blocking unsecure websites?
You can disable the not secure warnings from the settings, and you can avoid this by purchasing an SSL Certificate so that all websites will redirect through the HTTPS protocol.
Conclusion
Hope you understood how to allow Chrome to access the network in your firewall. As I said at the beginning, you need to exercise caution when giving Google Chrome access to the network in your Firewall settings; if you don’t, you may inadvertently invite malware into the system.
Whether you work with a Windows or Mac system, you need a basic understanding of a firewall for proper configuration and effective troubleshooting of this type of network connectivity problem.
Lastly, the Chrome browser is very good for browsing, but we need to exercise caution with the way we share information online and the type of websites we visit via this browser. Do not rush to click on any links, do not rush to enter your financial details on a suspicious website, as this may be the pipeline to security attacks on your system.
When you implement all these security precautions, you will be able to enjoy a safer and more secure browsing experience while using Google Chrome.
Was this helpful?
Recommended Reading
-
![How to Open Recently Closed Tabs in Chrome[Quick Fix] (1)](data:image/svg+xml,%3Csvg%20xmlns='http://www.w3.org/2000/svg'%20viewBox='0%200%20240%20135'%3E%3C/svg%3E)
Here we will explore multiple effective methods to understand How to Open Recently Closed Tabs in Chrome on various devices: Have you ever accidentally closed a tab or a window while working on multiple ones? Happens to me all the time. And trust me, it can be horrifying to lose…
-
Review and compare the list of the Best Chrome Extensions along with the features to select the must have Google Chrome Extensions: Google’s Chrome browser is one of the most popular web browsers around. Millions of users across the globe use this browser daily. This browser’s functionality can be enhanced…
-
Want to block a website on Chrome? Refer to this step-by-step guide with screenshots and 6 easy methods to block websites on Chrome: You might have faced a situation where you need to block a website on Chrome, either while setting up computers for school or while setting up a…
-
This tutorial explains why do we need to clear browser cache and different methods to Clear Cache in browsers like Chrome, Firefox, etc.: A few decades back no one would have ever imagined that a connection of numerous computers can lead to an evolution of the world's largest network, which…
![How to Open Recently Closed Tabs in Chrome[Quick Fix] (1)](https://www.softwaretestinghelp.com/wp-content/qa/uploads/2021/10/How-to-Open-Recently-Closed-Tabs-in-ChromeQuick-Fix-1.png)


