Learn how to check PC specs on Windows 10 and 11 with our simple step-by-step guide. 6 Easy ways to check system specs in minutes using built-in methods and third-party tools.
Most people don’t know that Windows has built-in methods to check PC Specs immediately without having to download any external software.
From checking RAM speed to finding out which processor is installed in your computer, everything is explained in the following section in the easiest ways to check PC Specs on Windows 10 and 11.
It is vital to have complete knowledge about what hardware your PC consists of before upgrading or troubleshooting issues.
Table of Contents:
- How to Find Your System Specs: Step-by-Step Guide
- 6 Quick Ways to Check PC Specs on Windows (Built-in Methods)
- Which Method Should You Use? (Comparison Table)
- 4 Best Third-Party Tools to Check PC Specs for Free
- Check Your PC’s Storage Using File Explorer
- Check Your PC’s Specs on Linux
- How to Check Specs on Mac?
- What Specs to Consider While Purchasing a PC
- Frequently Asked Questions
- Conclusion
How to Find Your System Specs: Step-by-Step Guide
If you also plan to play heavy video games on the computer, you will need to know if the computer has a graphics card and the type of graphics card in the system. Memory checks are also very essential to determine the performance of the PC, and you may also want to upgrade your PC to a higher specification.
How to Check PC Specs on Windows 10 and 11
The fastest way to check PC specs on Windows 10 and 11 is to press Windows Key + I and navigate to -> System -> About. This shows all your device specifications (CPU, RAM). For detailed GPU and BIOS info, type msinfo32 in the Windows search bar and hit Enter.
Quick Recommendation to check your PC Specs
- Just want basic info? → Use Windows Settings
- Want full system details? → Use System Information (msinfo32)
- Checking graphics card? → Use dxdiag
- Need Quick performance view in real time? → Use Task Manager
- Advanced/Technical use? → Use CMD or PowerShell
These methods are explained step by step in the following subsections.
Here is the video guide on how to check PC Specs on Windows 10 without any third-party tool:
6 Quick Ways to Check PC Specs on Windows (Built-in Methods)
Here are some of the ways through which you can check your PC Specs.
#1) Using Task Manager
Task Manager is a Windows utility tool that displays information about the programs and processes currently running on your computer. This tool enables the management and monitoring of system performance. When an application is not responding well, this tool can end the unresponsive application.
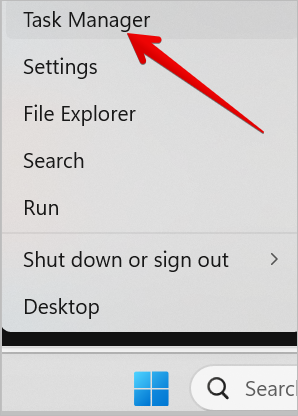
1. Open Task Manager by right-clicking on the Windows icon and selecting Task Manager as shown below. You can also type “Task Manager” in the search box and launch it.
2. In the Task Manager, click on the Performance menu as shown below, and you will see the different system components. To learn more about a specific component, click on it.
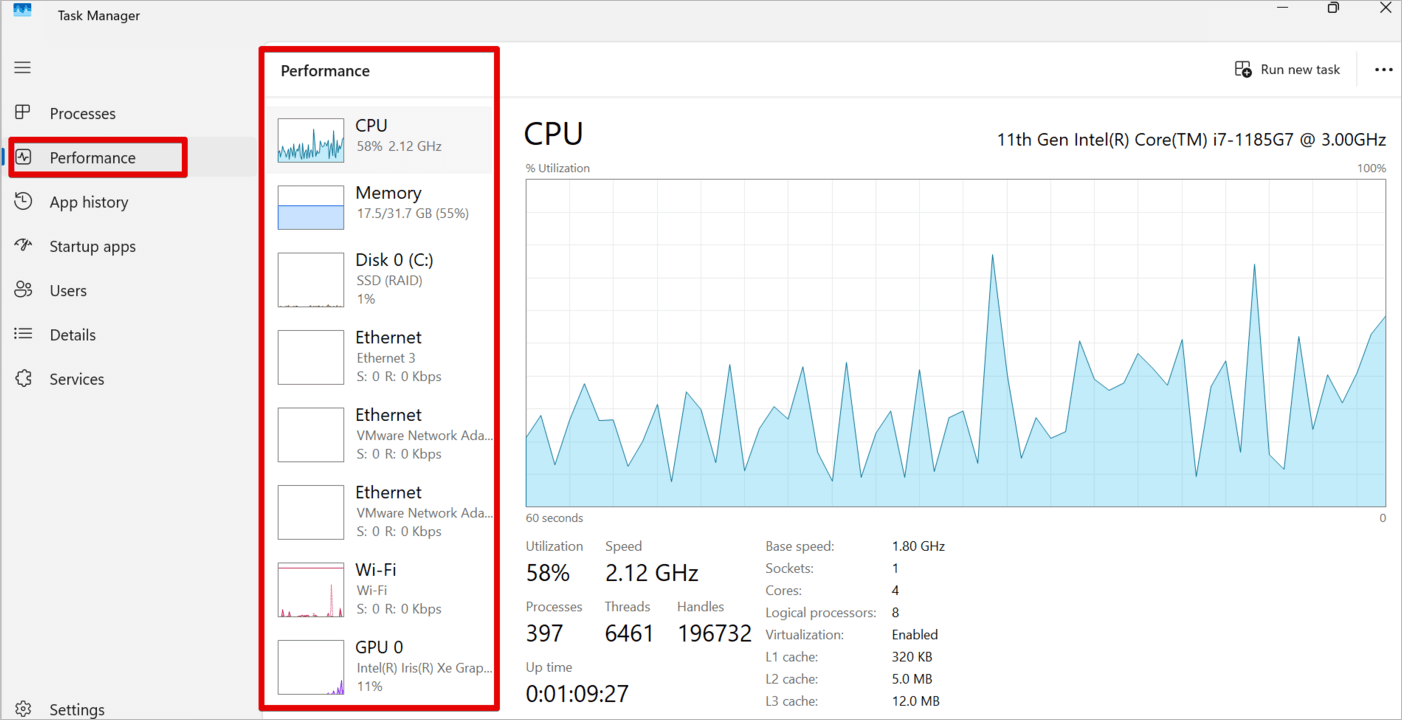
When you click on CPU, Memory, or Disk on the right pane, you will see the details of the processor, like the Processor Generation, Processor Speed, Memory usage, Disk name and storage, and many other details you may require.
#2) Using Settings
Computer settings is a Windows utility that can check the basic details like the processor type and memory usage.
Enter Settings in the search box and navigate to System -> About as shown below.
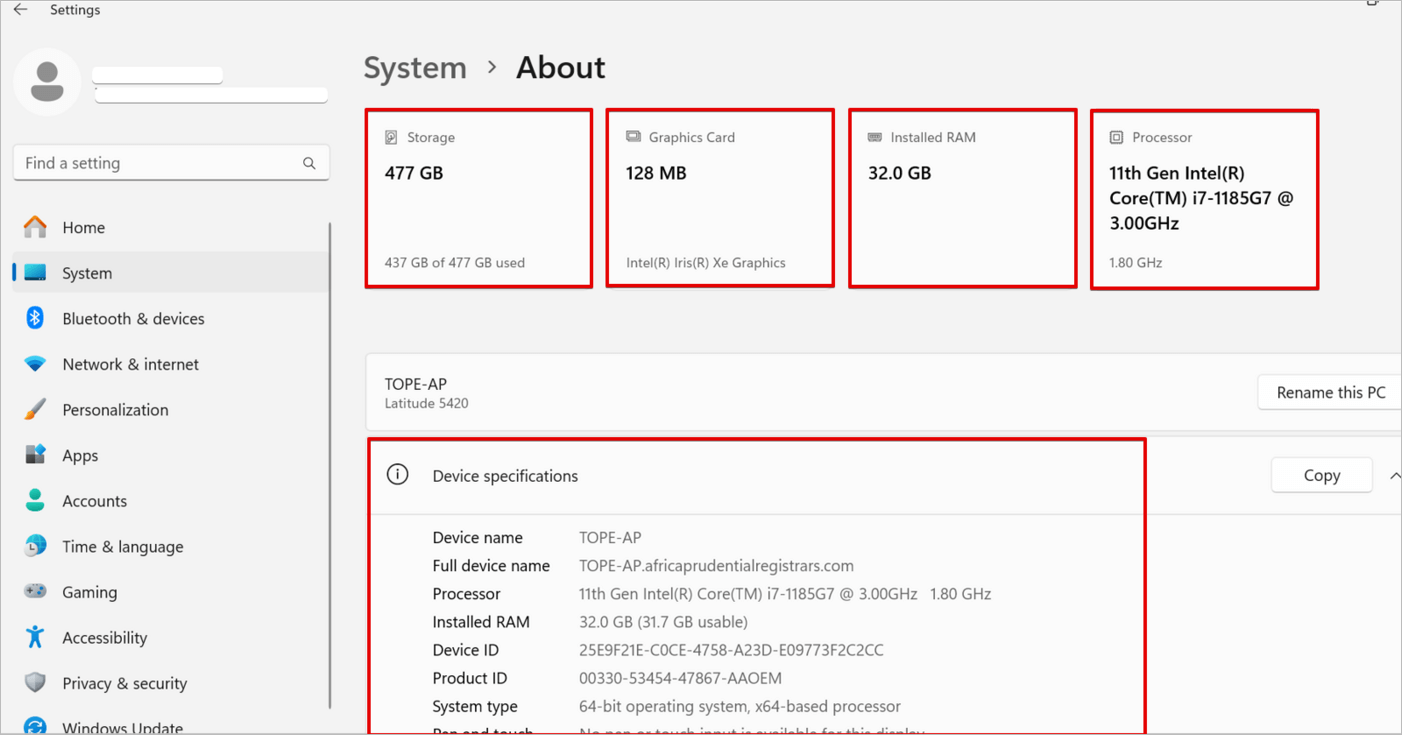
On the right pane, you will see your PC’s specifications under the Device Specifications section.
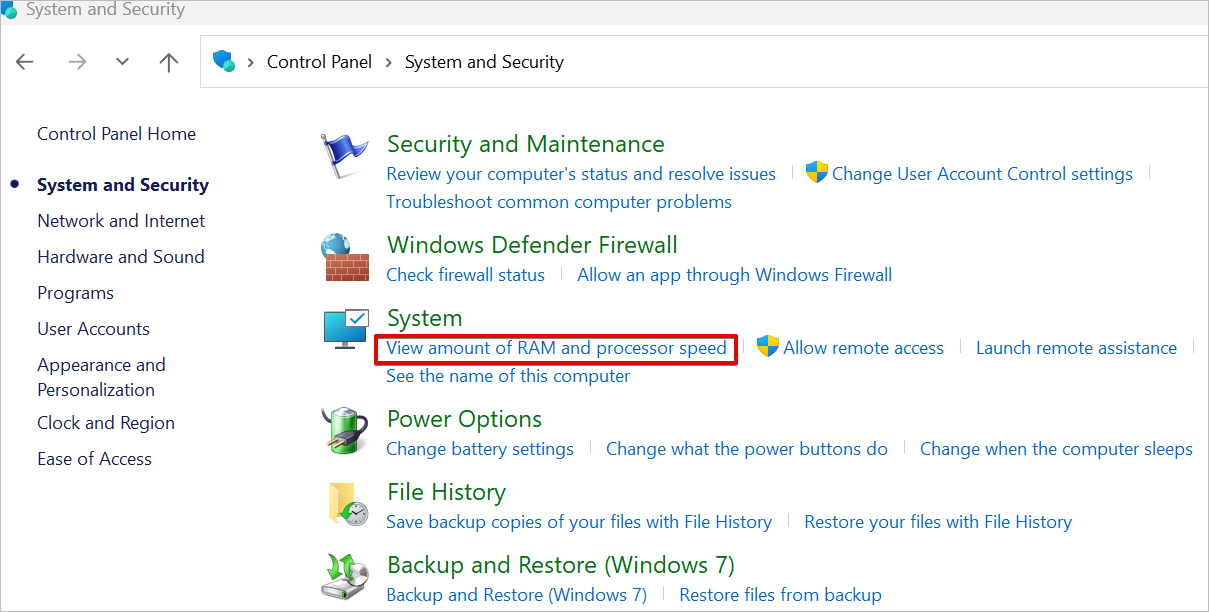
#3) Using Control Panel
With a Windows Control Panel, you can get details of your PC’s specifications, like the CPU type, speed, memory usage, and operating system version.
1. Type Control Panel in the search box
2. Click System and Security in the Control Panel window
3. Click System or View amount of RAM and processor speed as shown below.
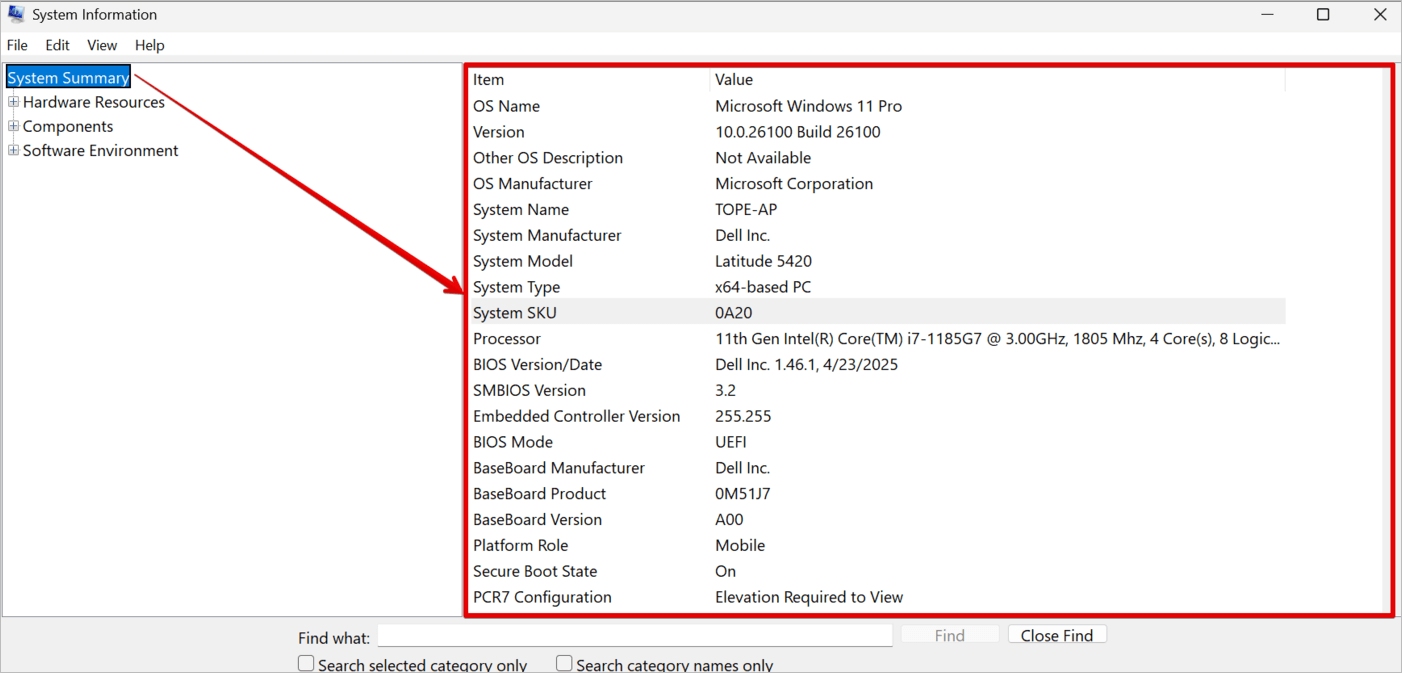
#4) Using Windows System Information Tool
The System Information is a robust tool that can get detailed PC specifications. Follow the steps below to learn how to use System Information to find specs on Windows.
1. Type System Information in the search box or run the command prompt and type ‘msinfo32’
2. The System Information page will open: It is a System Summary of OS Name, OS Manufacturer, System Manufacturer, System Model, System Type, Processor, BIOS Version, and many more. You can still find more system details when you expand Hardware Resources, Components, and Software Environment.
System Summary image is shown below:
These are some definitions that you need to know:
Processor – { CPU }
BaseBoard – { Motherboard }
Physical Memory – { RAM }
Drives – { Formatted disk space, e.g, C: and D: }
Disks – { The physical storage hardware in your computer that contains the formatted drives }
Display – { Graphics Card }
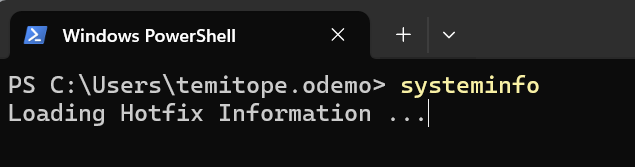
#5) Using PowerShell or Command Prompt
Follow these steps to check your system hardware and software for detailed information:
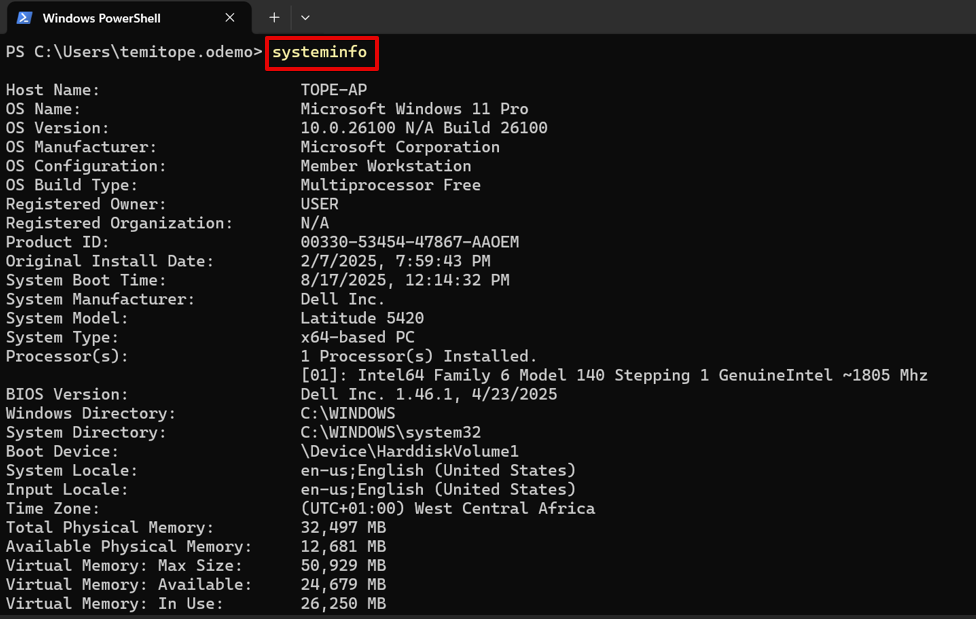
Open PowerShell or Command Prompt. Enter the command systeminfo and press Enter.
systeminfo command will look as shown below:
You will see your system information displayed on the screen as shown below.
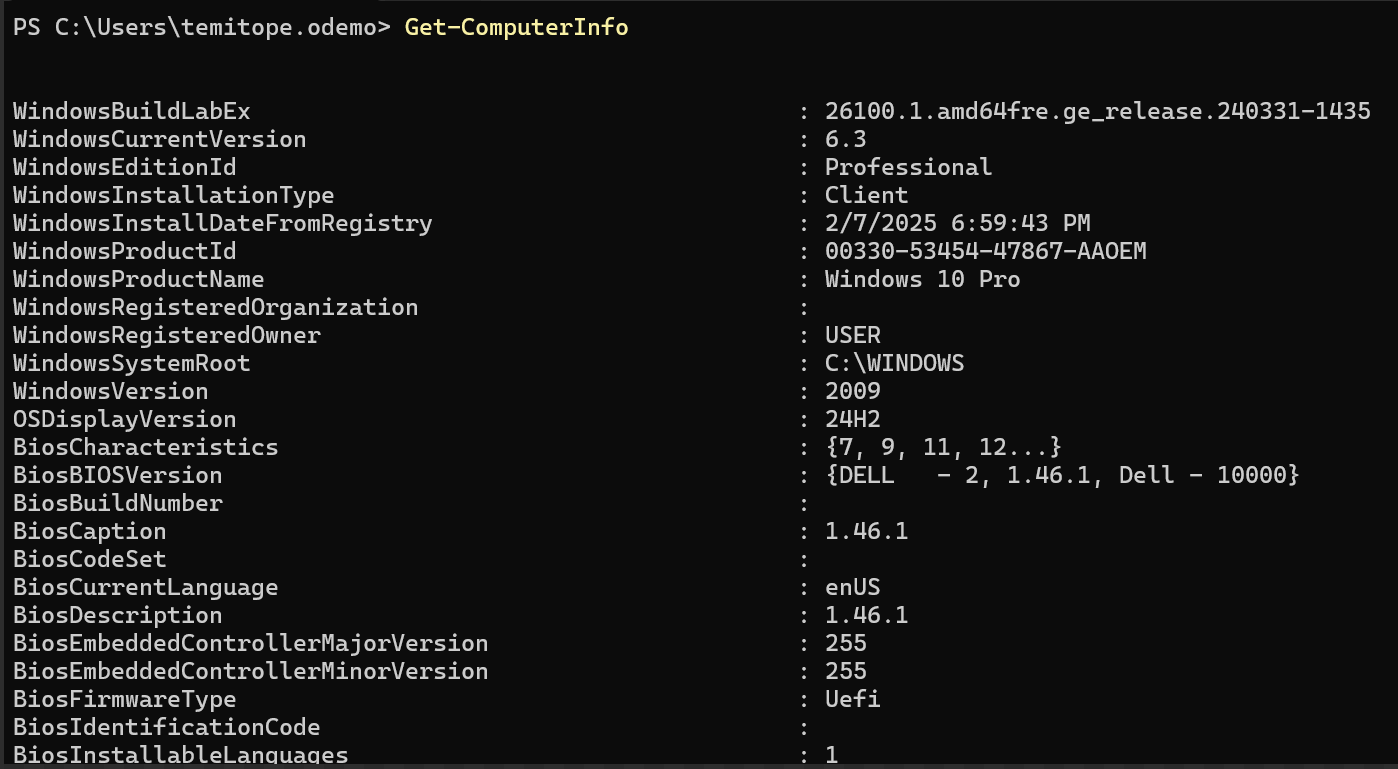
As shown in the image below, you can also run this command, Get-ComputerInfo, in PowerShell to generate your system information:
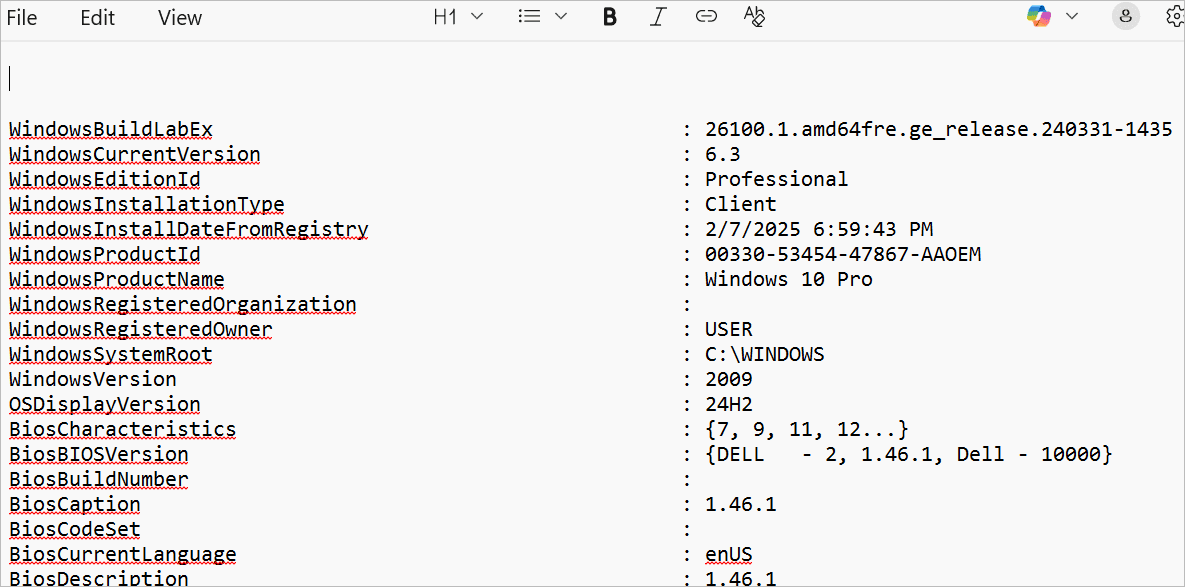
But if you want to save the computer information as a text file inside the users’ directory, then use the command below:
Get-ComputerInfo | Out-File -FilePath “ComputerInfo.txt”
When you check the directory location, you will see the file, and when you open it, you will see the information in the file as shown in the image below.

You can also run the command below if you want to view specific component details or properties on your system.
Get-ComputerInfo -Property “PROPERTY-NAME”
Let us assume you want to view the BIOS information on your system; then, you will need to pass “bios” as the property name inside the command.
Get-ComputerInfo -Property “bios*” image is depicted below:

Please note that the asterisk (*) shown in the command is there to serve as a wildcard to match every property that starts with BIOS on the system.
Running the DXDIAG Command
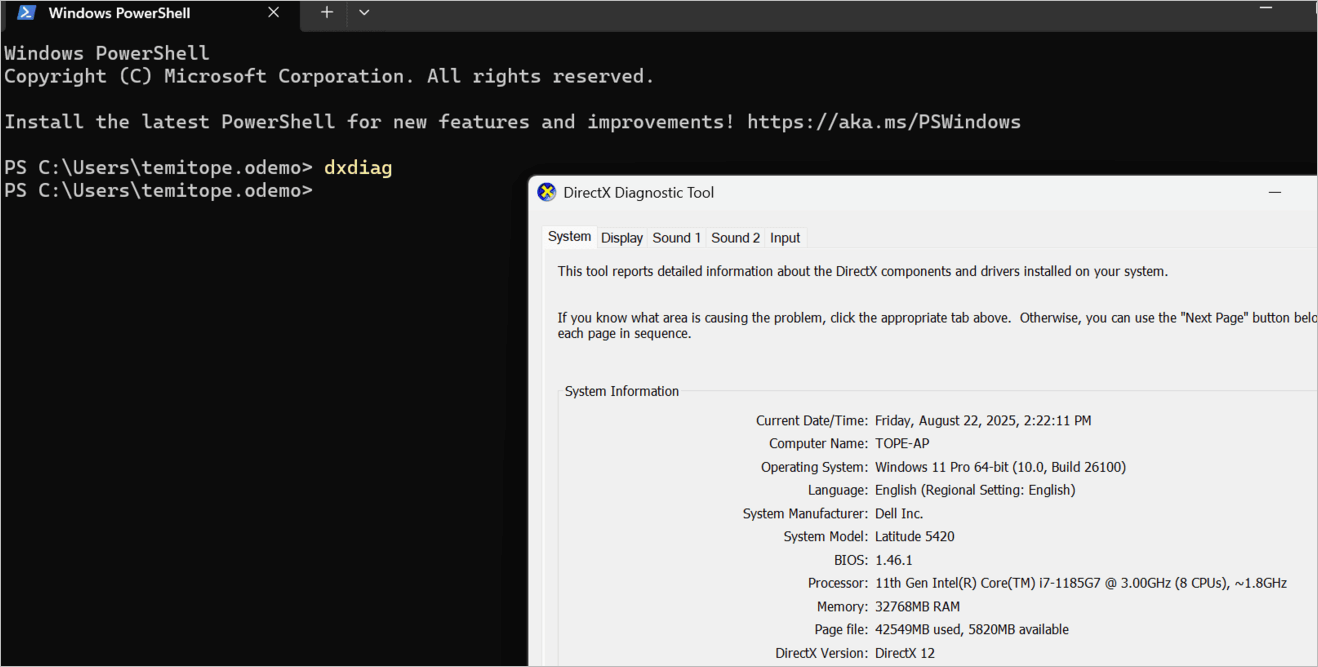
When you run the command dxdiag on your PowerShell or Command Prompt, a DirectX Diagnostic Tool page will display. Click on the System tab as shown in the image below, and you will see your System Information, like the System Model, BIOS, Processor, and Memory.
Click on the Display tab. You will see Device Graphics information like the Graphics name, Manufacturer, Chip Type, Display Memory, and Shared Memory.
When you click the Sound tab, you will see all the information about the sound component, like the type of speaker. When you click the Input tab, you will see all direct input devices, such as the mouse, keyboard, HID2C device, and input-related devices, including PS/2 devices.
The Display Tab is shown in the image below:
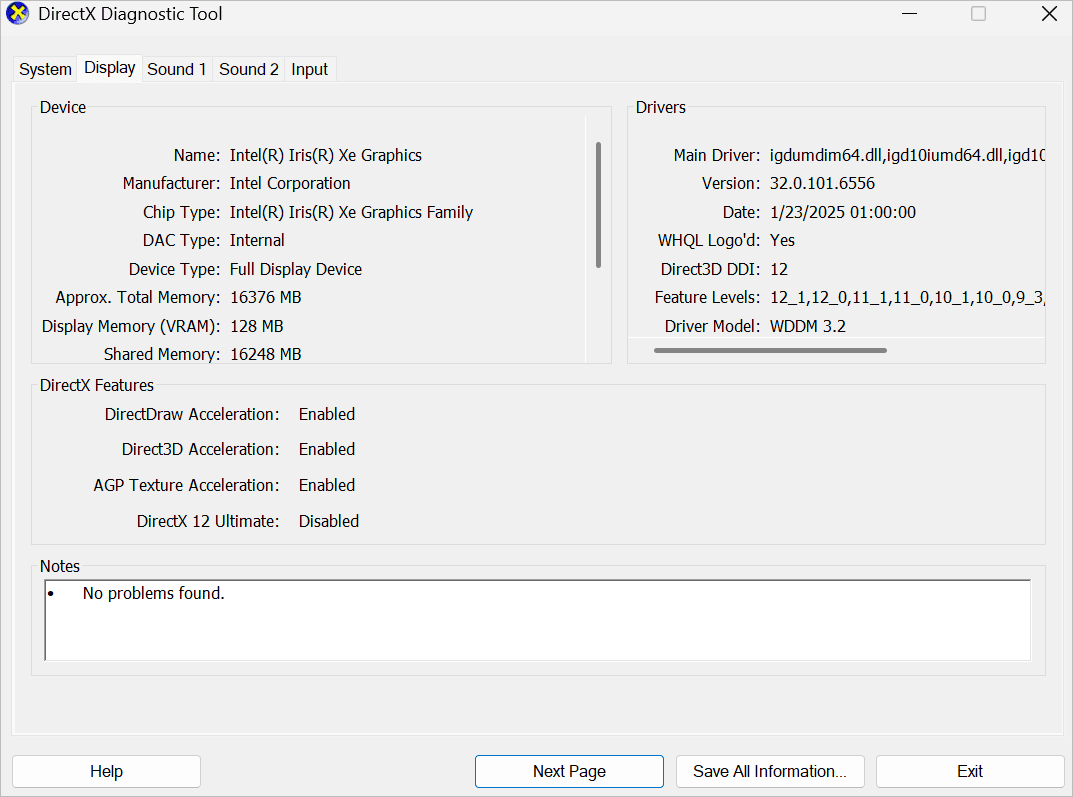
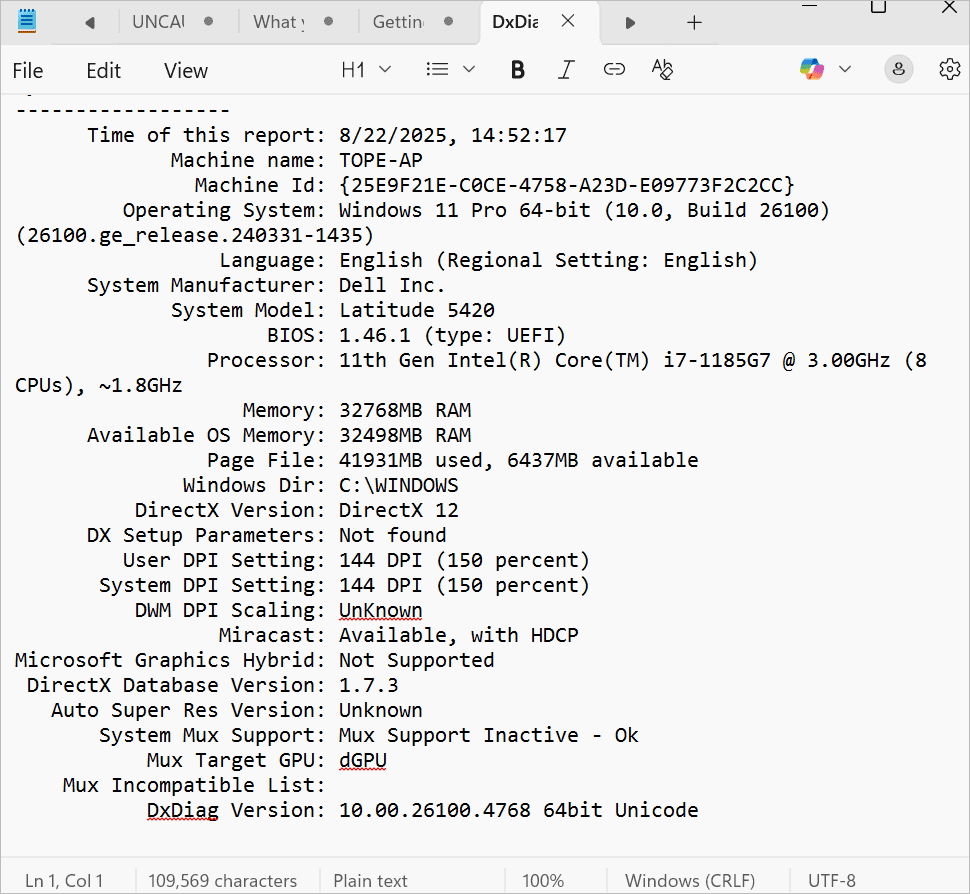
The information displayed on the DirectX Diagnostic Tool page can be saved to a Notepad file by clicking the Save All Information button.
The image below is an example of a DirectX Diagnostic Notepad file.
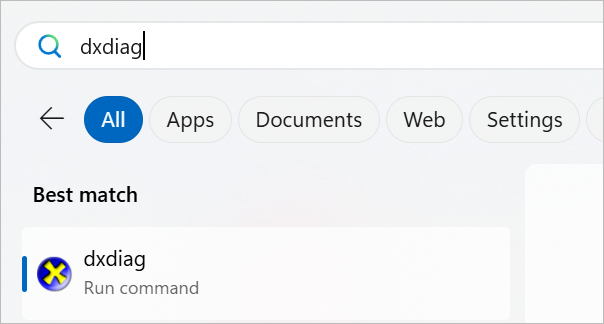
You may decide not to launch either PowerShell or Command Prompt; you can enter dxdiag in the search box and click on it, and the same DirectX Diagnostic Tool page will open as shown below.
#6) Using Device Manager
Device Manager is a built-in Windows utility tool that allows you to view and manage hardware devices connected to your PC.
- Type Device Manager in the search box.
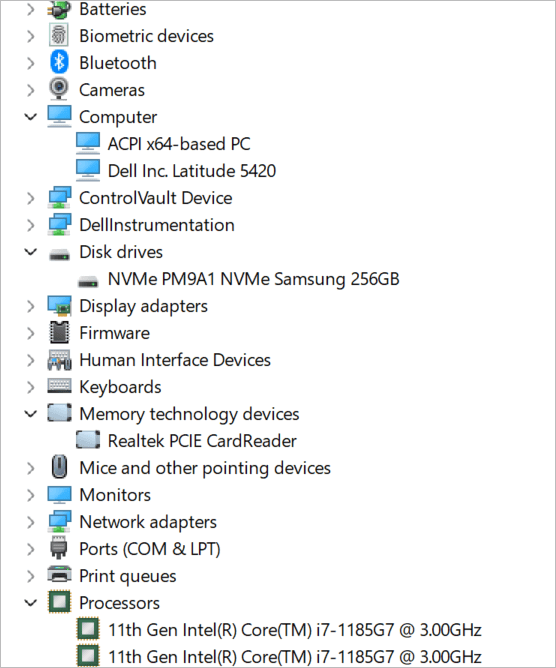
- In the Device Manager, you will see various devices attached to your PC.
- When you expand each device, you will see the device type as shown below.
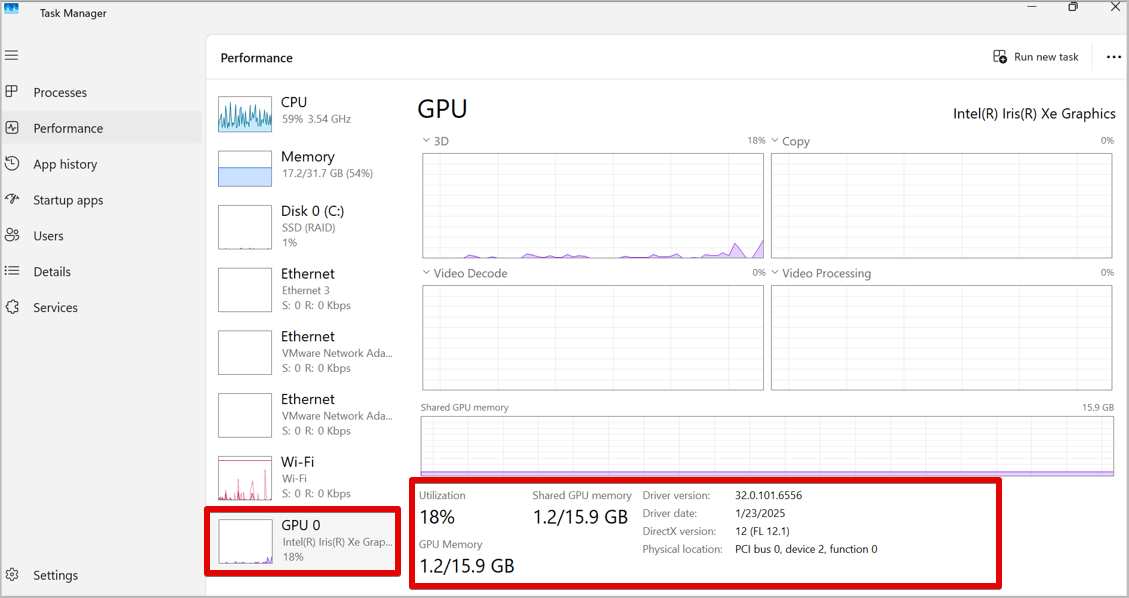
How to check GPU Specs for Gamers using Task Manager
- In the Task Manager, click on the Performance menu, and among the listed components is GPU. Click it to see information on GPU utilization, GPU memory, and shared GPU memory as shown in the image below.
Which Method Should You Use? (Comparison Table)
| Method | Best For | Data Depth | Technical Level |
| Windows Settings | Quick overview (CPU, RAM) | Basic | Beginner |
| Task Manager | Real-time performance of RAM, CPU etc | Live Data | Beginner |
| System Info | Full hardware & BIOS report | Advanced | Intermediate |
| msinfo32 . Run from Search bar | Full hardware, BIOS, drivers, and system report | Very Detailed | Intermediate |
| DxDiag. Run from Search bar | Gaming & Graphics (GPU) details | Multimedia | Intermediate |
| PowerShell | Generating/Exporting full system audits | Expert | Advanced |
Key Components to Identify
- CPU: The processor model.
- RAM: The total amount of memory installed.
- GPU: The graphics card or display adapter.
- Storage: The size and type (SSD or HDD) of your hard drives.
- Motherboard: Listed under “BaseBoard” in System Information.
- Operating System: Windows version and build
4 Best Third-Party Tools to Check PC Specs for Free
Aside from the Windows Utility tool, you can use a third-party tool to check your PC’s Specs.
Below are some third-party tools you can use:
Using GPU-Z to Check Your GPU Specs for Gamers
GPU-Z is a free third-party tool that can display information about your PC’s graphics card.
- Download GPU-Z from here.
- Install and open GPU-Z.
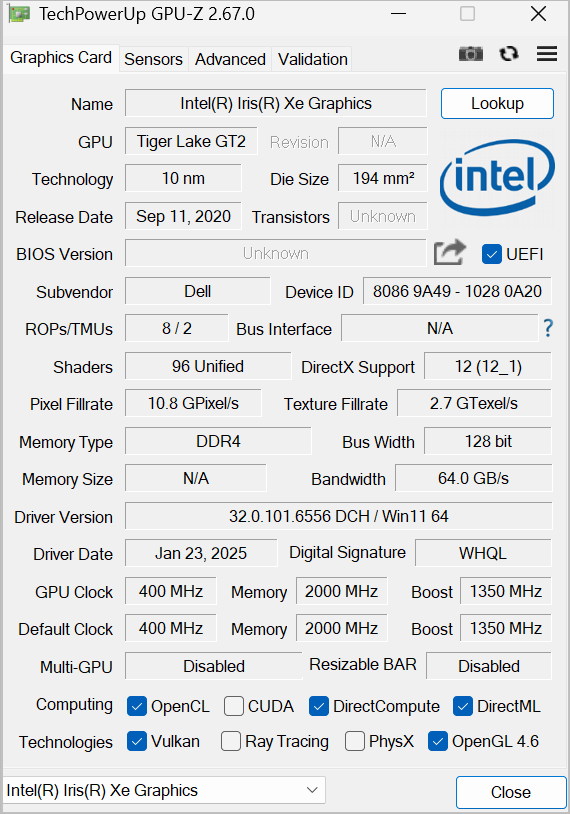
- This third-party utility tool will show you who manufactured it and the graphics card model, and other important details.
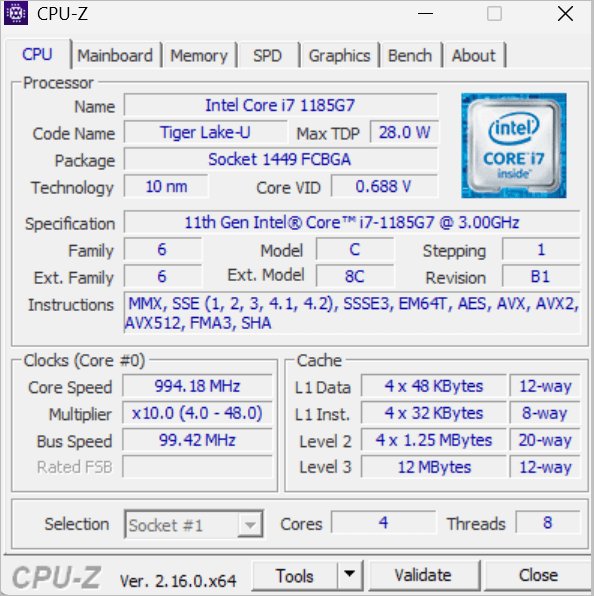
Using CPU-Z to Check Your CPU Specs
CPU-Z is a free third-party tool that is widely used for system monitoring and performing system diagnostics. It can help display information about your PC’s storage, memory, and BIOS.
- Download CPU-Z from here.
- Install and open CPU-Z. The utility tool will show details of the CPU, Mainboard, Memory, and Graphics as shown below.
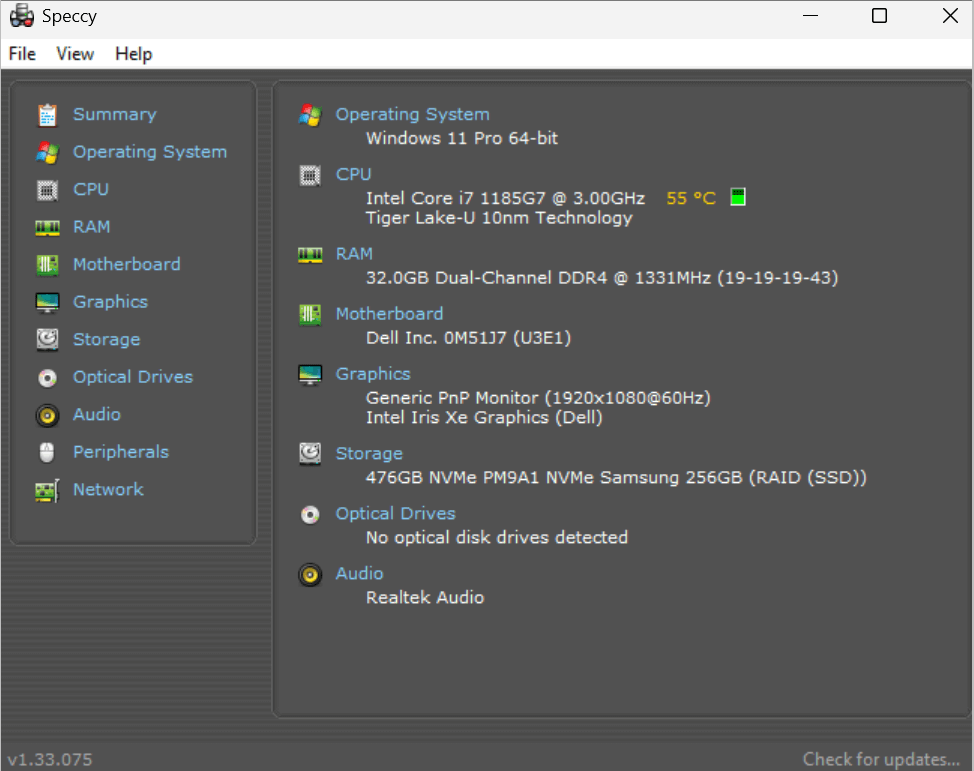
Using Speccy
Speccy is a free utility tool that can display comprehensive information about your PC specifications.
- Download Speccy from here.
- Install and open Speecy. The utility tool will show details of the Operating System, CPU, RAM, Motherboard, Storage, Graphics, and others, as shown below.
Using HWInfo
HWInfo, which stands for Hardware Info, is a free diagnostic utility tool that can provide detailed information about your PC’s hardware components.
- Download HWInfo from here.
- Install and Open HWInfo. The utility tool will show details of your PC’s hardware components.
Check Your PC’s Storage Using File Explorer
You can use the file explorer to check how much storage you have used and the space left on your PC.
1. Open File Explorer and click on This PC.
2. Right-click on the specific Local Disk and click Properties as shown in the image below.
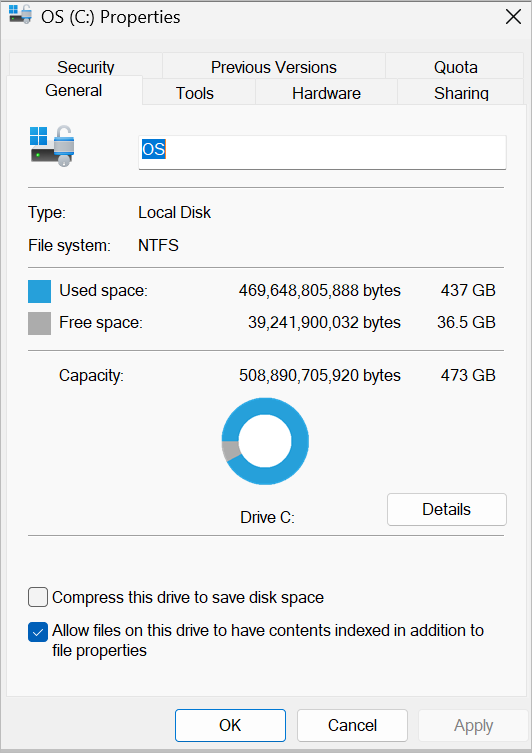
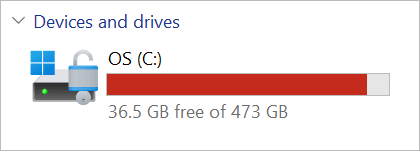
In the properties page, you will see your system’s total storage capacity. You will see the level of space you have used and the amount of free space remaining.
My system drive properties show 473 GB as the total storage capacity on my system. It also shows that I have a used space of 437 GB and free space of 36.5 GB left on my system.
Check Your PC’s Specs on Linux
We will show you how to use Linux commands to check your Linux computer’s specifications.
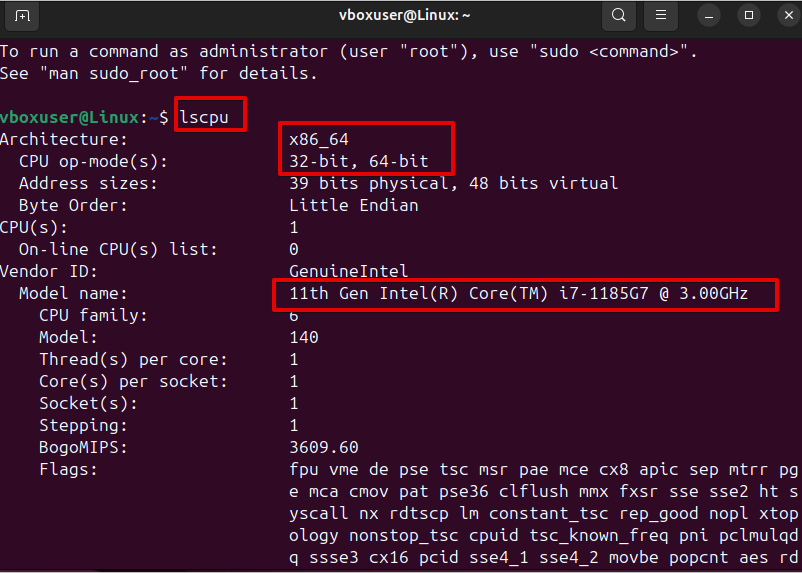
#1) Check CPU Specification
Launch the Linux Terminal, and when you run the lscpu command, it displays a detailed overview of your computer’s processor information and its various units.
This command will display the Model name, the processor architecture, the vendor, the CPU family, virtualization features, and many more.
#2) Check RAM Specification
When you run the free command on the terminal, you can view the total memory, the amount of memory already used, and the amount that is available on your Linux system.

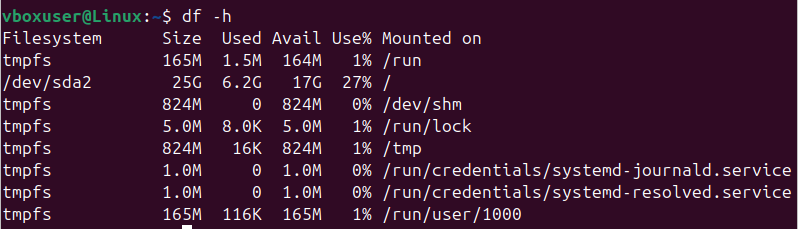
#3) Check Hard Disk Specification
When you run the df command, you will be able to see the storage space used, available storage space, and the number of partitions available. The -h added to the command helps to display the information in a human-readable format.
You may just want to check a short and brief information about your Linux System hard disk, run this command sudo lshw -short -C disk on your terminal as a super user.

Run the lsusb command to display information about devices currently attached to your system. These devices can be a USB device, an external disk reader, or many more.

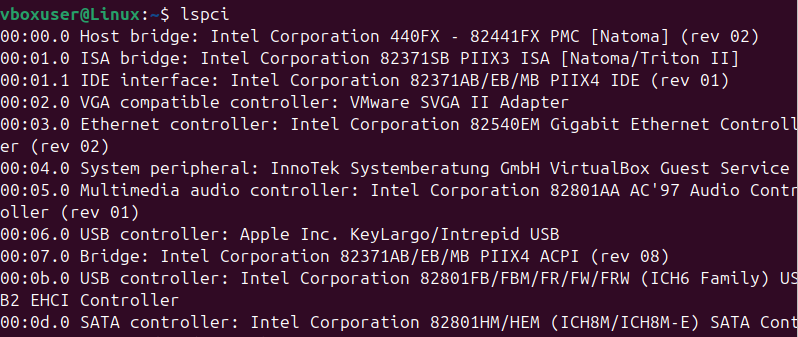
Apart from USB devices, there are some other devices or controllers that are connected to your system’s PCI buses.
To display this, other controllers run the lspci command, and you will be able to see the controllers connected to your system’s PCI buses, like the Host bridge, Ethernet controller, Multimedia audio controller, USB controller, and VGA compatible controller.
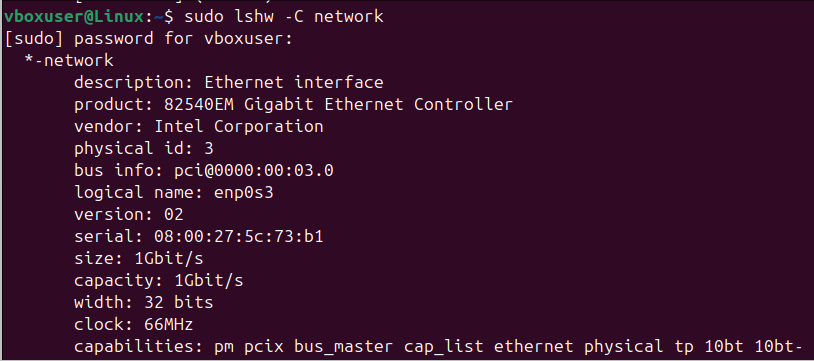
#4) Check Network Card Specification
When you run the command sudo lshw -C network, you will be able to see information about your Linux system’s network card. You will see the Ethernet controller, size, capacity, and many other things.
How to Check Specs on Mac? 
To get the system information about your Mac, check this link for more details.
Here is the video guide on how to check MacBook Pro hardware specs:
What Specs to Consider While Purchasing a PC
You will need to consider the level of the task you will use the computer to execute. The following are the specifications that every buyer must pay attention to when purchasing a PC.
- The processor that ensures adequate speed for multitasking jobs must be considered.
- The memory must be adequate to ensure seamless operation when running multiple programs.
- There must be storage space to handle the type of workload you intend to use the computer for. It is recommended to go for an SSD as it is faster and accommodates more files when compared to an HDD.
- If you use the computer to play sophisticated games or carry out high-end designs, then going for a GPU that can handle high visuals and designs will be the best option.
- If you plan to stay on the computer for an extended period without a power connection, then opting for a computer with a higher battery life will be the best choice.
- If you want an operating system with broad compatibility, then the Windows OS is recommended. However, in terms of a very secure system, it is recommended to choose macOS.
Frequently Asked Questions
1. How to check Windows 10 & 11 specs: The Fastest Methods
The easiest way to see your core specs (CPU, RAM, and Windows version) is through the About menu.
How to access: Press Windows Key + I → System → About.
What it shows: Your Processor model, installed RAM, Device ID, and whether you’re running a 64-bit or 32-bit system
2. How do I check my CPU and GPU specs?
Type Task Manager in the Windows search box and open it
Click on the Performance tab
Select CPU to view processor details
Select GPU to view graphics card information
3. How do I check my RAM?
Method 1 (Task Manager):
Open Task Manager
Click on the Performance tab
Select Memory to see RAM usage and capacity
Method 2 (Settings):
Go to Settings > System > About
Check the Installed RAM under Device specifications
4. How to check the PC CPU?
Press Windows + R to open the Run dialog
Type msinfo32 and press Enter
View the System Summary to find processor details
5. How do I check my RAM specs?
Method 1 (Task Manager):
Open Task Manager
Go to the Performance tab
Click on Memory to view RAM specs
Method 2 (System Information):
Press Windows + R
Type msinfo32 and press Enter
Check RAM details in System Summary
6. How much RAM is enough?
4GB – 8GB: Basic tasks (browsing, office work)
8GB – 16GB: Smooth multitasking and general use
16GB+: Gaming, video editing, and heavy software
If the task involves a more intense operation like playing a video game or graphics designing, then you might need memory capacity above 16GB.
7. How do I see what graphics card I have?
Open Settings
Go to System > Display
Click on Advanced display
Check the Display information section for GPU details
8. How do I know my PC model?
Open Settings
Go to System > About
Check Device specifications to find your PC model
9. What’s better, more RAM or a faster processor?
More RAM: Improves multitasking and smooth performance
Faster CPU: Improves speed, processing, and overall performance
Best setup: A balance of both RAM and CPU for optimal results
10. How to Check PC Specs on Linux?
Linux users can pull detailed hardware data directly from the terminal.
General Overview: Run sudo lshw -short or inxi -Fxz (if installed).
CPU Details: Run lscpu.
RAM/Memory: Run free -h or sudo dmidecode -t memory for hardware-level detail.
Graphics Card: Run lspci | grep -i vga.
11. How to check PC specs using System Information (msinfo32)?
For a “Hardware DNA” report—including your Motherboard model and BIOS version—this is the professional choice.
How to access: Press Windows Key + R, type msinfo32, and hit Enter.
What it shows: BaseBoard (Motherboard) manufacturer, BIOS mode (UEFI/Legacy), and a full hardware resource list.
12. How to check PC specs using DxDiag (Best for Graphics & Gaming)?
If you need specific details about your display drivers and DirectX compatibility, use the DirectX Diagnostic Tool.
How to access: Press Windows Key + R, type dxdiag, and hit Enter.
What it shows: Click the Display tab to see your exact Graphics Card name, manufacturer, and total VRAM.
Conclusion
As you can see from the above methods, it is quite easy to know how to check your PC specs. Whether you want to upgrade your current system or you plan to buy an entirely new computer, knowing how to check your PC specs gives you an overview of your current system specifications and components like RAM that may need upgrading.
Knowing how to check PC specs as a non-technical person is an advantage, as this gives you a clear overview of the technical details about your computer, and you will be able to make a better decision on whether or not to upgrade your system.
Research Process: The total time involved to complete and publish this article is approximately 42 hours. This content was created through a structured research approach to ensure accuracy and reliability.
For more PC-related guides, you can explore our range of tutorials below:
- FIXED: There Was a Problem Resetting Your PC (7 Solutions)
- Test 11 CPU Temp Monitor Tools: PC Temperature Monitor
- How to Fix When Windows PC Won’t Shut Down
- How To Shutdown Or Restart Remote Computer/Windows 10 PC
- Top 10 Free Download Managers for Windows PC
Was this helpful?
Recommended Reading
-

Are you struggling with the "There was a problem resetting your PC Error? Here are the step-by-step methods for repairing system files, fixing WinRE, and completing your windows PC reset. If your computer displays the message "There was a problem resetting your PC. No changes were made," it might be…
-
In this guide, you will come across step-by-step solutions to factory reset Windows 10 when your PC won’t start. If your Windows 10 PC is running slowly, experiencing errors, or won’t boot properly, performing a factory reset can help restore it to its original state. A reset removes system issues,…
-

Are you frustrated with a stubborn PC that refuses to power off? Quickly discover expert solutions and fix for computer PC won't shut down and learn how to regain control easily: With digital transformation all our documents such as birth certificates, school leaving, facilitation certificates on graduation, mark sheets, pictures,…
-
Maximize your Windows 11 experience instantly with full-screen mode. Quickly learn the simple shortcut for full-screen mode to toggle full screen both in your personal and professional work: Windows (or Microsoft Windows or Win) operating system allows users to view and store documents, browse the internet, play games, watch movies,…