


This tutorial explains how to use Flask App, Flask Blueprint and Flask Bootstrap in a Flask project:
In this topic, we will move a bit away from the archetype of Flask-Appbuilder to build our understanding of Flask Blueprints. Read our tutorial on Flask, Flask Templates & Views, and Flask with Databases such as MongoDB, SQLite, and MySQL. We have been using an example project called flaskTutorialApp.
However, you can also create the project from scratch using the flask fab create-app command. This command creates the scaffolding required for a Flask project along with an application directory based on the application name given by you.
=> See The Flask Training Series For All

In this tutorial, we explain about Flask App, Flask Blueprint, and Flask Bootstrap. We develop our Flask app initially with the pre-existing scaffolding provided by Flask-Appbuilder. We then create a Flask Blueprint called hello2. Finally, we will describe the Flask Docker concept by dockerizing our Flask App.
Table of Contents:
Flask App
Flask App is another name for a Flask Application. If you notice the code written in the __init__.py file then you will notice that an instance of Flask is created, and the variable is named as app. The instance of the class Flask is the Flask Application, which is the instance of WSGI application.
from flask import Flask
app = Flask(__name__)
Flask Blueprint
Flask Blueprint lets us keep related features together and helps in better development practices. Some of the benefits of Flask Blueprints are as follows:
- Easy organization of large scale applications.
- Increases the reusability of code by registering the same Blueprint multiple times.
- A set of operations are recorded and can be subsequently replayed after registering a blueprint.
With the above background given on Flask Blueprint, we can move ahead and design our first Blueprint. We can think of Blueprint as a module too. Let’s create a HelloWorld blueprint.
All components, resources, and features of a blueprint are kept and organized separately from the other source code of the Flask application. It means that a Flask Blueprint can have its views, forms, models, static files, and templates.
You can create multiple Blueprints from the same set of resources. However, that is likely to create confusion and is not a good practice.
Create Flask Blueprint Files And Directories
Let’s start creating a Flask Blueprint with the name of hello2. Use the below-given script to create the directory structure after activating your virtual environment by using the source venv/bin/activate after going to the application directory.
blueprint_name="hello2"
mkdir "$blueprint_name"
mkdir -p "$blueprint_name/templates/$blueprint_name"
touch "$blueprint_name/templates/$blueprint_name/hello.html"
mkdir "$blueprint_name/static/"
touch "$blueprint_name/__init__.py"
touch "$blueprint_name/views.py"
We want our hello2 Blueprint to have its views that we will import in its __init__.py. We create a separate directory for our Blueprint with templates and static directories to render Flask views and serve static resources, respectively.
Flask Blueprint Directory Structure
The directory structure for the Blueprint should look as shown below. Use the tree command to create a similar output.

Create Flask Blueprint View
Now let’s define a simple view inside views.py. Open hello2/views.py and enter the below-given code snippet.
from flask import Blueprint, render_template

hello2 = Blueprint(
            'hello2',
             __name__,
            template_folder="templates",
            static_folder='static'
        )
@hello2.route("/hello2")
def hello2_view():
    greeting = "Hello World 2"
    return render_template("hello2/hello.html", greeting=greeting)
We import the Blueprint class and render_template method. Then we create a Blueprint object by giving the names of the template and static directories.
Then we define a route, using the decorator @hello2.route, and a controller with the name hello2_view. This controller is a Python function. In this function, we assign a value to a variable called greeting and then pass it to the render_template method.
Create Flask Blueprint Template
Now let’s create the template hello.html. If you have been reading our previous tutorials, then you must have noticed that the template is of the same name as we created for rending the HelloWorld view. For this hello2 Blueprint, we create a new template by extending the previous one.
Furthermore, notice that we have used a path semantic hello2/hello.html while calling render_template to render greeting in the template. This pattern avoids conflicts between the templates of the same names.
Use the below-given code snippet to create hello.html and save it under hello2/templates/hello2/ path.
{% extends "hello.html" %}

{% block hello %}

<p> <b/>{{ greeting }} </b>, from Software Testing Help. </p>

{% endblock %}
This template is almost similar to the hello.html. However, it inherits most of its HTML parts from hello.html. Notice the use of {% block hello%} and {% endblock %}. Block hello in hello2/hello.html overrides the block hello of the base template hello.html.
Now let us open the __init__.py file of the hello2 Blueprint and mention the below-given code in it.
from app.hello2.views import * # expose all views at the blueprint level
In this statement, we import all the decorated methods that we have created in views.py of the hello2 Blueprint. If required, we can import only those methods/controllers that are ready to be used or tested.
Register A Flask Blueprint With Flask App
Now let us open __init__.py under the Flask application directory and register our hello2 Blueprint as shown in the below code.
from app.hello2 import hello2
app.register_blueprint(hello2, url_prefix="/hello2")
Here also, please notice that we can selectively import views and register only those that are ready for use or testing.
Let us run our Flask app in debug mode with the command python run.py from the project’s root directory and navigate to the http://localhost:8080/hello2 to see whether the view of hello2 works fine.
The result in the browser should be similar to the example shown below.

Let’s work on a better presentation of hello2 blueprint by using Twitter’s bootstrap framework. Moreover, in the next section, you will learn more about the optional parameters to change the behavior of a Flask Blueprint. Let’s see it with the help of an example of a Flask Blueprint called Flask Bootstrap.
Recommended Reading => Read Through the Bulma CSS Framework Tutorial Series
Modular Flask Application Example With Flask Blueprint
Based on our learning of hello2 Flask Blueprint, let’s add some more blueprints to understand how we can create modular applications in Flask.
Let us assume that we have a web application that serves content to visitors in the form of ebooks, tutorials, and courses. It also has some additional content concerning information about the team and a home page.
If we try to accommodate these new features in the existing application, then we will have to create views in views.py, and the corresponding templates under the application template directory. Similarly, we need to create models and forms in models.py, and forms.py.
However, maintaining all application code will become cumbersome, and collaboration with the other team members will be too complicated and might result in commit conflicts or complex development workflow.
Currently, in this conventional approach, the application structure is as shown below.

To avoid such a scenario, we can make use of Flask Blueprints to create modules specific to the features and respective content. Let’s create some Flask Blueprints, with their separate resources.
Each of the Flask Blueprint layouts will look similar to the one shown below.

Use the below-given script to create the required files and directories for the planned Flask Blueprints. Run this script from the project’s root directory.
cd app
for dir in home courses tutorials ebooks
 do
  echo "generating files for $dir .."
  mkdir -p $dir/templates/$dir
  touch $dir/templates/$dir/$dir.html
  mkdir $dir/static
  touch $dir/static/style.css
  touch $dir/__init__.py
  touch $dir/views.py
  touch $dir/models.py
  touch $dir/forms.py
 done
Let’s first create features for the home module.
Open views.py under the home directory, and update it with the below-given code.
from flask import render_template, Blueprint
home = Blueprint("home", __name__, template_folder="templates",
static_folder="static")

@home.route("/")
def index():
    return render_template("home/home.html")
In this file, we have imported Flask’s Blueprint class and instantiated it with the required parameters with separate templates and a static folder. Then we use @home decoration to declare the associated route of the view method called index.
Now create a base.html Jinja2 template under the template directory of the app. Use the below-given code to update the file.
<h1>Welcome to our {% block pagename %} {% endblock %}</h1>
{% block content %}
{% endblock %}
Now open home.html under templates of the home module and update it with the following code.
{% extends "base.html" %}

{% block pagename %}
Home Page
{% endblock %}

{% block content %}
    Check following pages
    <ol>
        <li><a href="/courses">Courses</a></li><!—list of links
        <li><a href="/ebooks">Ebooks</a></li>
        <li><a href="/tutorials">Tutorials</a></li>

    </ol>

<p>
    Check <a href="/home/about">About Us</a>
</p>

{% endblock %}
In the above-given template, notice how we make use of the extends keyword to inherit parts from base.html. Also, we override content in two blocks called pagename and content, as shown.
Similar to the above-created template, let’s create about.html.
{% extends "base.html" %}

{% block pagename %}
About Page
{% endblock %}

{% block content %}

<p>
    Lorem ipsum dolor sit amet, consectetur adipiscing elit. Etiam turpis
    tellus, interdum sed diam cursus, sollicitudin luctus libero. Vestibulum
    tincidunt ex vel consectetur aliquet. Donec odio sapien, gravida non
    laoreet sed, rhoncus eu dolor. Cras tincidunt purus ac justo pharetra,
    accumsan faucibus justo interdum. Aliquam commodo justo at urna
    sollicitudin pretium. Vivamus vitae diam luctus, faucibus nibh ut, faucibus
    tortor. Vestibulum varius ipsum nec mi lobortis dignissim. Aliquam
    dignissim placerat purus, eu lobortis elit interdum et. Donec velit sem,
    tristique in lacus mollis, ultricies malesuada felis. Praesent nec urna
    eros.
</p>

<p>
    In hac habitasse platea dictumst. Maecenas egestas sit amet neque sed
    pretium. Curabitur nec ex vitae tortor luctus vulputate sit amet sed orci.
    Nam vehicula augue sem, sit amet aliquet ipsum aliquet vel. Curabitur
    varius odio eget nisl gravida malesuada. Phasellus neque neque, scelerisque
    vel eleifend ac, ullamcorper nec lacus. Aliquam auctor nibh lacus, at
    tristique quam sodales nec.
</p>
{% endblock %}
Add the following view to the views.py under the home directory.
@home.route("/about")
def about():
return render_template("home/about.html")
In this new approach, we can now create features concerning ebooks, tutorials, and courses independently as separate modules and plug them in for testing or production use in the __init__.py file under the app folder as shown below.
from app.home import home
app.register_blueprint(home, url_prefix="/home")
While the development server is running, navigate to http://localhost:8080/home, and you will see a home page as shown below.

Similar to the above-given example, we can create Flask blueprints corresponding to the other modules mentioned above.
Now in this new approach, the structure of the application looks similar to the one shown below.

Compare the project layout between the conventional approach and the new approach using Flask Blueprint.
With this modular method, using Flask Blueprint, it is easier to manage and scale the web application because individual features are being developed and organized in their separate directories, following the conventions of Flask Blueprint.
Flask Bootstrap
How good is the plain HTML? We will use Flask Bootstrap to present our HTML in a better way to enhance user experience. Flask Bootstrap also mostly consists of a Flask Blueprint named Bootstrap.
It wraps Twitter’s Bootstrap framework in an easy to use API for us to make use of it in the Flask framework. We use Flask semantics to plug the functionality of Twitter’s Bootstrap in Flask Templates.
Let us first install Flask-Bootstrap with the following command.
pip install flask-bootstrap
Now let’s include twitter’s Bootstrap with the Blueprint that we have designed above.
Open __init__.py of the Flask application and modify it as per the below-given code to initialize Flask-Bootstrap.
from flask_bootstrap import Bootstrap
Bootstrap(app)
Once Flask-Bootstrap is initialized, we can make use of Twitter’s Bootstrap Framework’s classes in our HTML to enhance the views.
Make the following changes in hello2/hello.html.
{% extends "bootstrap/base.html" %}

{% block content %}

<div class="container">

    <div class="hero-unit">

        <h1>{{ greeting }}</h1>
    <p>from Software Testing Help. </p>

    <a href="#" class="btn btn-primary btn-large">Learn More >></a>
    </div>

</div>

{% endblock %}
We have extended from Bootstrap’s base.html. Notice the use of div of the class container and hero-unit. Moreover, we have created a button for users to learn more. We modified this HTML and used classes from Twitter’s Bootstrap framework.
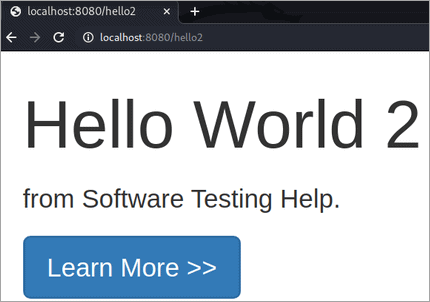
Now refresh the page in the Browser at http://localhost:8080/hello2.html to see the changed look of the hello2.html.
The view of Changed Hello2 will look similar to the one shown below.
The use of Flask-Bootstrap is entirely dependent on the blocks that are available for overriding or modification. We can use the below-mentioned blocks to customize the experience. A detailed list of all possible blocks can be seen at https://pythonhosted.org/Flask-Bootstrap/basic-usage.html.
Sometimes when we just want to amend a block rather than completely replacing it then we can use Jinja2’s super() function to achieve the results.
Create a file called hello2.css under hello2/static and place the below code snippet to style the color of the paragraph in hello2/hello.html.
p {
color: orange;
}
Take the code snippet shown below and place it in hello2/hello.html.
{% block styles }
 {{ super() }}
 <link rel="stylesheet" href="{{ url_for('hello2.static',
 filename='hello2.css')
 }}">

{% endblock %}
Now open views.py of the Flask Blueprint hello2 and modify the blueprint statement as shown below.
hello2 = Blueprint('hello2', __name__, template_folder="templates",
static_folder='static')
Navigate to the Flask Blueprint’s registered URL, i.e., http://localhost:8080/hello2 again. The result because of the changes done so far should look as shown below.

Flask Docker
Docker helps in containerizing an application. It isolates the environment which the Flask application needs in a way that there is no requirement of complete virtualized environments such as virtual machines.
Besides, docker containers have a minimal footprint and are more comfortable to manage and scale with the help of an orchestration platform. These days, when every other application also has containerized deployment, we too, need to learn to deploy our sample application as a docker container.
A Linux based container can run on Windows and a MAC. A dockerized Flask App, thus, is deployable on any operating system regardless of the Operating system in which it was built.
In this section, we will explain the steps of dockerising a Flask app. We will dockerize this project so that it can be deployed in a container with all the dependencies packed inside it.
First, install Docker on your machine.
sudo apt-get install docker.io
Once the installation is complete, go into our sample project’s root directory and create a Dockerfile.
Write the code given below into that Dockerfile.
FROM python:3
ADD . /flaskTutorialApp
WORKDIR /flaskTutorialApp
RUN pip install -r requirements.txt
ENTRYPOINT ["python"]
CMD ["run.py"]
Update the config.py file and change the database to SQLite, as shown below.
# The SQLAlchemy connection string.
SQLALCHEMY_DATABASE_URI = "sqlite:///" + os.path.join(basedir, "app.db")
# SQLALCHEMY_DATABASE_URI = 'mysql://myapp@localhost/myapp'
Besides, if this is the first time you are working with the SQLite in this tutorial series, then please create the admin user by using the flask fab create-admin command.
Check whether the Admin user can log in to the application.
Now Build the docker image of our sample application using the below command.
sudo docker build --tag flask-tutorial
This command takes some time as it downloads resources from the docker hub. Once this command is complete, check that the images have appeared by using the below command.
sudo docker images
Now run this recently created Docker image.
sudo docker run -p 5001:8080 flask-tutorial:latest
The console will show the log messages of the development server.
Installation of Docker results in the creation of a virtual NIC with the name docker0. Find the IP address by using the sudo ifconfig command. Once you get the IP of Docker, you can access the application by navigating to the below-given URL.
http://<DOCKER_IP>:5001
Once you are confident with the development of the application, you can deploy your Docker image to the Docker Hub for the others to download and use.
Testing The Flask Blueprint
Now let us create few tests for testing the Blueprint hello2. Let’s see whether our sample app returns the correct HTTP code when the client sends a Get request for resources at /hello2 endpoint or not. If you remember, we registered our Flask Blueprint hello2 with a url_prefix with the value as /hello2.
Create a file called test_blueprint.py under tests and add the following test into it.
def test_hello2(client):
resp = client.get("/hello2")
assert 308 == resp.status_code
HTTP 308 pertains to Permanent Redirect, and it is expected that our Flask app needs to redirect the request to the resources related to the Blueprint called hello2.
Now let’s add another test to check the rootpath of the resources of our Blueprint. Let us add a test to see whether it has a value or not.
from app.hello2 import hello2

def test_rootpath():
assert hello2.root_path is not None
Now let us run these tests along with the other tests to ensure that they are passing.
pytest -v
You would see a similar output of the test results, as shown below.

Now commit all the changes to the repo and publish those changes to the remote repository on Github. Compare the differences with the code with that of the master branch and create a pull request if there are no conflicts.
The pull request invokes the build jobs that are a part of our Github Workflow. If all checks for the pull requests from tutorial-4 do not fail, then we can safely merge this branch with the master.

Frequently Asked Questions
Q #1) What is Flask BluePrint?
Answer: Flask Blueprint is a way to structure a Flask Application into smaller and reusable modules. A Flask Blueprint has its separate resources such as views, templates, static files, models, forms, etc. We use the Flask Blueprint approach to create easily maintainable and scalable Flask Applications.
Q #2) How do you use Flask Blueprint?
Answer: To use Flask Blueprint, we need to import it and register it with the Flask Application object, using app.register_blueprint method. We can pass a value to the url_prifix parameter to prepend a path to the routes of the Flask Blueprint.
Conclusion
In this tutorial, we explained Flask Blueprints along with concepts of creating static resources for a Flask app. We explored the benefits of using Flask Blueprint along with the thoughts of blueprint resources with the help of a Flask plugin called Flask-Bootstrap.
We also covered the concepts of creating the Docker image of the sample Flask tutorial application. Moreover, we also created two tests for validating the Flask Blueprints.
In our next tutorial, we will cover the commonly followed patterns while building features in the web applications using Flask.
=> Visit Here To Learn Flask From Scratch
Was this helpful?
Recommended Reading
-

Most frequently asked Bootstrap interview questions and answers: Here, in this article, we have included a list of the most popular interview questions and answers for cracking Bootstrap interviews. This will help in cracking the interview for both experienced and fresher candidates. Let's go!! => Visit Here To Learn Bootstrap…
-
This Flask API Tutorial explains popular Flask extensions like Flask twitter Oembedder, Flask API, and Flask RESTful with examples: The Flask framework has quite an abundant number of extensions. These extensions are quite useful and are easy to be developed. We know that the Flask framework is very Pythonic and…
-
This introductory Python Flask tutorial explains what is Flask, installation of Python, Virtualenv, Flask Hello World example with a section on code examples, debugging, and testing: Website development is more of an art than a skill. It requires patience and diligence, along with perseverance, courage, and dedication to create what's…
-
Hands-on Bootstrap Tutorial Series for beginners: In this hands-on Bootstrap Tutorial Series for beginners, we have covered all Bootstrap 4 concepts with examples and sample programs. Target Audience For a better understanding of this tutorial series, you need to have a decent knowledge of HTML, CSS, and JavaScript. This tutorial…


