


Get equipped with the necessary knowledge and skills to implement automated tests effectively with this step-by-step guide on Automating TestNG in Selenium:
The TestNG framework is an open-source advanced automation testing framework for the Java programming language. JUnit and NUnit inspire it, and it has some new functionality that makes it more powerful and easier to use. (NG stands for ‘Next Generation’).
It provides advanced features such as annotations, data-driven testing, test sequencing, grouping, and parallel testing to help organize and execute Selenium tests more efficiently and effectively.
Table of Contents:
- How to Automate TestNG in Selenium
- TestNG Annotations
- Types of TestNG Annotations
- Hierarchy of TestNG Annotations
- Multiple Test Case Scenarios
- Test Priority in TestNG
- TestNG Annotation Attributes
- TestNG Parameters & Data Providers
- TestNG Groups
- TestNG Listeners
- TestNG Assertions
- TestNG Parallel Execution
- Advantages and Disadvantages of Parallel Execution
- Steps to Run Parallel Tests Using TestNG and Selenium
- TestNG Test and Test Suite
- First Test Case with TestNG in Selenium
- Frequently Asked Questions
- Conclusion
How to Automate TestNG in Selenium

TestNG Data Provider is a way to pass parameters into the test function, which passes different values in test cases in a single execution. While TestNG is popular for its annotations, TestNG Data Providers are another feature that makes data-driven testing easier and more efficient.
To do the testing and setup, we don’t need any main function in our code for execution.
TestNG annotations are placed over the method by providing a sign at the rate, i.e.’@’.
For example:
@Test
public void MyTestcase11() {
System.out.println(“This is MyTestcase11”);
}
<these lines of code can be converted to html snippets>
Also, it can generate the HTML report automatically once the test case is built and run with the help of TestNG. It is a unique testing framework that can be integrated with selenium tests and used for reporting purposes.
Besides this, TestNG has a default reporting class called the Reporter, which helps to log in. This is useful in detecting the root cause of failure and debugging the failed test.
Pre-Requisites:
- Before learning TestNG, you should have a basic understanding of testing and knowledge of IDE and Selenium Web Driver using Java programming.
- It’s nice to learn about the differences between the Normal Java project and Maven project.
Why Use TestNG Framework for Selenium Scripts

Selenium Web Driver tests do not generate a proper format for the test results or have no native mechanism for generating reports.
Using TestNG in Selenium, we can generate the test results report.
The most important features that we can use in TestNG with Selenium scripts are:
- Generate a proper readable format report (including the number of test cases passed, number of test cases failed and number of test cases skipped).
- Multiple test cases can be grouped (like Regression, Sanity, etc) easily by converting them to a “testng.xml” file, in which we can also mention the priorities of which test case should be executed first.
- You can execute the same test cases multiple times without loops. (eliminates the looping statements).
- Can execute multiple test cases on multiple browsers, i.e., cross-browser testing.
- TestNG framework can easily be integrated with tools like Jenkins and Maven.
- The annotations used are easy to understand.
- Simplifies the way tests are coded, no more need of static main method in our tests.
- Uncaught exceptions are automatically handled by TestNG without terminating the tests earlier. These exceptions are documented as failed steps within the report.
- Using a wide range of TestNG annotations, we can amend the test case according to our requirements.
TestNG Features

How to Install and Set up TestNG in IntelliJ
TestNG Installation (/ Downloading) can be done on any desired IDE, i.e., Eclipse or IntelliJ IDEA.
The steps to Install TestNG Jars on IntelliJ IDEA are:
Note: IntelliJ IDEA comes bundled with TestNG jars. All we need to do is provide the maven repository path and version on the pom.xml file to update automatically as and when new updates of jars are available.
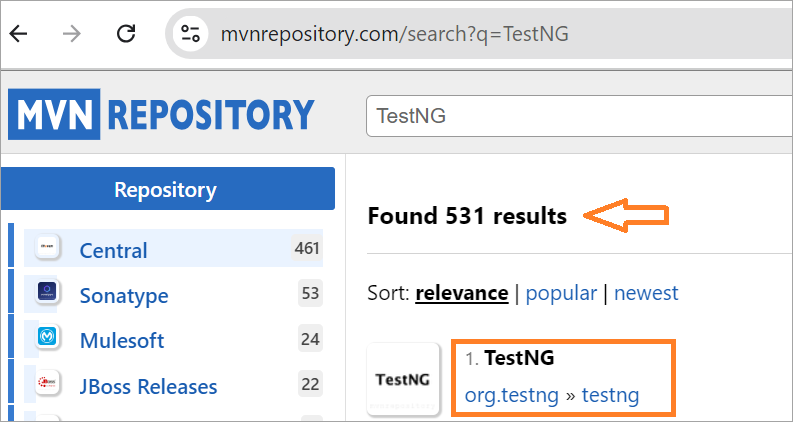
#1) Go to the maven repository https://mvnrepository.com/ and search for the ‘TestNG’ on the search bar provided.

#2) Open the TestNG jar link in the search results appeared.
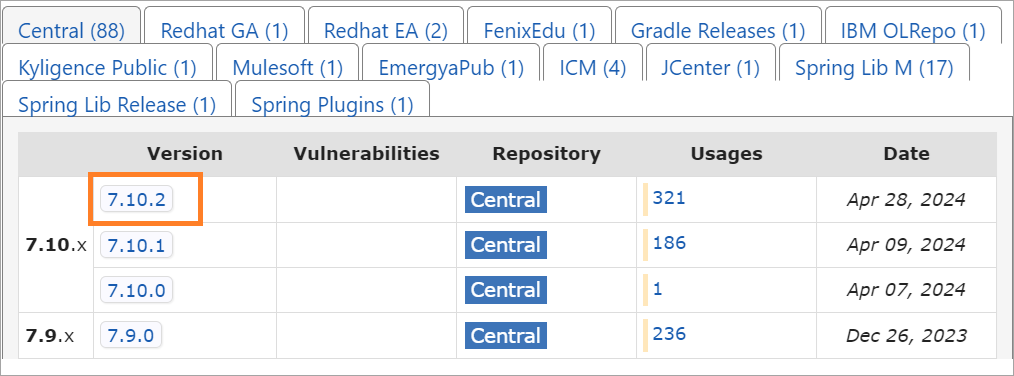
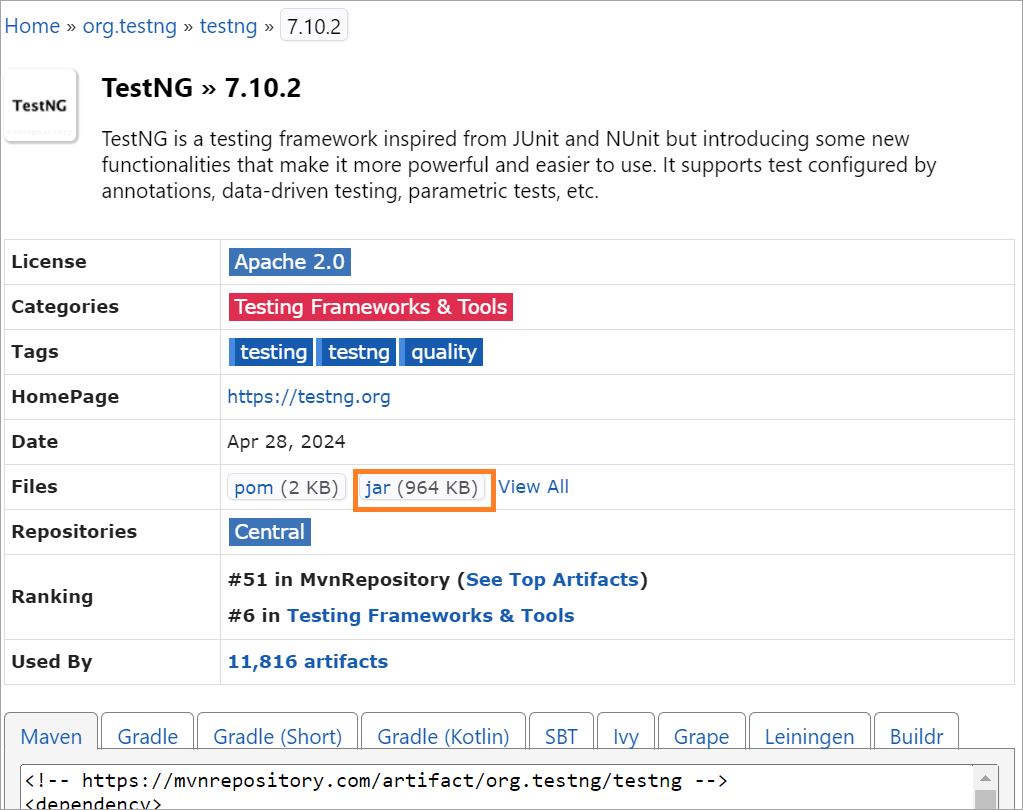
#3) Select the latest release version and select “jar” to download the TestNG jars onto your local computer. It will download to your local folder. Next, we need to add these jars to IntelliJ which can be used in TestNG tests later.
Setting up TestNG Jars in IntelliJ
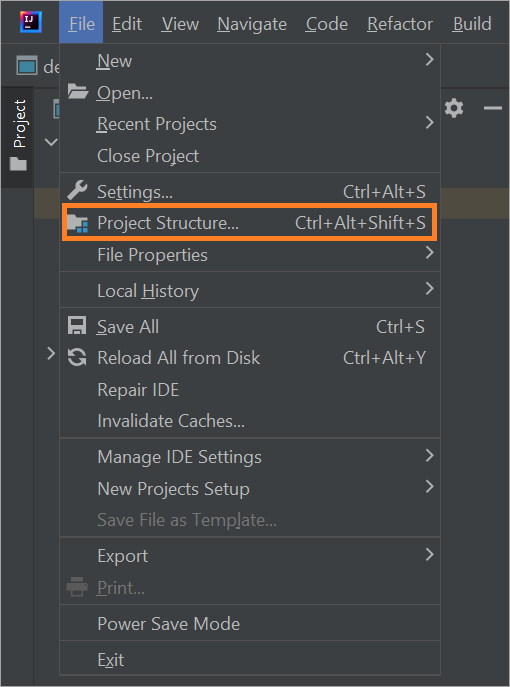
#1) Launch IntelliJ on your system. TestNG jars are already downloaded to your local system.
Now, On IntelliJ, Navigate to File -> Project Structure
#2) Click on Modules on the left-hand pane.
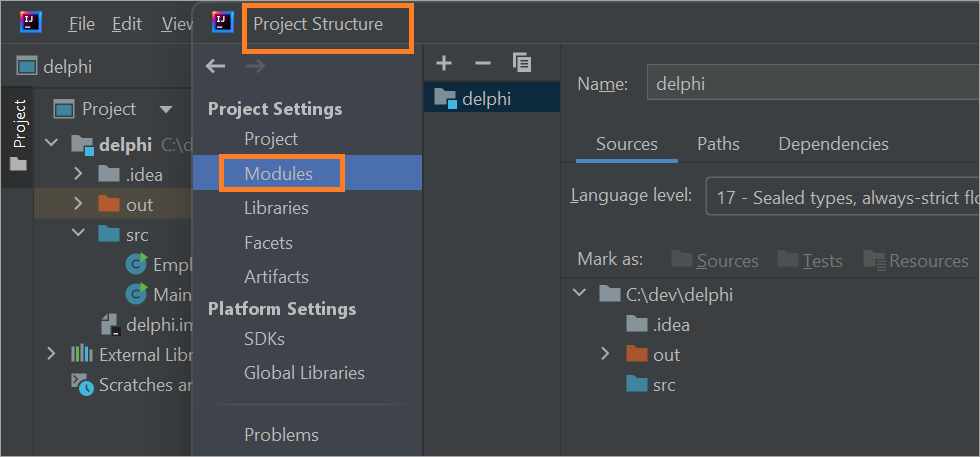
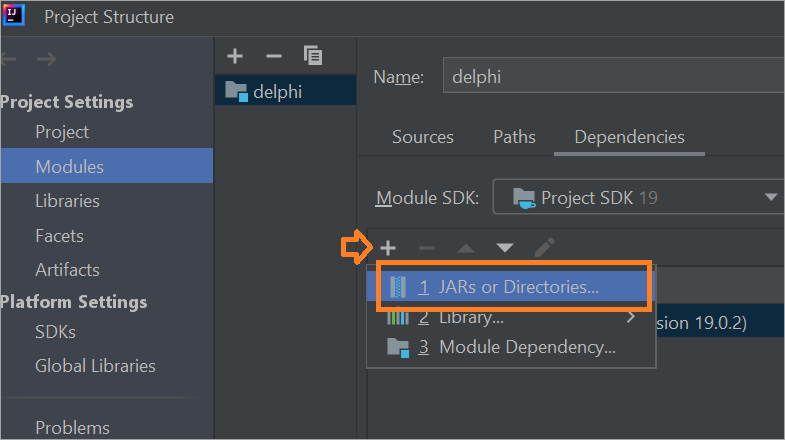
#3) Navigate to the ‘Dependencies’ tab.

#4) Click on ‘+’ sign in order to add new dependencies and then select “JARS or directories”
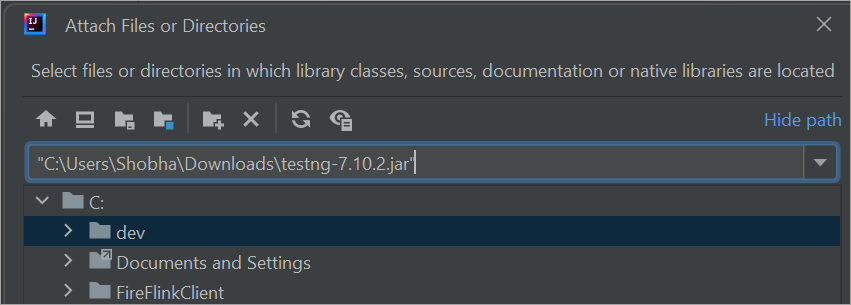
#5) Provide the path of the folder where you downloaded the jar files from mvn repository and then click on OK.
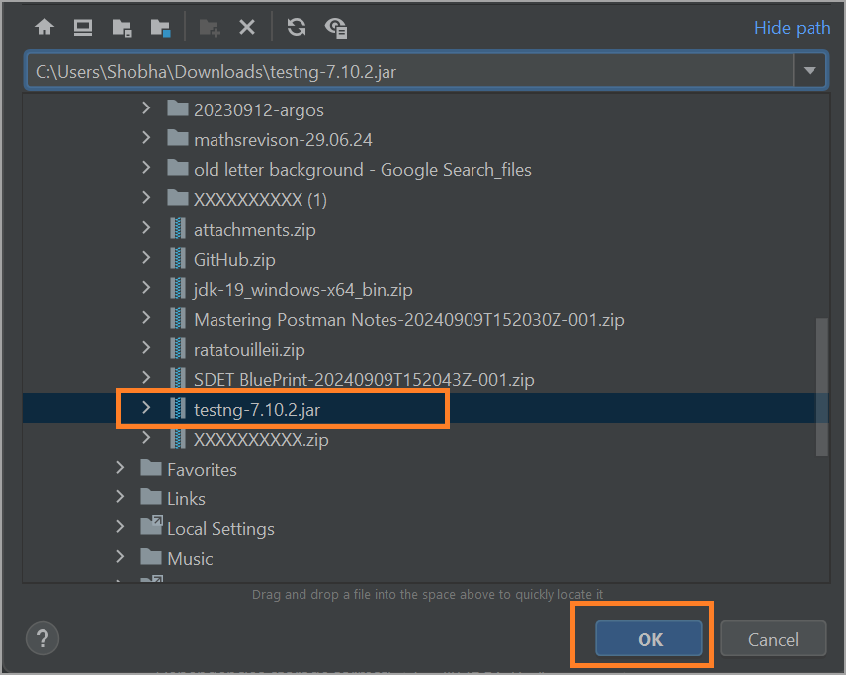
Now, you have the TestNG installed in your IntelliJ.
Suggested Read => Integration of TestNG in Eclipse
How to Install and Set up TestNG in Eclipse
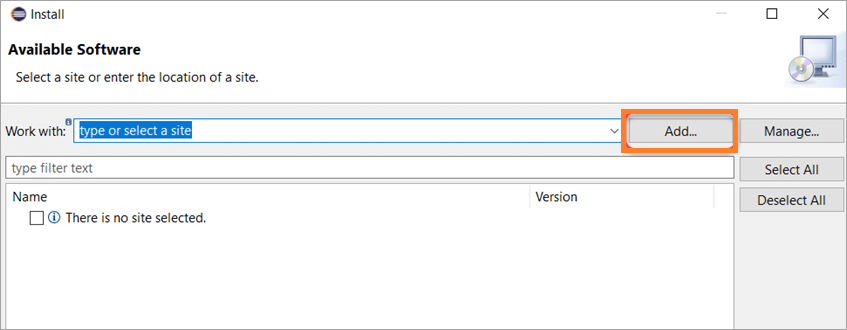
#1) Go to your local folder and launch Eclipse IDE. Once launched, click on the Help menu and select ‘Install New Software’.

#2) Installation dialogue appears and click on the Add button.
#3) Provide the details as shown on the screenshot and tap on the add button.
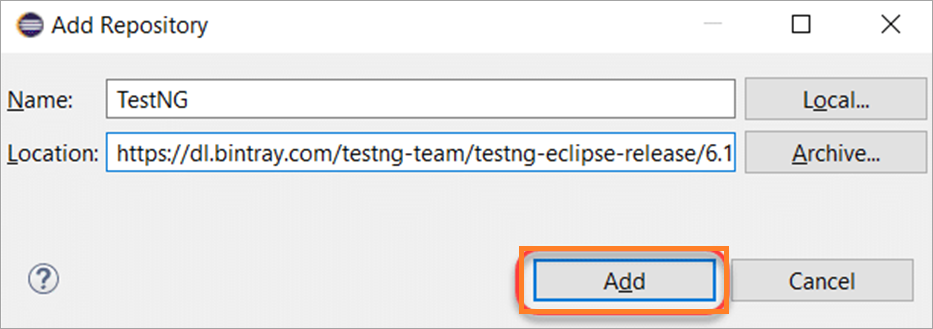
Name: TestNG (Can be User’s Choice)
Location: https://dl.bintray.com/testng-team/testng-eclipse-release/6.14.3/
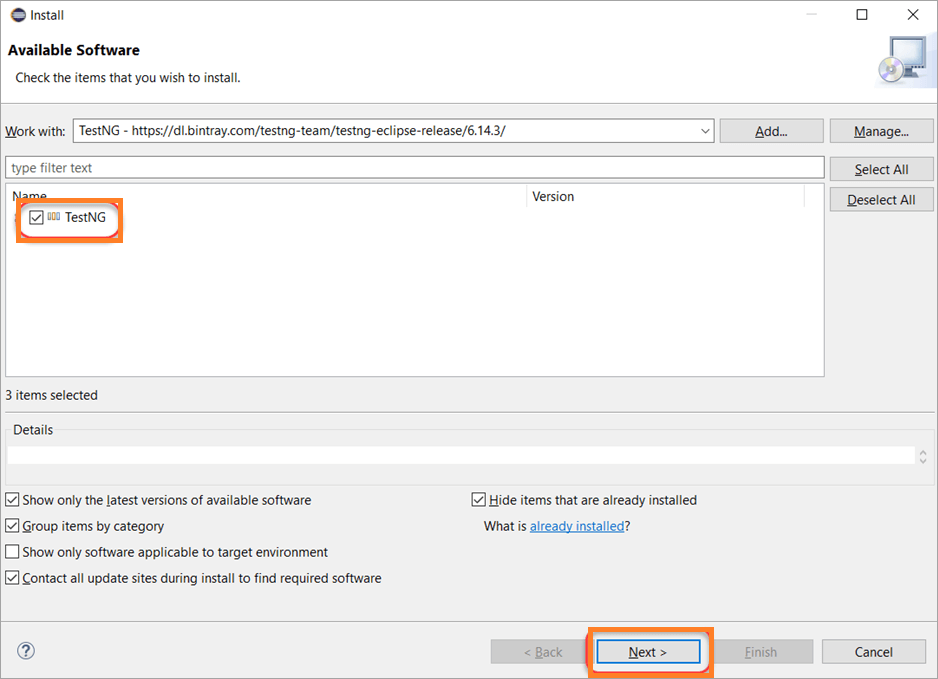
#4) Tapping on the Add button redirects back to the previous window. We should see the TestNG option on the available software list. Select the “TestNG” check box and tap on Next.
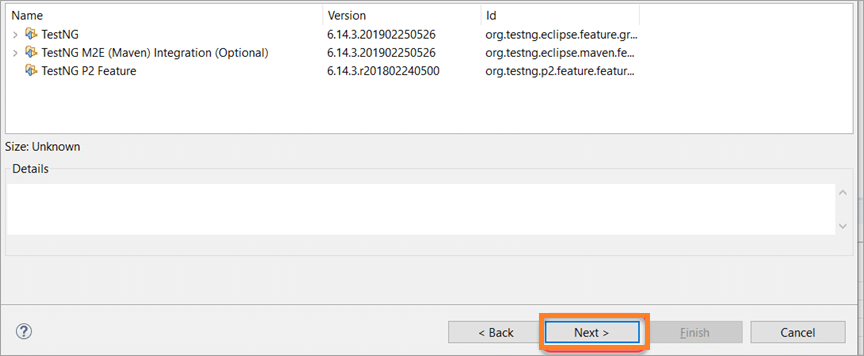
#5) Tap on Next to install the TestNG dependencies that Eclipse has listed.
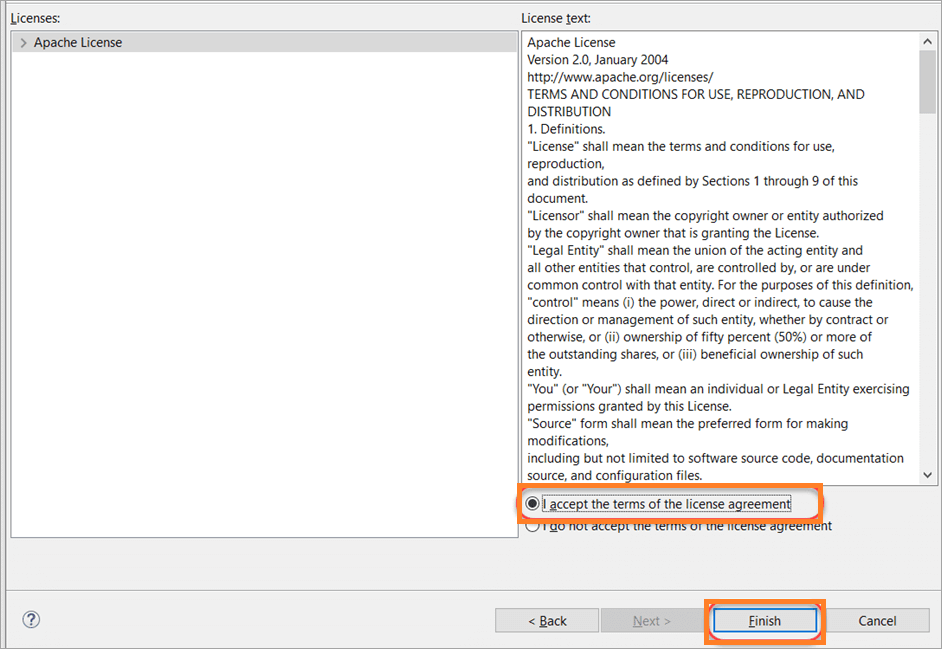
#6) Accept the terms and conditions of the License Agreement and select the Finish button.
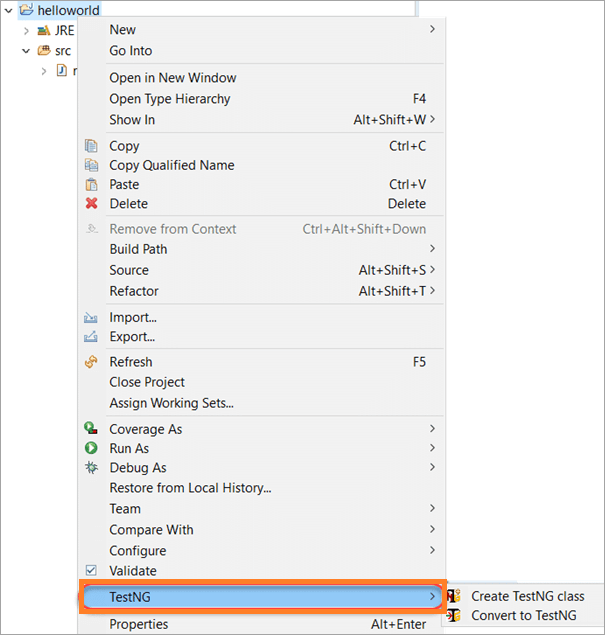
#7) Click Install anyway. If you have already created a Java /Maven project, right-click on it on the left-hand pane on EclipseIDE and TestNG appears as shown in the below image.
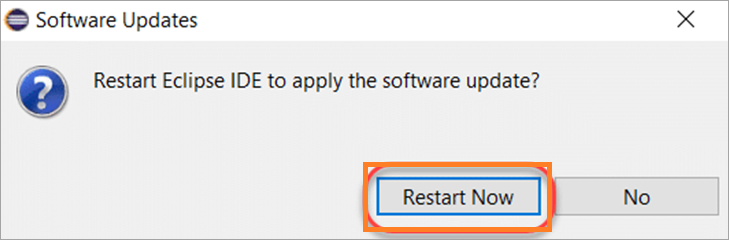
#8) To finish the installation setup, ‘Restart Now’.
#9) To verify that TestNG has successfully been installed on Ecplise IDE, right-click on the project and make sure the TestNG is listed on the menu.
TestNG Annotations

TestNG annotations are the pieces of code that can be inserted inside the business logic or in your source test code program to control the flow execution of test methods.
TestNG will ignore the methods which doesn’t contain any annotations, it will not know when to execute that particular method. Hence, it is essential to mention these annotations for your methods in TestNG to run tests.
TestNG Annotation starts from the symbol at the rate, i.e.,”@” and whatever is followed by this symbol is the annotation name, which is pre-defined.
Types of TestNG Annotations
10 Types of Annotations are available in the TestNG framework, such as:
- @BeforeSuite
- @AfterSuite
- @BeforeTest
- @AfterTest
- @BeforeClass
- @AfterClass
- @BeforeMethod
- @AfterMethod
- @BeforeGroups
- @AfterGroups
These annotations have self-explanatory meanings and are accordingly used in your source test code.
Hierarchy of TestNG Annotations
TestNG provides many annotations to write better source code during the testing phase of the software. How does the TestNG figure out which test cases to run first and then the rest and so forth?
-> The answer to this is the Hierarchy of the TestNG Annotations. TestNG contains the hierarchy among the annotations that is top being the highest priority given.
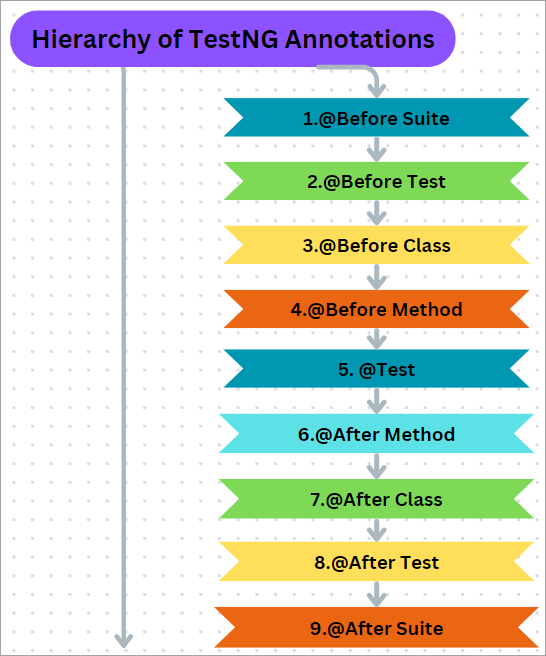
- @BeforeSuite
- @BeforeTest
- @BeforeClass
- @BeforeMethod
- @Test
- @AfterMethod
- @AfterClasswed
- @AfterTest
- @AfterSuite
Benefits of using these TestNG Annotations:
- Based on the requirements, test methods can be accessed, i.e. no pre-defined format.
- Additional parameters can be passed to these annotations or can be parameterized.
- No need to extend any test classes like JUnit.
- Errors can be identified at run time itself, which saves time for testers.
- Easy to learn and execute.
Multiple Test Case Scenarios
If there are multiple @Test scenarios, TestNG runs them in alphabetical order.
Example of Multiple Scenarios:
@Test
public void abc(){
}
?	This will be run first <abc()>, followed by below test <bcd()>,

@Test
public bcd(){
}
<these lines of code can be converted to html snippets>
Suggested Read =>> TestNG versus JUnit
Test Priority in TestNG
TestNG annotations decide in which order the test should be run, but setting up the priorities to an additional option that we can use along with testNG annotations. This attribute right beside the testNG annotations decides the priority of the annotation.
Note that priority check is carried out after the annotation check by TestNG, hence the hierarchy is checked then followed by the check for priority-based execution.
The larger the priority number in the attribute, the lower its priority during the execution of tests.
Example: Method with priority-1 will be run after the test method priority-0.
What if the 2 TestNG test methods have the same priority?
There might be some scenarios intentionally or unintentionally tester provides the same priorities for the 2 different methods under the annotations, TestNG will run the test cases in alphabetical order.
@Test(priority=1)
 public void y_method(){
    System.out.println("Y Method");
  }

@Test(priority=1)
 public void x_method(){
    System.out.println("X method");
 }
Output:
X method
Y method
PASSED: x_method
PASSED: y_method
->That’s in alphabetical order execution is carried out, i.e., 2 tests with NO priority will run alphabetically and also the 2 tests with the same priority will run alphabetically too.
What if the combination of them is specified? (with and without priority)?
->The test cases without the priority attribute mentioned with annotations, are given the “priority” and executed before the methods with the priority attribute. Along with running alphabetically.
Annotations are core concepts of TestNG. The more you practice on these and master them means mastering the TestNG itself. Keep practicing on these different combinations.
Example:
import org.testng.annotations.Test;
public class TestNG {
@Test(priority=1)
 public void f_method(){
    System.out.println("This is F Method");
  }

@Test(priority=1)
 public void e_method(){
    System.out.println("This is E method");
 }
@Test
 public void h_method(){
    System.out.println("This is H Method");
  }

@Test
 public void g_method(){
    System.out.println("This is G method");
 }
}
<these lines of code can be converted to html snippets>
Output:
This is G method
This is H method
This is E method
This is F method
PASSED: g_method
PASSED: h_method
PASSED: e_method
PASSED: f_method
TestNG Annotation Attributes
Test Attributes are test-specific and are specified next to the @Test annotation like this,
@Test(attribute="value")
public void testcase2()
{
 System.out.println("This is testcase2");
}
<these lines of code can be converted to HTML snippets>
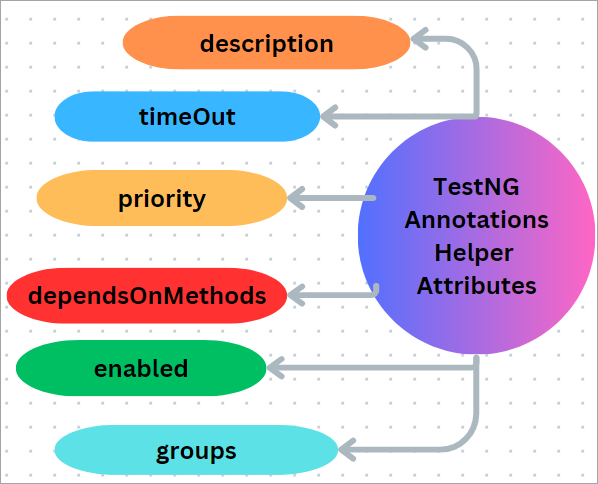
There are some attributes associated with these TestNG annotations, such as:
- description
- timeOut
- priority
- dependsOnMethods
- enabled
- groups
TestNG Parameters & Data Providers
TestNG parameters are the arguments passed to test methods.
Two ways to pass the parameters to test methods, such as TestNG Parameters and TestNG Data Providers.
#1) TestNG Parameters
TestNG Parameters declaration is similar to annotations in TestNG.
Functions are created in test environments and in development environments too, to not repeat the same code again and again and used in different levels in the source code.i.e., declare to pass some values to that function. Similarly, the TestNG Parameters are used for various kinds which pass the values in the runtime.
The syntax for parameters is used as below:
@Parameters ({“a”, “b”}) // a and b are the values passed to the function.
Example:
1. Open Eclipse or IntelliJ IDEA and create a Java class file
import org.testng.annotations.Parameters;
import org.testng.annotations.Test;
public class Parameters
{
    @Test
    @Parameters ({"value1", "value2"})
    public void Sum(int n1, int n2) {
    	int totalsum = n1 + n2;
        System.out.println("The total sum is: " + totalsum);
    }
}
Test case File
Note that the TestNG parameters file is run via the TestNG XML file and not from the direct test case file.
2. Create testng.xml file
Sample XML File would be like this:
<?xml version="1.0" encoding="UTF-8"?>
<!DOCTYPE suite SYSTEM "https://testng.org/testng-1.0.dtd">
<suite name="TestNG Parameters Suite">
   <test name="Parameters">
      <parameter name="value1" value="8" />
      <parameter name="value2" value="3" />
      <classes>
         <class name="Parameters" />
      </classes>
   </test>
</suite>
In the above XML file, a tag is defined called parameters, which work as follows:
name: Name of the variable, declared in the test case file like value1 and value2 in the example.
value: The value of the variable to insert of your choice.
In testing.xml file parameters are passed, which are valid for all classes.
3. testing.xml file should be run.
4. Check the Output.
#2) TestNG Data Providers
In the previous section, saw how to pass parameters and use them in XML files, but there could be a problem when we want to run the same test multiple times with different values with that approach.
Hence, the TestNG Data Providers are the standard approach in such cases and are another way to pass parameters to the test function. Data providers pass the parameters in different ways.
Data providers pass different values to TestNG Test methods/ test cases in a single execution in the TestNG annotations form. Also, this is one of the in-built TestNG-data-driven testing. For that reason, TestNG is quite popular.
The configuration of the @DataProvider annotated method always returns Object[][] which can be used in the @Test annotated method. The @Test method wants to receive data from this DataProvider and needs to use a dataprovider name equal to the name of this annotation.
TestNG Data Provider Syntax is as follows:
@DataProvider (name = "name_of_dataprovider")
public Object[][] dpMethod() {
    return new Object [][] { values}
}
Data Providers are run directly via test case file, unlike TestNG parameters.
NOTE:
Some of the key points worth to be aware of before creating the TestNG test cases are:
- The TestNG DataProvider (the annotation part)in the above syntax has/contains only a single attribute, that is its name. It is always a string type in nature. For example, “name_of_dataprovider“, as mentioned above.
- DataProviders have a method for its own, “dpMethod” as mentioned above.
- By default, the method name becomes the data provider name. If the tester has not specified the name of the data provider,
TestNG Groups
TestNG Groups to perform the groupings of our different test methods are specified in the testing.xml file under the <groups > tag. Groups can be mentioned at <suite> tag level or <test> level
Sample code to create TestNG Groups is shown below:
package com.sth.groupExamples;

import org.testng.annotations.Test;

public class TestGroupExample
{
	@Test(groups = { "test-group" })
	public void testMethodOne() {
		System.out.println("This method one belonging to group.");
	}

	@Test
	public void testMethodTwo() {
		System.out.println("this method two not belonging to group.");
	}

	@Test(groups = { "test-group" })
	public void testMethodThree() {
		System.out.println("This method three belonging to group.");
	}
}
TestNG Listeners
@Listeners annotation: This annotation is used with the test class, which helps in writing logs and results.
@Listeners annotation Listen to every event triggering in the selenium code.
Listeners are an interface that can modify the TestNG behavior and are activated before the test or after the test case.
Say, for example, when test cases are running via Selenium or Appium, if there is a failure during this time testers might need screenshots to triage the issue and meet the scenario’s expected results, TestNG will provide the facility called Listeners which will direct to new chunk that wrote for a screenshot.
ITestListeners is an interface via which these TestNG Listeners are implemented, which has the following methods.

TestNG Assertions
TestNG is offering multiple-level assertions to validate our test’s actual results against expected results.
Generic Syntax for TestNG Assertions as follows:
Assert.Method(actual, expected);
Some of the TestNG Assertions used are:
- assertTrue:
Assert.assertTrue(condition); - assertFalse
Assert.assertFalse(condition); - assertEquals
Assert.assertEquals(actual,expected); - assertNotEquals:
Assert.assertNotEquals(actual,expected,Message);
TestNG Parallel Execution
Multiple tests can be run simultaneously in multiple execution modes which reduces the execution time. This way of execution is particularly useful when running across various multiple browsers and operating systems, i.e., Cross-Browser testing. Parallel testing is an important concept in Automated testing.
TestNG is used most often with Selenium for seamless integration during execution making the testing process easier and increasing efficiency.
Advantages and Disadvantages of Parallel Execution
Advantages:
- Since multiple tests are running simultaneously there is a drastic reduction in the time consumption of Execution time.
- Allows independent execution of the different software components, ie, Multi-Threaded tests.
- Helps in the identification of the issues /defects faster which enables us to find solutions earlier in the Software development life Cycle. Also reduces the project’s overall time and its associated costs.
Disadvantages:
- If any Dependent module fails Debugging complexity might be the challenging task to pinpoint the exact root cause of failures and unexpected behavior.
- Testers must be thorough and must possess a deep understanding of the Program Test Information to create a balanced testing module. Even trivial dependency might ruin the entire successful parallel execution process.
Steps to Run Parallel Tests Using TestNG and Selenium
#1) Create Maven Project in the desired IDE(IntelliJ, Eclipse, etc): by default, the Maven project comes with pom.xml file.
#2) Adding Dependencies: Open the pom.xml file in the project and add dependencies for Selenium WebDriver and TestNG.
#3) Setting up Java project: Set up a Java project and add TestNg and Selenium web Driver libraries to your IDE9Eclipse, IntelliJ, or any IDE of your choice.)
#4) Create Test Group: Organize your tests using these annotations: @Test, @BeforeTest, @AfterTest
Write Selenium Web Driver code to run your tests.
#5) TestNG XML Configuration file should be created now, ie “testng.xml” file where in our test related Test Suites, Test Classes, and if any parameters.
#6) Run your tests: Before running tests following the above steps(1 to 5) are mandatory for successful parallel execution.
Tests can be run on the command line or IDE console/terminal or using the TestNG command line.
If Maven is used, run this command: mvn test
#7) View the results on the console output or HTML report generated by TestNG.
Below sample code below would launch 2 different browsers:
import org.openqa.selenium.By;
import org.openqa.selenium.WebDriver;
import org.openqa.selenium.firefox.FirefoxDriver;
import org.openqa.selenium.chrome.*;
import org.testng.annotations.Test;

public class ParallelTests {
    public WebDriver driver;
        @Test
        public void FirefoxTest() {
            //Initializing the firefox driver (Gecko)
        driver = new FirefoxDriver();
        driver.get(“https://www.softwaretestinghelp.com/”);
        driver.findElement(By.xpath(//*[@id=\app\]/div/div/div[2]/div/div[1]/div/div[1])).click();
        driver.quit();
         }
        @Test
     public void ChromeTest()
     {
      //Initialize the chrome driver
      driver = new ChromeDriver();
      driver.get(“https://www.softwaretestinghelp.com/”);
      driver.findElement(By.xpath(//*[@id=\app\]/div/div/div[2]/div/div[1]/div/div[1])).click();
      driver.quit();
     }
}
By following the Steps from 1-to-7 we can set up a Java project with Selenium web Driver and TestNG dependencies, which allows us to write and execute the tests efficiently.
TestNG Test and Test Suite
Tests in TestNG are structured at 4 levels, such as
Suite -> Tests -> TestNG Class -> Test Method
Test Suite: The collection of TestNG Tests is called Test Suite and can run multiple tests at once by executing the test suite. This provides the capability to manage the test execution.
One of the unique features of this suite cannot be defined inside the test code or main function
To run the test suite, we need to create a separate file called TestNG XML file.
How is the TestNG XML File Created
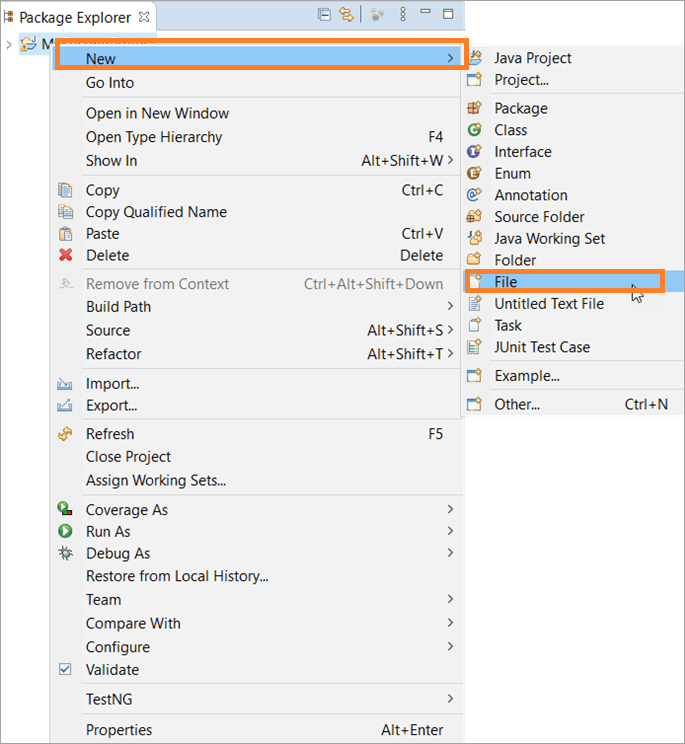
Step #1: In Eclipse, Package Explorer, right-click on the project select New, go to ‘File’, and click on it
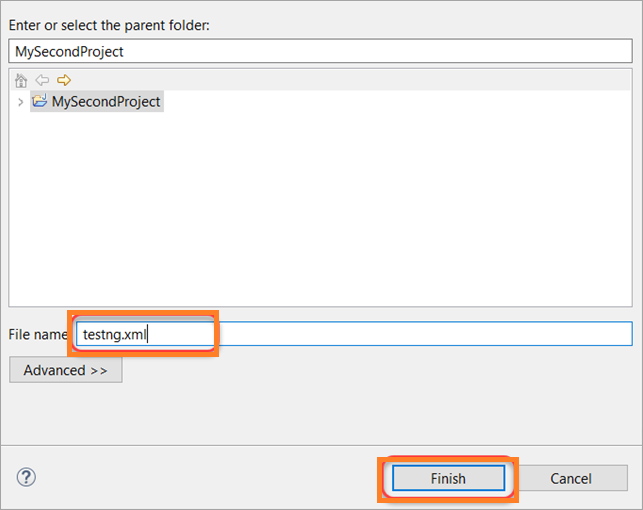
Step #2: New File window appears, provide the file name as ‘testng.xml’, then click on the ‘Finish’ button.
Step #3: The ‘testng.xml’ file will be listed under the project’s folder structure.
Now that the first testing.xml file is set up to run TestNG test suites.
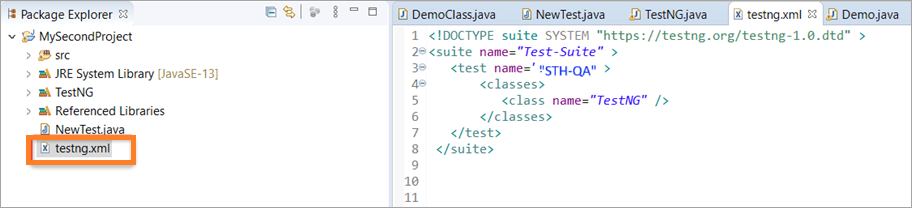
Step #4: Below code snippet below should be added to the testing.xml file
<!DOCTYPE suite SYSTEM "https://testng.org/testng-1.0.dtd" >
<suite name="Test-Suite" >
   <test name="STH" >
       <classes>
          <class name="TestNG" />
       </classes>
   </test>
 </suite>
Step #5: testing.xml file would look like the below under the project’s structure folders
In the above sections, we saw how to install and set up the TestNG jars in IntelliJ IDEA and Eclipse IDE respectively. Also learned TestNG concepts in subsequent Sections.
Now it’s time to start writing the First TestNG Test in IntelliJ IDEA or Eclipse IDE or in any desired IDEs.
First Test Case with TestNG in Selenium
How to Set up the TestNG Test Project in Eclipse and/or the First Test Case with TestNG
TestNG file is nothing but a simple Java Class file.
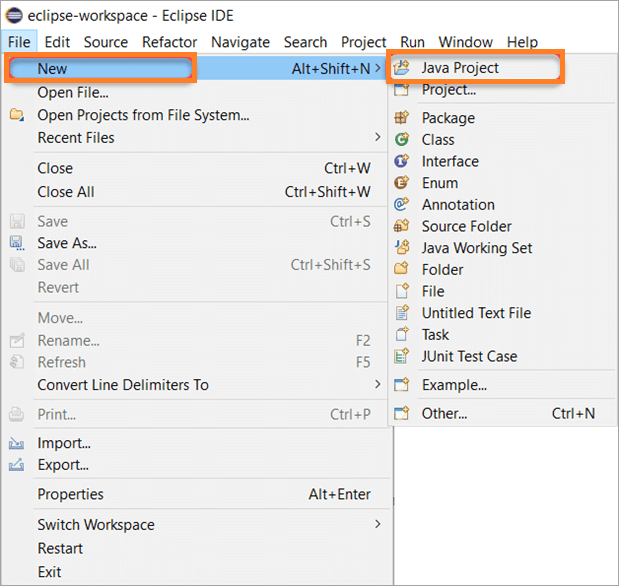
#1) Launch Eclipse IDE, to set up a new TestNG project. Once launched, Navigate to File->New ->Java Project
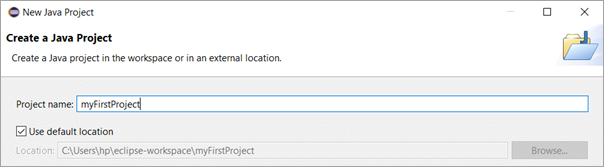
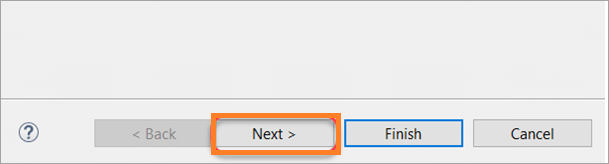
#2) Provide the name of your choice for your first TestNG project and tap on Next which moves to the next panel.
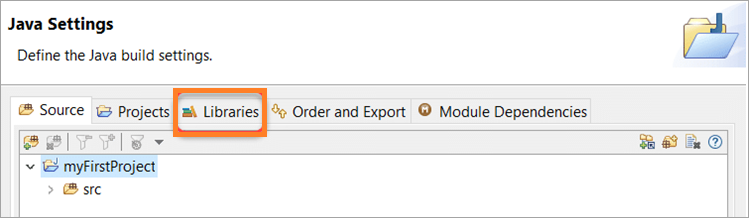
#3) Select Libraries as shown in the below image to add the TestNG libraries to your new project.
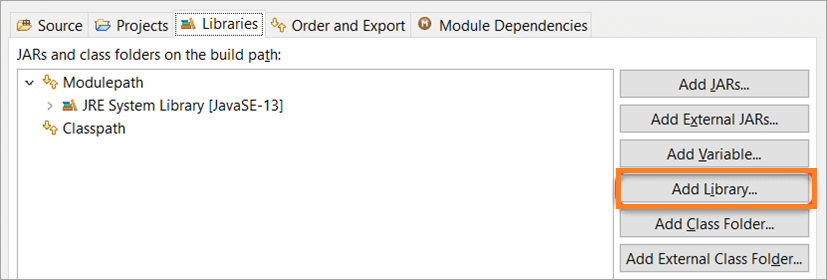
#4) And on right-hand side select ‘Add Library‘ button
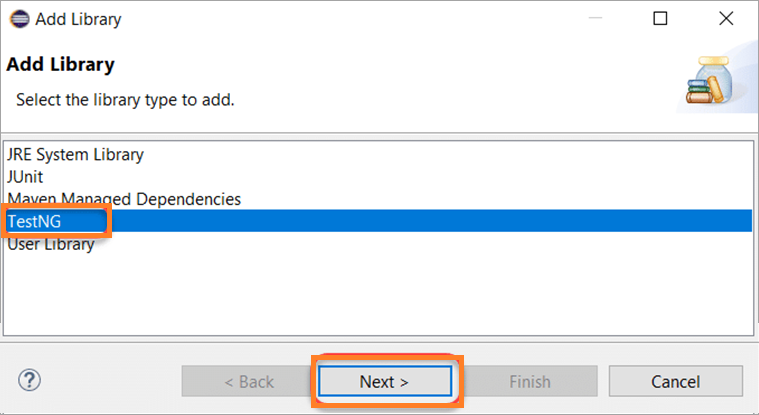
#5) Add Library window opens, select the library type as TestNG, and tap on Next. Then tap on ‘Finish’ to finish adding the TestNG libraries to the Project.
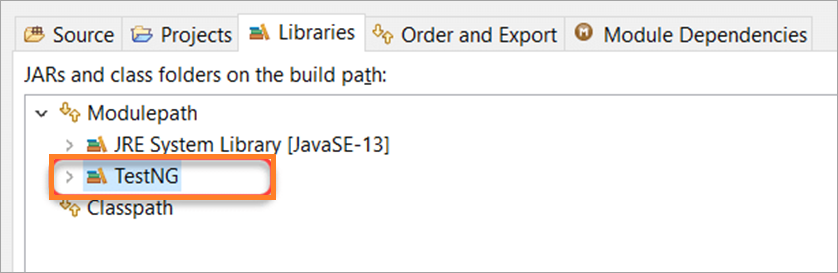
This concludes that TestNG libraries have been added successfully to the First TestNG project
The next step is to Add the Selenium Jar files to a project before moving on to write code for the Test cases
Download Selenium Jar Files for TestNG
Firstly, make sure the Selenium Web Driver is set up on your System. Then Download the jar files from the official Selenium link Download Selenium Jars.
Note the path where the jar files are extracted on your local folder which will be required at a later stage.
The next step is to create a TestNG class in the Project on Eclipse.
Create TestNG Test Class in Eclipse
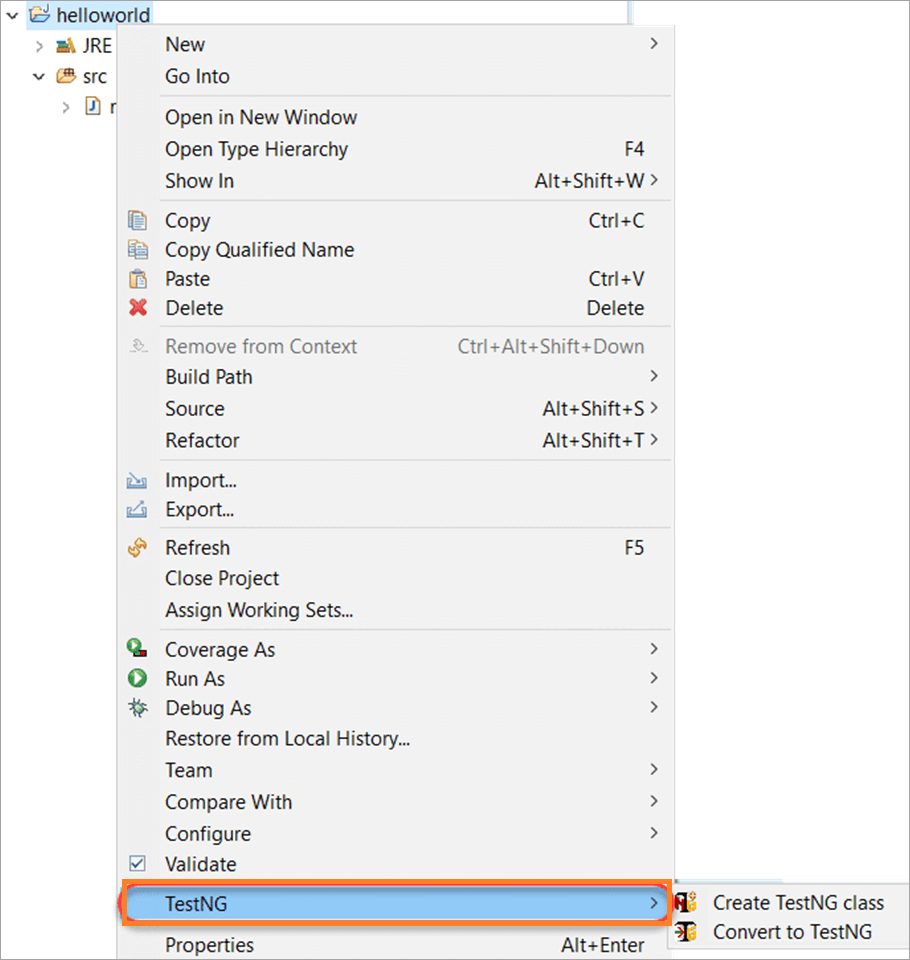
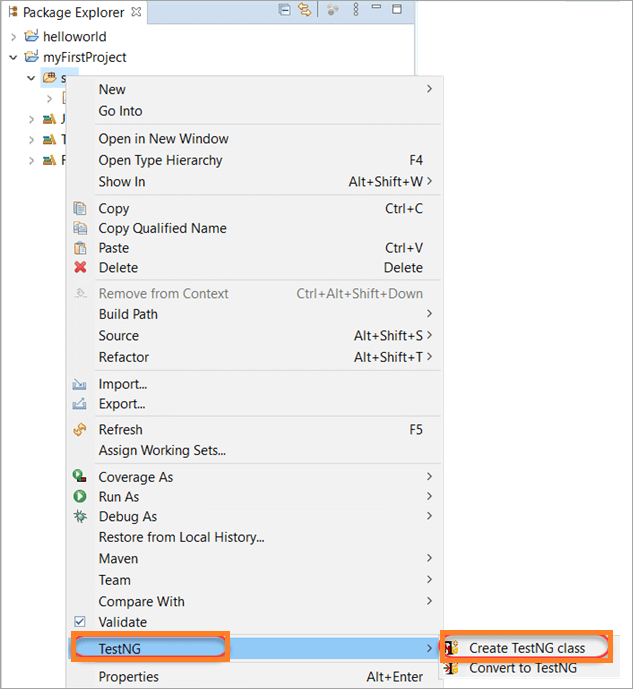
#1) In Eclipse, on the left-hand pane package explorer, your newly created project is listed with in-built folder structures. Select ‘src’, right-click on it, then hover on ‘TestNG’, options show as
‘Create TestNG Class & Covert to TestNG’, select CreateTestNG Class
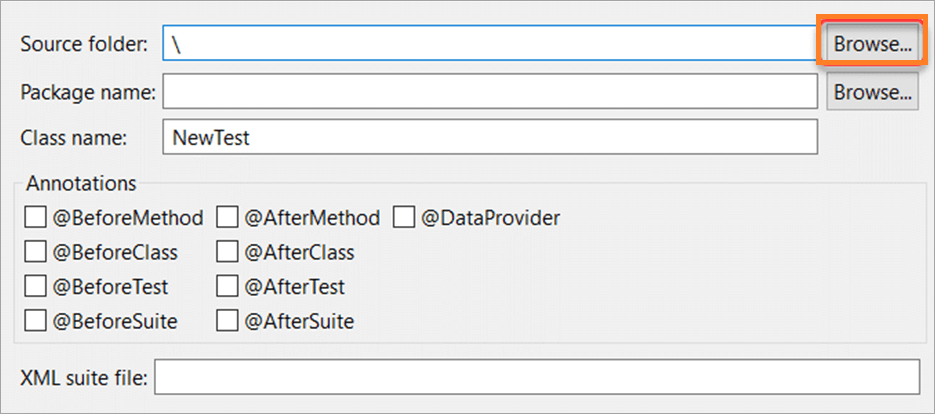
#2) Browse for the source folder name by tapping the browse button.
#3) Set the Class name to ‘TestNG’.
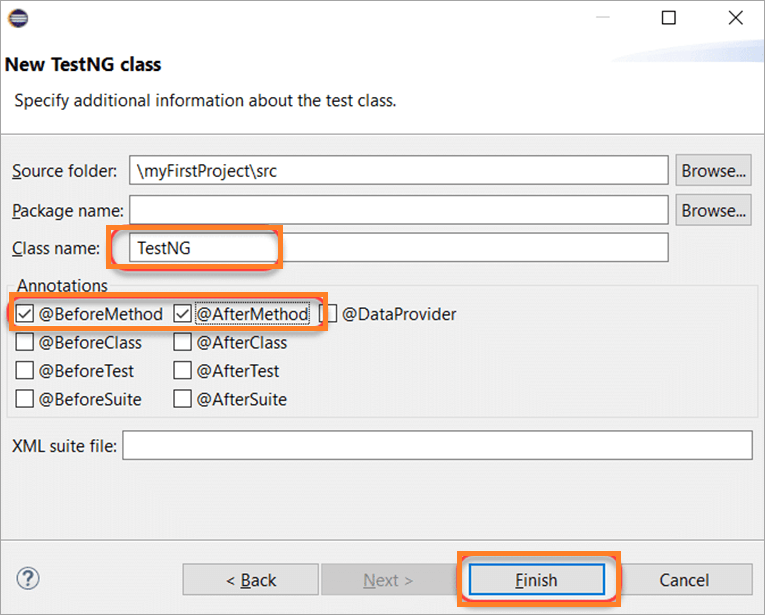
Leave the annotations marked as is and click finish.
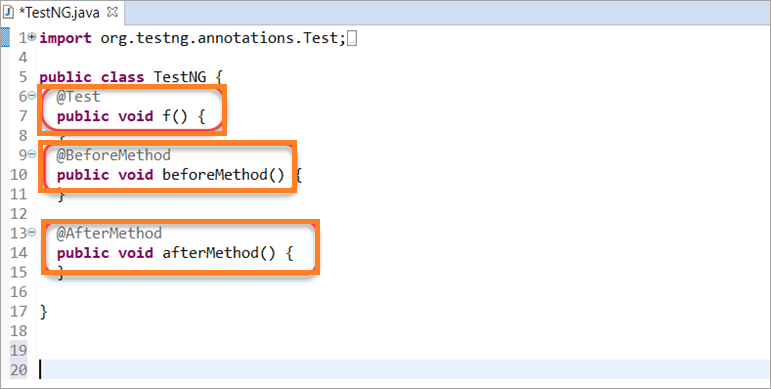
#4) TestNG.java file will be created as shown in the below image.
The file shows the @Before method and @afterMethod that were selected in step 3 above.
The first Test Class in TestNG is created. In the next section proceed to create the First TestNG Test case.
Start Coding for the First Test Case in TestNG
Pre-requisites: Proficient knowledge of Java Coding language, Selenium Web Driver drivers, and System Environment path setup.
Dependencies:
- Selenium Web Driver jar files
- Web Drivers (for Chrome, Safari, Firefox, etc)
- TestNG jar files
- JDK
Plugins:
- Create TestNG XML plugin (install in IntelliJ IDEA). This plugin will generate a testng.xml file.
- maven-compiler-plugin. (Include in pom.xml from mvn repository under <plugins/> tag).
- maven-surefire-plugin. (Include in pom.xml from mvn repository under <plugins/> tag).
Sample Test Case in TestNG code is shown below:
Sample Test Case in TestNG
import org.openqa.selenium.WebDriver;
import org.testng.annotations.Test;
import org.testng.annotations.BeforeMethod;
import org.testng.annotations.AfterMethod;
import org.openqa.selenium.*;
import org.openqa.selenium.chrome.ChromeDriver;
import org.testng.Assert;
import org.testng.annotations.*;
public class TestNGTest1 {
	WebDriver driver;
	@Test
	public void f() {
	    String Url1 = " https://www.softwaretestinghelp.com/";
	        driver = new ChromeDriver();
         System.out.println("Google Chrome browser is launched. ");
	        driver.get(Url1); // to navigate to desired website,
         System.out.println("Navigated to desired website on Google Chrome browser");
	       String testTitleName = "QA and Software Testing topics!";
	        String originalTitleName = driver.getTitle();
	        Assert.assertEquals(originalTitleName, testTitleName); // to check two objects are equal
  }
	@BeforeMethod
	public void beforeMethod() {
	System.out.println("Starting Test On Chrome Browser");
	}
	@AfterMethod
	public void afterMethod() {
		 //driver.close();
             driver.quit(); //close the browser
		System.out.println("Finished Test On Chrome Browser");
	}
}
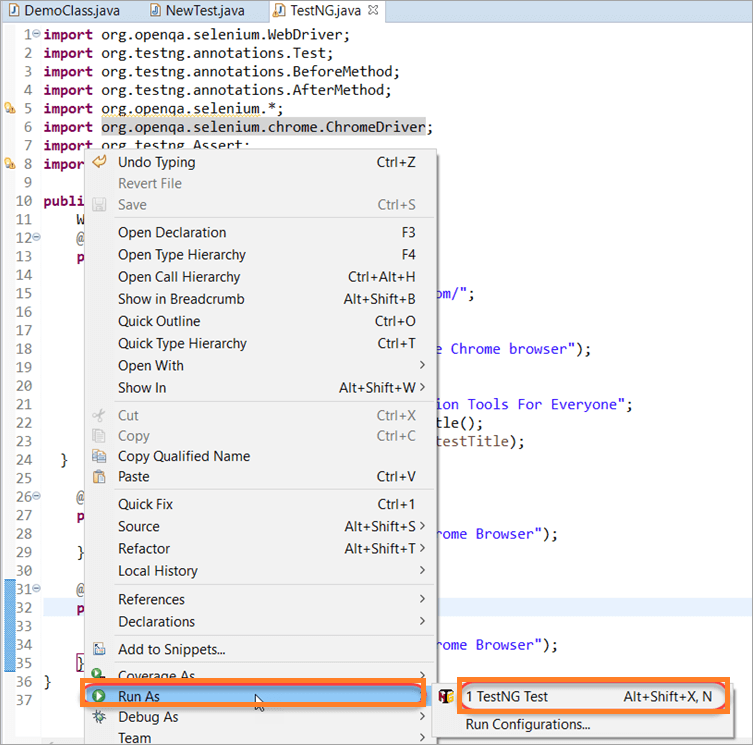
Run Test Case in TestNG
Right-click on the test case script< example: TestNG.java file>. Go to ‘Run As’ and select ‘TestNG test’.
Tests will run successfully and the Next step is to check results.
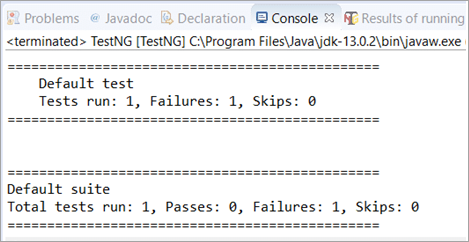
How to View TestNG Reports
As soon as tests are run the TestNG generates the reports and are available to view them either on,
- Console
- TestNG Reports
Scroll down on the console screen will show the test results as below:
The advantages of pom.xml are:
- There is no need to download the dependencies (3rd party jars, WebDriver jars) manually and pom will associate with the project automatically, we don’t need to do it manually, but need to tell pom.xml version numbers of the different dependencies.
- Execute the complete project without having Eclipse or any IDE, through cmd prompt or Jenkins.
Prerequisites to Create a TestNG Report:
- Install Java(version above 8) in the system and check if it is present with the command: java -version. The Java version installed will be visible if the installation has been completed successfully.
- Install maven in the system and check if it is present with the command: mvn -version. The maven version installed will be visible if the installation has been completed successfully.
- Install any IDE like Eclipse, IntelliJ.
- Add the TestNG dependencies from the link below: https://mvnrepository.com/artifact/.
- Add the Selenium Java dependencies from the below link: selenium-java
- Save the pom.xml with all the dependencies and update the Maven project
Frequently Asked Questions
1. What is the TestNG framework?
TestNG (Test Next Generation) is one of the popular testing frameworks primarily used for test automation. When combined with Selenium, a widely-used web application testing tool, one powerful solution for the automated testing of web applications.
2. What are the Different Ways to Generate TestNG Reports?
The different ways to generate a TestNG report are listed below.
• emailable-report.html
• index.html report
• Reporter class report
3. Can parameters be used in TestNG Annotations?
Yes, use the testNG annotations similarly to methods in Java.
4. Can the priority be set manually in TestNG annotations?
Certainly Yes! This is one of the unique features of TestNG for defining the priority as a parameter in its annotations.
public class TestNGTest1 {
@Test (priority = 3) //Lowest Priority for this
public void z_test() {
}
@Test (priority = 1) // Highest Priority
public void y_test() {
}
@Test (priority = 2) //2nd Highest Priority
public void x_test() {
}
}
5. Are multiple parameters allowed in TestNG annotations?
Yes, multiple parameters are used in TestNG annotations.
6. What is Selenium?
Selenium is a robust test automation suite, used for automating web-based applications. It supports multiple browsers, programming languages, and platforms.
Suggested Read =>> Frequently Asked TestNG Interview Questions
Conclusion
TestNG is one of the famous testing frameworks when integrated with Selenium in the Java environment, which provides a powerful solution for web application testing.
Despite a learning curve and configuration complexity, TestNG’s advantages make it a popular choice for automated web testing.
Was this helpful?
Recommended Reading
-

This Tutorial Explains the Different Types of TestNG Annotations and Listeners. You Will Also Learn How to use the TestNG Annotations & Listeners with Examples: Here, we will run a basic TestNG program using TestNG annotations and also see the role of TestNG Listeners and how to use them in…
-

Top frequently asked TestNG interview questions and answers with examples to help in your preparation: A list of the most popular and frequently asked interview questions and answers on TestNG is explained in this article. Simple examples are added at the concerned places for your easy understanding of the concept.…
-
This Selenium Tutorial on Assertions Explains What Are Assertions in Selenium And Different Types of Assertions And Assertion Methods Using Junit and TestNG Frameworks: Assertions are used for validating a test case and helps us understand if a test case has passed or failed. The assertion is considered to be…
-
This Detailed Tutorial Explains All About Integration of TestNG in Eclipse. It Also Shows How to Find Other Plugins Through the Marketplace and Install Them: In this In-Depth Eclipse Training Tutorials For All, we learned about Configuring Maven and SVN with Eclipse in our previous tutorials. These tools will help…
-
In the last few tutorials, we shed light on the basic and commonly used WebDriver commands. We also learned about the locating strategies of UI elements and their inclusion in the test scripts. Therefore, we developed our very first WebDriver Automation Test Script. Moving ahead with this tutorial, we will…
-
This tutorial Explains How to Use The Maven Surefire Plugin to Manage our Dependencies and Select & Execute Particular Test Scripts or Suites Using TestNG: Here is a perfect guide for you on the Integration of Maven and TestNG using the Maven Surefire plugin and how to execute the script…
-
A comprehensive comparison between JUnit Vs TestNG frameworks. Includes comparison of annotations and featurewise comparison with examples: In the previous tutorial, we learned DisplayName annotation and conditional test execution based on different criteria like JRE version, environmental variables, etc. We addressed some important questions around the topic as well. Since we…
-

In this article, I am going to focus on how to use TestNG Annotations in Selenium with appropriate examples. TestNG, as most of you know, is an automation framework widely used in Selenium. It is important for all testers to understand the annotations used while working with TestNG. To put it…


