Learn how to download and set up a Minecraft server in minutes. This guide covers system
requirements, installation steps, server setup, and Port forwarding:
If you want to play Minecraft on your PC or host your own Minecraft server for friends, the process is easier than it seems. In this guide, I will walk you through how to download Minecraft for PC, install the latest Java Edition, and set up a fully functional Minecraft server using my own hands-on experience.
I’ve hosted multiple Minecraft servers over the years — from basic LAN servers to fully configured, always-on multiplayer worlds. Based on my experience, I’ll explain step-by-step everything clearly, including system requirements, server.jar configuration, customisation, port forwarding (25565), firewall rules, and common troubleshooting fixes.
Table of Contents:
- Set Up Your Own Minecraft Server: Complete Download Guide
Set Up Your Own Minecraft Server: Complete Download Guide

I truly believe that the best way to experience Minecraft is by sharing that experience with friends and strangers online. To do that, you’ll need to do a lot more than download Minecraft.
You’ll need to create and host a Minecraft server. I understand that this is easier said than done, which is why I feel obliged to write down this comprehensive guide.
Consider this your hands-on guide to setting up your own Minecraft servers on PC, regardless of whether you are using the Java or Bedrock edition of the game.
Why Create Your Own Minecraft Server?
Setting up a Minecraft server can be challenging. You might ask whether the whole ordeal is even worth it. I believe it is. In fact, the benefits you are bound to experience by hosting your own Minecraft server are rewarding enough to make the entire ordeal worth enduring.
While Minecraft began as a single-player game, it has evolved into a multiplayer, sandbox phenomenon. People still indulge in this game because of the community experience it offers. With a server of your own, you can create a virtual world that your friends can enjoy and an ever-growing network of players.
Another important benefit of setting up a server is control. A server grants you control over your Minecraft world. As an admin of that server, you’ll have the power to set up rules and regulations that players will have to follow. Simply put, you get better security and customization control with your own Minecraft server.
Last, you also have the privilege of monetizing your servers. You can make some cash on the side by gathering donations from server-users or selling them certain features.
In hindsight, I would say you stand to gain a lot by creating your own Minecraft server.
How to Host a Minecraft Server on Your PC
Hosting a Minecraft server is challenging for sure, but it isn’t something hard to comprehend for those paying attention. I suggest you pay heed and follow the processes I am about to share step-by-step. Success will be yours.
Here’s how you do it.
#1) For Java Edition
1. Check Hardware Requirements
Your Windows or Mac system should meet the following requirements to successfully download, install, and then host the Java version of Minecraft’s server.
| Minimum | Recommended | |
|---|---|---|
| RAM | 2 GB | 4 GB |
| CPU | Intel Core i3-3210 3.2 GHz, AMD A8-7600 APU 3.1 GHz, Apple M1 or equivalent | Intel Core i5-4690 3.5 GHz, AMD A10-7800 APU 3.5 GHz ,Apple M1 or equivalent |
| Storage | Windows: 10 GB macOS: 2 GB | – |
| Internet Speed | Windows: 3Mbps download speed macOS: 2 Mbps download speed | – |
| Graphics | Intel HD Graphics 4000, AMD Radeon R5 | NVIDIA GeForce 700 series or AMD Radeon Rx 200 series with OpenGL 4.45. |
| Architecture | ARM, x64, x86 | ARM, x64, x86 |
2. Download Minecraft

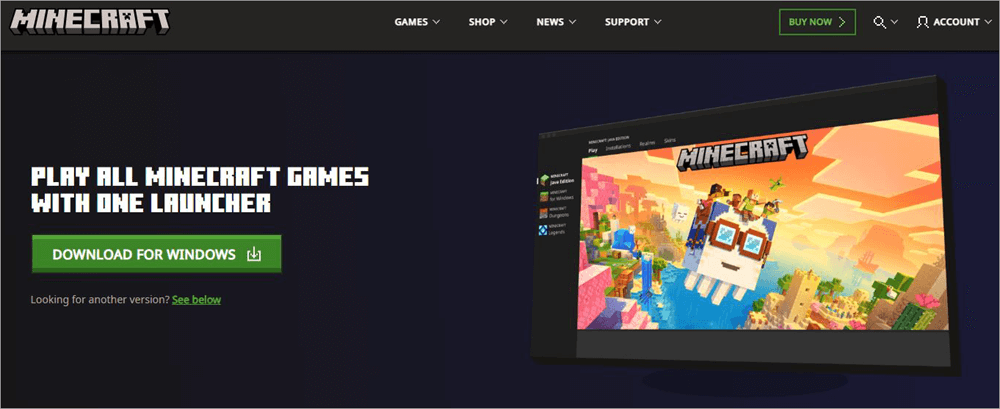
After making sure your system is the right fit for Minecraft, it is time to download the software from the official website. You’ll find the download button clearly labelled as soon as you land on the official site. Click on it.
- After downloading, open the MinecraftInstaller.exe file to begin installation.
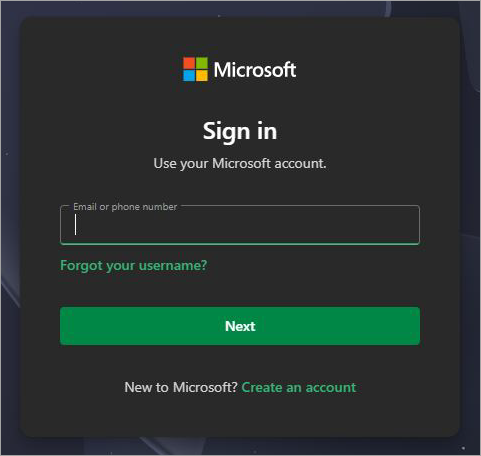
- Sign in using your Microsoft account.
- On the Minecraft Launcher page, select Java Edition.
Also, make sure that your system has the latest version of Java installed on it. You are going to run into major, game-breaking errors if Java is outdated on your system or simply missing.
3. Set Up the Server
With the Java edition installed on your system, it is time to set up the server. For this, you’ll need to head to the “Server” page. There you’ll find a file called Minecraft server.1.21.8.
Click on it to download the file. Keep this file in a convenient location on your system.
1. Open the server file via the Command Prompt on Windows or Terminal on macOS.
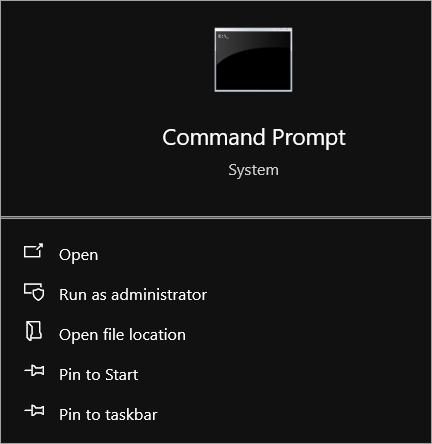
2. You’ll need to use the change directory command to find and access the downloaded server file.
3. Once the correct file location is identified, you’ll need to run the following command as it is presented on Minecraft’s official website.

4. This command will result in the required files being generated.
You can now close the Terminal or Command Prompt window.
This server software won’t open until all terms and agreements as dictated within the end-user license agreement have been accepted.
To accept the conditions, do the following:
- Open the Minecraft Server file
- Open the eula.txt file
- In the file, modify eula=false to eula=true
- Save the changes
It is time to run the server again. It should be up and running by now. You’ll find your username in the Players tab, which is within your server’s graphical user interface. You can begin customizing the server by configuring the server.properties file.
#2) For Bedrock
1. Check Hardware Requirements
As we did with Java, first make sure your system is compatible enough to run Bedrock.
The following table should help:
| Minimum | Maximum | |
| RAM | 4 GB | 8 GB |
| CPU | Intel Celerion J4105, AMD FX-4100 | Intel i7-6500U, AMD A8-6600K |
| OS | Windows 10 and above, Ubuntu | – |
| Internet Speed | 2 Mbps download speed. | – |
| Graphics | Intel HD Graphics 4000, AMD Radeon R5 | NVIDIA GeForce 940M | AMD Radeon HD 8570D |
| Architecture | ARM, x64, x86 | ARM, x64, x86 |
Remember, Minecraft’s Bedrock Edition is not officially available for Mac. You’ll need a Windows system, preferably one running on OS 10 or above, for the best results.
2. Download the Software
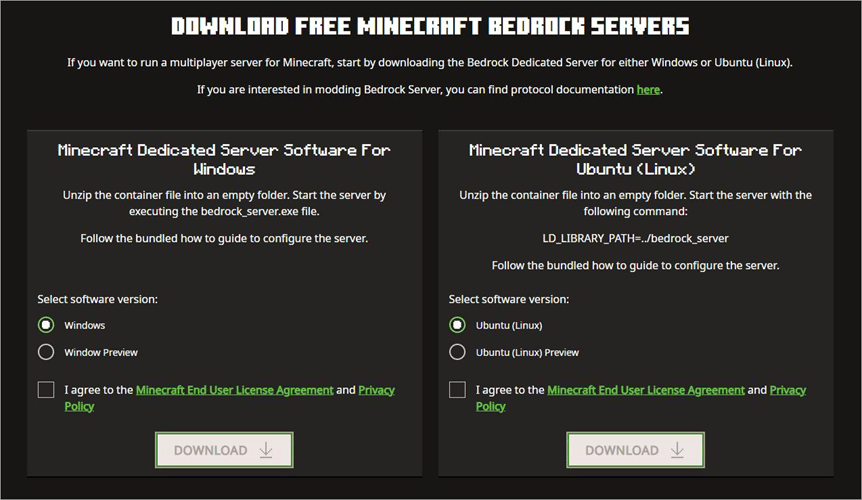
Go to the official website and download the Minecraft Bedrock server. A zip file will be downloaded onto your system. You can unzip it using your computer’s default file explorer or other software like WinRAR.
3. Set Up the Server
When setting up the server, know that your Windows system might prevent UWP apps like Minecraft Bedrock from connecting to the local server.
We’ll need to change that by doing the following:
- Open Command Prompt.
- Paste the following command inside the Command Prompt. CheckNetIsolation.exe LoopbackExempt –a –p=S-1-15-2-1958404141-86561845-1752920682-3514627264-368642714-62675701-733520436
- Close the Command Prompt, and now open the bedrock_server.exe file.
- This will trigger your system’s Windows Defender Firewall.
- When that happens, check both the “private network” and “public network” access before clicking on “Allow Access”.
- Your server will now be up and running.
Final Step: Port Forwarding
With the server up and running, you’ll now need to use a mechanism called “Port Forwarding”, which will help other players connect to your server via your router.
Further Reading => Complete Guide to Port Forward a Minecraft Server
Before I delve into the details of this process, I must warn you of the potential security risks it may pose to your system. By activating “Port Forwarding”, you are essentially exposing your Wi-Fi router to other people.
Therefore, I would only suggest undertaking this process if you are running a small multiplayer server with people you trust, like friends and family.
The actual process may vary depending on the type of router you are using. That said, the basic gist remains the same:
- You’ll need to first find our IP addresses. To do this, you’ll need to open Command Prompt for Windows or Terminal for macOS.
- On Windows, type ipconfig. On Mac, type /sbin/ifconfig.
- You’ll now be shown a list of IP addresses. You’ll need to note down the IPv4 address alongside your Default Gateway.
For more detailed information on IPv4, you can read through our comprehensive guide on IPv4 Vs IPv6
Follow the steps below to set up your router:
- Open your browser and enter the Default Gateway address.
- Log in to your router settings.
- Navigate to Advanced Settings > Port Forwarding
- Add a new rule; you can name it anything.
- In the Internal IP section, enter the IPv4 address.
- Now, use your Minecraft’s default port number, which will be 25565 as UDP and TCP port numbers.
- Save the configuration.
With the ports now open, provide other players with your IP address, which they will use to connect to your server.
Joining the server is as simple as shown below:
- The player will need to launch Minecraft
- Select “Multiplayer”
- Click on “Add Server”
- In the “Server Address” field, enter the provided IP address.
- Click on “Done” to save.
- Select the server and click “Join Server”.
Is there a free trial?
Yes, Minecraft does offer a free trial for Windows, PS5, and Android devices. The trial length, however, will vary depending on the device in use. On average, you can expect the trial length to last for about 100 minutes of in-game time or 5 in-game days.
Follow the steps below to get the free trial:
- Download the game
- Make sure you are signed in to your Microsoft account.
- Launch the trial on your device.
Quick Steps to Customize Your Minecraft Server
Creating and running your server is only half the battle won, especially for folks who seek an elevating experience playing Minecraft. If you want to get the most out of your Minecraft gameplay, you’ll need to learn how to customize your server. This is fairly simple, provided you are familiar with the customization options at your disposal.
#1) Server.Properties File
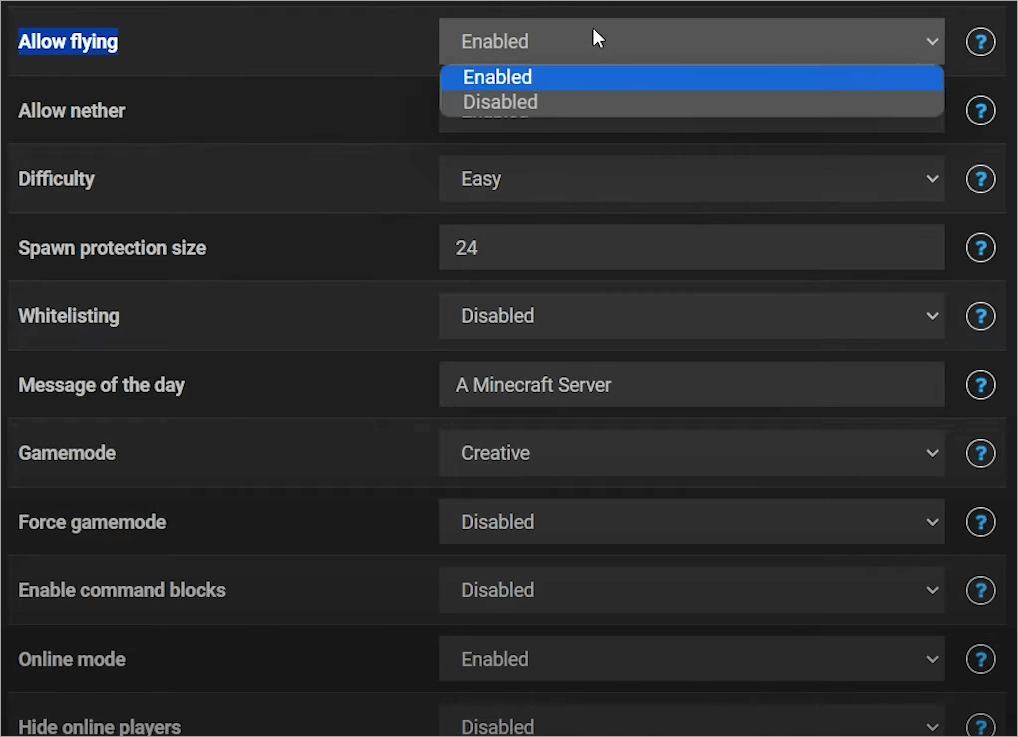
[Via Apex Hosting]
You’ll need this file to customize various aspects of your Minecraft world and gameplay. This is a normal text file with UTF-8 encoding. It can be edited via Notepad on your Windows system or other solutions like Nano or Vim. Server.Properties file features the following configurations:
- Gameplay Difficulty
- Player Slots
- Server Settings
- World Properties
- Player Abilities
- Cheats.
You can edit these configurations with Notepad or any similar software used for editing text files.
#2) Resource Packs
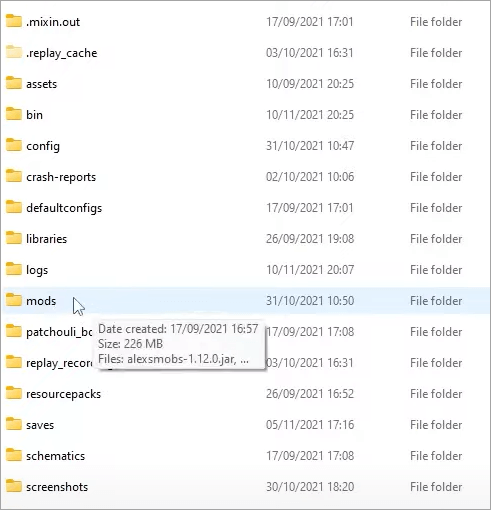
[Via AreMine]
There are a ton of websites out there that offer resource packs and other custom features, which you can use to personalize your Minecraft world. Download the resource pack and place it in the “Resource Packs” folder within the server folder on your system.
You can also download custom maps and place them inside the “Worlds” folder to change the aesthetics of your Minecraft world.
#3) Commands
If you don’t mind coding, perhaps you could learn about certain commands, which could further customize your server. These commands work like cheats, which grant you the power to change various aspects of your gameplay.
For instance, the command – /summon sheep will result in a sheep spawning right next to you inside the game. The command – /damage will help you inflict harm to an entity in the game. Similarly, there are many other commands that you can run to modify your gameplay.
Troubleshooting Tips to Follow When Downloading Minecraft on PC
Although downloading Minecraft on PC is simple, you can run into certain issues. The most common issue pertains to download failure. If that happens, the first thing you need to do is check your Internet connection. Make sure your connection is stable.
Also, make sure the Java on your system is up-to-date. If not, download the updated version from the official website. Finally, make sure all hardware requirements, as I’ve specified above, are met.
If Minecraft keeps freezing, it may be due to limited system resources. This happens when too many applications are running in the background. So, make sure that only Minecraft is open when you are playing the game. Shut down all other running applications for a smoother experience.
Should You Rent or Build Your Own Server?
When you decide to create your own server, you’ll be confronted with a choice. You can decide to host the server yourself on your computer or rent the server from a hosted provider.
The former option will cost you nothing, while you’ll have to pay a monthly or annual subscription fee to the provider hosting your server. Both options come with their own set of merits and disadvantages. For example, self-hosting is perfect if you want to create a server that accommodates a small group of people.
However, if you want to create a growing player base with some opportunities for monetization down the line, a public server is the way to go. Public servers also offer other imperative features like guaranteed tech support, DDoS protection, and near-perfect uptime. Check our review of Top DDoS protection services to secure your website.
The following table will hopefully help you make an informed decision:
| Parameters | Build a Server | Rent a Server |
| Setup Process | Complex Manual Configuration required | Automatic, one-click setup process. |
| Player Capacity | Limited to 1-5 players | It can be unlimited, depending on the chosen plan. |
| Performance | Performance is restricted to the specs of your PC | Professional hardware with guaranteed uptime. |
| Security | Manually configure DDoS and Firewall setup | Built-In DDoS protection. |
| Maintenance | Manual backups and troubleshooting | Daily auto-backups. Automatic updates |
| Customization | Greater control over mods. | Restricted control over mods |
| Cost | One-time cost for hardware setup | Fixed monthly or annual subscription fee. |
| Best for | Playing with a small group of friends and family | People who want to create a growing community and monetize their servers. |
Safety Tips for Downloading Minecraft on PC
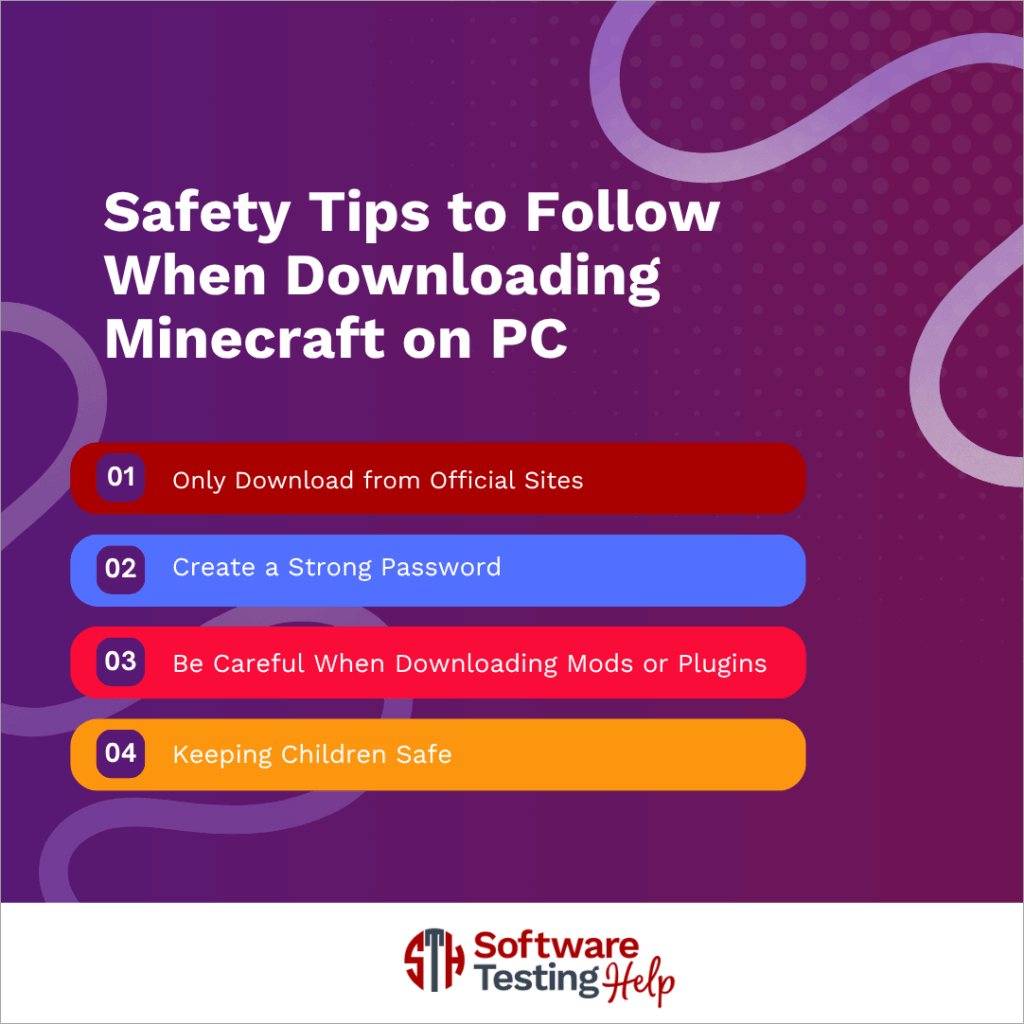
You must remember that when downloading Minecraft, you are essentially downloading a piece of foreign software on your system. Therefore, it is recommended to practice caution. I suggest you follow the tips below to keep your PC and your private information safe.
1. Only Download from Official Sites
One Google search for Minecraft will result in a boatload of results, depicting a variety of launchers. Know that most of these launchers are fake and can cause irreparable damage to your PC if downloaded. Only stick with official sites like the Microsoft Store or the official Minecraft.net website to download your game.
2. Create a Strong Password
When creating your Minecraft or Microsoft account, make sure you type in a very strong password, which is a mix of letters, numbers, and special characters. You should enable two-step verification for added security.
3. Be Careful When Downloading Mods or Plugins
As you continue playing Minecraft, you’ll be tempted to customize your experience with mods and plugins. I suggest only downloading these elements from reputable, trusted websites online. Also, make sure your PC is protected by strong antivirus software, which can detect and block malware before it is installed on your PC.
4. Keeping Children Safe
Minecraft has certain child-friendly security features in place to keep minors safe. Use them if the game is being played by a minor in your family. Create a child account, as it will ensure your child’s privacy and safety when they are online. You can also filter content and set screen time limits via Microsoft’s Family Safety feature.
How to Manage Your Minecraft Server & Gameplay
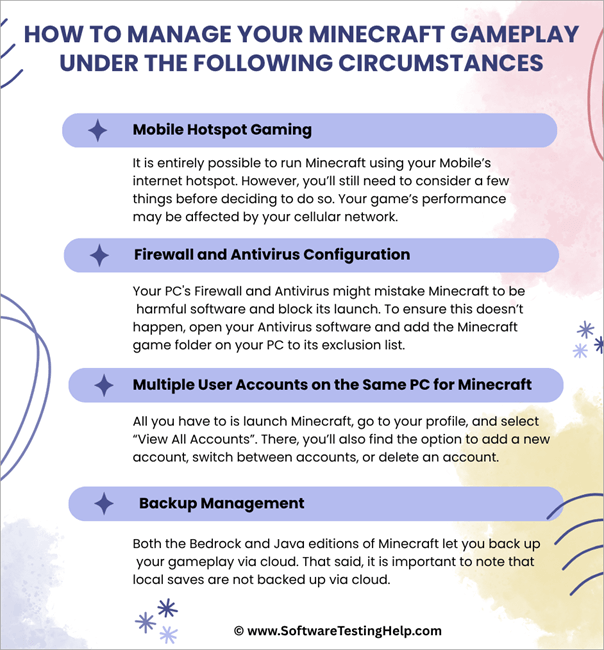
1. Mobile Hotspot Gaming
It is entirely possible to run Minecraft using your mobile’s internet hotspot. However, you’ll still need to consider a few things before deciding to do so. Your cellular network may affect your game’s performance.
A weaker network will result in poor performance. A limited data plan might also hinder your gameplay session. Just make sure you have enough data and that your mobile’s cellular network is strong for better performance.
2. Firewall and Antivirus Configuration
Your PC’s firewall and antivirus might mistake Minecraft to be harmful software and block its launch. To ensure this doesn’t happen, open your antivirus software and add the Minecraft game folder on your PC to its exclusion list.
In the case of Firewall, make sure that your Minecraft launcher and Java can communicate with each other. Also, make sure that your network is set to private. You’ll also need to disable “Controlled Folder Access” restrictions. In Windows Defender, create an inbound rule for both Java and the Port.
Here is our exclusive review of the differences between Windows Defender Vs Avast Antivirus.
3. Multiple User Accounts on the Same PC for Minecraft
If multiple people are playing Minecraft on the same PC, then you probably have to manage multiple accounts. The Minecraft launcher makes this easy. All you have to do is launch Minecraft, go to your profile, and select “View All Accounts”. There, you’ll also find the option to add a new account, switch between accounts, or delete an account.
4. Backup Management
Both the Bedrock and Java editions of Minecraft let you back up your gameplay via cloud. However, note that local saves are not backed up via the cloud.
To restore any lost data, do the following:
- Launch Minecraft
- Select Minecraft Realms and then select our Realm.
- Select Configure -> World -> World Backups
- You’ll now be presented with all versions that can be restored. Select the version you want and click on “Restore”.
Buying Minecraft from the Official Microsoft Store
Both the Java and Bedrock editions of Minecraft are available as a bundle on the official Xbox and Microsoft Store. To purchase it, do the following:
1. Open the Microsoft Store on your PC and search for Minecraft: Java and Bedrock Edition for PC. Alternatively, you can visit here for Minecraft: Java and Bedrock Edition for PC

2. You’ll be asked to register and sign in before you can proceed with the purchase. Remember your Minecraft account credentials, as you’ll be needing them to access your game every time you want to play.
3. If you have an Xbox Game Pass, you don’t have to pay anything and can download the Minecraft launcher. Without a pass, the game will cost you $29.99. If you want to game share on Xbox, then read our tutorial to gain more knowledge.
4. Enter the payment method and complete your purchase. You can pay by credit card, debit card, bank transfer, or PayPal.
5. Once purchased, follow the instructions shown to you to download and install the launcher.
6. Start the launcher, and select the game version for your PC.
7. Click the Play button within the launcher to start playing.
There isn’t much of a difference between downloading the game from the official Minecraft website and the Microsoft Store. You’ll only need to create a Microsoft account to download from the store as opposed to the official site. Downloading the game from Microsoft is advisable if you are playing the Bedrock edition on a gaming console like Xbox.
If you are looking for ways to Uninstall Xbox game bar on Windows, you may check our detailed review.
Frequently Asked Questions
1. How to download Minecraft for free on PC?
Although Minecraft isn’t free to play, there are certain methods you can employ to play the game for free. First, you could try using an alternative Minecraft launcher like TLauncher.
Note that using this software is against Mojang’s EULA. If detected, your account will be banned.
A legal way to play Minecraft for free would be to just download the 2009 classic version of the game. Just remember that this is an older version of the game, which will have none of its latest features.
Alternatively, Minecraft does offer a free demo to its users, which will allow you to play the game for free for the first 100 minutes.
2. How much is Minecraft on a PC?
The standard price for both the Java and Bedrock editions of Minecraft is $29.99. The deluxe plan, which also includes a ton of other features like Emotes and Skin Packs, will cost you $39.99.
3. How many GB is Minecraft?
The base file itself is very small, with a size being just under 1 GB. However, you can expect this size to balloon as you customize, adding plugins and mods. You can expect the size to increase by many GBs as you continue to configure the game.
4. How to host a modded Minecraft server on your PC?
1. To host a modded Minecraft server, you’ll need a Forge or Fabric server. 2. You can download them from their respective official sites.
3. Once downloaded, install the server files.
4. Accept the EULA terms and regulations before running the .jar command to launch the server.
5. Install the mods you wish to apply. Make sure to only download mods from reputable websites like CurseForge.
6. Place the downloaded mods inside the mods folder, which you can find within your server directory.
7. Restart the server for the mods to take effect.
5. Is Minecraft safe for PC?
Minecraft is generally considered a safe game for your PC. However, your system does become vulnerable to security risks when playing the game online with other players. If you are apprehensive about such risks, my advice would be to stick to a smaller group of players, preferably your friends and family.
6. Can you play Minecraft on older PCs?
Yes, it is possible to play Minecraft on older PCs, provided you lower the game’s graphical and video settings. For the best experience, I recommend adhering to the tech specs I’ve specified in this article for both the Java and Bedrock editions.
7. What’s the difference between Java and Bedrock edition?
A major difference between the two editions has to do with the gameplay and performance they both deliver. Java is supposed to be the original version of Minecraft on PC.
Bedrock was introduced later on as a more performance-optimized alternative. Java supports cross-play with Windows, Mac, and Linux systems.
On the other hand, Bedrock is only compatible with Windows PC. Java supports independent, user-made changes to the game, while Bedrock does not. Recent updates in Bedrock offer features like parental controls and ray tracing. Both these features are absent in the Java edition. Read our detailed listicle of the top Parental Control Apps.
8. How do I update Minecraft?
Minecraft updates automatically while your PC is on standby. If, for some reason, your updates are stalling, you can opt to manually update the game.
Here’s how you do it:
• Click on Start -> Minecraft launcher
• Select More
• Navigate to App Settings
• Within these settings, click on Repair and Reset.
• This should update the software.
9. Can I transfer my account from console to PC?
Unfortunately, Minecraft doesn’t allow you to transfer an account from your gaming console to a PC. This is because Minecraft is licensed and sold separately on each platform. To play Minecraft on PC, you’ll need to purchase the game and create a new account on that PC.
Here is a video guide that explains what Minecraft SMP is:
You may also check the video below on how to host or download Minecraft for Java or Bedrock Edition:
Conclusion
Downloading Minecraft on your PC is a straightforward process that takes only a few seconds. However, hosting your own server for an infinitely better experience playing this game can be challenging. Setting up a server is the best way to enjoy the game online with friends, family, or strangers.
It also grants you control over several aspects of your gameplay. You could modify the difficulty level of your game, authorize who has access to your server, and also enter cheat commands to make your game more exciting.
If you are ambitious, perhaps you can try renting a server instead. This will not only help you grow your player base but also monetize the server. Downloading Minecraft on a PC is simple, but creating a server to manage it may seem daunting.
With the above guide, hopefully you can have an easier time setting up and managing your server.
For more quick Minecraft-related guides, you can explore our range of Minecraft tutorials below:
- How to Find the Seed of a Minecraft Server
- How to Make Terracotta in Minecraft
- Best Terraria Server Hosting Providers
Was this helpful?
Recommended Reading
-

This is a comprehensive review of Apex Hosting with features, pricing, pros, cons, and comparison with other Minecraft Hosting Platforms: In this article, we will take a thorough analysis of the many features provided by Apex Hosting, understand whether the pricing packages that the platform offers are reasonable. Read this…
-

We have put together a list of the best, free, and cheapest Minecraft Server Hosting Provider companies in the world. Check out the detailed comparison and select a suitable vendor for you. Minecraft Server Hosting is a service provided by hosting companies to help individuals or organizations host their games…
-
Are you an addictive player who is looking for a seed finder in Minecraft? Discover how to find the seed of a Minecraft Server instantly with proven methods using simple commands: So, how does one find the seed of a Minecraft server? A question that’s often asked by the more…
-

Unlock the Crafting Secrets and get to know how to make Terracotta in Minecraft. Explore more about the Terracotta Minecraft recipe and learn to successfully create terracotta within the Minecraft game environment: Terracotta, as hardened clay was introduced on 24th April 2013 by Dinnerbone - its developer, and released under…