


Getting started with WebLOAD for Visual Studio and Azure DevOps Users:
The world of Web Performance and Load testing is dynamic and changing all the time. Web Performance and Load Tests via Visual Studio Enterprise and Azure DevOps used to be a good option. However, since Microsoft recently published that Visual Studio 2019 will be the last version of Visual Studio with load testing functionality, this may no longer be the case.
In addition to that, the cloud-based load testing service of Microsoft is also deprecated. This means that the Cloud Load Testing (CLT) functionality in Azure DevOps will soon be not available.
In this article, we will review what this means to you, as a Visual Studio or Azure DevOps user, and what you can do moving forward with your existing load test project, in order to continue to load test your app or web application to ensure its optimal performance.
=> Check All Azure Tutorials Here
Table of Contents:
Microsoft’s Visual Studio And Azure DevOps
We will also provide a brief comparison between Visual Studio/Azure DevOps load testing and WebLOAD load testing (to download the full comparison paper here), demonstrate with a “how-to” guide with explanations and screenshots, how to quickly get started with your load testing with WebLOAD, and conclude with an explanation why it is important to make this transition now.
After the End of Life Announcement – Now What?
Edwin Hernandez, a Test Consultant at Microsoft, posted on Microsoft’s official blog, “What are the best Performance Testing Tools?” and included WebLOAD as one of the 5 best performance testing tools available today.
In his blog he wrote:
“WebLoad is a full-featured enterprise-level load testing tool by RadView. It has many similar features compared to LoadRunner or Visual Studio Load Tests while it has a lower cost than LoadRunner… It is a pretty popular LoadRunner competitor and has been gaining market in the last years.” (emphasis added).
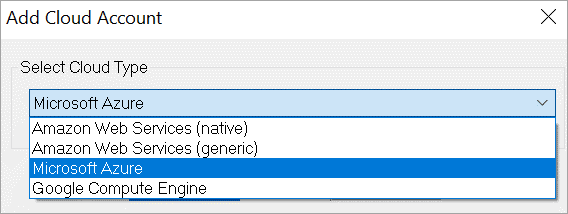
In fact, RadView’s WebLOAD is one of the world’s most advanced Load Testing platforms available on-premise through its IDE/Recorder or in the Cloud/SaaS: It supports running Load Generators in the cloud on Azure similar to Azure DevOps and in addition with other cloud providers such as AWS, and Google Cloud.
RadView also supports the following cloud-based load testing deployment scenarios:
SaaS/Cloud, Private Cloud, Hybrid, and On-Premise.

WebLOAD provides a single unified command and control interface where you can create load tests, execute, schedule, and analyze test results – all directly from your web browser.
Recommended Reading =>> VSTS Tutorial
Mapping Table: From Visual Studio Load Test to WebLOAD
The following table outlines how the concepts in Visual Studio load test map to those in RadView’s WebLOAD. This together with RadView’s Enterprise Support and documentation, will enable you to easily migrate your load test and load test project to WebLOAD.
| Visual Studio Load test | WebLOAD |
|---|---|
| Load test (.loadtest file) | WebLOAD Load template (.tpl) |
| Webtest recorder | WebLOAD Recorder |
| Webtest | WebLOAD Project file (.wlp file) |
| Unit test | JUnit runner building block |
| Selenium test | Selenium Script |
| Request and test plugins for extensibility | WebLOAD extensions |
| Reporting | WebLOAD Analytics / WebLOAD Dashboard |
| Distribution using Test Controller/Test Agent | Mix |
Getting Started With WebLOAD For Azure/Visual Studio Users
To illustrate how easy it is to move from Visual Studio/Azure DevOps, let’s see how to run a URL-based load test.
With Azure DevOps, in order to run a URL-based load test, you will need:
- Sign in to Azure DevOps
- Go to Azure Test Plans
- Open the Load test page
- Choose a URL-based test from the + New menu.
- Type a name for the load test
- Enter the URL you want to test and the HTTP method (GET/ PUT, etc). You can also define more than one URL for your test.
- Open the Settings page to change parameters like duration, load pattern, and number of users
- To run the test next to your user’s Load Location and then choose Save.
- To start the test choose Run Test
- As the test runs, you can see live information about the progress of the test.
- You can stop the test by using the Abort link.
- When the test is done, look at the results by looking at the summary page and opening the different charts
Now, let’s see, how we can do the same (and more) with WebLOAD, illustrated with screenshots for easier demonstration.
Run URL-based Load Test With WebLOAD
Follow these steps below:
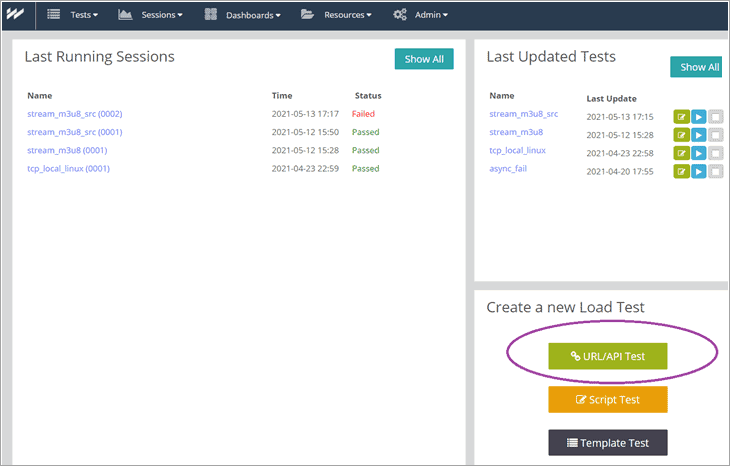
#1) Sign up to WebLOAD Dashboard
#2) Click on URL/API Test (under “Create a New Test)
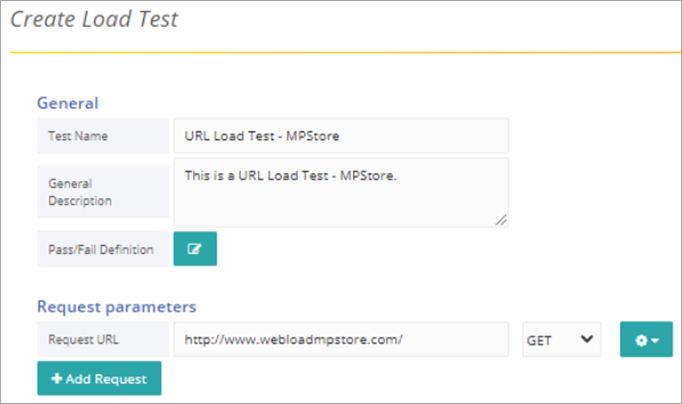
#3) In the Create Load Test page you can define all the parameters associated with your Load Test. There is no need to look for and navigate to other pages. Simply define:
- The name and description for the test
- Enter the URL you want to test and the HTTP method (GET/ PUT, etc). You can also define more than one URL for your test.
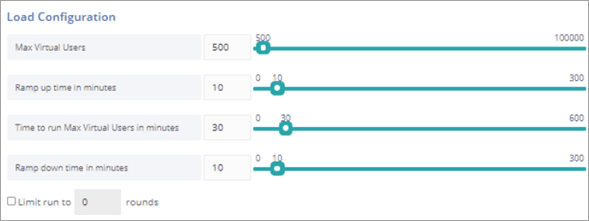
- In the same page under Load Configuration, change parameters as duration, load pattern, and number of users (“Max Virtual Users”).
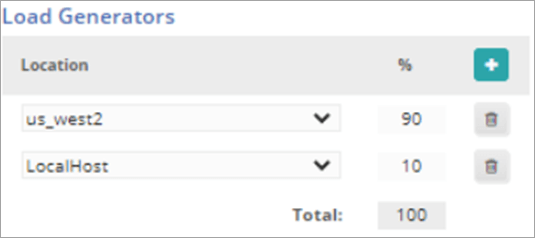
- To run the test next to your user’s Load Location and then choose the location of the load generators (under Load Generators) accordingly. You can choose several locations, including your localhost. As explained above, you can choose a load generator not just on Azure, but also on AWS or Google Cloud.
- You can optionally add or change additional parameters such (on that same page): Pass/Fail definition, Sleep Time (default is 1000 ms), SLA Rules, Recurrence, Notification channels, and more. These additional parameters give you more control and greater granularity for your load tests.
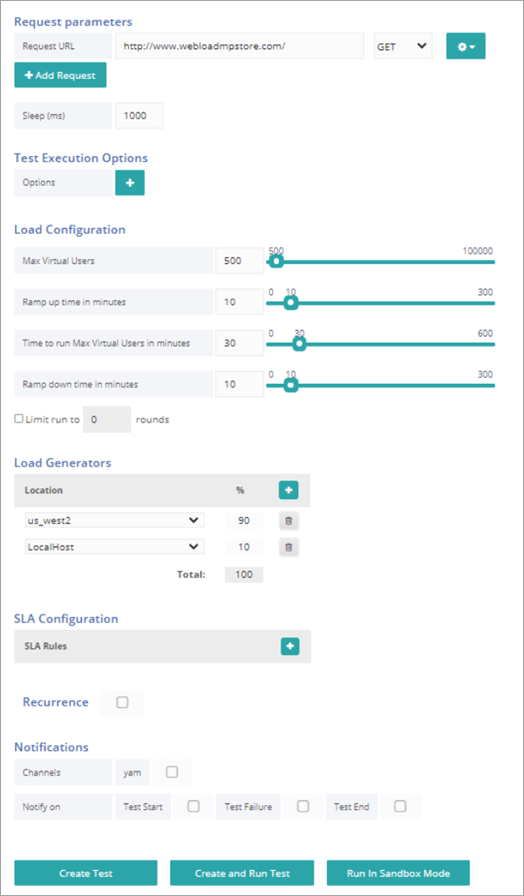
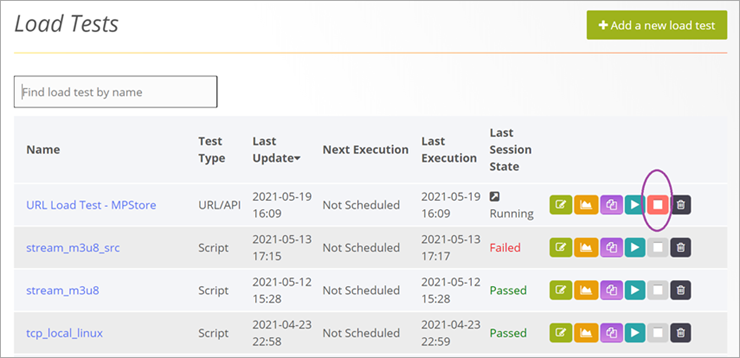
#4) To create the test, simply click (at the bottom of the same page), on Create and Run Test. You will automatically be routed to Load Tests.

#5) As the test runs you can see live information about the progress of the test by clicking on the report icon.
#6) To abort the test you can click on “stop session” (marked in purple).
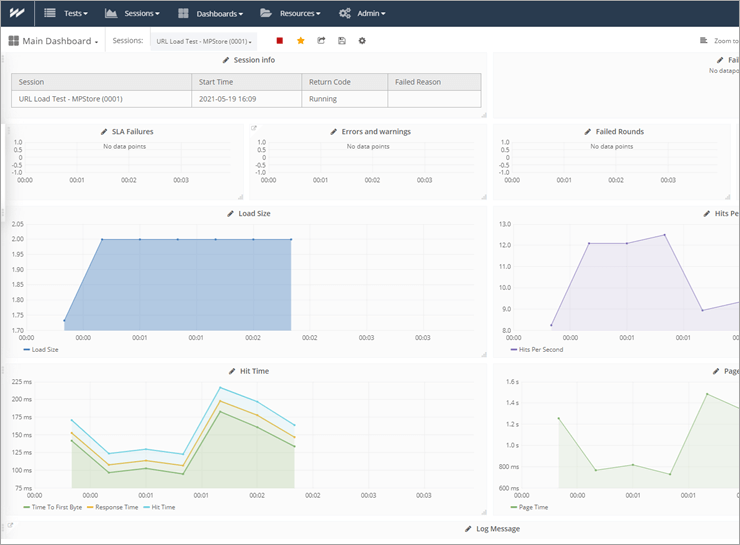
#7) When the test is done, look at the results by looking at the summary page and opening the different charts.
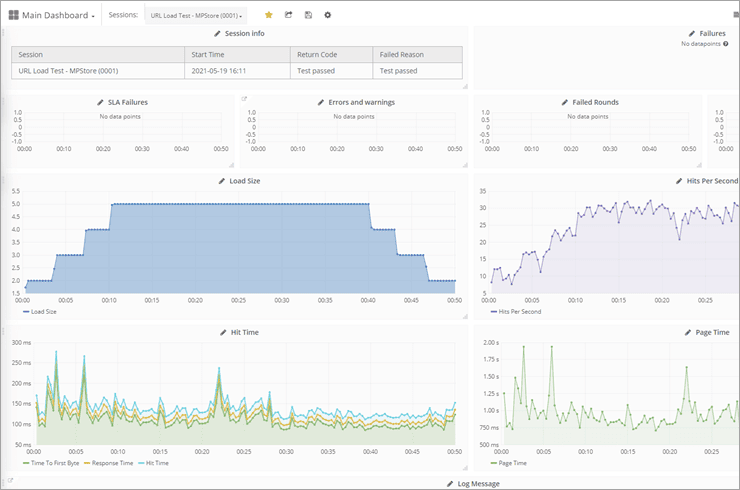
The above screen is also available during the execution of the load test. It displays log messages and session statistics such as error counts, page time, throughput, hits per second, and load size for a running session, allowing users to quickly determine the health of a running test, and identify the root cause and bottlenecks before the test is finished.
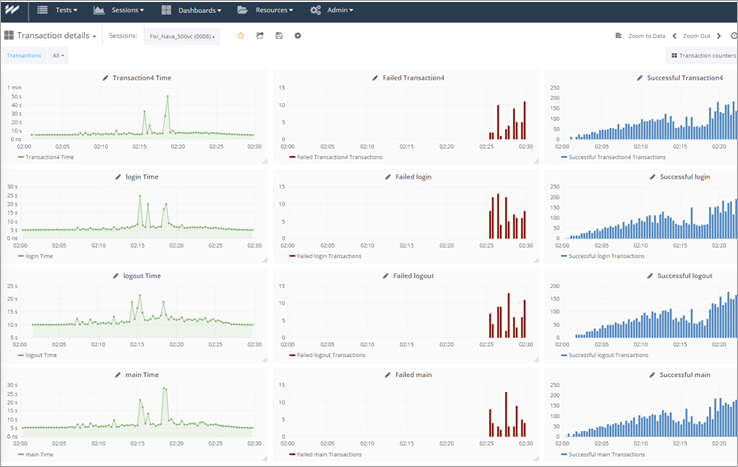
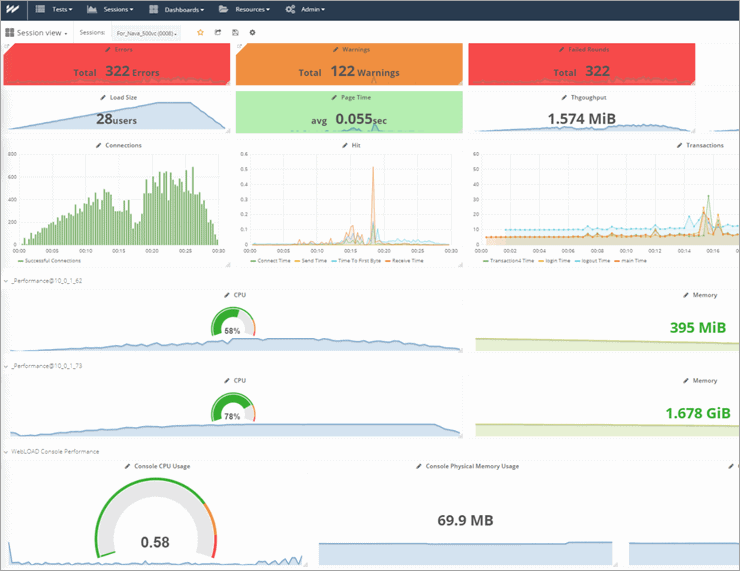
In the screen above, you can see the performance per the different transactions defined in your load test. For each defined transaction you can see the translation time, the number of failed transactions, and the number of successful transactions.
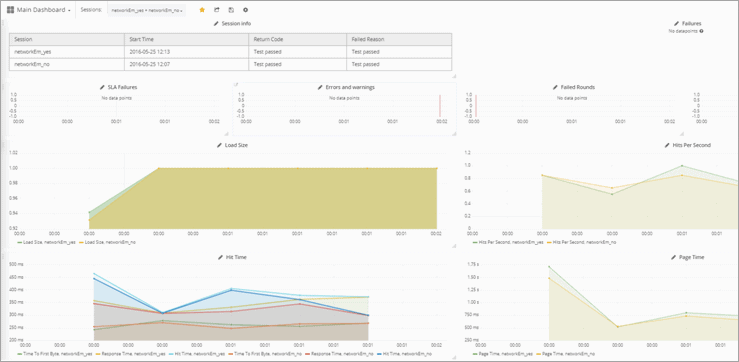
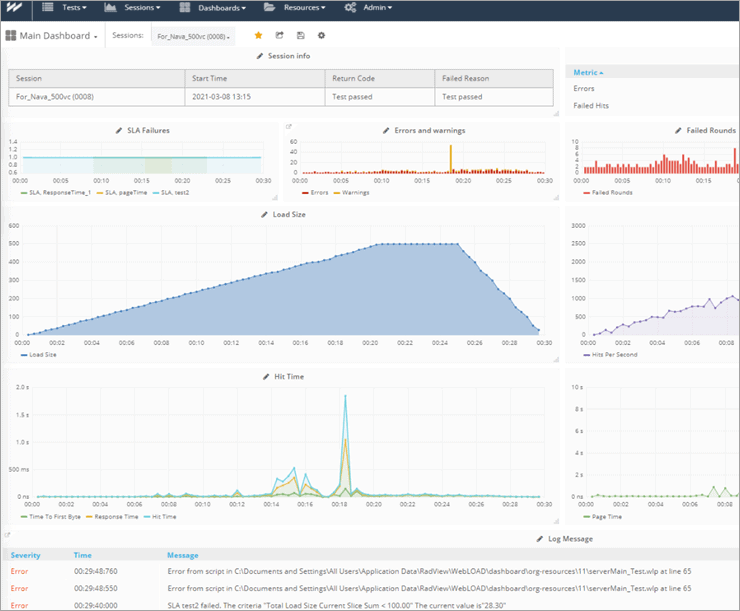
You can also compare different sessions across the different performance metrics and reports, to see if there was any deterioration in performance between one session to another.
In the screen above we can see a comparison between two sessions of the same test, across SLA failures, errors and warnings, failures, load size, his per second, hit time, and page load time.
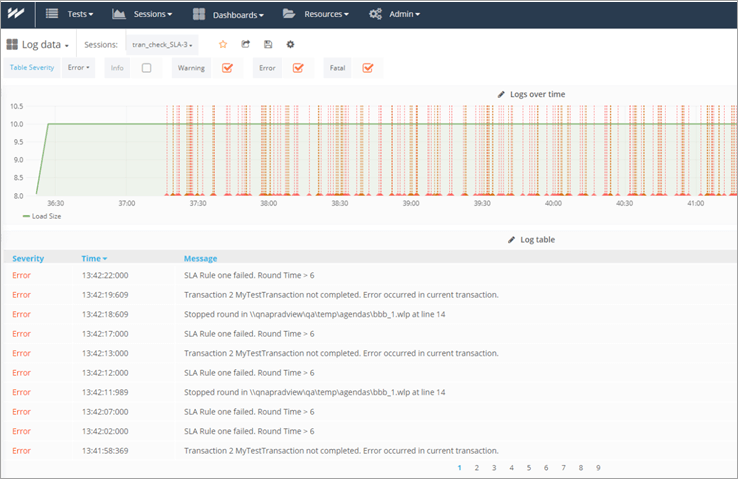
In the screen above you can view the logs data, in a chart of logs over time and in a log table.
To sum up: As you can see from the illustration above, running a load test with WebLAOD is very similar to Azure DevOps. The main difference is that it’s easier to navigate and that you have more options, and you can produce many more out-of-the-box reports for better and faster results analysis.
Suggested Reading =>> Microsoft Azure tutorial
For more complex scenarios you can use the WebLOAD recorder for more advanced scripts with automated correlation, parameterization, and response validation.
Why Make The Transition Now
In fact, choosing WebLOAD over Visual Studio and Azure DevOps load testing is actually a no-brainer – here’s a summary of why you should make the transition now:
#1) WebLOAD is the most advanced Performance and Load Testing tool.
#2) WebLOAD has all the functionality that Visual Studio has for load testing, and much more.
#3) WebLOAD has seamless integration with Azure and other Cloud Platforms.
#4) WebLAOD offers much more than Visual Studio Load Test in these important aspects.
- Not just for developers but for all types of users
- Not just for Microsoft shop but for any application or technology stack
- Not just another “add-on” but an end-to-end stand-alone performance solution
Following the Visual Studio End of Life announcement, you should not take unnecessary risks but make the transition now. By transitioning to WebLOAD now, you will have fewer scripts to migrate, get support for new technologies as they emerge, and future-proof performance and load testing for your organization.

Conclusion
With the fading out of load testing tools as Performance and Load Testing with Visual Studio or Azure DevOps, choose WebLOAD as your replacement Load testing tool and assure the quality of your load tests, covered with the best support available in the industry. For more information, click here to get a comparison paper between WebLOAD and Visual Studio Load Test.
Contact RadView today to hear more about your replacement opportunities, or to get a live demo with one of our experts.
In the demo, we will discuss how you can migrate your web performance test and load test project to WebLOAD, how you can improve your web performance and load tests, and how you can easily create a web performance and load test, and analyze your load test results.
Was this helpful?
Recommended Reading
-

This post is a WebLOAD Review, which is a powerful yet easy-to-use Load testing tool. This is a quick review to evaluate some of the tool's most important features. WebLOAD is a load-testing tool that’s been around for quite a few years. The current version is 10.3. I feel now…
-
This Hands-on Tutorial Explains how to use GitHub Extension as Code Repository with Microsoft Visual Studio. Learn Installation Steps and Creation Of Github Repository: The teams working on .NET projects usually use Team Foundation Server (TFS) as the main code repository for version control activities. This is an expected way of…
-

Tutorial on Microsoft Visual Studio Team Services (VSTS) Cloud ALM Platform for the Entire Project Team: Our previous tutorial briefed us with a list of Continuous Delivery Tools. Here, we will focus on Microsoft VSTS. Microsoft Visual Studio Team Services (VSTS) is a new cloud-based offering that helps the project…
-
This Visual Studio Code vs Atom comparison explains the features and compares the two most used source code editors of the modern world: A source code editor may sound mundane to some people, but it is the heart of so many software companies around the world. While there are loads…
-

Microsoft VSTS DevOps features for automating the build (Continuous Integration) and release process (Continuous Delivery) to Azure Web App: In VSTS Part 1 Tutorial, we learned how Microsoft VSTS can be used as an ALM tool (Work Items, Agile Project Planning, Version Control) in the cloud. Suggested Reading => Thorough…
-
In this Microsoft Azure tutorial, we will learn about Cloud Computing, Azure Cloud, Azure Marketplace, Azure DevOps, Continuous Integration, etc: Microsoft Azure is a cloud computing platform. It provides a set of services that you can use while developing your application and gives the best solutions to business users with…
-
Comprehensive review and comparison of Azure Monitoring Tools to help you monitor and detect issues in applications or infrastructure: Azure Monitoring tool is an application for consolidated monitoring, application visibility, and advanced security. These tools logically group Azure services from different Azure subscriptions and regions. They provide visibility for serverless…


