


An in-depth look at Ansible Roles, Integration with Jenkins, and Ansible S3 and EC2 modules:
In part 2 of the series on Ansible tutorials, we learned how Ans1ible playbooks are used to execute multiple tasks and get all the target machines or servers to a particular desired state.
Recommended Read => Exponential DevOps Training Series
Ansible playbooks are primarily YAML files which contain multiple tasks in one single huge file which is not modular and reusable. But if you need to break up your entire configuration and be more modular and reusable then Ansible roles will help a lot.
In this Ansible Tutorial, we will look at Ansible roles, Integrate Ansible with Jenkins for continuous delivery from a DevOps point of view and most importantly look at Ansible S3 and EC2 modules for managing AWS EC2 instances (Create and Terminate EC2 instances).

Table of Contents:
Ansible Roles
With Ansible roles you can group your variables, tasks, handlers etc., which increase reusability and most certainly reduce syntax errors. It helps to de-clutter the whole code.
Ansible roles are similar to modules in Puppet and cookbooks in Chef.
In order to create roles, you use the ansible-galaxy command which has all the templates to create it.
Example Scenario
I have been a DevOps specialist for most of my life and have been working only in CI and CD.
So for Example in Continuous Delivery where I am deploying a new build of my J2EE application (WAR file) to tomcat my steps would be as follows:
- Stop the application
- Uninstall the application
- Deploy the new build of an application
- Start the application
So I would be creating a role with at least 4 tasks and one main file calling it. This way I am making my code more modular and reusable. So let’s call this role as tomcat and create it.
$ cd /etc/ansible/roles
$ sudo ansible-galaxy init tomcat --offline
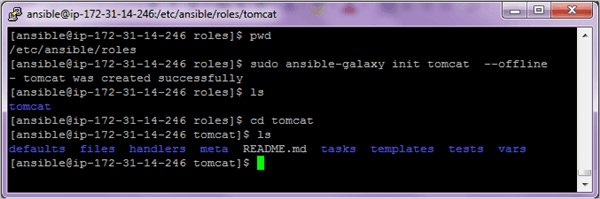
Once the role is created you can see the directory structure which it has created.
The main components we will use in this section include:
- tasks/main.yml – This is the starting point for tasks created for the role. You can use the main.yml file to point to the other task files.
- vars – This is to define any variables used.
- meta – This is to define information about yourself or the author.
Step 1: Create the main list of all tasks
Edit the tasks/main.yml file and add the below code. As per the example scenario mentioned above, we are defining 4 different tasks. In most cases, the deploy application will also start the application so the last one of the starting application may not be required.
---
# tasks file for tomcat
- import_tasks: stop_app.yml
- import_tasks: uninstall_app.yml
- import_tasks: deploy_app.yml
- import_tasks: start_app.yml
Step 2: Create all the 4 files as per the scenario
In the below tasks action: ec2_facts is used to get facts from remote EC2 instances and call them in plays/tasks
tasks/stop_app.yml file
---
- name: Gather EC2 instance metadata
  action: ec2_facts

- name: Stop application on {{ansible_hostname}}
  command: wget "http://{{tomcat_user}}:{{tomcat_pwd}}@{{ansible_ec2_public_ipv4}}:8080/manager/text/stop?path=/HelloWorld-Maven" -O - -q
tasks/uninstall_app.yml
---
- name: Gather EC2 instance metadata
  action: ec2_facts

- name: Undeploy application on {{ansible_hostname}}
  command: wget "http://{{tomcat_user}}:{{tomcat_pwd}}@{{ansible_ec2_public_ipv4}}:8080/manager/text/undeploy?path=/HelloWorld-Maven" -O - -q
tasks/deploy_app.yml
---
- name: Deploy the new WAR file to target servers

  copy: src=/var/lib/jenkins/workspace/Demo-Maven-Project/target/HelloWorld-Maven.war dest=/home/ansible/tomcat/webapps
In the deploy code if JENKINS is used to build the WAR file then you need to provide the source directory of the WAR file in the copy module and the destination is the target server webapps location of tomcat.
task/start_app.yml
---
- name: Gather EC2 instance metadata
  action: ec2_facts

- name: Start application on {{ansible_hostname}}
  command: wget "http://{{tomcat_user}}:{{tomcat_pwd}}@{{ansible_ec2_public_ipv4}}:8080/manager/text/start?path=/HelloWorld-Maven" -O - -q
Step 3: Define Variables
Edit the vars/main.yml file and add the code as shown below.
---
# vars file for tomcat

tomcat_user: tomcat
tomcat_pwd: tomcat
Step 4: Define information in the meta folder
Edit the meta/main.yml file and add your information like author, description, and company.
galaxy_info:

 author: V Niranjan

 description: Devops specialist

 company: <Company Name>
Step 5: Create a main site.yml file
Lastly, create the main site.yml file to call the role created which in turn will help to deploy the application to the servers or a list of hosts as per the inventory file. Create the file as /etc/ansible/site.yml
---
- hosts: webservers
  become: true
  roles:
  - apache
Step 6: Run playbook file site.yml
$ ansible-playbook site.yml

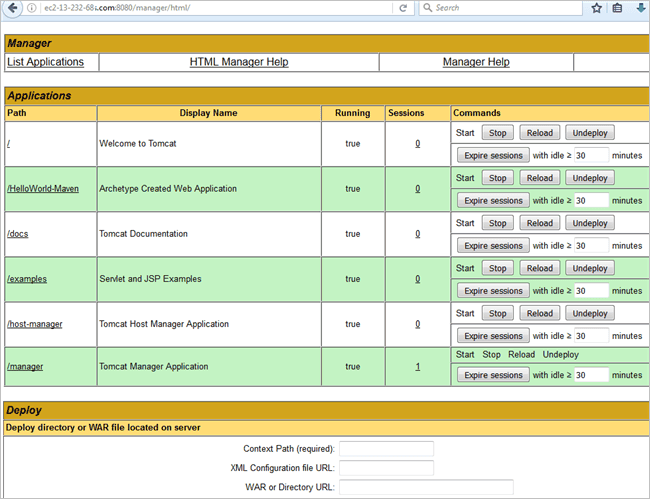
Launch the Tomcat URL to see if the application has been deployed and started.
HTTP://<HostnameorIPAddressOfEc2Instance>:portno/manager
Jenkins Integration with Ansible
In this section, we will see how Jenkins can be integrated with Ansible. The WAR file built using the build process will be used to deploy to Tomcat on the target machine using Ansible. We will be calling the Ansible role created in the previous section in Jenkins using the Ansible plugin.
So once the build is done the deployment of WAR file will be automatically triggered using Ansible.
I am keeping this simple and have not configured Sonar or Artifactory or Junit during the continuous integration activities which can also be done.
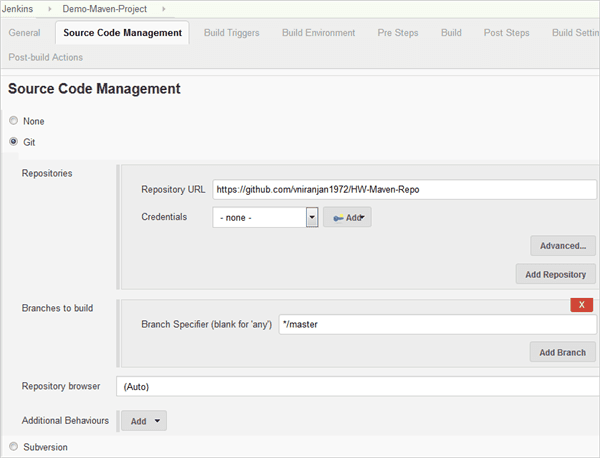
Step 1: Create a Jenkins job and configure the SCM repo using the code in GitHub
Step 2: Configure the build

Step 3: Create roles directory within the Jenkins workspace

Step 4: Create the tomcat role in the Jenkins workspace location using the command shown below
$ sudo ansible-galaxy init tomcat –offline

Follow the procedure as in the previous section to create all the files for tasks, vars, meta and the main site.yml.
The main site.yml file is created in /var/lib/Jenkins/workspace/<Jenkins-Job-Name> directory.
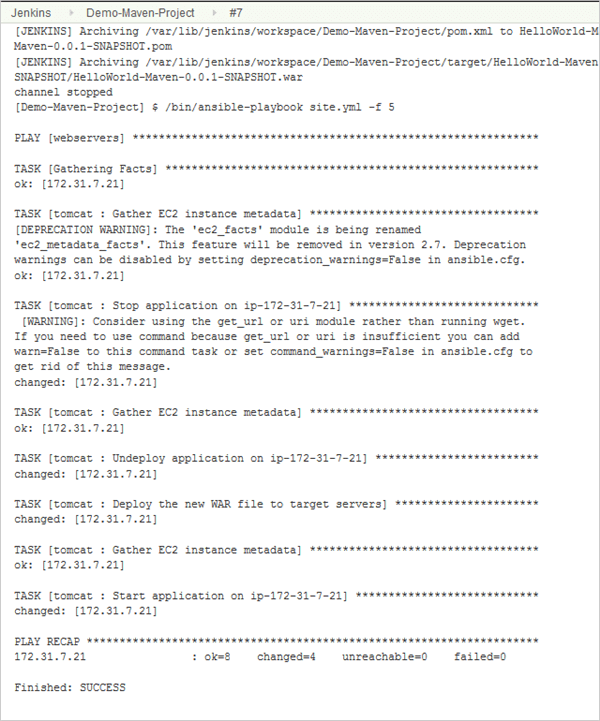
Step 5: Configure the Jenkins post-build step to invoke the Ansible playbook and call the site.yml file. Save the job.

Step 6: Trigger the build job and launch the Tomcat URL to verify if the application is deployed correctly.
Manage AWS S3 Objects with Ansible
Ansible S3 module can be used to get or put a file to or from an S3 bucket. To use this module we will need to install and configure boto module of python which acts as an API(Application program interface) to access AWS. This has to be installed on the Ansible control machine.
On Redhat Linux
$ sudo yum install -y python python-dev python-pip
On Ubuntu
$ apt-get install -y python python-dev python-pip
Once the above is done install boto
$ sudo pip install boto boto3
If not able to install then you will need to enable EPEL repo. The procedure can be found in part 1 of the article series in the installing ansible section.
Once the above is done we also have to provide AWS user credentials. You can export the AWS Access and Secret Key environment variables
export AWS_ACCESS_KEY_ID='AK123'
export AWS_SECRET_ACCESS_KEY='abc123'
If in case even after setting the above environment variables you get an error as the credentials not found then you may also specify the same in the playbook.
Let’s now look at some examples of how to use Ansible with S3 buckets and later on to create and terminate instances.
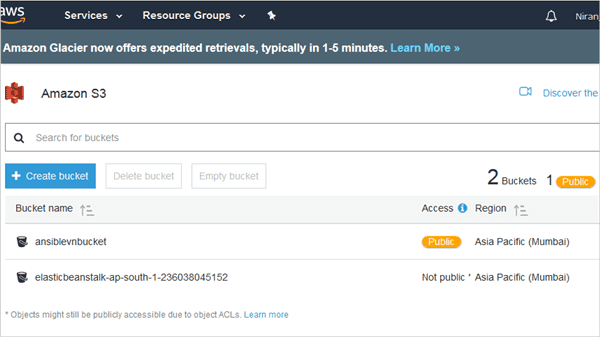
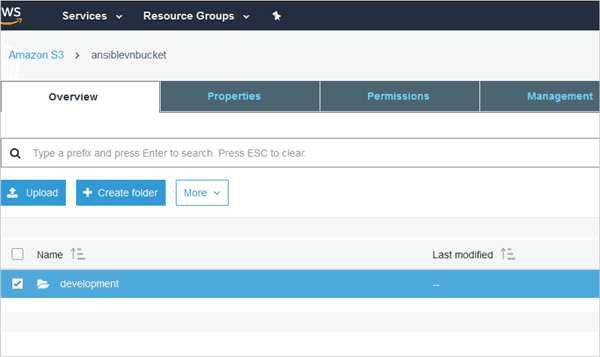
Example 1: Create an empty bucket with a folder
---
- hosts: localhost
  become: true
  tasks:
  - name: Create an S3 bucket
    s3: aws_access_key=<Access Key> aws_secret_key=<Secret Key> bucket=ansiblevnbucket object=/development mode=create permission=public-read region=ap-south-1
Note: Here the mode is created for creating bucket and Permission can be public-read or public-read-write
Run the playbook and view the bucket created with the development folder within it.
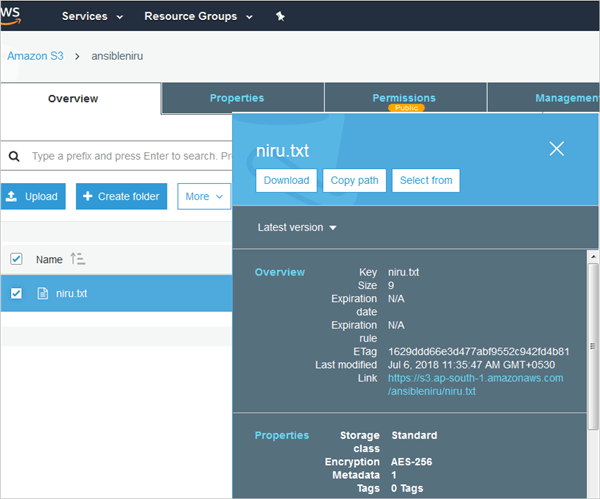
Example 2: To copy (upload) a file to S3 bucket
---
- hosts: localhost
  become: true
  tasks:
  - name: Copy file to S3 bucket
    s3: aws_access_key=<AccessKey> aws_secret_key=<Secret Key> bucket=ansibleniru object=/niru.txt src=/home/ansible/niru.txt mode=put
Here the object is the file created within the bucket. It can be a file or folder. In this case, it is a file. The source is the file that is picked up from the local machine which is the Ansible control machine.
Note: Here the mode is put for uploading object
Run the playbook and look at the S3 bucket.
Example 3: Get (download) the file from S3 bucket
---
- hosts: localhost
  become: true
  tasks:
  - name: Download file from S3 bucket
    s3: aws_access_key=<AccessKey> aws_secret_key=<Secret Key> bucket=ansibleniru object=/niru.txt dest=/home/ansible/niranjan.txt mode=get
Note: Here the mode is get for download object
Example 4: Delete an object or file from S3 bucket
---
- hosts: localhost
  become: true
  tasks:
  - name: Delete an S3 bucket
    aws_s3: aws_access_key=<AccessKey> aws_secret_key=<Secret Key> bucket=ansiblevnbucket object=/development/niranjan.txt mode=delobj
Note: Here the mode is delobj for delete object
Example 5: Delete a bucket and all contents
---
- hosts: localhost
  become: true
  tasks:
  - name: Delete an S3 bucket
    s3: aws_access_key=<AccessKey> aws_secret_key=<Secret Key> bucket=ansiblevnbucket mode=delete
Note: Here the mode is delete for the delete bucket
Provision an AWS EC2 instance using Ansible
Lastly, I will leave you with one of the most important features of Ansible which is to create or spin up an AWS EC2 instance and also how to terminate the instance. Of course, do not forget to install boto which is a pre-requisite and also ensure to export the user “AWS_ACCESS_KEY_ID” and “AWS_SECRET_ACCESS_KEY”.
In case the export does not work ensure to add the same in the code as shown below.
The code below will show you how to create an EC2 instance along with creating a security group and key pair.
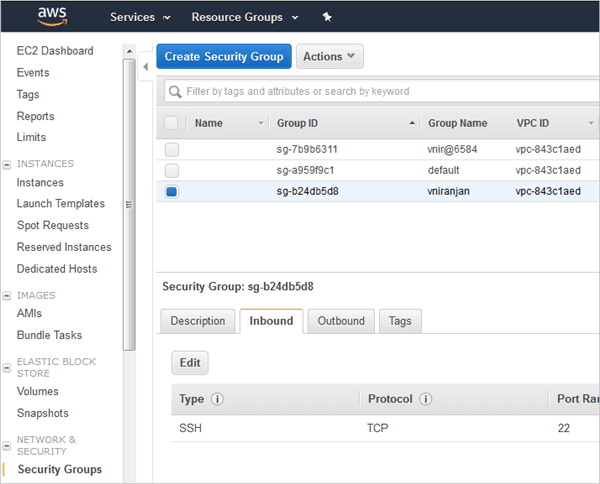
- Create a security group
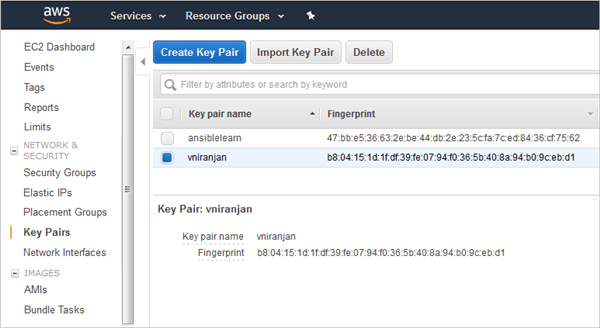
- Create key pair and the PEM file
- Create EC2 instance
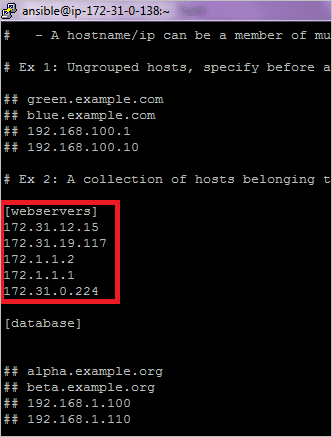
- Save the EC2 instance IP address to the ansible inventory file
I am assuming that the users doing this exercise are well versed with the AWS EC2 concepts.
Add the below code to a file and run the same to verify the EC2 instance creation in the AWS console. As the code is big, it is split into 2 pages but ensure you save all to a single yml file.
---
- hosts: localhost
  become: true
  gather_facts: False

vars:
  region: ap-south-1
  instance_type: t2.micro
  ami: ami-5b673c34 # RedHat Linux 7.5
  hosts_file: /etc/ansible/hosts

tasks:
 - name: Create security group
 ec2_group:
  aws_access_key: <access key>
  aws_secret_key: <Secret key>
  name: "vniranjan"
  description: "V Niranjan Security Group"
  region: "{{ region }}"
  rules:
    - proto: tcp
      from_port: 22
      to_port: 22
      cidr_ip: 0.0.0.0/0

- name: Create an EC2 key
  ec2_key:
   aws_access_key: <access key>
   aws_secret_key: <Secret key>
   name: "vniranjan"
   region: "{{ region }}"
  register: ec2_key
- name: Save private key (PEM file)
  copy: content="{{ec2_key.key.private_key}}" dest=/home/ansible/vniranjan.pem mode=0600
  when: ec2_key.changed
- name: Create an ec2 instance
   ec2:
    aws_access_key: <access key>
    aws_secret_key: <secret key>
    key_name: vniranjan
    group: vniranjan # security group name
    instance_type: "{{ instance_type}}"
    image: "{{ ami }}"
    wait: true
    region: "{{ region }}"
    count: 1 # default
    count_tag:
      Name: Demo
    instance_tags:
      Name: Demo
  register: ec2
- name: Save IP to inventory file
  lineinfile:
    dest: "{{hosts_file}}"
    insertafter: '\[webservers\]'
    line: "{{item.private_ip}}"
  with_items: "{{ec2.instances}}"
Run the playbook
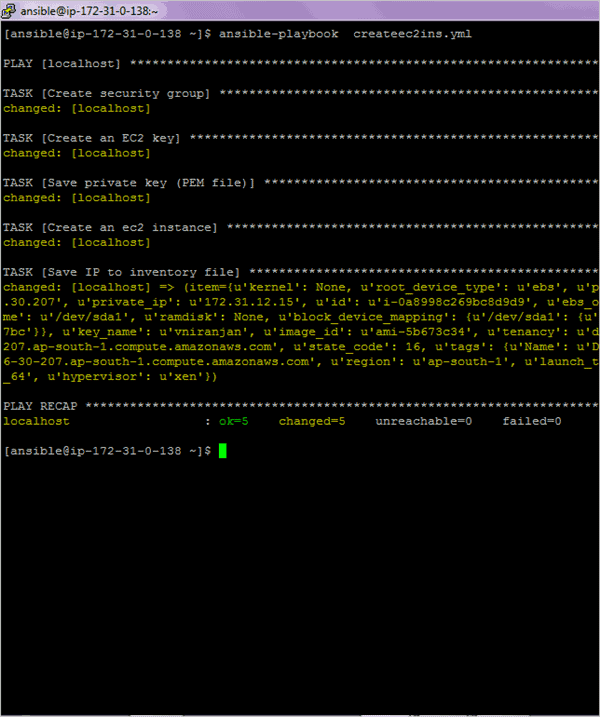
/etc/ansible/hosts inventory file updated with private IP
Login to the instance
ssh -i “vniranjan.pem” ec2-user@ec2-13-126-30-207.ap-south-1.compute.amazonaws.com
(Note: Click on the below image for an enlarged view)

Security Group created
Key Pair created
Terminating EC2 Instances
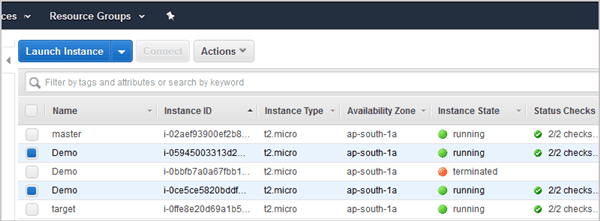
In this section let’s know more about terminating EC2 instances.
In the following screen you can see that there are 2 instances running and the steps for terminating would be in the following order:
- Terminate the EC2 instances using Instance id’s
- Remove security group
- Remove key pair
Playbook to terminate both the EC2 instances
---
- hosts: localhost
  gather_facts: false
  connection: local
  vars:
   instance_ids:
    - 'i-05945003313d20603' # Replace these with your EC2 instance id’s
    - 'i-0ce5ce5820bddf610'

  region: ap-south-1
  keypair_name: vniranjan
  securitygroup_name: vniranjan
 tasks:
 - name: Terminate EC2 instance
   ec2:
    aws_access_key: <access key>
    aws_secret_key: <Secret key>
    instance_ids: '{{instance_ids}}'
    region: '{{region}}'
    state: absent
    wait: true

- name: Remove EC2 Key
  ec2_key:
   aws_access_key: <access key>
   aws_secret_key: <Secret key>
   name: '{{keypair_name}}'
   state: absent
   region: '{{region}}'

- name: Remove Security Group
  ec2_group:
   aws_access_key: <access key>
   aws_secret_key: <Secret key>
   name: '{{securitygroup_name}}'
   state: absent
   region: '{{region}}'
Summary
Today, most of the IT organizations are looking at some kind of differentiators to win business and showcase the same to their clients. I would say automation is definitely one of the key differentiators.
With tools like Ansible, I am of the opinion that you should be able to automate most of the repetitive manual tasks.
Thus what we have learned from this 3-part Ansible Tutorial series showcases Ansible as a very popular and powerful configuration management tool which helps in different areas of automation ranging from task automation, application deployment, and cloud provisioning. Thereby, we are primarily talking about IT orchestration.
Hope you enjoyed the range of Ansible tutorials and I’m sure that you would have gained immense knowledge on the concept by now.
Next, we will learn how to Integrate Jenkins with Selenium which is also a part of our DevOps training series.
Was this helpful?
Recommended Reading
-

This Video Tutorial Explains what is Continuous Integration, Set Up for Jenkins Continuous Integration, Explored Jenkins CI Features, Dashboard, etc.: In this tutorial, we will learn about Continuous Integration and Jenkins CI in brief. Here we will also cover Agile Development methodology, setup and deployment of Jenkins Continuous Integration, Jenkins…
-
What is Continuous Integration in DevOps? So far we have covered Part 1 and Part 2 of this topic in our previous sessions and currently in Part 3. Till part 2, we covered about the people and process aspect of DevOps, which is collaboration and focus on the common goal, common…
-
Get Ready To Explore The Hands-on Jenkins Tutorial Series Learn Jenkins in detail with the help of this Intensive Jenkins Training series for beginners and experienced professionals. This series of tutorials would completely enrich your knowledge of Jenkins. Simple and clear examples have been included in each tutorial for your…
-
Overview: Hi Testers!! In this tutorial, you will learn a very interesting topic i.e. integrating your selenium scripts with JMeter and measuring the performance. Below are the topics covered in this session: Integrating Selenium with JMeter. Using WebDriver Sampler Plugin. => Click here for The Complete Free Training On JMeter…


