


How to Use the Snipping Tool Shortcut in Windows 10 and 11? The following step-by-step instructions with simple capture techniques and expert tips will help you to take a screenshot instantly.
The use of the Snipping Tool shortcut on Windows 10 and 11 is one of the fastest ways to capture a screenshot without the use of any third-party applications. You can capture the screen completely or a specific window or region with the help of Windows keyboard shortcuts.
In this tutorial, I will show you how to use the Snipping Tool shortcut on Windows 10 and Windows 11 operating systems, as well as some tips on how to customize it for use.
Table of Contents:
Snip Tool Shortcut in Windows 10 & 11: Complete Guide

The Snipping Tool was initially released with Windows Vista 2007. While Windows 10 has both the Snipping Tool and Snip & Sketch working separately, Windows 11 combined these two apps into a single Snipping Tool.
The Snipping Tool shortcut in Windows 10 and 11 allows you to capture screenshots instantly without opening the full app. By pressing the Windows key + Shift + S, you can choose from multiple snip types: rectangular, freeform, window, or full-screen.
Once captured, your screenshot is automatically copied to the clipboard, ready to be pasted into documents, emails, or image editors.
In the sections below, we’ll walk you through each snip mode, how to access your captured screenshots, and tips to customize the Snipping Tool for faster and more efficient use.
Feel free to read through our exclusive guide on the top Snipping Tools for Mac.
Here is the video guide on Windows 10 Snipping Tool Shortcut:
How to Use the Windows Snipping Tool Shortcut Step-by-Step
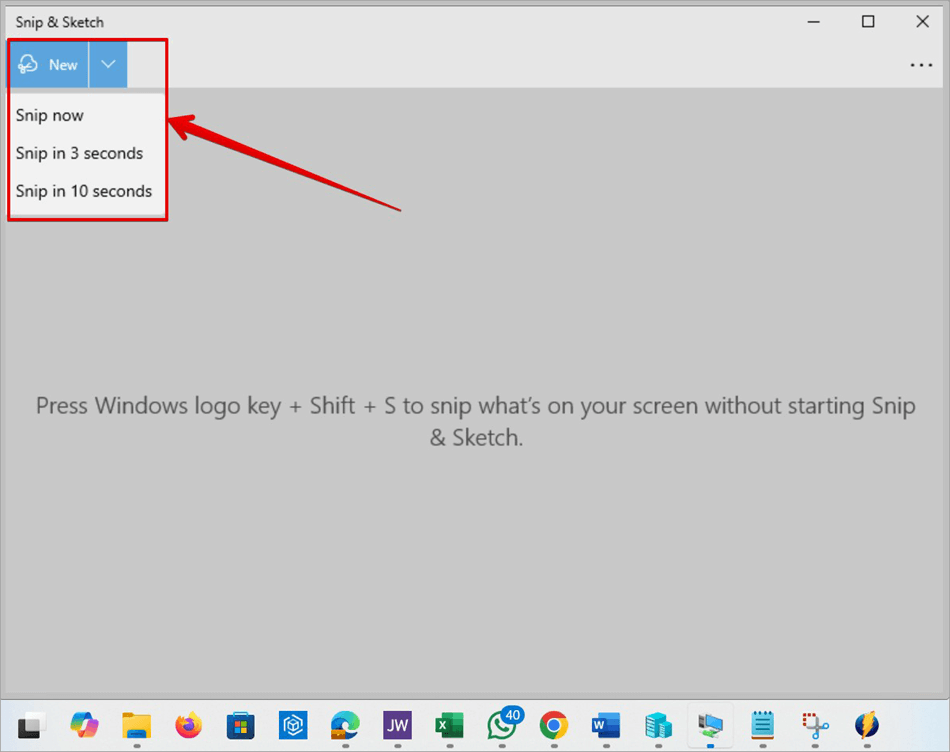
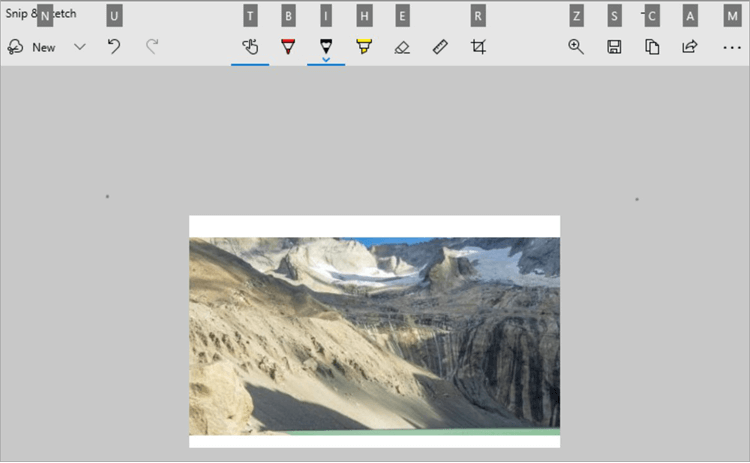
1. On the Snip & Sketch, you can use a combination of the Windows logo key + Shift + S to snip or screenshot your screen without starting Snip & Sketch.
2. You can decide to Snip now, Snip in 3 seconds, or Snip in 10 seconds as shown below.
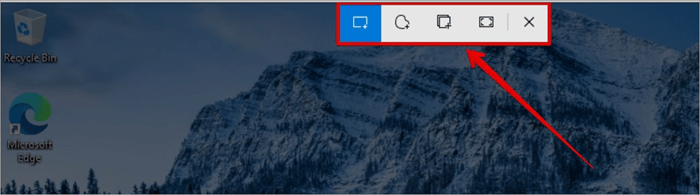
3. When you click on the New button, you will see four buttons: Rectangular Snip, Freeform Snip, Window Snip, and Fullscreen Snip. These tools can capture your screen in different shapes and angles.
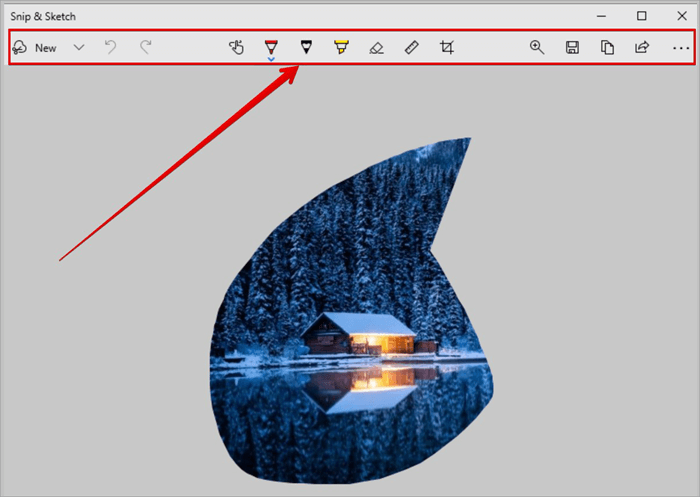
4. Immediately, you click any of the buttons to capture the screen, a second screen will pop out showing further editing functionalities like the Touch Writing, Ballpoint pen, Pencil, Highlighter, Eraser, Ruler, and Image Crop.
5. Please note that in Snip & Sketch, when you click the New button, the app may not prompt you to save the capture; you have to click the Save button to save the image file or you go into the Settings and toggle the Save Snips to ON, which is different from Snipping Tool that is default to prompt you to save before closing a screen capture.
Snipping Tool Windows 10
1. On the Snipping Tool, there is no default keyboard shortcut to open it like Snip & Sketch.
2. In the Windows Search box, type Snipping Tool and hit the Enter key.
3. If you want a shortcut on your computer, you can pin it to the taskbar and use the combination of Win + the number where you pin the Snipping Tool on the taskbar. It is usually counted from left to right. For example, the image below shows the counting to the right, starting from the Copilot pinned to the taskbar to the Snipping Tool.

4. There is the Mode button that allows you to select either a Free-form Snip, Rectangular Snip, Window Snip, or Full-screen Snip.
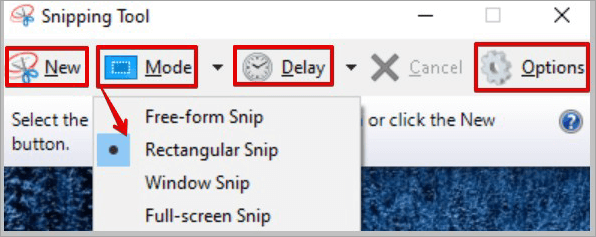
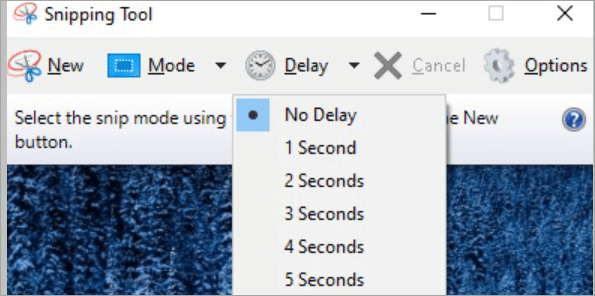
5. You can decide to delay your snipping for between 1 – 5 seconds.
6. You can further set up the Snipping Tool options, like the Ink color and others.

Snipping Tool on Windows 11
Microsoft combined the initial Snipping Tool and Snip & Sketch into just one app and still called it Snipping Tool on Windows 11. This new one has a better UI experience, and how to screenshot part of the screen on Windows is now made easier.
Some of the Snipping features on these Windows 11 are:
- Snipping Modes
- Capture Options
- Annotation and Editing
- Sharing and Saving
- Dark Mode
You can click on the New button or use the combination of these keyboard keys: Windows key + Shift + S is a snip tool shortcut.
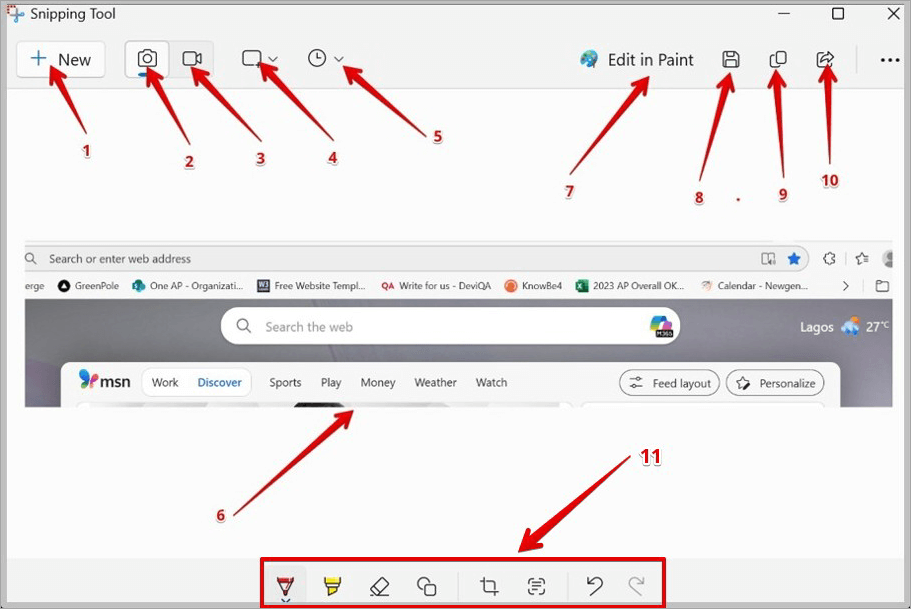
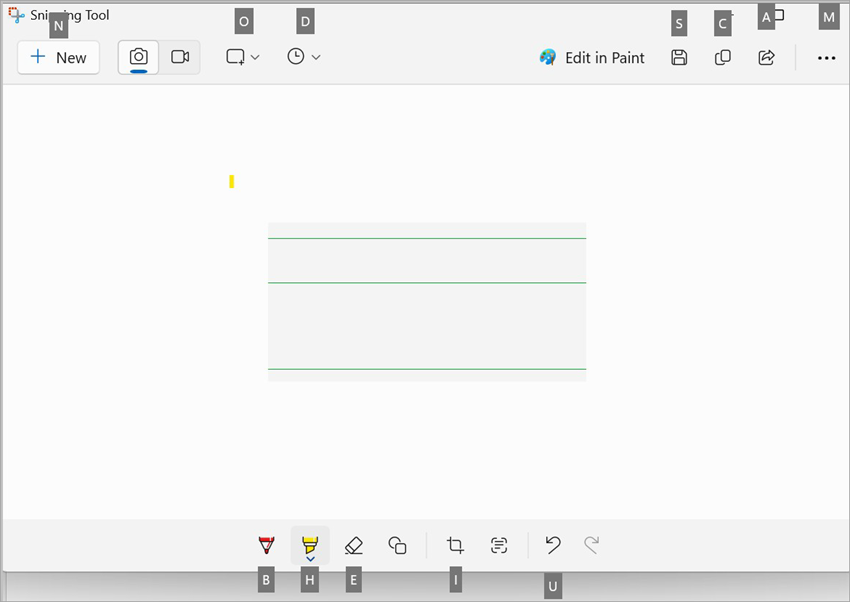
In the image below, after capturing your screen, you will notice the following buttons for different Quick Screenshot Methods in Windows 11.
- New Screenshot
- Screenshot snip
- Video Recording snip
- Snipping area
- Delay snip
- Captured image
- Edit in Paint
- Save
- Copy
- Share
- Editing tools
Windows Video Recording Shortcuts
You also have the privilege of using key shortcuts to capture a recording on your computer by following these steps:
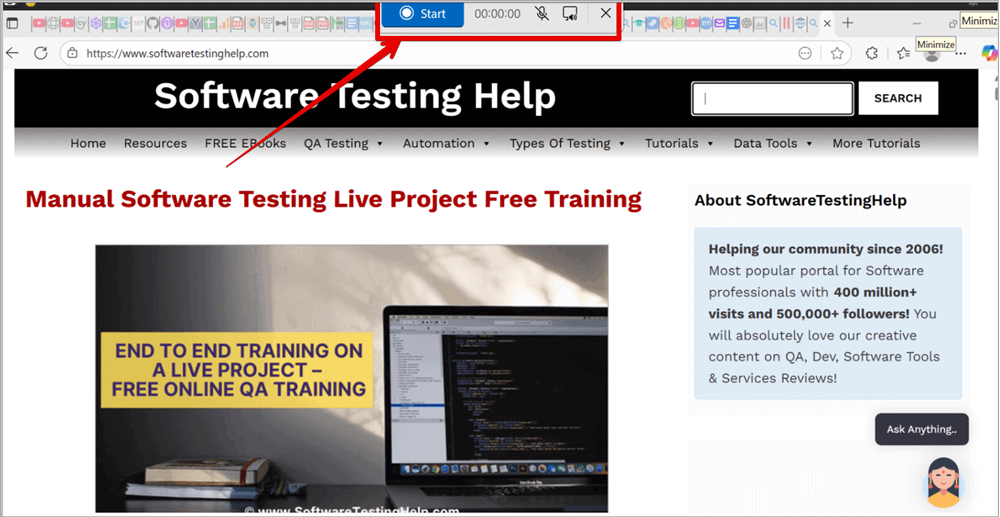
- Use the combination of these keys to open the snipping tool overlay to capture a video clip: Windows logo + Shift + R.
- Drag the cursor across the area you want to record on your screen.
- Click Start Recording. You can pause or stop the recording at any time.
- You can also unmute the microphone or mute the system audio.
Saving Snipped File to OneDrive Using Settings
You can easily save your file to a Cloud platform like OneDrive.
Follow the steps below to automatically save your screenshots or recording file to OneDrive.
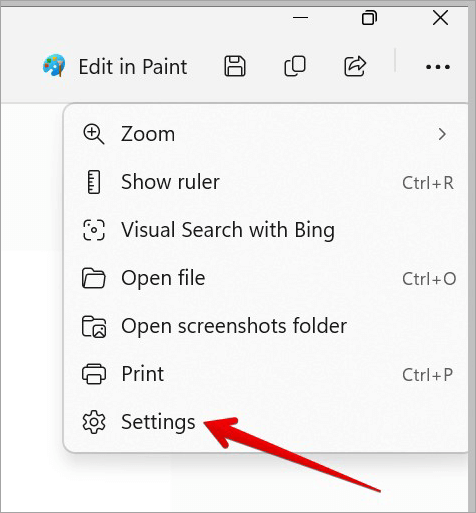
1. Click on the Snipping Tool settings as shown below.
2. Scroll down to “Screenshots are saved to” and “Screen recordings are saved to” and click Change to navigate to your OneDrive document. Whenever you save, it will automatically be saved to the OneDrive document.

Saving Snipped file to OneDrive using Keyboard Shortcut
You can use the following keyboard shortcut to save your file to OneDrive.
- Alt + PrtScn: This will capture the active window and automatically save to OneDrive.
- Win + Shift + S: This will open the snipping overlay and, after capture, automatically save to OneDrive.
Windows Snipping Tool Keyboard Shortcut
The primary keyboard shortcut for the Windows Snipping Tool is Windows logo key + Shift + S.
This opens a menu at the top of the screen, allowing users to capture a rectangular, free-form, window, or full-screen snippet, which is then copied to the clipboard for editing and saving.
When you press the Alt key on Snipping Tool and Snip & Sketch, you will see the keyboard letter that will be pressed with the Alt highlighted on the icons.
Here are some of the best Snipping Tool shortcuts for productivity:
| Alt + N or Ctrl + N | This launches a new screen capture. |
| Alt + M Windows 10 Snipping Tool Alt + O Windows 11 Snipping Tool | This set the focus to the capture mode. Use the Page Up and Page Down arrow keys to select the type of mode you want, whether it’s Freeform, Rectangular, Window, or Fullscreen mode. Hit the enter key to apply. |
| Alt + M Windows 11 Snipping Tool Snip & Sketch | This opens the Menus on the three dots. |
| Alt + D | This set the focus on the Delay snip before starting capturing. Use the Page Up and Page Down arrow keys to select the type of delay: No delay, 3 seconds, 5 Seconds, 10 Seconds on Windows 11, while the delay is 1-5 seconds on Windows 10. |
| Ctrl + S Alt + S | This can be used to save the screen capture as a file. |
| Ctrl + C Alt + C | This copy the screen capture |
| Ctrl + E | This edit in Paint 3D |
| Ctrl + P | This Prints the screen capture |
| Alt + F | This can access the File menu |
| Ctrl + E | Edit with Paint 3D |
| F1 | Snipping Tool Help |
| Ctrl + O | Open File |
| Esc | This cancels an intended operation |
| Alt + A | This can share the image file to an external app |
| Alt + B | This selects the Ballpoint pen |
| Alt + H | This selects the Highlighter |
| Alt + E | This selects the Eraser |
| Alt + I Windows 11 Snipping Tool | This selects the Image crop |
| Alt + I Snip & Sketch | This selects the Pencil |
| Alt + R Snip & Sketch | This selects the Image crop |
| Alt + U | This will undo an Action |
| Alt + T Snip & Sketch | This selects the Touch Writing |
| Alt + Z Snip & Sketch | This selects the Zoom |
What Task Can You Perform With the Windows Snipping Tool?
You can use the snipping tool to do more than just capture your screen.
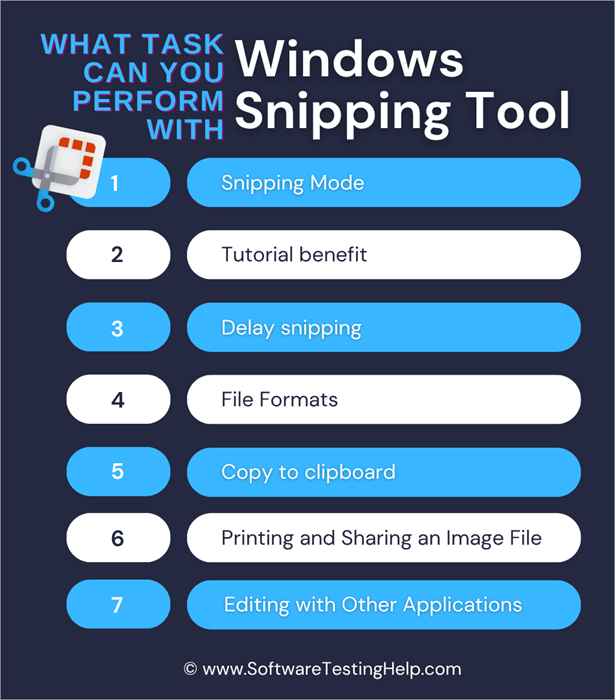
Here are the different tasks you can complete with Snipping Tool:
1. Snipping Mode:
You have the flexibility to extract or capture a specific part or angle with different modes like the free-form, rectangular, window, or full-screen snips.
2. Tutorial Benefit:
You can use the pen or highlighter to highlight an important area of capture. You can also add hand-written notes on the image, which is very good for tutorials and presentations.
3. Delay Snipping:
This feature is very good for capturing things that usually disappear when you no longer interact with the screen, like a context menu or drop-down menu. This feature has a delay functionality that allows the snipping tool to appear only after a few seconds.
4. File Formats:
You can save your captured image in many file formats, like PNG, JPEG, GIF, and HTML.
5. Copy to Clipboard:
You can quickly copy and paste your screenshot to a Word document, email, social media, chat, and many other platforms, even before you save the image file.
6. Printing and Sharing an Image File:
There is a direct share feature that enables you to send your captured image via email. You can send the image to other applications like WhatsApp and Telegram, and you can decide to print the screenshot.
7. Editing with Other Applications:
You can conduct advanced editing on the image file with Photos, Paint, and Paint 3D applications. This functionality helps to resize and apply more filters.
Common Snipping Tool Issues and How to Fix Them

Customize or Override Default Shortcuts
If you want to customize or override default shortcuts, you can use a free Microsoft utility tool like Microsoft PowerToys, which will help to remap the shortcut keys to whatever you want. Launch the Microsoft Store on your system and search for Microsoft PowerToys.
Snipping Tool Not Responding
The snipping tool on your system may stop working for different reasons. It may be because of memory issues or system update; a little restart or reset can do the magic. If all efforts do not work, you can try reinstalling the app from the Microsoft Store.
Why isn’t Windows + Shift + S Working
- Confirm that the keyboard keys are working normally and not locked.
- Confirm that the Shortcut keys are not disabled by navigating to this location
- Navigate to Settings => Accessibility => Keyboard => Use the Print Screen key to open screen capture. Toggle the button to ON.
- Confirm that no other service or process is conflicting with the snipping tool.
- Restarting the system can stop and fix this issue.
Can I customize Snipping Tool shortcuts?
Yes, but not a direct customization. You will need a third-party tool like PowerToys to carry out the customization.
Frequently Asked Questions
1. How to use Snipping Tool with a shortcut?
• Windows logo + Shift + S will open the snipping tool overlay to capture an on-screen image.
• Windows logo + Shift + R will open the snipping tool overlay to capture a video clip.
• Ctrl + N will open a New Screenshot
• Ctrl + O will open a file
2. How do I snip part of my screen?
Launch the snipping tool by pressing Windows logo + Shift + S on your keyboard. The screen darkens to show that the tool is ready to capture. Drag the snipping tool on the area you want to capture on your screen.
3. How to snip without clicking?
• Use this key combination: Windows logo + Shift + S to open the snipping tool.
• Use this key combination: Alt + M to open the Mode dropdown.
• Use the arrow keys to select your snipping mode: Free-form Snip, Rectangular Snip, Window Snip, Full-screen Snip.
• Hit Enter to confirm.
4. What is the alternative to snip tool?
We have built-in alternatives on Windows, such as Print Screen (PrtSc) and Xbox Game Bar.
• Use the key prt sc to open the Snipping Tool and be ready to snip.
• Use the key Alt + prt sc to capture the active window.
• Use the key Win + prt sc to capture the full screen and save it automatically in Pictures => Screenshots folder.
• Use the key Win + G to open the Xbox Game Bar. Read through our quick guide on how to uninstall Xbox Game Bar on Windows PC
We have third-party alternatives like:
• Monosnap
• Snagit
• Lightshot
• Greenshot
• Screenpresso
5. What is the shortcut for screen snipping?
When you want to open the Snipping Tool, the most common and easiest screen snip shortcut for Windows 10 and 11 is the key combination of Windows key + Shift + S. When these three are combined, it launches the Snipping Tool, and you can now decide which mode you want to use, whether it is rectangular, free-form, window, or full-screen snipping mode.
6. What is the shortcut for screenshot section on Windows?
Shortcut for Snipping Tool depends on the type of computer you are using; some systems use the Windows Logo + PrtScn button as a shortcut for print screen directly to the Screenshots folder.
If your computer does not have the PrtScn button, you may use the key combination of Fn + Windows logo + Space Bar to take a screenshot that can be printed.
7. Can you add text in a Snipping Tool?
You can use the ballpoint pen and edit in Paint to add text to your screenshot. Currently, you cannot add typed text directly to your screenshot, but you can only annotate with Pen, Pencil, Highlighter, and Touch Writing.
8. Where do Windows Screenshots go?
When you do a Print Screen on your system, it is saved and can be located in the Pictures => Screenshots folder. Navigate to C:\Users\Users-name\Pictures\Screenshots.
9. Can I edit screenshots after capture?
It is very possible that you edit your screenshots with another application like Paint. You can click on Edit in Paint or save the image file, which can now be opened in an editing application for further editing.
10. Where does the Snipping Tool save?
It can automatically save original screenshots to this location C:\Users\Users-name\Pictures\Screenshots. It can automatically save original recordings to this location C:\Users\Users-name\Videos\Screen Recordings
11. How to copy a screenshot?
Press the PrtSc key on your computer and snip the area you want to capture on your computer. Use this key (CTRL+V) to paste the image into a Word document or any other application.
12. What are the Ctrl keys for screenshots?
You can use the PrtScn keyboard shortcut to start capturing your screen. After snipping your screen, it will be copied to your clipboard.
Open a Word document or photo editing app like Paint or Photoshop and press Ctrl + V to paste the screenshot. You can further edit and save your screenshot.
13. Why isn’t my Snipping Tool working?
Sometimes, the Snipping Tool on your system may not respond due to memory issues. You will need to restart the system to release memory for the task, and there are times you will need to update your operating system. You can also reset or reinstall the Snipping Tool.
14. How to disable Snipping Tool notifications?
• Open your computer Settings.
• Navigate to System => Notifications.
• Scroll down and search for Snipping Tool.
• Toggle Notifications button Off
Conclusion
Using the Windows snipping tool is very easy to use and much easier when you know how to combine different shortcuts. The Snipping Tool has undergone improvements over the years, and it remains a valuable tool for capturing your screen seamlessly.
You can find time to test all these key combinations for the Windows Snipping Tool shortcut, and you discover that you can easily do things on the Snipping Tool without clicking your mouse.
Research Process:
The total time involved to complete and publish this article is approximately 36 hours. This content was created through a structured research approach to ensure accuracy and reliability.
For more quick Snipping or Screen Capture-related guides, you can explore our range of tutorials below:
- How to Fix Can’t Take Screenshot Due to Security Policy
- Best 6 Methods To Take A Screenshot On Windows 10
- How To Take Screenshot On Mac [4 Step-By-Step Methods]
- Steam Screenshot Folder: Where are Steam Screenshots Saved
- Movavi Screen Recorder Review: Best Feature Details
- How to Screen Record on Windows 10 or 11 [4 Simple Methods]
- Top 20 Online Video Recorder Review (Updated List)
Was this helpful?
Recommended Reading
-

A Complete Step-by-Step Guide on How to Screen Record on Windows. Get to know the simple and easy methods to quickly screen record windows: If a picture speaks a thousand words, then a video is worth a million. With Windows, you can easily record your screen to demonstrate how to…
-
A complete step-by-step guide to clearly understand how to Share Screen on FaceTime using iPhone, iPad, or Mac without any difficulties or hassle. With FaceTime’s screen sharing feature, you can share your iPhone, iPad, or Mac screen with someone you are making a FaceTime call with. This is a great…
-

Best Screen Capture Software Tools that would enable you to make your workday much more productive: A few years ago, screenshots were not that much popular. It was only used to share the error message on the screen. But, nowadays screenshots are routinely and widely used in our day-to-day life.…
-
List of the Best Free Screen Recording Software Apps That are Useful for Capturing Your Screen Effectively: A lot of people ask us about the best screen recording software online. The answer is not that straightforward. While there are many apps online that let you capture the desktop screen, not…


