


This is the tutorial #3 in our QTP Training series.
=> Click Here For The QTP Training Tutorials Series
In the last tutorial, we saw how to work with the Keyword View.
Today’s article is going to be about adding steps to a QTP test from the keyword view. Before we go about adding the steps, let’s see what kind of steps we can add.

Adding Standard Steps from Keyword View
#1) Standard Step: A standard step is anything that acts on an object. For example, a set operation on an edit box with a particular value or selecting a value from a list box.
#2) Checkpoint Step: Checkpoint is a step in a QTP Test that compares an expected value of a specific property/state of an object with the actual value. This is a kind of validation that QTP provides to the users to make sure their AUT is working as intended.
So, when this kind of a step is inserted, QTP performs a check during this step execution and if expected and actual values are the same, the checkpoint passes or else it fails. An example of a checkpoint is if in an application a checkbox is supposed to be ON after its selected or a particular name that a text on the screen should be, etc.
QTP has 10 checkpoints that it provides the users with. Apart from these, the tester can verify and validate any conditions by programmatically writing them. All checkpoints will be dealt with in detail in the upcoming articles.
#3) Output Value: As the name implies an output value is nothing but a variable that stores the outcome of a particular step in a test. This value can be used subsequently as an input for another step. This value is only available for the time period of a test run after which it gets reset. This topic will also be detailed out shortly.
#4) Comments: Any step that is non-programmatic, won’t be executed, but is put in the script to increase readability is a comment.
#5) Conditional and Loop statement.
#6) Other: These are the kind of statements that help in designing the programming logic. Some examples are sync statements, writing into test results, etc.
Let’s start by adding a standard step. For our convenience, I am going to explain only the use of the item, operation, value, and documentation columns in the keyword view. Though there are two more columns, they are seldom used.
Inserting a step is the first part of adding a line to a program. A step merely adds a blank line to your test. It is up to the tester to define the step and to add details to the step. The details include what items to act on, what operations to perform, what value to assign, etc. If it’s a new test, then any step we are trying to add becomes the first step.
From the menu main, select Insert -> New Step after clicking anywhere in the keyword view.

Another way is to right-click on an existing step and select Insert new steps from the menu.

Both of these options result in the addition of a new line after the selected step. If a container object is selected while adding a new line, the new step gets added as a sub-step. If a last-level object is selected, then the new line gets added as a sibling.
Here is what the new line looks like. The new line added is nothing but a skeleton that can be defined as required.

So, the first thing you see in a newly inserted line is a “Select an item” dropdown.

Given the fact that every operation needs an object to be performed on, this is inevitable. As already discussed, items can be anything: a Test object, Statement, Utility Object or comment. Test objects that are contained under a Container Object are displayed here.
Therefore, according to our example, Agent Name, OK, the Password is displayed in the list when a new step is to be added while clicking on or under the sub-level steps of the Login Dialog.
Object Repository:
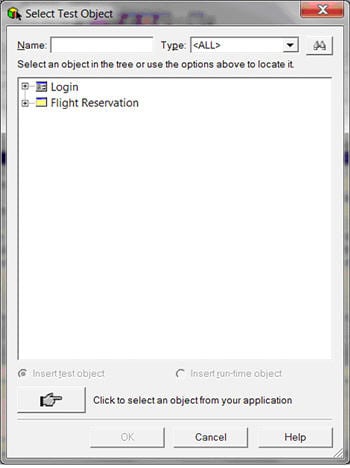
If anything other than the items listed is required by the user, then there is an option to select the same from the Object Repository. Now, this is the first time in our articles that we have encountered the word Object Repository. So, what is it really? When we try to put it simply, an Object Repository is what its name suggests.
It is a place or more like a database where all the Objects in a test are stored. This is what happens when the user chooses the “Object Repository” from the list.
So an item can be selected either from the list displayed or from the Object repository. The next thing is to define the operation to be performed on the selected object. Click on the Operation column and a list of operations that can be performed on the selected object will be displayed.
This list is dependent on the type of object selected. For instance, a dialog object will have different methods available than when an Edit box is chosen.
Choose the desired operation

The next column is the Value. As we already know, this column is the argument for the operation to be performed on the selected item. Upon clicking on this column, the arguments are displayed as shown below:
![]()
If more than one argument is required to carry out the said operation, all the arguments will be displayed as multiple cells in the Value column.
The type operation on the ‘FlyFrom’ item needs a keyboard input. When the icon in this column is displayed the following dialog is displayed that helps the user to configure this value.
As you can see from the window above, the value to be entered in this field can either be a “Constant” in which case the constant value can simply be typed in the text box and then followed by clicking the “OK” button in the window.
Or it could be parameterized i.e., it could be picked up from a location in the datasheet, a random number or an environment variable. How to parameterize a value for an argument will be discussed later on in detail.

In our example, I am writing “Test” in the constant field and clicking OK and here is how the line generated looks:

It should be noted that the “Documentation” field gets auto-populated with the description pertaining to the operation performed on the item selected.
Conclusion
So, that concludes the topic, “Adding a standard step to a test from the Keyword View”. We have discussed the various kinds of steps that can be added from the Keyword view and explored the adding of a Standard Step in detail.
We’ll have a couple of more articles on the QTP keyword view. In the upcoming articles, we will see how to add other kinds of steps, add conditional and loop statements and how the Keyword view can be used to modify/delete the test steps.
=> Visit Here For The QTP Training Tutorials Series
We need your feedback to improve this QTP training article series. Let’s make it more interactive. Add your questions in the comments below. Join our email newsletter as there are many more articles to come in this series.
Believe us this will be the most comprehensive QTP training article series you’ve ever seen online!
Was this helpful?
Recommended Reading
-

Today we are publishing part one of a multi-part guest post series on Micro Focus Quick Test Professional (QTP). In this multi-part QTP training series we'll be covering all QTP tutorials and concepts in detail with adequate illustrations. Our expert author Swati S. will be helping us in bringing this…
-
This is the tutorial #2 in our QTP Training article series. => Click Here For The QTP Training Tutorials Series This article is going to give you an insight into the Keyword view of the QTP GUI. During this process, we are going to get a quick introduction to Actions, Object…
-
Let's continue the QTP training series with our next QTP tutorial #4 - Adding Conditional and Loop Statements in Keyword View. Understanding the QTP keyword and expert view feature in detail is very important to learn QTP. Hence, we have divided this Keyword View tutorial into four articles. This is…
-
In the previous QTP training session, we listed all the checkpoints that QTP provides. All these checkpoints are very important to insert verification points in QTP tests to check if the current and expected values of an object match or not. This determines the PASS or FAIL status of the…


From my little knowledge , we will working more with Expert view rather than Keyword view. Keyword view is rarely used. Am I correct or wrong. can any one clarify
@Ajay Mehtre: Checkpoints is coming up as an independent article. You will find the details soon….
Is there any difference when we select an item from the Object Repository and when we select an item from the dropdown for a new step?
Because in both cases we can select only the item corresponding to the particular container object under which the step was added.
Hi, Thanks for the Notes. Can we have a session on QTP Actions/Action Call.
Thanks.
How it calls the website with the flight app?
I liked your tutorial very much.. Thanks a tone !!
which version of QTP are u using in these tutorials?
@Anil Kumar M R: QTP has two views. Each one has its own capabilities. So it is really upto the user to decide which to use depending on the comfort and also the test at hand. Since this is a tutorial on the entire QTP Tool, we would like to give as much information as possible…I hope this helps.
Thanks buddy..
Awesome tutorial.
can you tell us all checkpoints we can insert using keyword view?
@Manidipta: Sure, Actions is also an independent topic coming up…
Good!! Thanks
It’s god if you can explain indetail more, thanks.
@Anil: You are right anil but due to initial phase of training, we should have at least an idea about keyword view, What you say?
thank you vijay and swati for these useful QTP articles.
I am learning qtp 11 currently and also need some qtp interview questions to prepare side by side while learning.
good.. u r doing the great job!