Deeply explore all about Jira Cloud Advanced Roadmaps for effective planning and tracking of projects across business units. Visualize the tasks to meet your goals and improve progress rapidly in real time:
As a team, you need to know your work items’ current and future health. Advanced Roadmaps helps you plan and track work across your teams. This feature allows you to manage team capacity, track dependencies, and prioritize.
The Advanced Roadmaps feature lets you include issues from boards, projects, and filters to create a plan for multiple teams or the entire organization. Project teams can use this plan to estimate release dates for their projects.
=> Read Through Our Exclusive JIRA Tutorial Series Here
Table of Contents:
- Get Started With Jira Cloud Advanced Roadmaps
- Why Should You Use Advanced Roadmaps
- Permissions in Advanced Roadmaps
- Hierarchy in Advanced Roadmaps
- About Sample Jira Project Used For Planning
- Create Plan in Advanced Roadmaps
- Create Team in Advanced Roadmaps
- Create Parent Issue in Advanced Roadmaps
- Add and View Dependencies Between Issues
- Review Changes and Save Issues in Jira
- Limitation of Advanced Roadmaps
- Tips to Improve the Performance of the Plan
- Conclusion
Get Started With Jira Cloud Advanced Roadmaps
This article outlines the key concepts and best practices for planning and tracking using Advanced Roadmaps in Jira Cloud.
Advanced Roadmaps are available as part of the Premium and Enterprise plans only and not in the lower plans. It is available FREE for the Jira Data Center and can be downloaded and installed as well.
Here is a quick video on Jira Cloud Advanced Roadmap along with a few tips and best practices:
Features:
- Add and expand your hierarchy levels in the plan.
- Look at all dependencies that can impact the project timelines.
- Stay in Advanced Roadmaps. Data will not be saved into Jira unless ready.
- Plan based on the capacity and velocity of the team.
Pre-requisites:
- Jira Cloud Account with Premium or Enterprise plan
- Jira Admin permissions
So, with Advanced Roadmaps, you have a powerful planning tool that will help to visualize your work items or issues to meet your goals. Advanced Roadmaps works only with company-managed projects in Jira Software cloud.
Why Should You Use Advanced Roadmaps
Advanced Roadmaps offers project teams the following benefits:
- Tracking and visualization of the progress with an exact duration of when the tasks are due.
- Better visibility of project lengths and individual progress.
- Making important decisions on the projects and their initiatives.
- Assess the impact of the addition of any tasks.
- Analyze when tasks are added or modifying the timeline affects the entire project.
- Manage any unforeseen tasks added or if the priority of certain tasks changes
With Advanced Roadmaps, you have a visual plan wherein you can predict how long a project or an initiative may take to deliver.
Advanced Roadmaps help teams to accelerate and deliver faster by increasing visibility and most importantly making important decisions.
Suggested Read => Creating Jira Dashboard Quickly
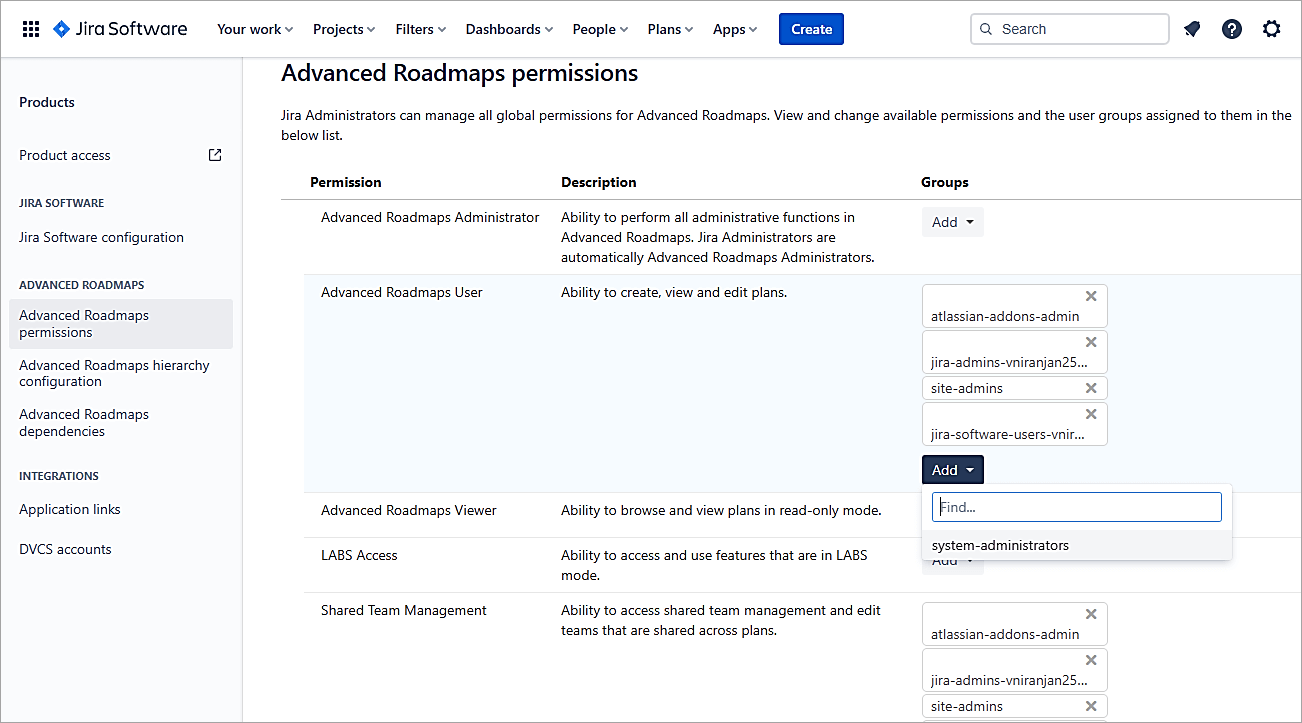
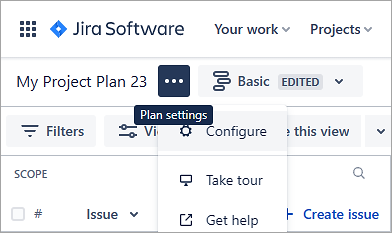
Permissions in Advanced Roadmaps
Before we start to create a plan, which is the core component, or a shared source of truth for the teams in advanced roadmaps, we need to set up permissions that can Create, View, and Edit the plans. By default, Jira Admins and System Admins have permissions. We can assign the user group for access to the Advanced Roadmaps.
As you login to Jira Cloud and as Jira Admin go to Plans-> Settings. Under Advanced Roadmap User, add the appropriate groups.
Hierarchy in Advanced Roadmaps
Hierarchy in Jira shows how issue types are related. The typical hierarchies that organizations follow are Epic => Story, Task, and Bug => Subtask.
You can add custom issue types above Epic e.g. Initiative as per the project needs.
To set the hierarchy in Advanced Roadmaps as a Jira Admin, go to Plan => Settings => Advanced Roadmaps => Advanced Roadmaps hierarchy configuration
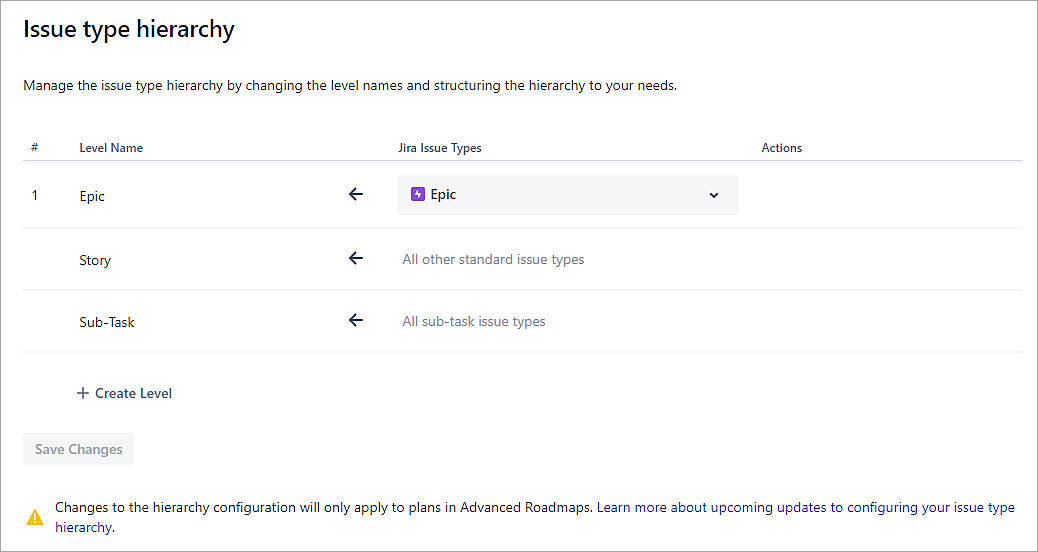
You can click on +Create Level to add a custom hierarchy. Important to note is that this is a global setting for the entire instance. All plans will follow this hierarchy.
About Sample Jira Project Used For Planning
I have a sample project with Story issues in Backlog and 2 versions. I will use this data for my planning and tracking.

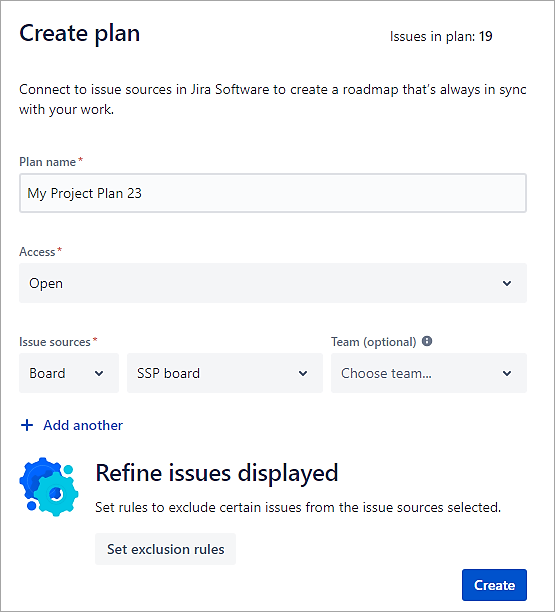
Create Plan in Advanced Roadmaps
The plan can be created by a user. To create the plan, go to Plans => Create Plan.

Enter the plan name and select the Board. Click on Create.
The initial view of the plan created looks as shown below.

Start and Due date are pre-defined fields. These dates, if not mentioned, will be taken from the Sprint dates, which are configured in the plan settings under inferred dates.
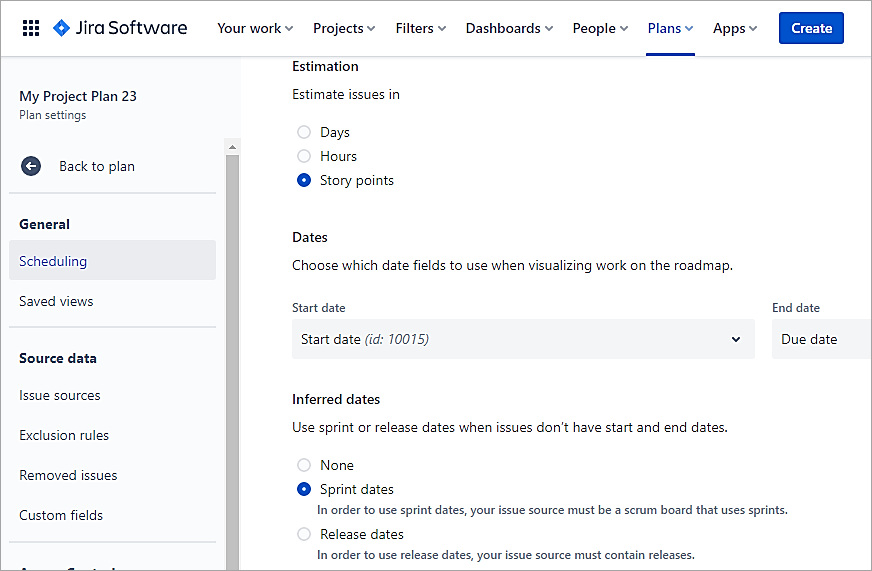
If any other field or custom field needs to be selected click on the Fields drop down and select the desired field.
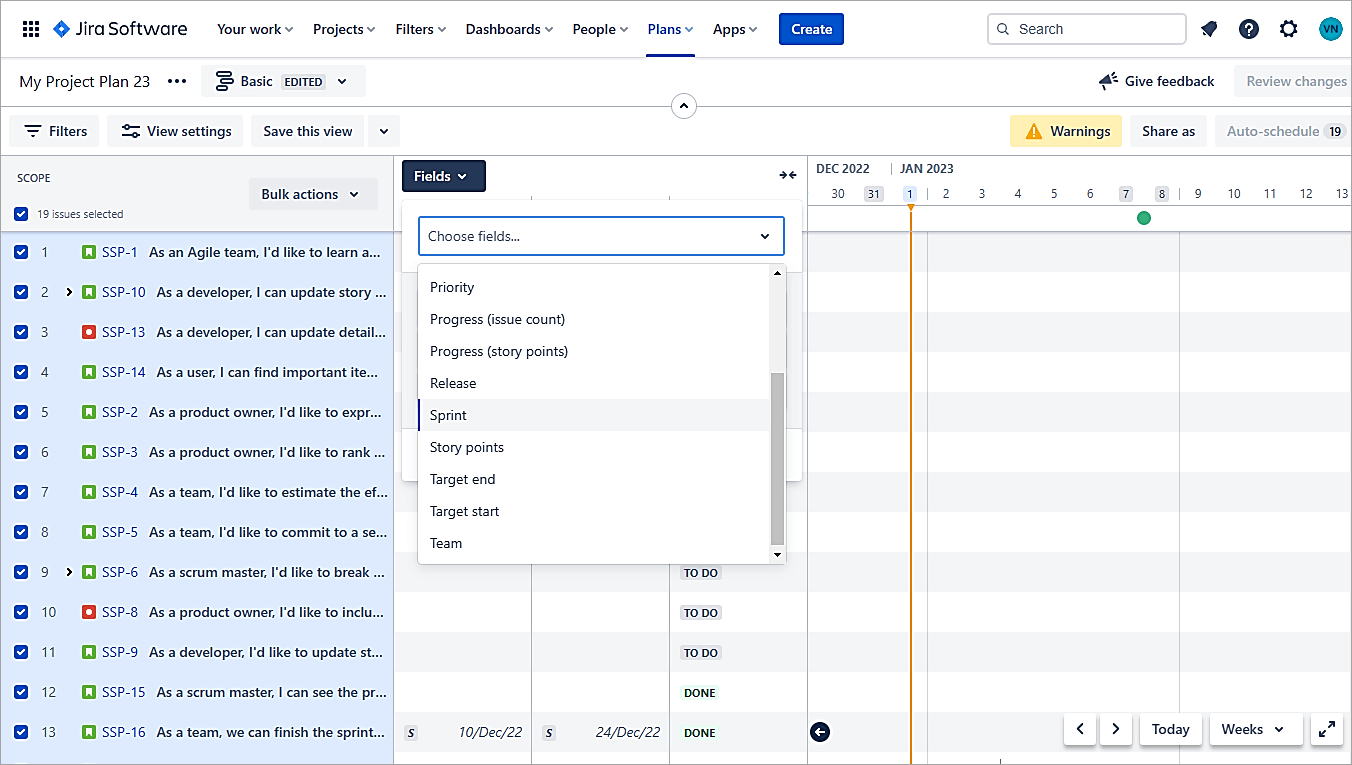
Select the Sprint field.
E.g. select a sprint for the first Story issue. The start and due dates are auto-populated.

The progress bar in weeks is also updated on the right.
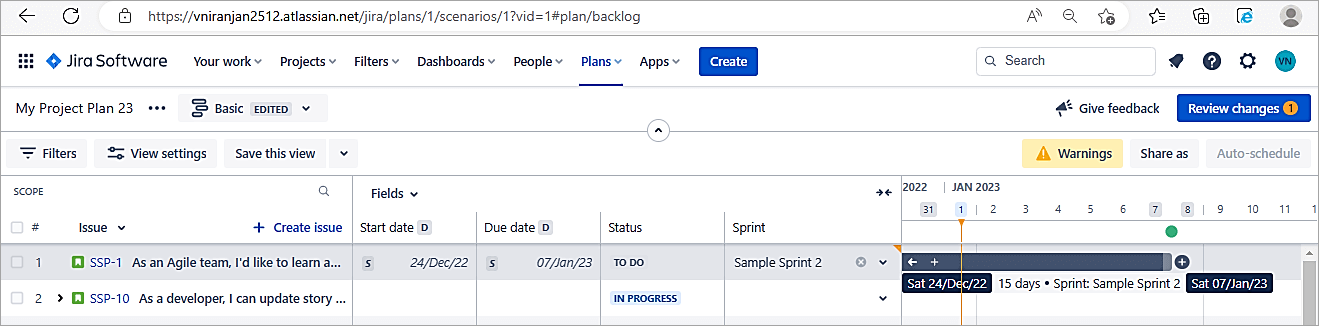
Similarly, select the appropriate sprint for all other issues as well which originally is in Backlog. Remember here that the Sprints are not updated in the main Backlog view unless Review changes are done.
Also Read =>> Best Free Jira Plugins
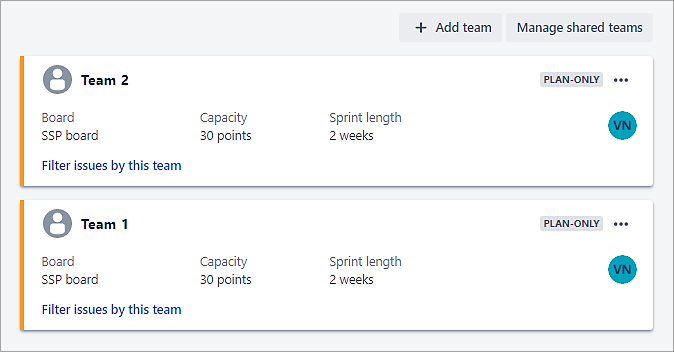
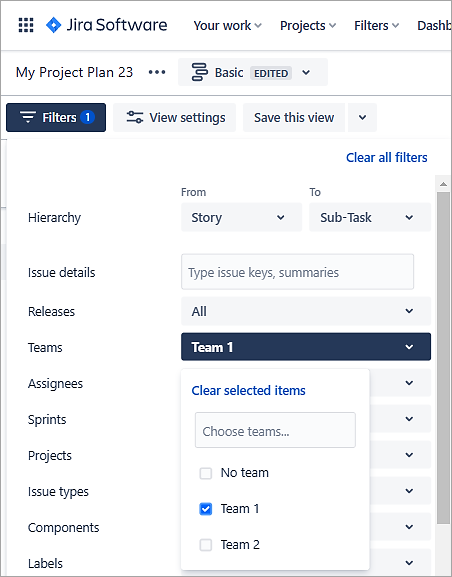
Create Team in Advanced Roadmaps
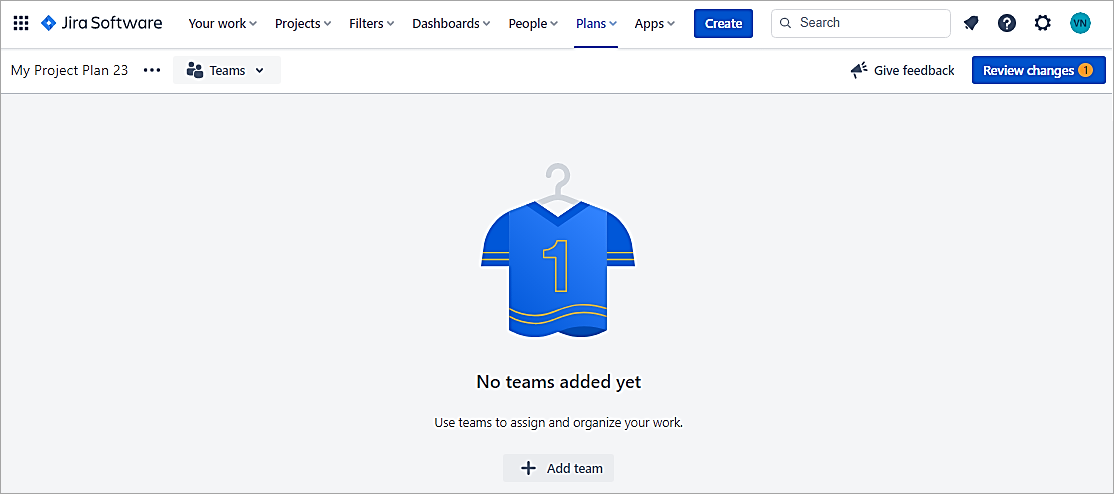
Teams can be associated with the plan. You can group and filter work based on teams and help manage the allocation of work, which will be based on capacity.
To create a team, click on the drop-down next to the plan and select Team.
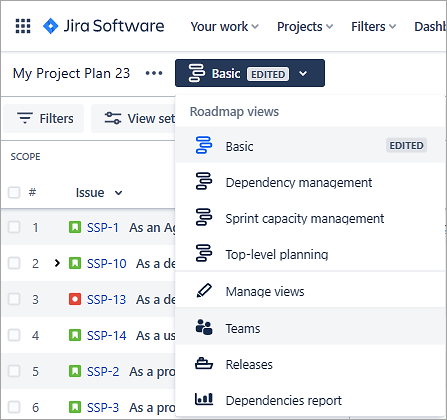
Click on + Add Team.
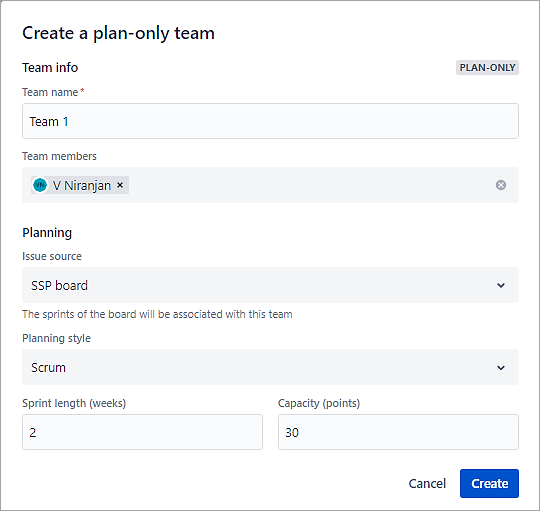
Select ‘Create a plan -only team’
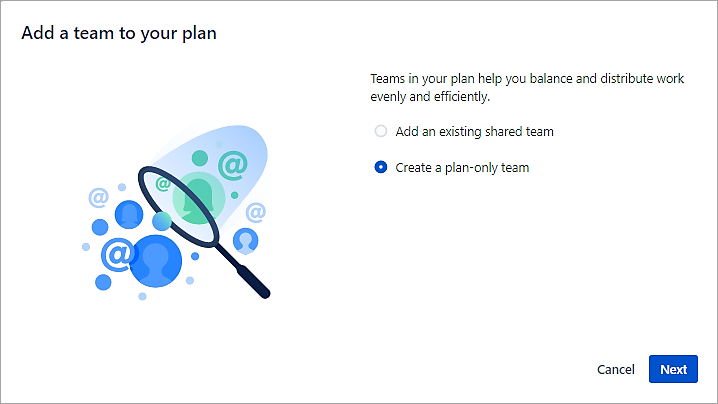
Click on Next. Add a name, and members of the team, and select Issue source. Click on Create.
Similarly, add one more team.
Switch back to the plan and select the field Team to be visible in the plan.

Set sprint for a few Story issues as shown and the Team as well.
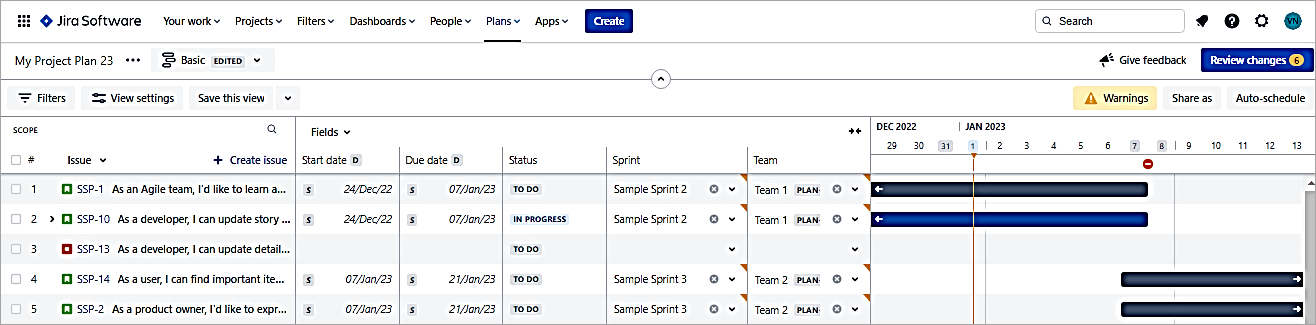
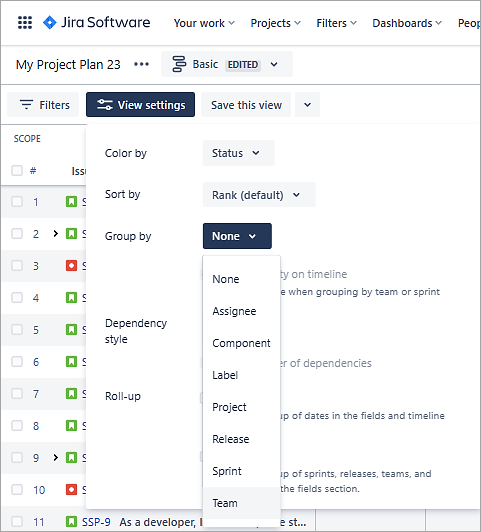
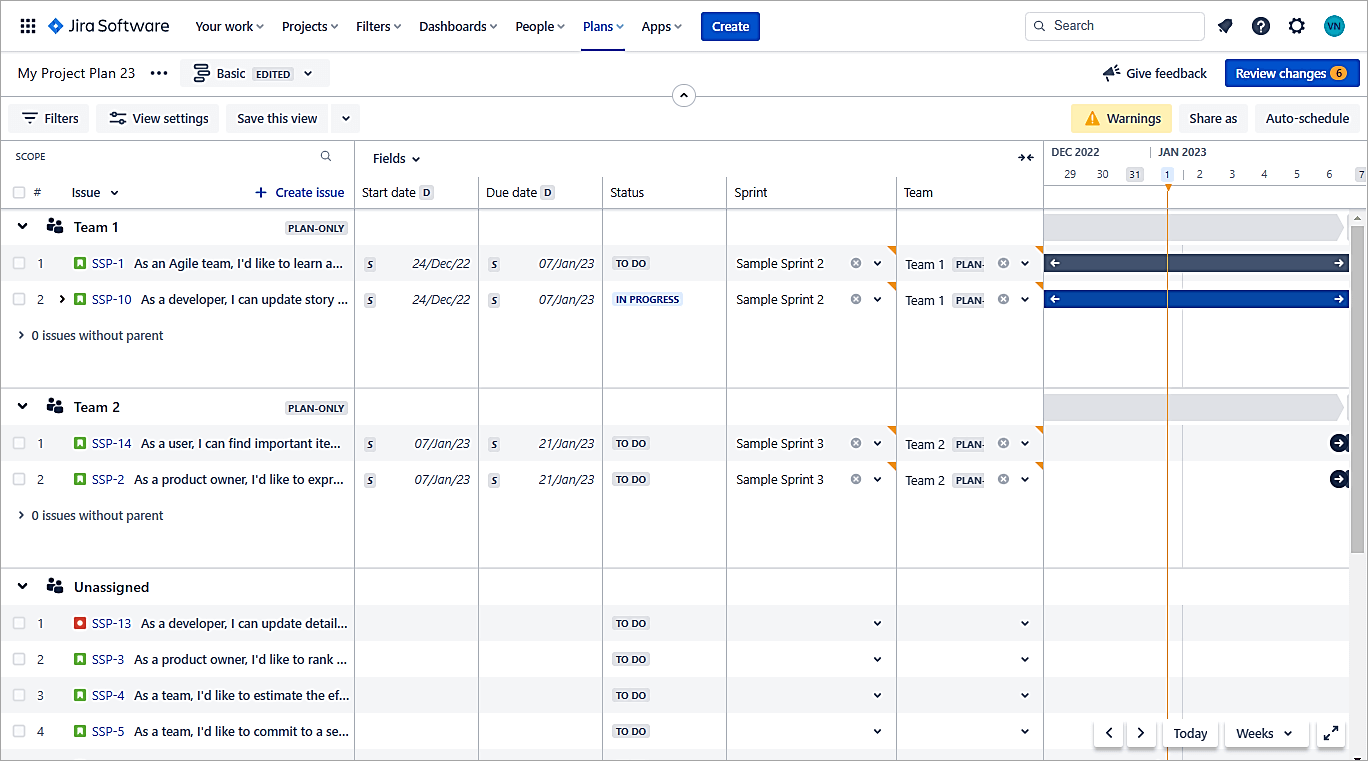
Let’s Group by Team in the Plan view. Click on View Settings => Group by => Team
The view now looks like the one below.
Since there could be multiple teams, you could also filter on viewing issues for a specific Team. Click on Filter and select the appropriate team.
Create Parent Issue in Advanced Roadmaps
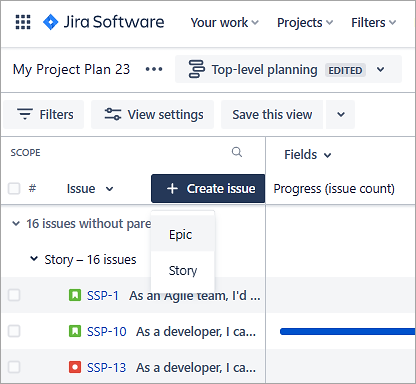
If you look at the plan created, it has Story and Bug issues, but it does not have any Parent issue Epic and no Story linked to it. In this section, we will look at creating an Epic issue and link Story issues to it.
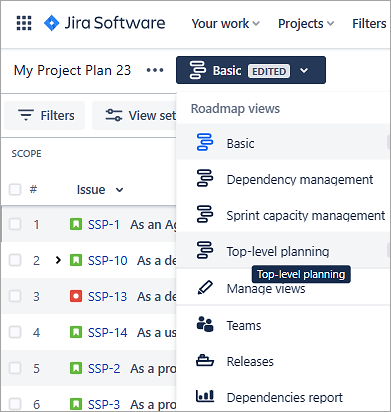
In the plan, click on the Top-level planning view.
In this view, click on + Create issue => Epic.
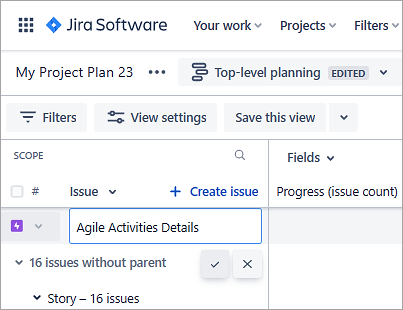
Enter the Epic summary and click on Enter.
Enable the Parent field and for the Story issues set the Epic as a parent issue.
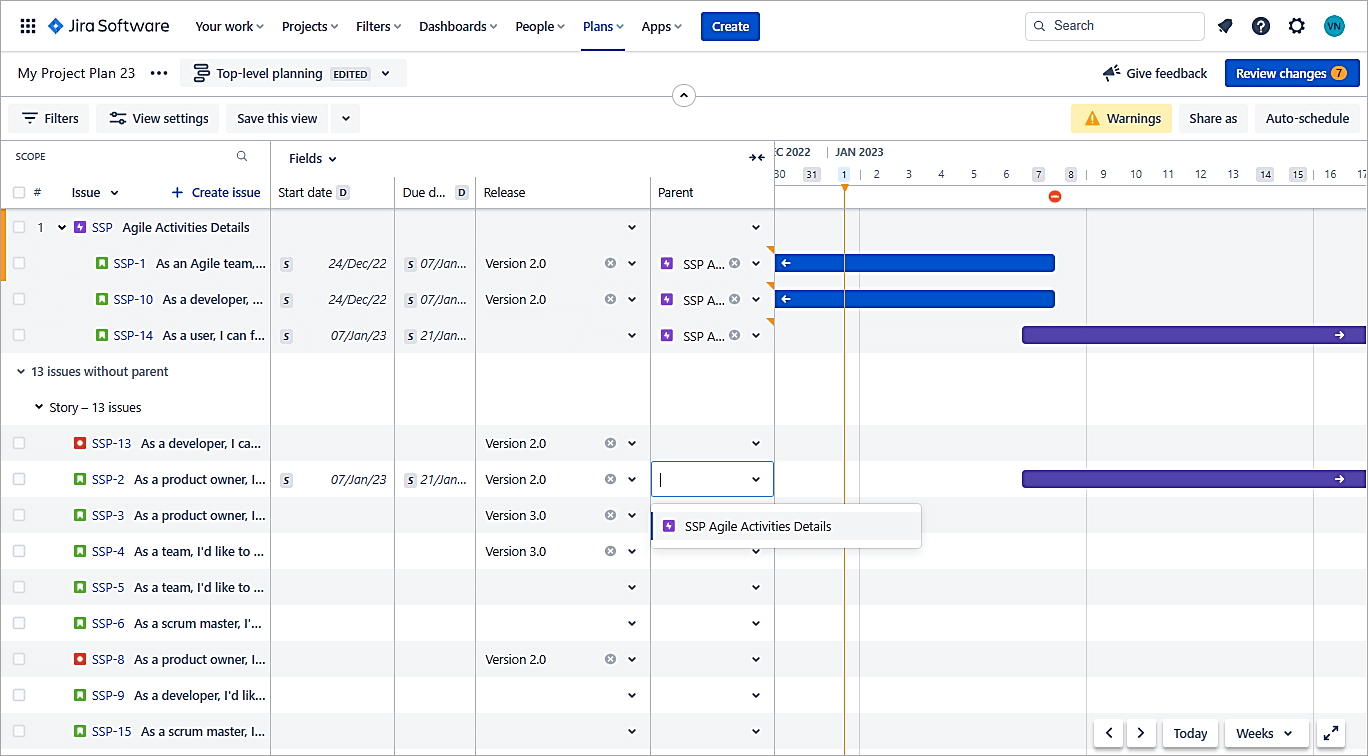
The final view looks as below with the Parent-child and planned for the appropriate Sprint.

Please note here that the changes are not yet saved in Jira but are present only in the plan. We will look at the option to Review changes for the data to be saved in Jira.
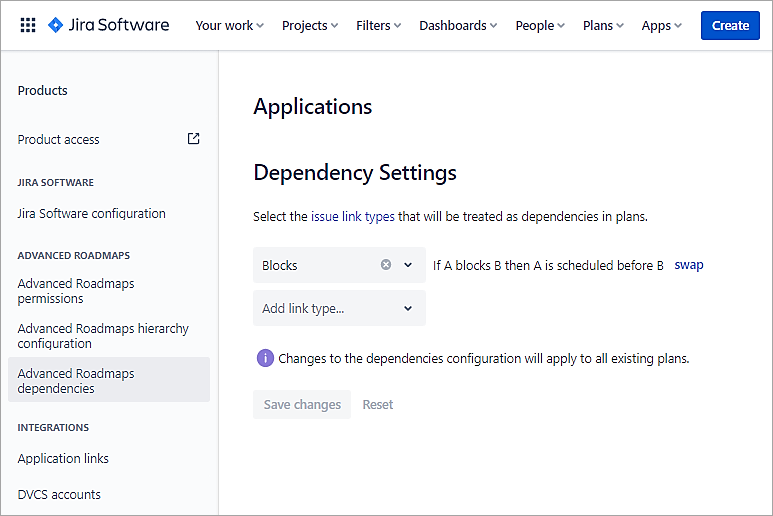
Add and View Dependencies Between Issues
Dependencies are very important in the roadmap, as they specify the relationship between issues and help to understand any blockers. In the plan, the Dependencies are shown by badges.
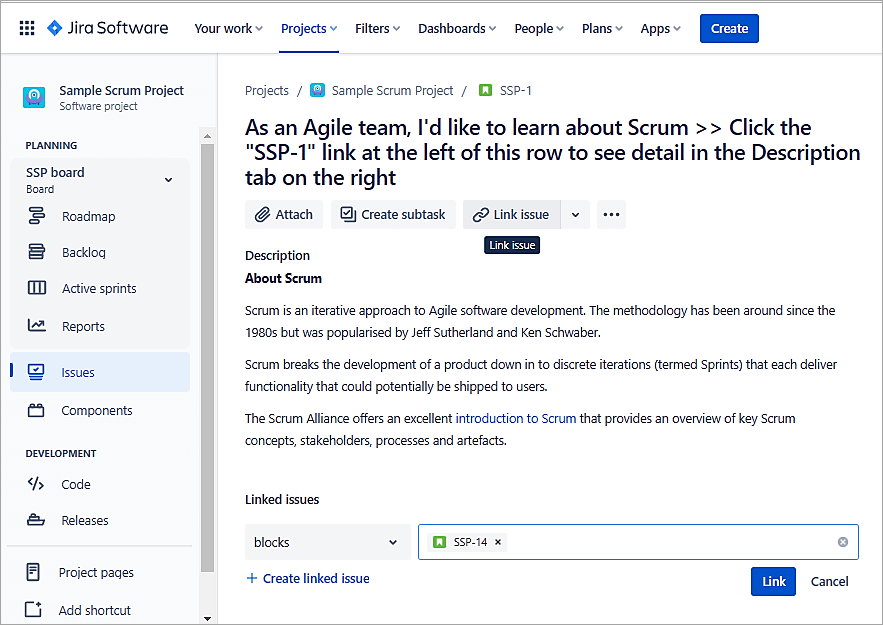
Let’s look at an example here.
In the plan, let’s assume that issue SSP-14 is dependent on SSP-1. This means that SSP-1 BLOCKS SSP-14.
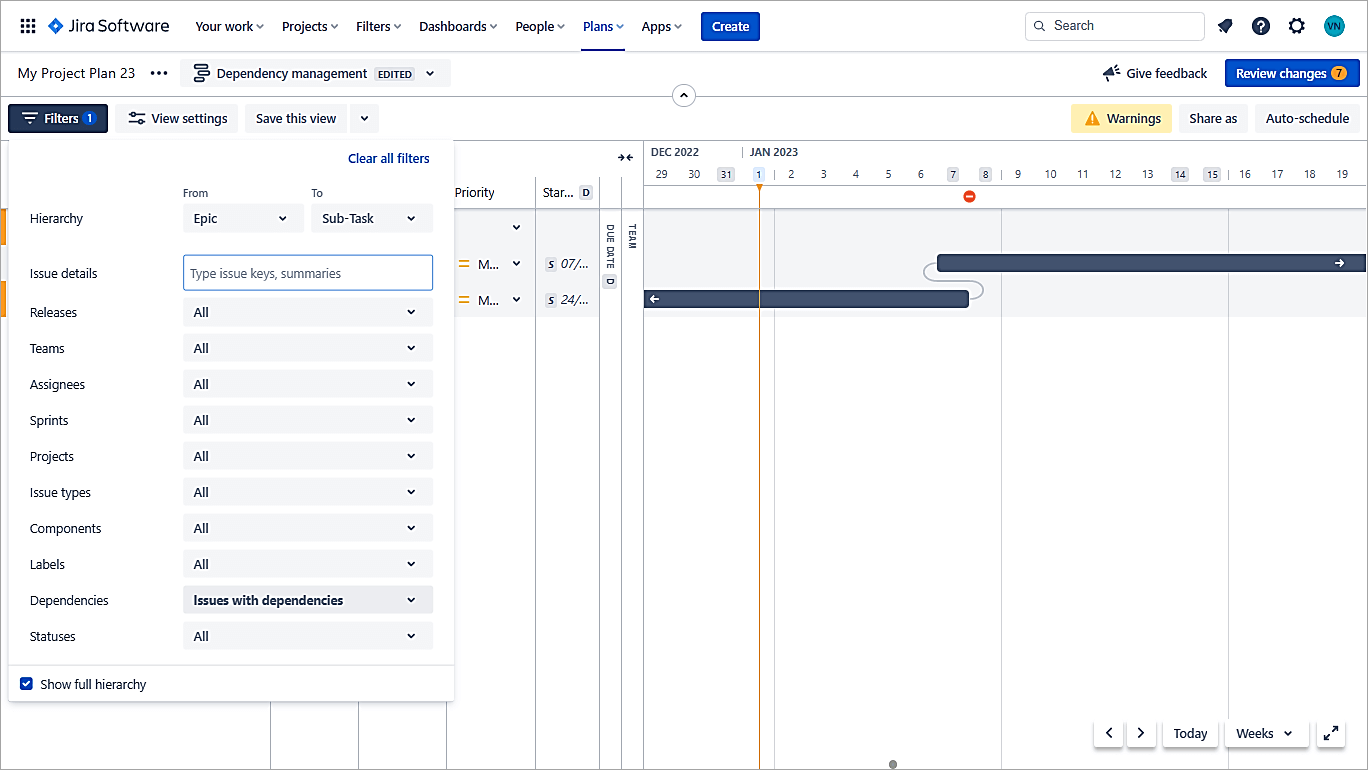
In the Plans => Settings, set the issue link type as Blocks that will be treated as Dependencies in the plan.
Open the SSP-1 issue and link it to SSP-14 with the link type as Blocks.
Back in the Plan refresh once and view the dependency in the Dependency Management view. This typically means that for SSP-14 to start SSP-1 should be completed.
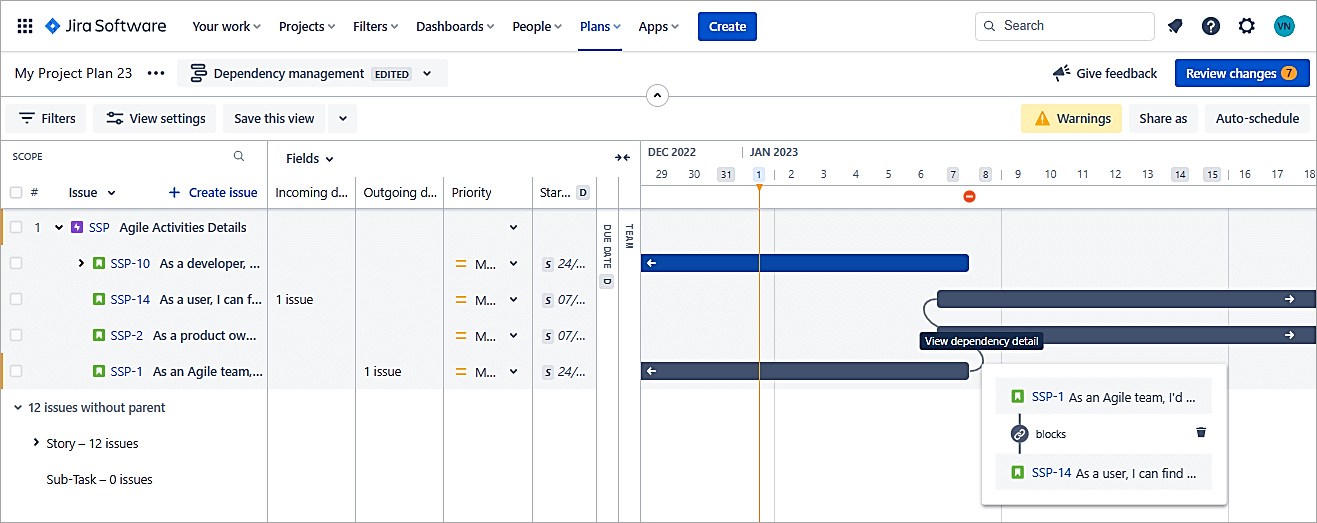
Also, look at the Dependencies Report, which is shown in a Visual format.
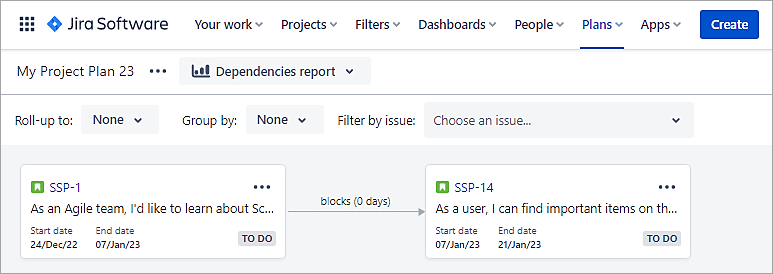
The filter can also be applied to view only issues with Dependencies.
Review Changes and Save Issues in Jira
As we were discussing, the changes have to be saved in Jira since the data is currently in the plan only. To save changes, click on the Review Changes button.
The changes done to issues are shown and will be saved.
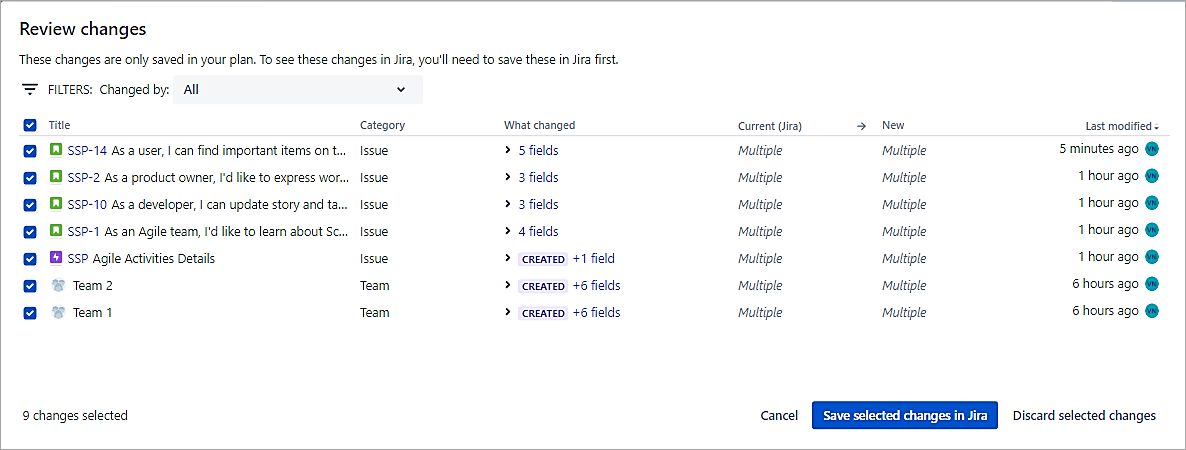
Click on Save Selected Changes in Jira.
Back in the Backlog view, look at the data saved in Sprint 2 and 3.

Also Read =>> Guide on Jira Cloud Migration Assistant
Limitation of Advanced Roadmaps
In Advanced Roadmaps, there are limitations in how much data a plan created can handle.
- Issue limits: A single plan can handle up to 5000 issues post that there could be performance issues.
- Team limits: It is suggested to have at most 50 teams in a single plan. If more are added then you will need to search for the same.
- It is better to spread your work across multiple plans.
Tips to Improve the Performance of the Plan
The larger and more complex your plan, that much more time it will take to load the plan. Here are some possible ways to improve the performance of the plan:
- An issue source in your plan like the board, should contain only relevant issues.
- Keep a tab on the limit of issues as mentioned in the previous section to 5000 max.
- If there are issues related to older releases, consider removing them and focusing on issues specific to your current releases else it may slow down the performance of the plan.
- Remove older sprints from your plan.
Suggested Reading => Open Source and Commercial JIRA Alternatives/Competitor
Conclusion
In most organizations, senior management asks for a roadmap of work planned for 2 to 3 quarters. Because of this and in this article, we have looked at a very essential feature of planning and tracking issues with a view of future work in Advanced Roadmaps.
This feature is a must for use for every product or project team, which provides a single view of your entire work tracking and progress, which includes dependencies and teams’ capacity.
The goal for every project team is to ensure the work is completed on time, which can be achieved with Advanced Roadmaps.
Hope this article helped you in the process of how to track the work for the future.
=> Check ALL Tutorials in the JIRA Series
Was this helpful?
Recommended Reading
-

This comprehensive guide on Jira Cloud Migration Assistant will help you in migrating Project Data from Jira On-Prem Server to Jira Cloud, including migration steps, project permissions, etc: Cloud Migration Assistants for Jira and Confluence are available as free apps from the Atlassian Marketplace. In this article, we will look…
-
Top Free Open Source and Commercial JIRA Alternatives/Competitors: Popular JIRA plug-ins were explained in detail in our previous tutorial. Read through our entire range of tutorials in this JIRA series. JIRA is a bug tracking and project management tool for agile teams. It was developed by Atlassian and is currently used…
-

Quickly discover Jira Service Management Cloud's ability in ticket management and task automation. This tutorial will guide you on the aspect of setting up SLAs with step-step screenshots: In the previous tutorial, we looked at how to set up a Jira Service Management Project and how customers typically use the…
-
Here we will review and compare the top Product Roadmap Tools to help you select the Best Product Roadmap Software as per your need: Product roadmap software is a visual project management application that can be used for managing resources and ideas related to a product. The application can help…
-
An in-depth review of Atlassian Intelligence in Cloud to highlight the AI features for Jira & Confluence to increase efficiency and most importantly accelerate your work with the assistance of AI: Artificial Intelligence, as everyone knows, involves creating systems to do tasks previously done by humans. Some activities like learning,…
-
Creating and working with Sub-tasks and Merge Task in JIRA: We came to know about the JIRA Bug Tracking Tool in our previous tutorial. We all know that the JIRA issue is a standard and standalone issue. But JIRA facilitates breaking down of issues as well. This can be achieved…
-
A Guide to Managing Issues in JIRA, Creating JIRA Workflow and JIRA Reports: JIRA Sub-task was explained in our previous tutorial from the Series of JIRA Tutorials. We have seen the different kinds of issues and how to create them in our earlier JIRA Tutorials. This is the next JIRA…
-
JIRA Portfolio, an Agile Project Portfolio Management Plugin Hands-on Review: In this excellent JIRA series, we learned how to use JIRA effectively for managing Agile projects in our previous tutorial. Portfolio for JIRA is the latest release of Atlassian’s Agile Project Portfolio Management plug-in for JIRA. Its purpose is to facilitate…