


Learn how to create assertions in SOAtest with a JSON example.
In the preceding section of this tutorial, key differences between REST and SOAP-based services were highlighted and explained.
In this segment, we will turn our attention to understanding assertions within SOAtest as we work with a sample JSON request/response. Throughout this process, we will be utilizing JSON Assertor to apply these assertions.
Read through the Entire SOAtest Tutorial Series for in-depth knowledge of SOAtest.
Let’s Explore!

Table of Contents:
Setting Up a Sample REST Client
- Expand Example project created in the Creating a SOAtest Project section of Tutorial #1: Parasoft SOAtest Tutorial.
- Double-click SOAtestTutorial.tst to open the .tst file and review the contents.
- Expand Test Suite: REST Example (with WADL) => Test Suite: bank?_wadl&_type=xml => Test Suite: /accounts/{accountId} and double-click Test 1: GET.
- Make sure that localhost port in WADL URL field points to port 8002 on which ParaBank project is running (rather than port 8080). If you update WADL URL port, the URL of the service will also be updated.
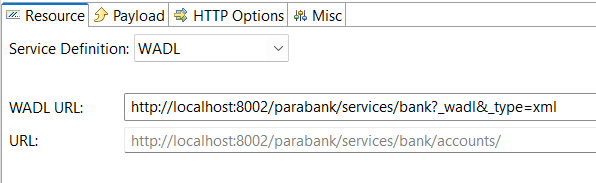
- All of the Path Parameters have been automatically propagated. However, to retrieve a valid result from ParaBank, we must provide a valid account ID.
- Provide a valid account ID by going to the Path table, then entering 12345 under accountId.
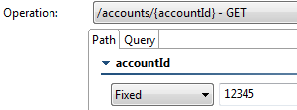
- Note that 12345 is now appended to the URL.
- Click the HTTP Options tab, choose HTTPHeaders, click Add, then add a new header with name Accept and value application/json. If this header is omitted, the service will respond with an XML. Once added, the service response will be in JSON format.
Creating and Applying HTTP Authentication
Before we send the request to the service, we need to make sure that we provide credentials necessary for request authentication.
In order to do so:
- Click HTTP Options and then Authentication.
- Click New and select Basic, and then Finish.
- In the Username field, enter john. In the Password field, enter demo. Make sure that you save the changes before closing a tab.
We have now created basic HTTP authentication settings, which will be used by our REST Client and can be applied to all clients in the project.

Creating a Sample JSON Assertor
- Right-click Test 1: GET in the Test Case Explorer and select Test Using “Example Configuration” to send request to the service with our REST Client.
- Double-click Traffic Object -> Traffic Viewer and select Response tab to review the response received from the service.
- Right-click Test 1: GET in the Test Case Explorer and select Create/Update Regression Control.
- Select Create Value Assertion and click Next.
- Select balance and click Finish. JSON Assertor has now been created.
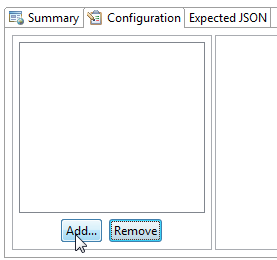
- Double-click Response Traffic -> JSON Assertor in the Test Case Explorer and switch to the Configuration tab to review the assertion that has been created. You will notice that the tool asserts that the balance of the account in the incoming response equals -2300.00.
Exploring JSON Assertor Configuration Options
JSON Assertor consists of three main tabs:
- Summary: This tab contains a table showing the details of the JSON assertions that have been configured.
- Configuration: This tab is used to create and configure new and existing JSON assertions.
- Expected JSON: Specifies the expected JSON response, creating a template from which you can select elements. If JSON Assertor receives a valid JSON message (e.g., from traffic or from the tool it is attached to), this panel will be populated automatically. Alternatively, you can copy a sample message into the Literal or Tree tabs. Note that the expected JSON does not get saved by default. If you want to save it, enable the Save Expected JSON option.
Reviewing Types of Assertions and Adding New JSON Assertor Manually
- Click the Add button in the JSON Assertor’s Configuration tab.
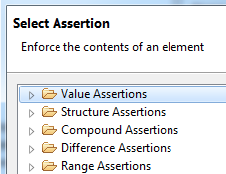
- Select an assertion type. The following is a brief summary of the available types of assertions.
- Value Assertions: The following value assertions are available:
- Value Assertion: Enforce the value of a particular element.
- Value Occurrence Assertion: Enforce a certain number of occurrences of an element with a given value (e.g., that the document must have n matches on both the XPath selector and the specified value string).
- Numeric Assertion: Enforce the numeric value of an element.
- String Comparison Assertion: Enforce the value of the text content of a given element.
- Regular Expression Assertion: Enforce that an element matches a regular expression. For more information regarding supported regular expression syntax, click here.
- Expression Assertion: Enforce the value of an expression composed of elements.
- Custom Assertion: Enforce the value of an element by scripting custom logic.
- Structure Assertions: The following structure assertions are available:
- Occurrence Assertion: Enforce the number of occurrences of an element.
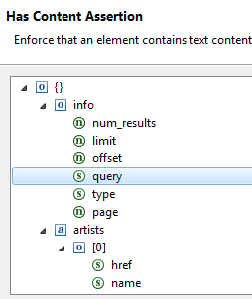
- Has Content Assertion: Enforce that an element has text content (i.e., length of text > 0).
- Has Children Assertion: Enforce that an element has one or more child elements.
- Type Assertion: Enforce the type of an element.
- Compound Assertions: The following compound assertions are available:
- AND Assertion: Group multiple assertions that all must succeed.
- OR Assertion: Group multiple assertions where at least one must succeed.
- Conditional Assertion: Enforce an assertion only if a condition is met, where the condition is a combination of previously defined assertions.
- Difference Assertions: The following difference assertions are available:
- Numeric Difference Assertion: Enforce a numeric difference on a value of a particular element. Assert that the numeric value of an element differs from a user-specified base value by a user-specified value. For example, in order to assert that a value in degrees Fahrenheit is 3 degrees below freezing, you would set the Base Value to 32 and the Difference Value to -3.
- Date Difference Assertion: Enforce a date difference on a value of a particular element.
- DateTime Difference Assertion: Enforce a date time difference on a value of a particular element.
- Range Assertions: The following difference assertions are available:
- Numeric Range Assertion: Enforce that the numeric value of an element is within the inclusive bounds of a numeric range.
- Date Range Assertion: Enforce a date range on a value of a particular element.
- Date Time Range Assertion: Enforce a date time range on a value of a particular element.
- Value Assertions: The following value assertions are available:
- Click the Next button. A tree view displays.
- From the tree view, select the element that you want this assertion to check, then click the Finish button.
- Note that you can edit the structure of this tree in the tool’s Expected JSON tab described above.
You may add additional assertions to apply to the message by clicking the Add button in the Configuration tab.If you later want to specify additional options (e.g., if you want to change the name of the column used to store the value, you want the value saved to a writable data source, or you want the value stored to an existing variable) or if you want to modify the referenced element, then click the Change Element button, which is on the bottom right of the Configuration tab. This opens a dialog that lets you graphically or manually edit the given element.
PREV Tutorial | FIRST Tutorial
Was this helpful?
Recommended Reading
-

Introduction to VBScript Excel Objects: Tutorial #11 In my previous tutorial, I explained ‘Events’ in the VBScript. In this tutorial, I will be discussing Excel Objects that are used in the VBScript. Please note that this is the 11th tutorial in our 'Learn VBScripting' series. VBScript supports different types of…
-
This Java Assert Tutorial Explains all about Assertions in Java. You will learn to Enable & Disable Assertions, how to use Assertions, Assert Examples, etc: In our earlier tutorials, we have already discussed exceptions in Java. These are the errors that are caught at runtime. Similar to exceptions there are…
-
Q1 A deviation from the specified or expected behavior that is visible to end-users is called: a) an errorb) a faultc) a failured) a defect Q2 Regression testing should be performed: v) every weekw) after the software has changedx) as often as possibley) when the environment has changedz) when the…
-
Explore Grouped Assertions In JUnit 5 With Examples: In our previous tutorial, we explored an important aspect of JUnit called Assertion. Along with the introduction to assertions, we learned the implementation of most of the assert functions for JUnit 4 and for JUnit 5. Here on, we shall extend our…


