In this post, I have discussed the ways to take a screenshot using the Chromebook keyboard shortcuts and tools. These simple steps will allow you to take a screenshot of the entire screen, the selected area of the screen, and the window of your Chromebook quickly.
Taking a screenshot using the Chromebook is quite simple and quick if you are familiar with the keyboard shortcuts. There are various tools and keyboard shortcuts available in the Chromebook that make the screenshot process quite simple and quick for users.
In this post, you will learn the best ways to take a screenshot using the Chromebook keyboard shortcuts and third-party tools.
Table of Contents:
- How to Take a Screenshot on Chromebook (Step-by-Step Guide)
- How to Screenshot on a Chromebook (All Methods Explained)
- How to Edit a Screenshot on Chromebook Using Built-in Tools
- Where Are Screenshots Saved on Chromebook?
- How to Automatically Sync Chromebook Screenshots to Google Drive
- Taking Screenshots on Chromebook in High-Contrast Mode (Accessibility Feature)
- Best Chrome Extensions for Chromebook Screenshots
- Best Way to Take a Screenshot on Chromebook
- Chromebook Screenshot Not Working? Try These Fixes
- Chromebook Screenshot – Frequently Asked Questions
- Final Thoughts on Taking Screenshots on Chromebook
How to Take a Screenshot on Chromebook (Step-by-Step Guide)
As such, grabbing a screenshot in the exact manner you desire can be tricky, especially for people using a Chromebook for the first time.
[Via HP]
This is where my expertise comes into play. I’ve been using a Chromebook for a while now and have taken a fair number of screenshots on it. So, it only makes sense that I be the one to lay out a comprehensive guide for all who wish to learn how to take a screenshot on a Chromebook.
So, without much further ado, let’s dive in.
Here is the video guide on how to screenshot on a Chromebook:
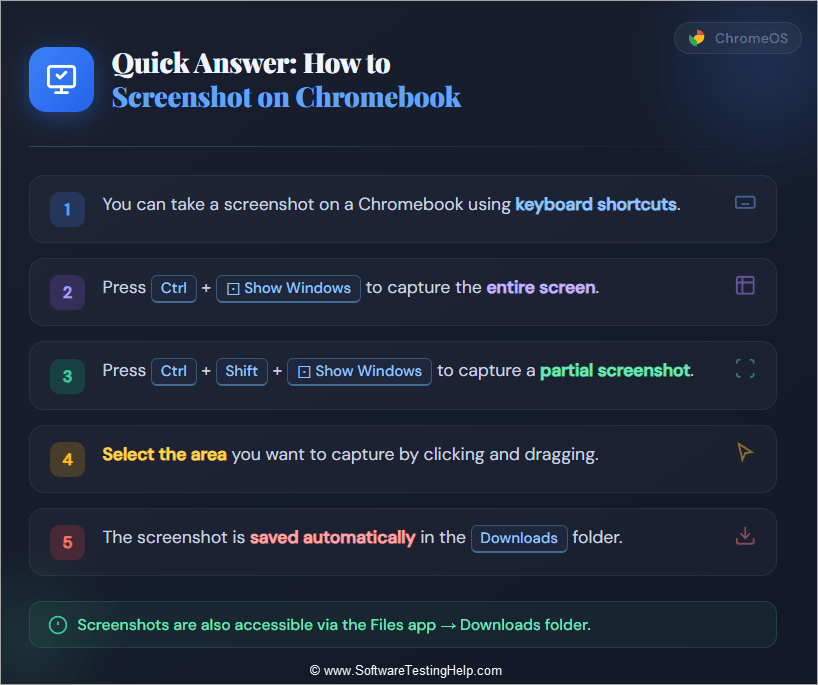
How to Take a Full Screenshot on Chromebook
The first thing we are going to learn here is how you can capture your entire screen through a screenshot. The method is super-simple, provided you know the right keyboard command. That command is Ctrl + The Show Windows Key. Press both keys at the same time. You know where the Ctrl key is situated.
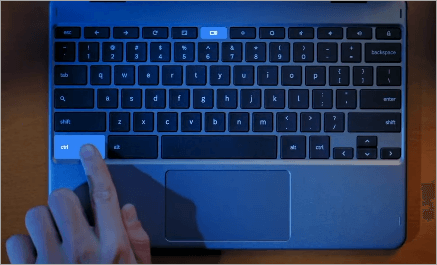
As for the Show Windows key, it will look like a rectangle with two lines on the right side. You’ll find it at the top of your keyboard above the letter keys. Depending on the Chromebook model you are using, this key’s location may be different. Usually, you’ll find the key at the top.
When you press those buttons, the system will automatically capture a full screenshot of your screen. This goes to show just how simple it is to screenshot a Chromebook.
Very few Chromebooks today also offer a dedicated screenshot key. This means all you have to do is hit this button to capture your screen. This key can usually be found on the top row of your device’s keyboard.
How to Capture a Partial Screenshot on Chromebook
Most of the time, you might want to capture only a specific part of your screen instead of the entire window. Again, this is easier to do on a Chromebook with the right key command.
Partial screen captures are the most commonly grabbed screenshots for obvious reasons concerning privacy. Whatever your reason may be, know that it is remarkably simple to grab a partial screenshot on a Chromebook.
Here’s a step-by-step guide on how to take a screenshot on a Chromebook (Partially)
- Press the Shift + Ctrl + Show Windows key simultaneously.
- This command will result in your cursor turning into a crosshair.
- Now, click and drag this crosshair across your screen, specifically the portion you wish to capture.
- Once you’ve dragged the crosshair across the entire area you want to capture, release it to grab the screenshot.
It is that simple.
How to Screenshot a Specific Window on Chromebook
Perhaps your goal is to only capture a specific Window open on your Chromebook. Well, the device offers you the privilege of doing just that with a simple keyboard command.
Here’s how to SS on Chromebook to capture a specific window:
- Press the Ctrl+ALT+Show Windows key simultaneously.
- Then, click on the window or icons in the menu bar to grab a screenshot.
In hindsight, all you need to do to take a screenshot on a Chromebook is memorize a combo of keyboard commands. In case you forget, use the following table as a reference at any time.
Chromebook Screenshot Shortcuts
| Keyboard Command | Purpose |
| Ctrl+Show Windows | Full Screen Capture |
| Shift + Ctrl + Show Window | Partial Screen Capture |
| Ctrl+ALT+Show Windows | Capturing Specific Windows. |
How to Screenshot on a Chromebook (All Methods Explained)
Enlisted below are the various ways to screenshot on a Chromebook.
Take a Screenshot on Chromebook Using the Screen Capture Tool
The key commands we just discussed aren’t the only tools in your arsenal to grab a screenshot on Chromebook. All Chromebook devices come with a built-in screenshot tool called Screen Capture. Chromebook’s Screen Capture is quite an intuitive and advanced tool that can take a screenshot and record your screen (more on this later).
You can use this tool to capture the entire screen, only a specific portion of it, or capture a specific window.
Here’s a step-by-step guide on how to take a SS on a Chromebook using this amazing built-in tool:
1. Click on the time displayed in the bottom right corner of your screen.
2. This will open the Quick Settings menu. Click on Screen Capture as shown below.
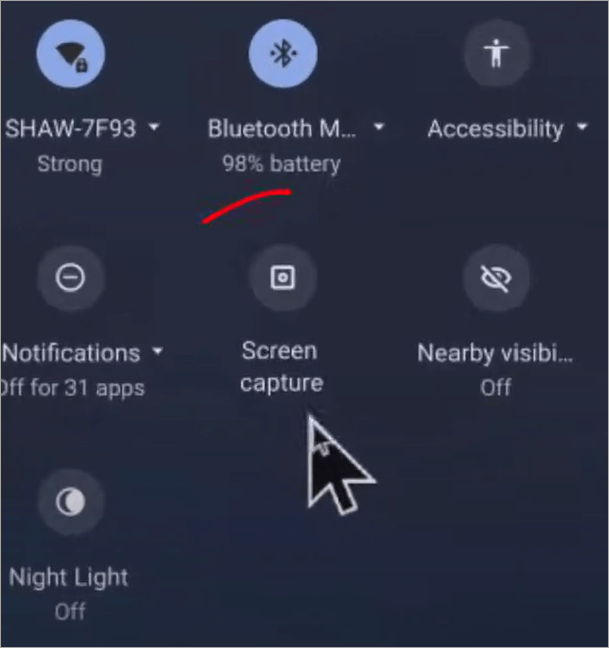
[Via Tech for Senior]
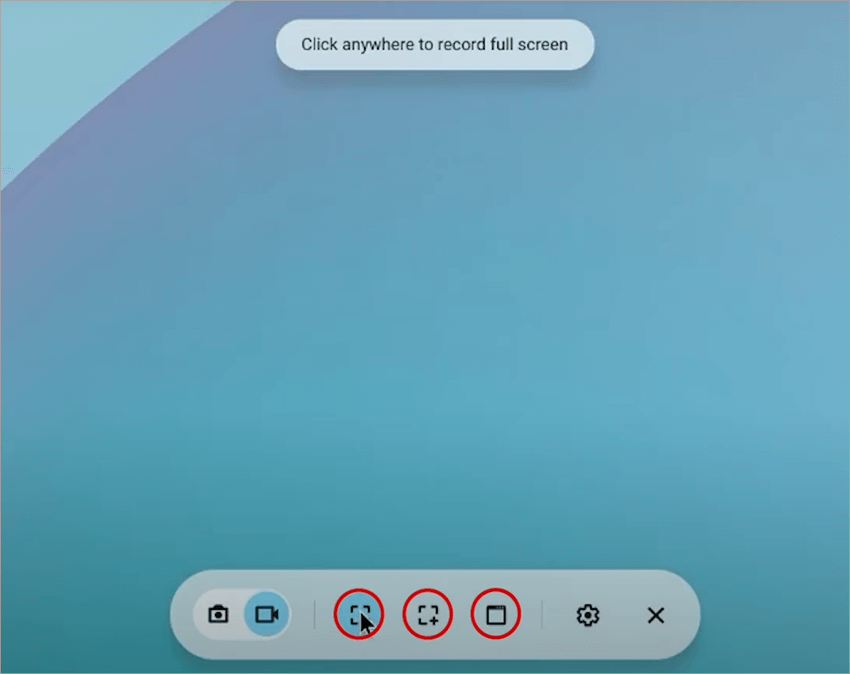
3. A small bar will show up in the center of your screen. You need to click on the camera icon, then choose between full screen, partial, or window capture.
The camera icon is depicted in the image below:
4. Now, click on the screen to grab the screenshot.
As I mentioned before, you can use the Screen Capture tool to record your screen as well. To do this, you’ll need to switch to video mode, which is presented to you beside the camera symbol.
Here’s a step-by-step guide to recording your Chromebook’s screen using Screen Capture:
1. Click on the time displayed in the bottom right corner of your screen.
2. This will open the Quick Settings menu. Here, click on Screen Capture.
3. A small bar will show up in the center of your screen. You need to click on the video recorder icon, then choose between full screen, partial, or window recording as shown below.
4. Click on the record button to start.
5. Hit the stop button when you are done.
You can use screen recordings to film tutorials or web conferences on your Chromebook. Simply clicking the record button won’t result in a good video. Instead, I suggest following the tips below for the best results with your recordings.
First, always plug in a decent microphone to your Chromebook if you plan to use a voice-over to narrate your recording. I would advise against long video recordings. Keep your videos precise, short, and laser-focused on the subject matter.
You can accomplish considerably better results by using a third-party video editor like Filmora or Adobe Premiere Pro. Put your recording through this editor to enhance its quality, maybe add some sound and visual effects, and trim excess footage.
Chromebook Screenshot Shortcuts Using an External Keyboard
If you are using an external keyboard to operate your Chromebook, chances are it does not have the “Show Windows” key. If that is the case, it is recommended to use the F5 key instead. The F5 key will serve as an alternative to the Show Windows key on your external keyboard.
Here’s what the key combo will look like with the Show Windows key replaced by the F5 key.
| Keyboard Command | Purpose |
| Ctrl+F5 | Full Screen Capture |
| Shift + Ctrl + F5 | Partial Screen Capture |
| Ctrl+ALT+F5 | Capturing Specific Windows. |
If you are keen on using the above keys, you can always customize the screenshot shortcuts.
Here’s what you need to do:
- Go to Settings
- Select Device and then select Keyboard.
Here, you’ll have the option to remap screenshot keys. Select the key that’ll serve as a replacement for the current shortcut and save the changes. Try to grab a screenshot with the new shortcut keys to make sure it works.
How to Take a Screenshot on Convertible Chromebook Models
In this section, we will learn more about taking a screenshot on Convertible Chromebook Models.
Some Chromebooks out there are convertible, meaning you can detach the keyboard or place it behind the screen to use it as a tablet. These Chromebooks offer a dedicated power and volume button, which is typical for a tablet device.
You’ll have to press both of these buttons (Power + Volume Button) simultaneously to grab a screenshot on such a device. This is how you screenshot a Chromebook in tablet mode. This function is only ideal for full-screen capture.
Take a Screenshot on Chromebook Using Voice Commands
Almost all modern Chromebook devices offer their users the privilege of voice commands through Google Assistant. With Google Assistant enabled on your device, you don’t have to rely on keyboard shortcuts or the built-in screen capture tool. A simple voice command instructing Google Assistant to “take a screenshot” will prove sufficient.
To use voice commands properly, you’ll need to enable Google Assistant on your device. You can do so by going to Settings -> Search and Assistant -> select Google Assistant. Make sure you are using a proper microphone to help Google Assistant understand your commands clearly.
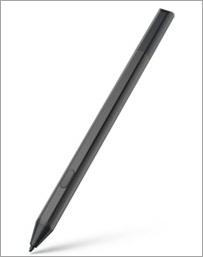
How to Take a Screenshot on a Touchscreen Chromebook Using Stylus
Some touchscreen Chromebooks come with a stylus, a pen-like device that can be used by users to interact with a device’s touchscreen. A stylus can take notes, draw, navigate, and even grab a screenshot. In fact, it can be a great way to take a screenshot on a Chromebook without a keyboard.
Here’s how you do it:
- Tap the Pen button on the Chromebook’s shelf.
- From the resulting drop-down menu, select Capture Region.
- Now, drag the stylus across the portion of your screen that you wish to capture.
- Lift the stylus off the display to successfully capture the screenshot.
It is that simple.
How to Edit a Screenshot on Chromebook Using Built-in Tools
Whenever you take a screenshot on a Chromebook, a toolbar opens. You can use this toolbar to manage your screenshot, share it to multiple destinations, and perform basic edits.
This toolbar enables you to annotate your captured screenshot. All you have to do is click on the small notification that appears whenever a screenshot is taken.
Once the screenshot is open, simply click on the edit button. Later, you can edit your screenshot in various ways, like cropping it or adding highlights and text to it.
Where Are Screenshots Saved on Chromebook?
Besides knowing how to take a screenshot on a Chromebook, you should also know where to find a recently grabbed screenshot. Chromebook saves your screenshots in the “Downloads” folder by default.
You can find the download folder by following the steps below:
- Click on the Launcher, which is the circular icon displayed in the bottom left corner of your screen.
- Select the Files app.
- Now, find and select “Downloads”.
- Find the file titled “Screenshot”.
You’ll find a long list of all the screenshots you’ve grabbed recently in this folder. As soon as you find these screenshots, I suggest systematically organizing them. Create folders on your Chromebook and copy-paste screenshots into them.
When saving a screenshot, give it a descriptive name. This will help you find the screenshot you need quickly at first glance. It will also be in your best interest to keep a backup of your screenshots just in case you end up losing Chromebook’s data.
Simply log into your Google Drive, create a dedicated folder for these screenshots, and upload them to that folder.
How to Automatically Sync Chromebook Screenshots to Google Drive
You can also have the screenshots saved to a folder in Google Drive automatically with a few tweaks in your Chrome browser’s settings.
Here’s how you do it:
1. Open your Chrome browser on your Chromebook.
2. Click on the three dots in the top-right corner and select Settings.
3. In Settings, select Downloads as shown in the image below.
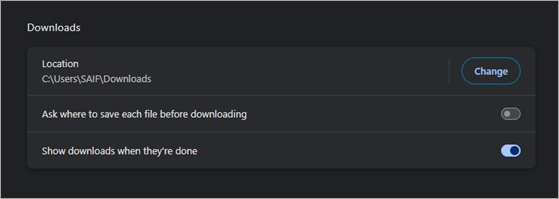
4. Find the Location option and click on “Change”.
5. Select your default location as a folder on Google Drive.
To eliminate any confusion, name this new folder “Screenshots”. Once you finish the configurations, Google Drive will automatically save all of your new screenshots and screen recordings to this folder.
Taking Screenshots on Chromebook in High-Contrast Mode (Accessibility Feature)
All devices let you turn their screen’s display to high-contrast mode. High-Contrast mode is the ideal display mode for people with vision-based disabilities, as it simplifies the colors being portrayed by the UI. This is done to maximize readability for people with low vision and photosensitivity.
High-contrast mode replaces visual elements like gradients, background images, and color schemes with simple outlines and solid fills. If you are someone struggling with conditions like low vision or photosensitivty, it only makes sense to grab a screenshot of your screen’s display on high-contrast mode.
Grabbing screenshots in high-contrast mode can prove especially beneficial for accessibility testing of products. Companies can use such screenshots to understand how a particular software solution performs in the service of users with special needs.
Best Chrome Extensions for Chromebook Screenshots
While I believe that Chromebooks’ built-in screenshot-grabbing capabilities are more than enough to serve your needs, it won’t hurt to keep your options open. As such, I would like to recommend 4 third-party extensions you can also use to conveniently take screenshots on Chromebooks.
#1) Nimbus
Nimbus is a free-to-use utility browser extension that you can use to capture screenshots and record video of your Chromebook’s screen.
The tool also comes with a built-in editor, which you can use to make edits or annotate your captured screenshot image. It is easy to use and can be used for full or partial screen capture.
Website: https://nimbus-screenshot-screen-video-recorder.en.softonic.com/?ex=RAMP-3582.1&rex=true
#2) Lightshot
Lightshot is yet another Chrome extension that I would recommend for just how easy it is to use. With a simple interface to boast, taking a full-screen or partial screenshot is a breeze with this extension.
Once you’ve grabbed a screenshot, you can use Lightshot’s built-in editing tools to edit the image right there and then.
Website: https://chromewebstore.google.com/detail/lightshot-screenshot-tool/mbniclmhobmnbdlbpiphghaielnnpgdp
#3) GoFullPage
GoFullPage is an advanced screen-capturing tool, which I would recommend you use to grab screenshots of complex pages. By complex pages, I am referring to pages with scrollable elements and embedded iframes.
Once this extension is done, when taking a screenshot, you can download the result as an image, a PDF file, or simply drag it to your desktop.
Website: https://chromewebstore.google.com/detail/gofullpage-full-page-scre/fdpohaocaechififmbbbbbknoalclacl
#4) Awesome Screenshot
Like Nimbus, Awesome Screenshot offers you a 2-in-1 tool that can take a static screenshot while also working as a screen recorder. You can use the tool to grab a screenshot with a single click.
You can edit the grabbed screenshot and also share it to multiple destinations directly from Awesome Screenshot’s interface.
Website: https://www.awesomescreenshot.com/
Best Way to Take a Screenshot on Chromebook
Any screenshot you capture should be of high quality. This requires a little more effort on your part than simply tapping on shortcut keys on your Chromebook. If you are interested in capturing the best-looking screenshots every single time, I suggest you adhere to the following guide:
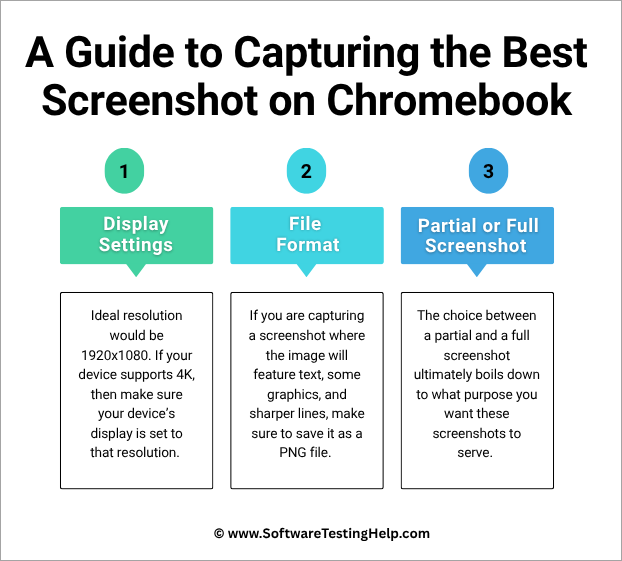
#1) Display Settings That Improve Screenshot Quality on Chromebook
A higher quality screenshot isn’t possible if your screen’s resolution is low. So, the first thing you’ll need to do is set your device to the highest possible resolution. The ideal resolution would be 1920×1080. If your device supports 4K, then make sure your device’s display is set to that resolution.
It is also ideal to scale your screen by 100%. Anything more or less will only affect the visual quality and fidelity of the captured screenshot. Alternatively, you can have the screenshot scaled manually after it has been taken.
It would also be wise to disable visual elements like background images, gradients, and color schemes to get a sharper image that isn’t unnecessarily large.
#2) Screenshot File Formats on Chromebook Explained
If you are capturing a screenshot where the image will feature text, some graphics, and sharper lines, save it as a PNG file. PNG is known for lossless compression. As such, you can expect the result to retain and clearly display all of the image’s original data.
For photographic images, which feature complex color gradients, it is best to save the screenshot as a JPEG file.
PNG files are larger in size, whereas JPEG files are smaller as they are known to eliminate image data to create a smaller file.
#3) Partial vs Full Screenshot on Chromebook – Which Should You Use?
The choice between a partial and a full screenshot ultimately boils down to what purpose you want these screenshots to serve.
Partial screenshots are ideal when you want to capture only a specific portion of your screen. This means only relevant details are covered, and any information you don’t wish to share is cropped out. With a full screenshot, you are capturing the entire window.
A Chromebook Partial Screenshot is ideal when:
- Capturing and sharing precise information.
- Taking a screenshot of an error message for troubleshooting.
- Documenting important information.
- Creating a step-by-step tutorial.
A Chromebook Full Page Screenshot is ideal when:
- Saving important information you don’t want to forget
- Presenting developers with visual evidence of an issue or bug
- Creating visual instructions, tutorials, or guides.
- Saving a particular moment in a video you are watching or a game you are playing.
It is also important to note that a partial screenshot will be smaller in size than a full screenshot. Consider these factors to make an informed decision between the two options.
Chromebook Screenshot Not Working? Try These Fixes
You may encounter unexpected problems when dealing with screenshots on a Chromebook. Maybe you are having trouble saving the screenshot, or perhaps the keyboard shortcuts aren’t working as they should. Whatever the issue, try using the tips below for a quick resolution.
| Problem | Troubleshooting Tips |
| Screenshots Can’t Be Saved | • Free up your storage space • Check your Chromebook’s permissions • Reboot your Chromebook |
| Poor Quality Screenshot | • Check and adjust your display’s resolution • Do not zoom in when taking a screenshot. • Try to use partial screenshots |
| Keyboard Shortcuts Not Functioning | • Use an external keyboard • Update your Chrome OS. • Use the Built-in screen capture tool. |
Chromebook Screenshot – Frequently Asked Questions
1. How do I take a screenshot on a Chromebook without a keyboard?
Well, if you are using a Chromebook with a touchscreen, you’ll need to use the on-screen keyboard to hit the keyboard combos necessary to grab screenshots.
The key combinations will remain the same, which are as follows:
• Ctrl+Show Windows: Full Screen Capture
• Ctrl + Shift + Show Windows: Partial Screen Capture
• Ctrl + Alt + Show Windows: Specific Window Capture.
2. How do I screenshot on a Chromebook and then edit it?
You’ll have the option to edit a screenshot as soon as it’s grabbed. To do this, simply grab the screenshot first.
Once taken, click on the notification that appears to access basic editing features like cropping or annotating the image. You can use third-party video and photo editors to make advanced edits to your screenshot.
3. How can I change where my screenshots are saved on Chromebook?
You can change where screenshots are saved on your Chromebook by using the steps below:
1. Open Screen Capture.
2. Click on Settings => Change Save Locations.
3. Now choose the folder you prefer to save the file.
Chromebook will not use your preferred folder as the default save location.
4. How do I share a screenshot on a Chromebook after taking it?
Chromebook allows its users to share their screenshots via email, messaging apps, and various social media platforms. Click on the notification that appears after you’ve just taken a screenshot.
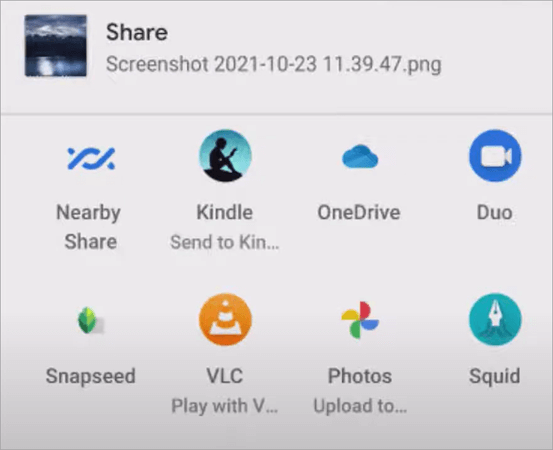
[Via Tech for Senior]
Then, select the “Share” button and select the destination where you want the screenshot shared.
5. Can screenshots be taken in Incognito mode?
There are no restrictions on taking a screenshot in Incognito mode. You can use the methods I’ve discussed above to grab a screenshot even if your Chromebook is in Incognito mode.
6. Is it possible to take a screenshot of a Chromebook’s lock or login screen?
No, Chromebook does not let users take a screenshot of their device’s lock or login screen, citing security reasons.
Final Thoughts on Taking Screenshots on Chromebook
So, there you have it, a set of clear answers to the question – how to do a screenshot on a Chromebook? Taking screenshots is part of using a Chromebook, especially if you are using it for work or communication. Whenever the need arises, know that you can capture a screenshot in no time using the right keystroke combo or the built-in Screen Capture tool.
As more models of Chromebooks get introduced in the market, we might see a new set of features to grab a screenshot on these devices. If that happens, I’ll be ready with another guide comprehensively covering those new techniques.
Meanwhile, I suggest practicing the methods I’ve depicted below. You’ll get used to the process in no time and become a pro at grabbing Chromebook screenshots effortlessly.
Research Process:
The total time involved to complete and publish this article is approximately 36 hours. This content was created through a structured research approach to ensure accuracy and reliability.
For more quick Google-related guides, you can explore our tutorials below:
- How to Get Emojis on a Chromebook with a Shortcut
- How to Split Screen on Chromebook
- How to Open Task Manager on Windows, Mac, and Chromebook
- How To Superscript and Subscript in Google Docs
- How to Change Google Form Header Image Size
- How to Change Background Color on Google Docs
- How to Draw a Radius on Google Maps: A Step-by-Step Guide
- How To Do A Voiceover On Google Slides?
- How To Merge Two Google Calendars
- How to Drop a Pin in Google Maps: Quick Simple Steps
Was this helpful?
Recommended Reading
-

Here is a comprehensive guide that will help you understand the difference between Chromebook Vs. Laptop and understand their pros and cons: Whether you're a student, a professional, or simply someone looking to purchase a new computer, choosing between a Chromebook and a laptop can be challenging. Both devices offer…
-

Quickly access emojis on Chromebook with simple emoji keyboard shortcuts. Learn how to get Emojis on a Chromebook and express yourself with colorful emotions to enhance your Chromebook communication: Chromebooks run on the Chrome operating system, which Google built. Introducing Chromebooks has made it easy for everyone to afford a…
-
This tutorial includes various stepwise methods to explain How to Open Task Manager on Windows, Mac, and Chromebook: Everyone using a computer opens the task manager every now and then. Your PC is slow, you want to close a program that has stopped responding; you want to optimize your system,…
-
This tutorial explains how to do a Voiceover on Google Slides and why Google Slides is your best choice to create presentations: Presentation is considered an effective and efficient way to present data to the audience and make a complex topic easier. Earlier, it was a pretty cumbersome task to…