


This guide explains the differences between public and private repositories while walking you through creating repositories, pushing images, and integrating Jenkins for automated workflows.
Amazon Elastic Container Registry (ECR) is AWS’s managed container registry service designed to store, manage, and deploy Docker images securely.
This guide focuses on the two repository types supported by ECR — public and private — and explains how to create, configure, and use them. You will learn how to build, tag, and push images, and how to integrate Jenkins for automated deployments.
By the end of this tutorial, you will understand the key differences between public and private repositories and know how to set up both in real-world workflows.
If you haven’t already, start with Part 1 of this series to learn the basics of Amazon ECR, including its key features, benefits, and requirements, before moving on to Part 2 of this series – Amazon ECR Public and Private Repository setup.
Table of Contents:
Introduction to Amazon ECR Public and Private Repositories
Amazon Elastic Container Registry (ECR) is a fully managed container registry service from AWS that lets you store, manage, and deploy Docker container images. ECR supports two types of repositories: public and private.
The diagram below shows the workflow:

Public repositories are accessible to anyone on the internet, making them ideal for open-source projects, community sharing, or public distribution of container images. In contrast, private repositories are restricted to specific AWS accounts or IAM users, ensuring that only authorized users can access and deploy the images.
Both repository types support standard Docker workflows, allowing developers to build, tag, and push images using the Docker CLI. The key difference lies in access control and visibility — public repositories offer broad access, while private repositories provide tighter security and governance through IAM policies.
In the sections below, we will walk you through creating both public and private ECR repositories, pushing images, and integrating Jenkins for automated deployments.
Please note: As a prerequisite, we will need the AWS CLI to be installed to authenticate with Amazon ECR, and Docker installed as well on any Linux system (e.g., EC2 VM) with access to the Amazon ECR service.
These instructions for installing AWS CLI are already covered in Part 1 of the series.
Comparison of Amazon ECR Public Repositories vs Private Repositories
| Feature | Amazon ECR Public Repository | Amazon ECR Private Repository |
|---|---|---|
| Visibility | Publicly accessible to anyone | Restricted access within AWS accounts |
| Primary Use Case | Sharing container images publicly | Storing and managing private container images |
| Access Control | No authentication required to pull images | IAM-based authentication and permissions required |
| Security Level | Suitable for non-sensitive images | High security for internal and production workloads |
| Docker Image Push | Requires AWS authentication | Requires AWS authentication |
| Docker Image Pull | Public pull without login | Pull requires authentication |
| Permissions Management | Limited access control | Fine-grained IAM policies supported |
| Best For | Open-source projects, demos, learning | Enterprises, CI/CD pipelines, private apps |
| Pricing Model | Free tier with usage limits | Pay-as-you-go based on storage and data transfer |
| Compliance & Governance | Not ideal for regulated workloads | Suitable for compliance-driven environments |
Amazon ECR Public Repositories
This section deals with the creation of the Amazon ECR Public Repository, along with the ways to build, tag, or push an image in the repository. You will get to know about integrating Jenkins with Amazon ECR in the Public Repository.
Create an Amazon ECR Public Repository
In this section, we will look at how to create an Amazon ECR public repository to store our container images and also build/tag/push the images from a local machine to the Amazon ECR repository. From the AWS services, search for ECR and click on Create to create a public repository.
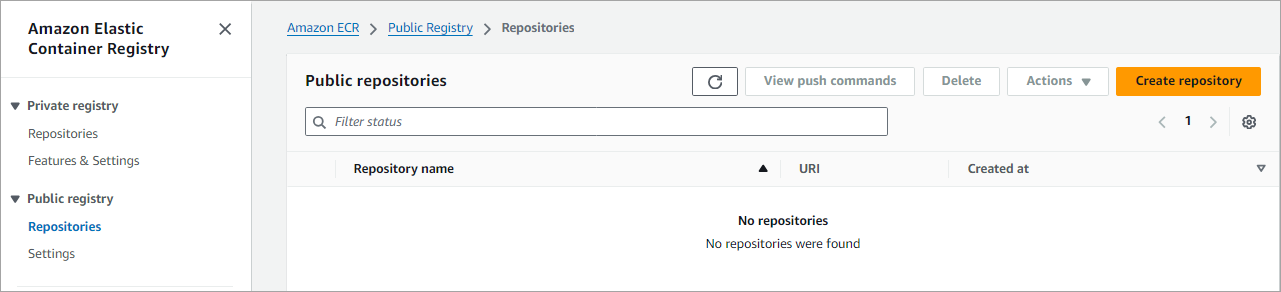
From the left navigation pane, choose Repositories under Public registry. Click on Create repository
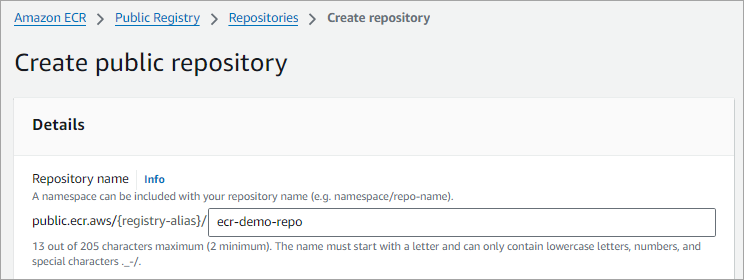
Enter a name in lowercase and click on Create.
Build, Tag, and Push an Image to a Public Repository
Once the repository is created, click on View push commands, which will provide you with commands to log in, build, tag, and push the image to your ECR repository just created, as shown below.

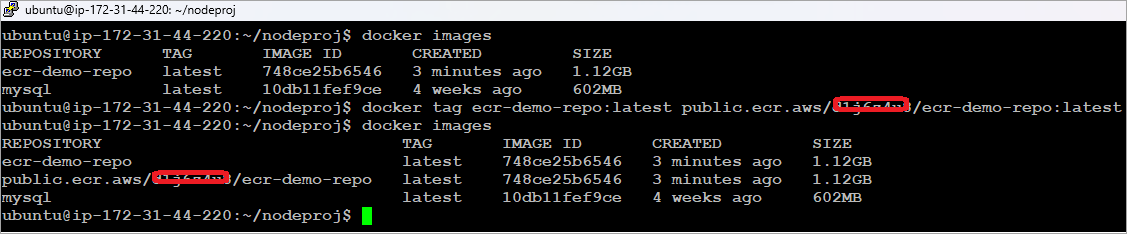
The complete URI for the repository is public.ecr.aws/{Default_Registry_Alias}/ecr-demo-repo
Note: Public repositories do not need any AWS account or IAM credentials to pull images
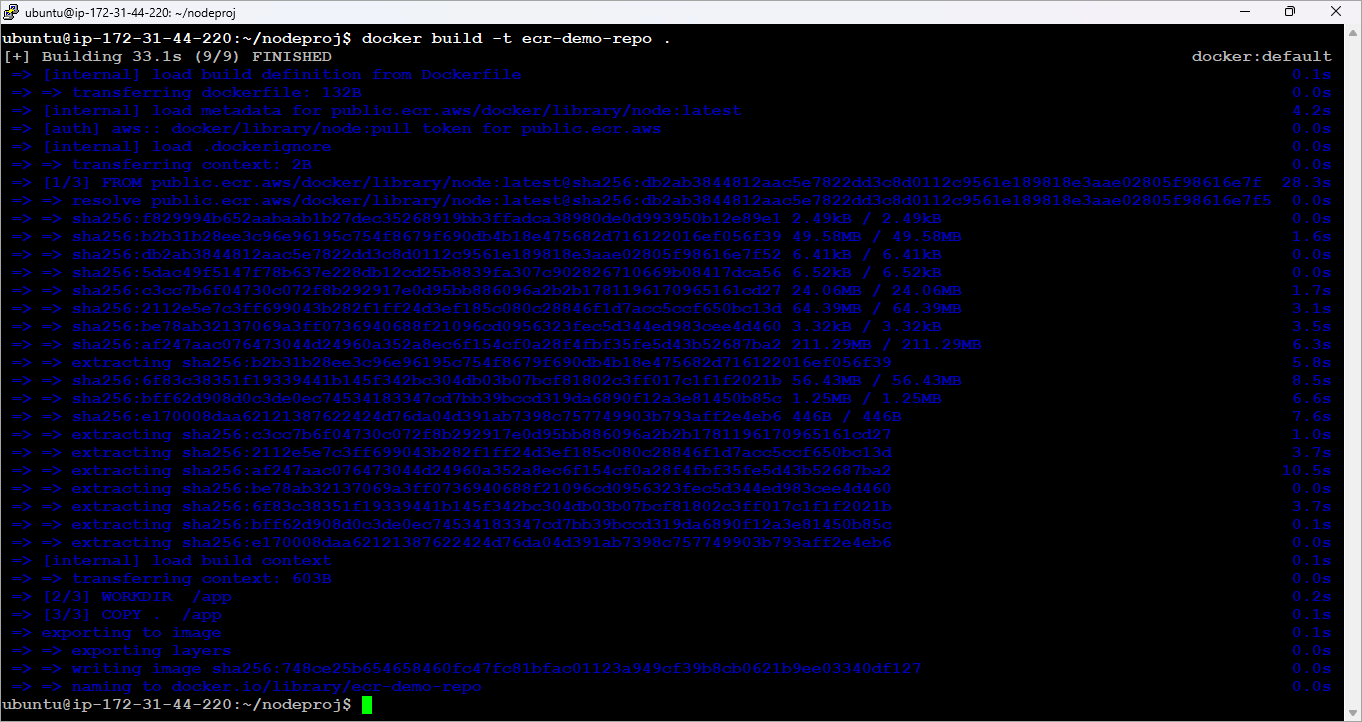
Run the commands as shown from the folder where the Dockerfile is stored to log in, build, and push the image.
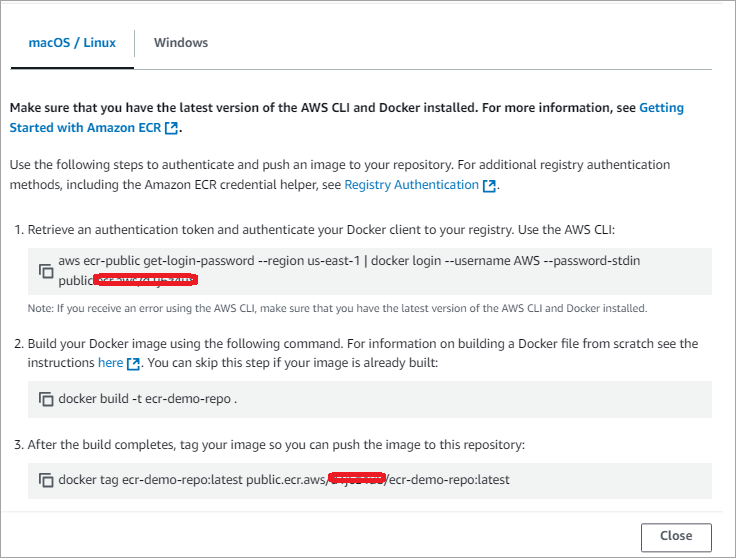
Run the login command first and build the image as shown with the command below.
Tag the image as shown below.
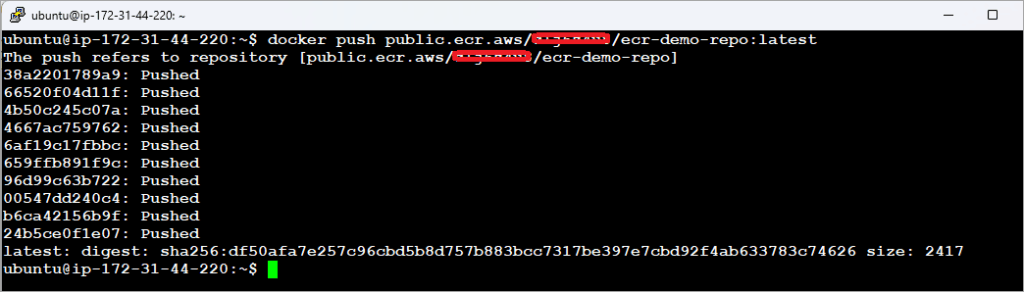
Push the Docker image to the Amazon ECR public repository as depicted in the image.
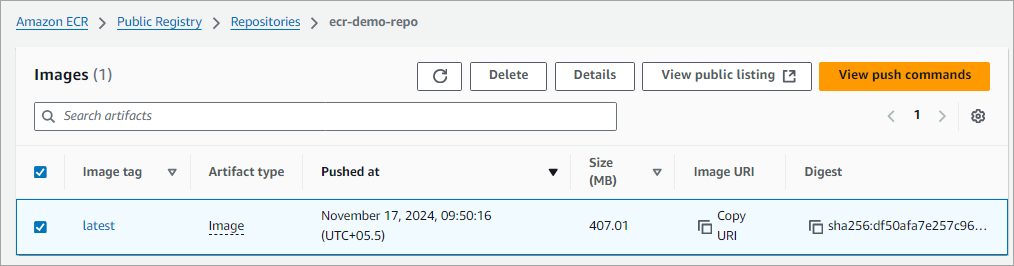
The image is now pushed to the repository. Click on the repository to view the images.
Integrate Jenkins With Amazon ECR (Public Repository)
In this section, we will see how to integrate Jenkins with Amazon ECR to automate the above manual steps of Docker image build and push to the ECR public repository.
We will look at the following steps:
- Install Docker/Amazon ECR Jenkins plugin.
- Set up Jenkins slave node on AWS EC2 VM (Ubuntu).
- Create a freestyle Jenkins pipeline to build, tag, and push a Docker image to a public repo.
Step 1: Install Docker/Amazon ECR Jenkins plugin.
Download and install the plugins as an admin user.

Step 2: Set up Jenkins slave node on AWS EC2 VM (Ubuntu)
I am using a Jenkins master server running on a Windows machine, which manages the job pipelines, and a slave is on an EC2 VM running Ubuntu, where Docker is installed, and the build command will be run through the jobs submitted to the master server.

Let’s look at how to create the slave node on the AWS EC2 VM.
Log in to the Jenkins MASTER machine and create an SSH key pair. Use the command below to create the key pair.
C:\Users\ADMIN> ssh-keygen
C:\Users\ADMIN> type .ssh\id_rsa.pub
Copy the content of the above command and log in to the slave node (EC2 Ubuntu VM). Add the copied content to the authorized_keys file.
# vi .ssh/authorized_keys
From the Jenkins master machine (Windows) ssh to the slave node using the below command. It will ask to accept the ssh fingerprint. Type yes and enter. You should now be able to ssh into the slave node using the command below.
ssh userid@EC2VM-IP-Address
Useridis‘ubuntu’ for EC2 VM running Ubuntu.
Step 3: Create a new Slave Node
Go to Manage Jenkins 🡪 Manage nodes
Click on + New Node and select Permanent Agent. Add the details below.
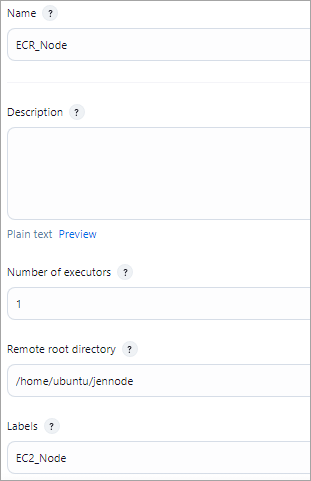
Add the host IP of the slave machine (EC2 VM) and add credentials.
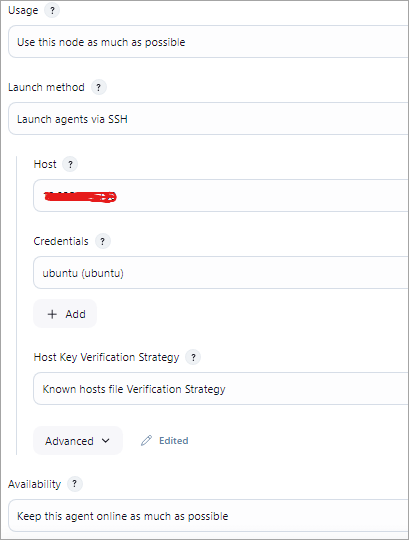
For credentials, select the + Add 🡪Jenkins, and the Kind of credential should be “SSH Username with private key”. Add the details below of username and private key contents.
Username is ubuntu, which is the login of the AWS EC2 VM. In the private key field, add the Jenkins master’s machine private key. You can find the private key in ~/.ssh/id_rsa file.
E.g. If Jenkins Master is in Windows, here is the file in C:\users\<UserName>\.ssh\id_rsa
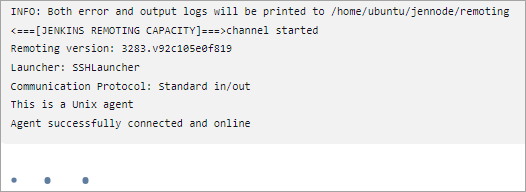
Click on Save, and you should see the agent connected successfully.
Step 4: Create a Jenkins pipeline, a freestyle job
The Jenkins pipeline will contain the following steps:
- Select the slave node (in this case, it is the EC2 VM) for the pipeline to run
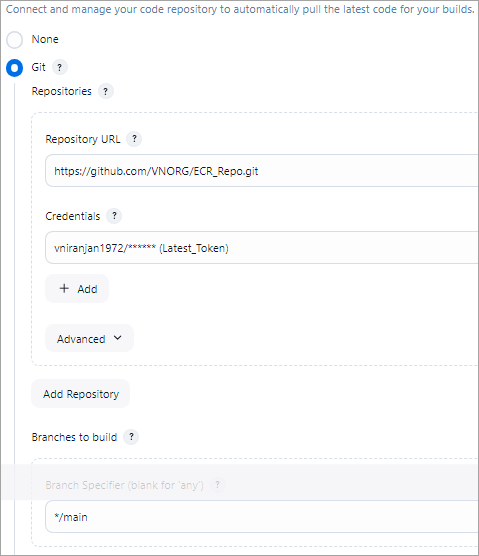
- Jenkins Source Code Management to get the latest code changes from the GitHub repository.
- Setup environment variables
- REGISTRY_ALIAS={Value as shown during public repository creation}
- URL_REGISTRY = public.ecr.aws/(REGISTRY_ALIAS)
- REGION= As shown in section 7, with the login command
- Build the Docker image using ${BUILD_NUMBER} as the tag to version the image using the Docker plugin.
- Push the Docker image to the Amazon ECR public repository.
Select the slave node under the General TAB in the job.

Source Code Management Step with GitHub credentials and using the main branch.
Setup Environment variables
Use the Mask passwords option to set up the variables (REGISTRY_ALIAS, URL_ REGISTRY, and REGION) as described at the beginning of the step. If this plugin is not installed, then install it.

Docker Build and Push to Amazon ECR repository as part of Build Step
Use the commands below to build, tag, and push the Docker image to the Amazon ECR repository.
Build Step 1 🡪 Execute Shell
Login step to Amazon ECR: This command is shown in section 7 for the ECR repository. Modify the command to use the environment variables defined.

Build Step 2 🡪 Docker Build and Publish
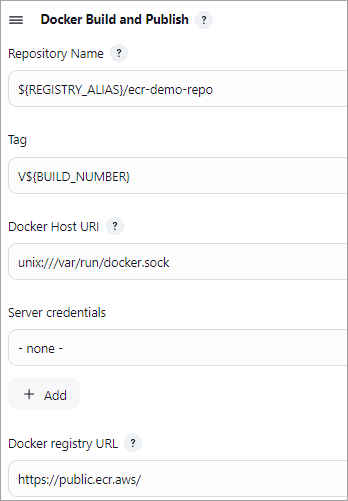
No other details need to be entered. Save the Jenkins Job.
Run the Jenkins job
Look at the Jenkins job console output, and all the commands should have run successfully.

Browse the URL https://gallery.ecr.aws/REGISTRY_ALIAS/ecr-demo-repo, and you should see the latest version of the Docker image pushed to the ECR repository.
Also, look at the ECR public repository listing to view the latest version pushed.
Amazon ECR Private Repositories
This section deals with the creation of an Amazon ECR Private Repository, along with the ways to build, tag, or push an image in the repository. You will get to know about the integration of Jenkins with Amazon ECR in the Private Repository.
Create an Amazon ECR Private Repository
In this section, we will look at how to create an Amazon ECR Private Repository using the console to store our Docker images and set appropriate permissions for accessing the repositories.
You can use a private registry to manage private repositories that comprise Docker images. An Amazon ECR private repository is isolated from public registries and is accessible only to the AWS account of the developer or to certain authorized users.
By default, your Amazon account would have read and write privileges to the repositories in the default registry, which is aws_account_id.dkr.ecr.your-region.amazonaws.com. But users will need permissions to push and pull images to/from the repository.
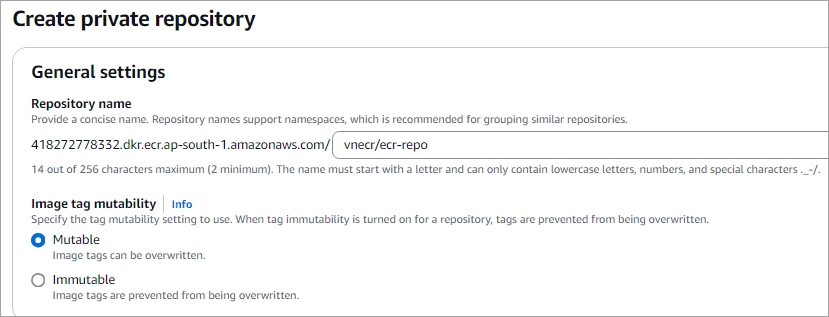
To create a private repository, go to the ECR console and click on Create repository under Private registry -> Repositories

Enter a name in the format namespace/repo-name
Namespace can be your project name. Click on Create.
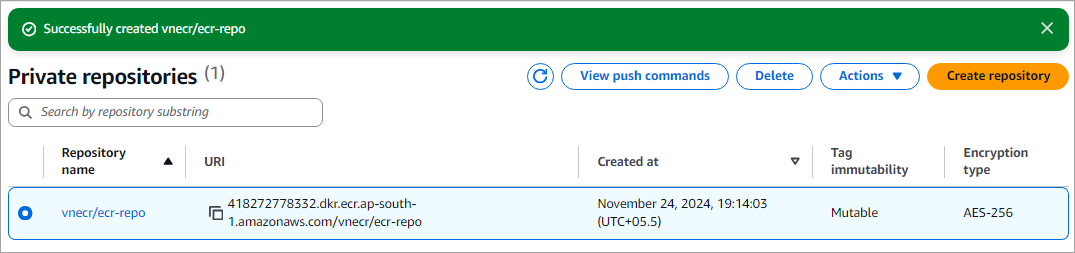
Repository is now listed.
Build, Tag, and Push an Image to a Private Repository
Select the repository and click on View push commands to view the commands for login/build/tag/push image to the private repository.
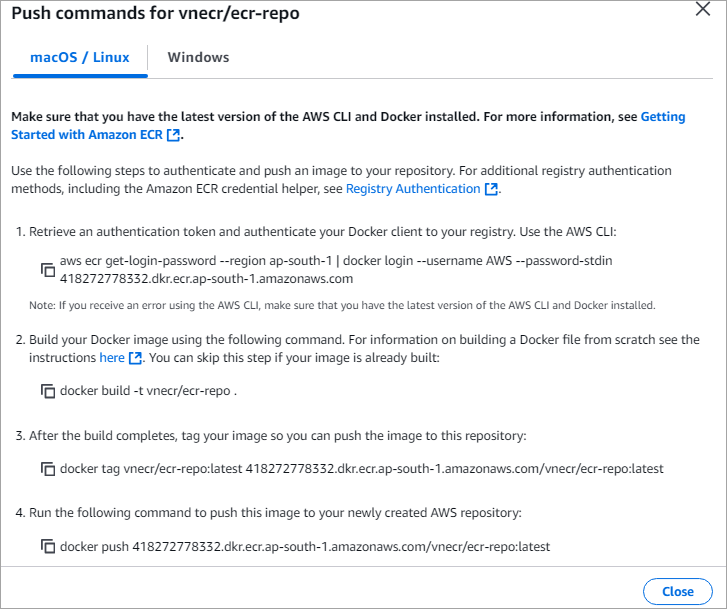
Run the above commands from the folder where the Dockerfile is stored. Before running the above commands, attach the AmazonEC2ContainerRegistryFullAccess policy to the IAM role created in section 4.

Step 1: Authenticate to your repository

Step 2: Build Docker Image
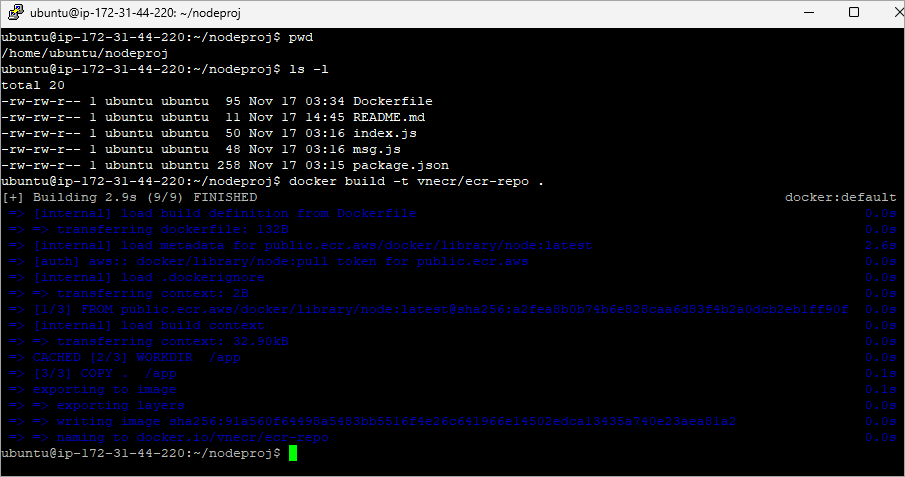
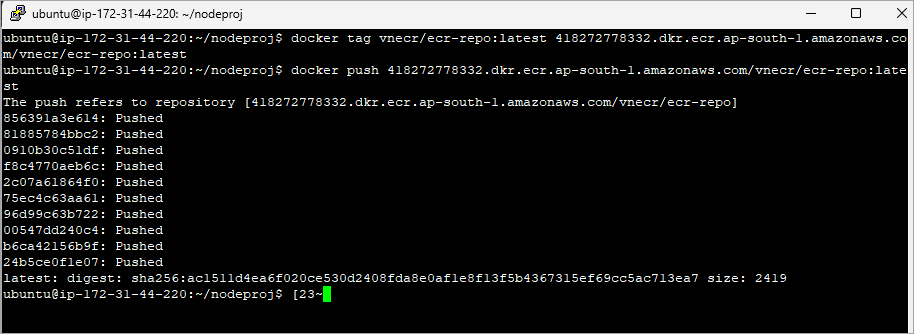
Step 3: Tag and push your image to the repository.
Integrate Jenkins with Amazon ECR (Private Repository)
In this section, we will see how to integrate Jenkins with Amazon ECR to automate the above manual steps of Docker image build and push to the ECR private repository.
We will look at the following steps:
- Use the Jenkins slave node on AWS EC2 VM (Ubuntu) created in section 3
- Create a freestyle Jenkins pipeline to build, tag, and push a Docker image to a private repo
As described in section 3, select the node for the job to be run and also configure the SCM step.
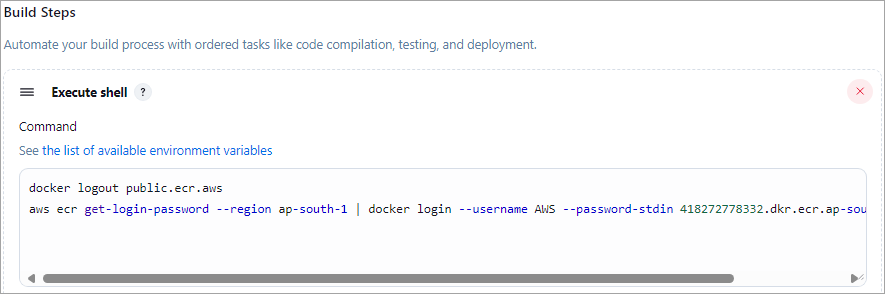
Build Step 1 🡪 Execute shell
The first command will log out of the Amazon ECR Public if there was a previous authentication, and will result in an unauthenticated pull of images from the Amazon ECR public gallery.
The second command will log in to the Amazon ECR private registry as per the view push command listing for the private repository shown in the previous section.
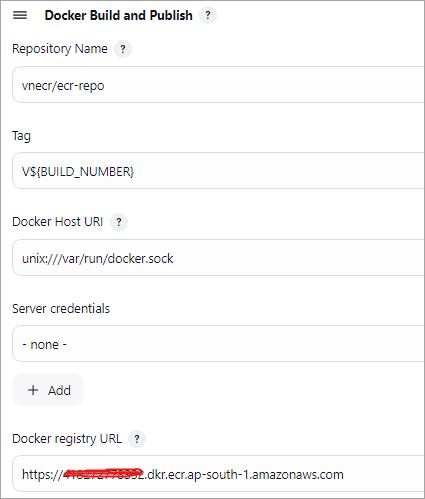
Build Step 2 🡪 Docker Build and Publish
Configure the step as shown using the details of the private repository created.
Save the job, run the Jenkins job. Look at the Jenkins job console output, and all the commands should have run successfully.

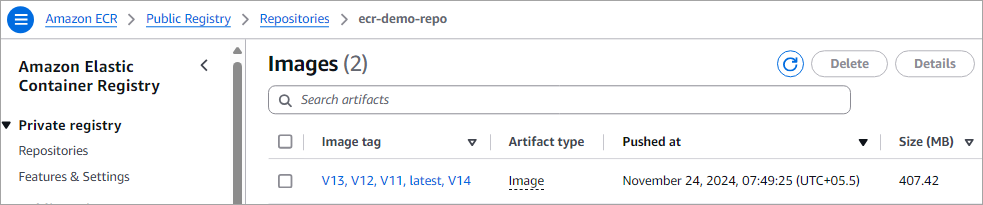
Look at the Amazon ECR Private repository to verify if the Docker image is pushed.

Conclusion
In this tutorial, we have seen how Amazon ECR is easy to implement to push container images and pull images without using any tools or utilities.
We also looked at how to automate the Docker Build and Publish of the images to Amazon ECR public and private repositories using Jenkins, which is probably the way developers should work, or, for that matter, use any other CI/CD tool to automate manual steps, which is very much essential for modern-day development and deployment.
In the last part 3 of the series, we will look at the security aspect of Docker images and also integration789 with another CI/CD tool, GitHub Actions.
Research Process
We have put together this guide using official AWS Elastic Container Registry documentation along with hands-on review of real-world use cases.
We have carefully considered the common tasks like creating repositories, pushing and pulling Docker images, managing access, and comparing public and private repositories by features, to keep the information practical and reliable.
Total Time Taken to research and publish this Guide: 30 Hours (Approx)
For more quick Amazon ECR-related guides, you can explore our range of tutorials below:
- Managing Private Repositories – GitHub
- GitHub Projects, Teams, Fork & Wiki For Documenting Projects
- Jenkins with Docker, Docker-Compose & Docker Swarm TUTORIAL
- What are GitHub Packages: Code and Packages in One Place
- Docker Tutorial: Installation And Introduction To Docker
- TOP 30 AWS Interview Questions and Answers
- Best AWS DevOps Tools for Cloud Build and Deployment
Was this helpful?
Recommended Reading
-

This Step By Step Docker Tutorial Explains What Is Docker, It's Installation And Terminology Used With Like Docker Container, Docker Build, Docker Hub, etc.: Docker is a containerization open-source platform that automates the deployment of applications inside containers. Let's look at it from the point of view of loading and…
-

This tutorial will give you a complete understanding of Jenkins Integration with Docker, Docker-Compose, and Docker Swarm with simple examples: Jenkins is an open-source automated CI/CD software for DevOps that enables developers to build, test and deploy their software. Docker is an open platform to create, run and deploy applications…
-
Read this in-depth review and comparison between Kubernetes Vs Docker used to build, deliver, and scale containerized applications: In a recent survey, the Cloud Native Computing Foundation (CNCF) figured out that 84% of the total respondents in question were using Docker and Kubernetes in their production environment by 2019. Naturally,…
-
Get to know what is docker compose and explore all about Docker Compose Volumes to learn how to manage multiple containers on a single host with examples: Docker is an open-source platform used to build, test, and deploy applications. Docker helps to package the software into units called containers which…


