Get ready to explore the most important aspect of Jira issues – Workflow Customization & Management. Here is a complete guide on Jira Cloud Workflow customization with pictorial representations:
This tutorial plays a key role in the Jira Cloud Administration Series. As every Jira project contains issues that users work on, it contains transitions through different stages. This is called a workflow, which we will see more about it in this article.
Normally, users work on issues that contain workflow and it consists of status and transitions that each issue will go through. As an example, here we will look at how to create a workflow and assign it only to the Story issue.
Table of Contents:
- Jira Cloud Workflows Customization: Detailed Guide
- Create a New Workflow
- Workflow Example 1: Close Parent Issue Only if Sub-tasks are Closed
- Workflow Example 2: Users in Groups Can Perform Certain Transitions
- Workflow Example 3: Make a Custom Field Mandatory During the Transition
- Workflow Example 4: Display a Screen During the Transition
- Workflow Example 5: Update the Assignee Field on the Transition to Done
- Workflow Example 6: Workflow Transition and Status Properties
- Conclusion
Jira Cloud Workflows Customization: Detailed Guide
Create a New Workflow
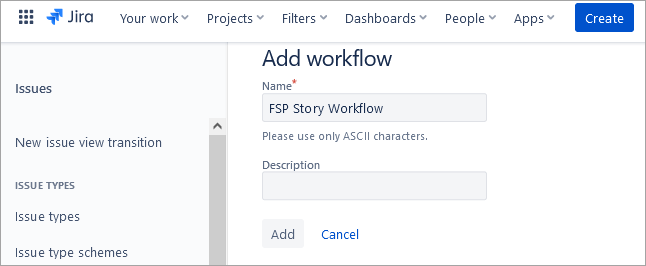
To create a workflow, go to Settings -> Issues -> Workflows

Click on Add Workflow -> Create new

Provide a name and click on Add.
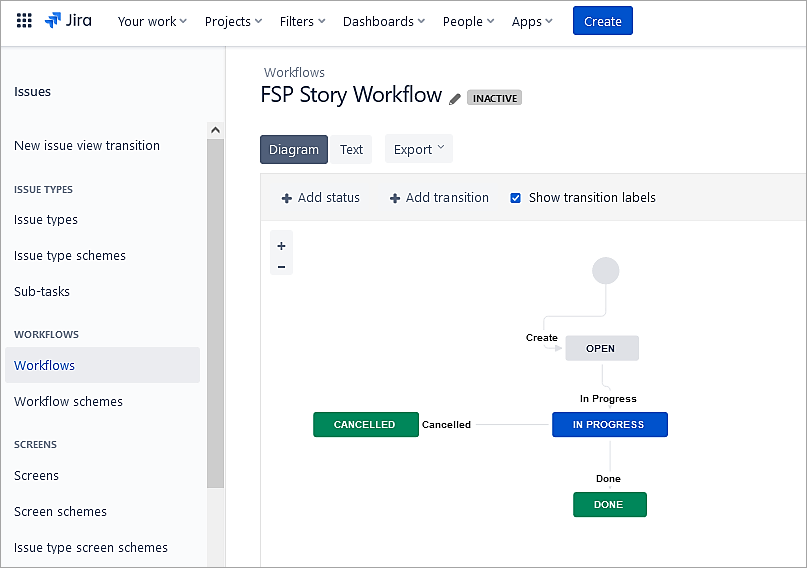
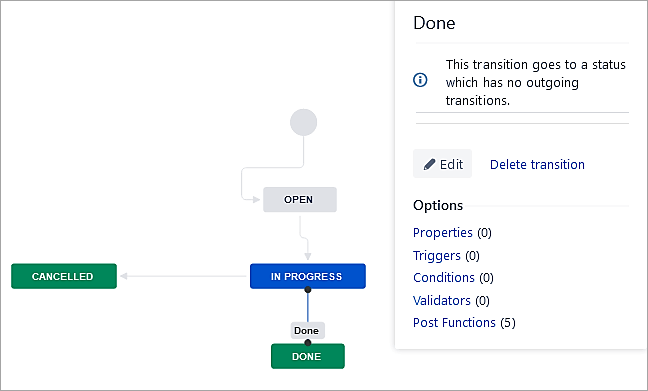
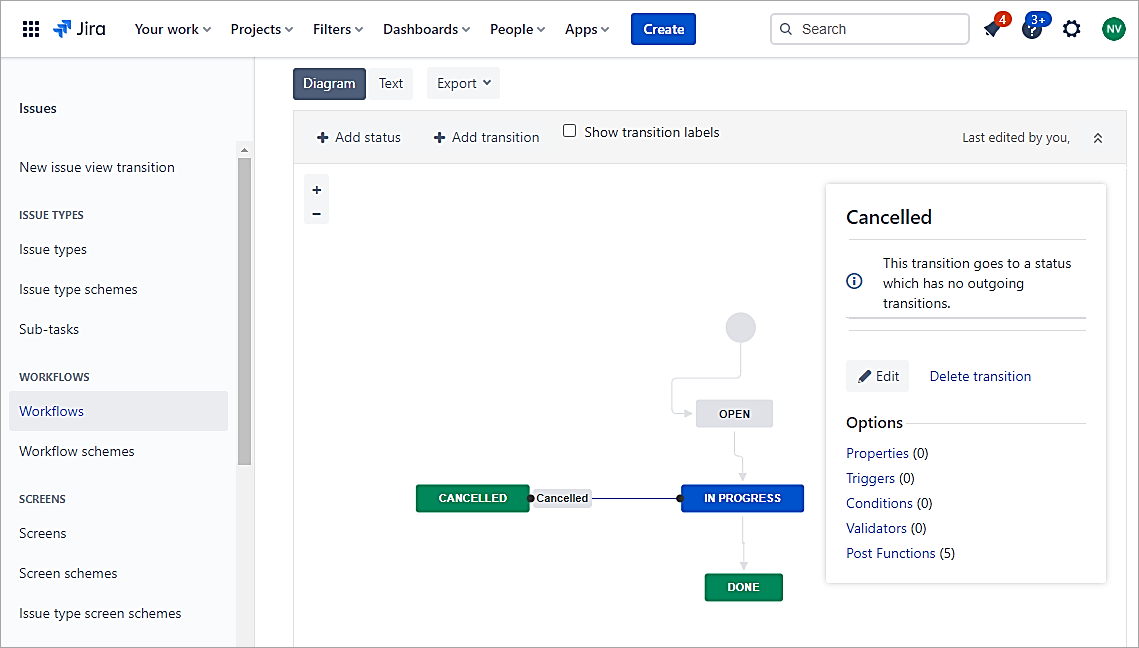
Click on Add status. If the status exists, use them else it will ask to create a new status. Add transitions as well.

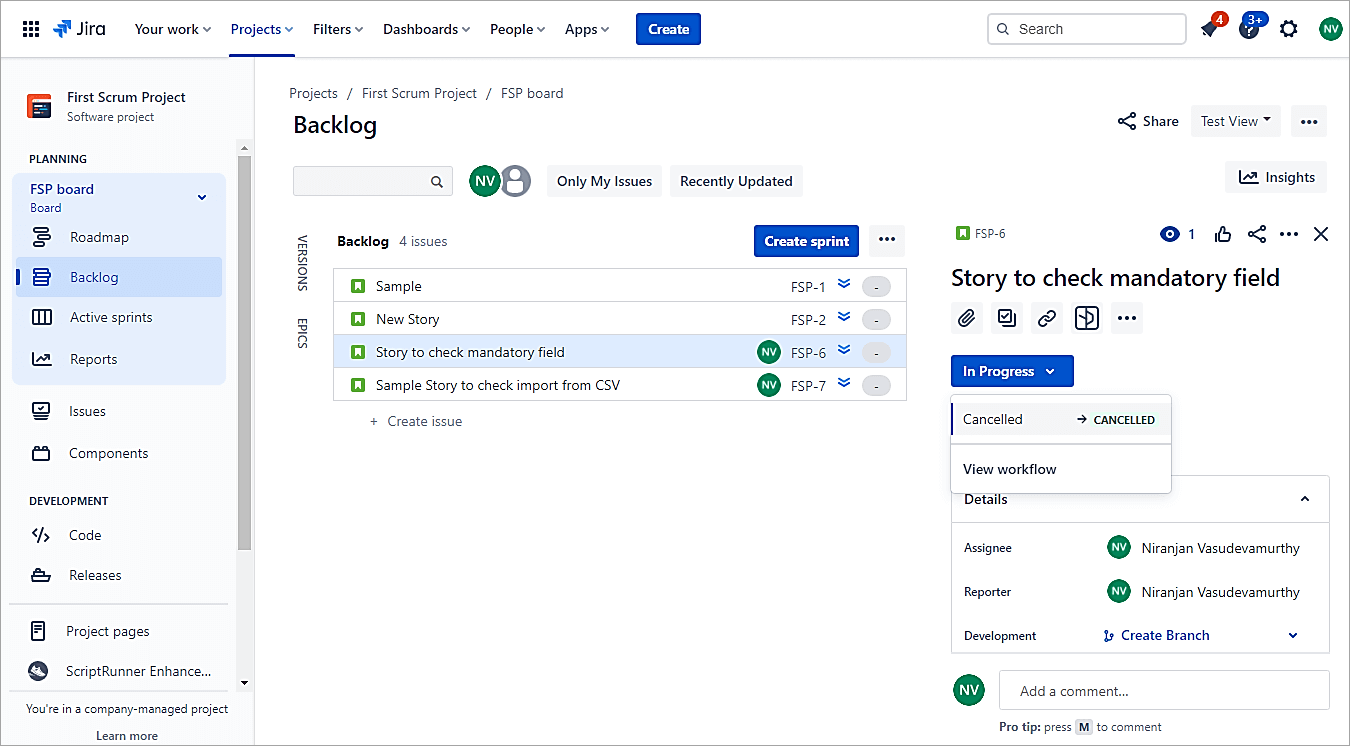
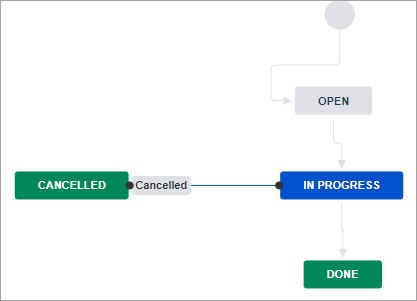
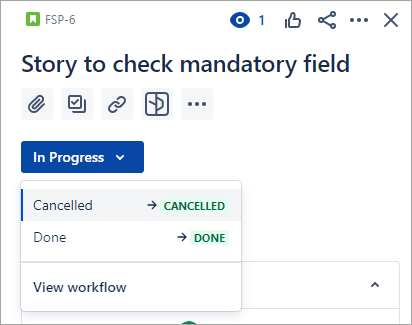
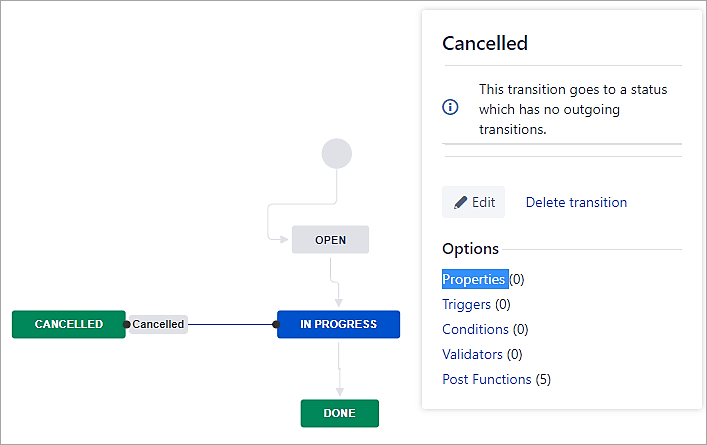
Add a new status called Cancelled and a transition from In Progress to Cancelled.
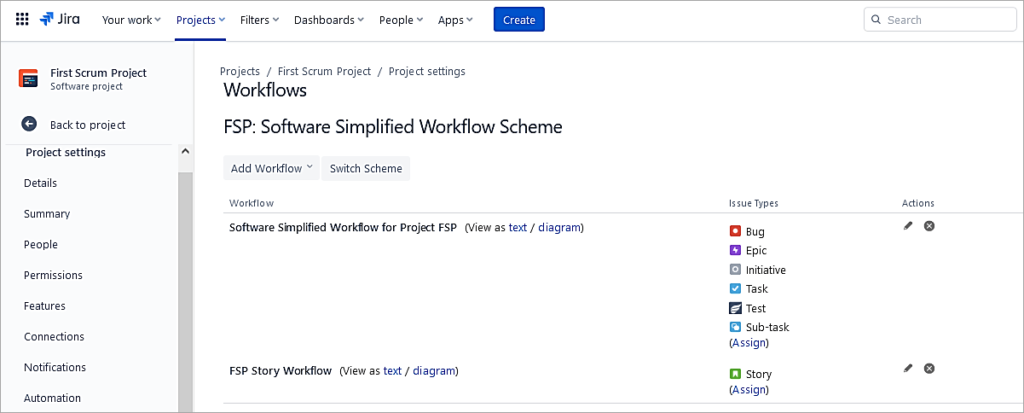
To apply this workflow to the Story issue type, go to Project settings -> Workflows.
Select Add Workflow -> Add Existing.
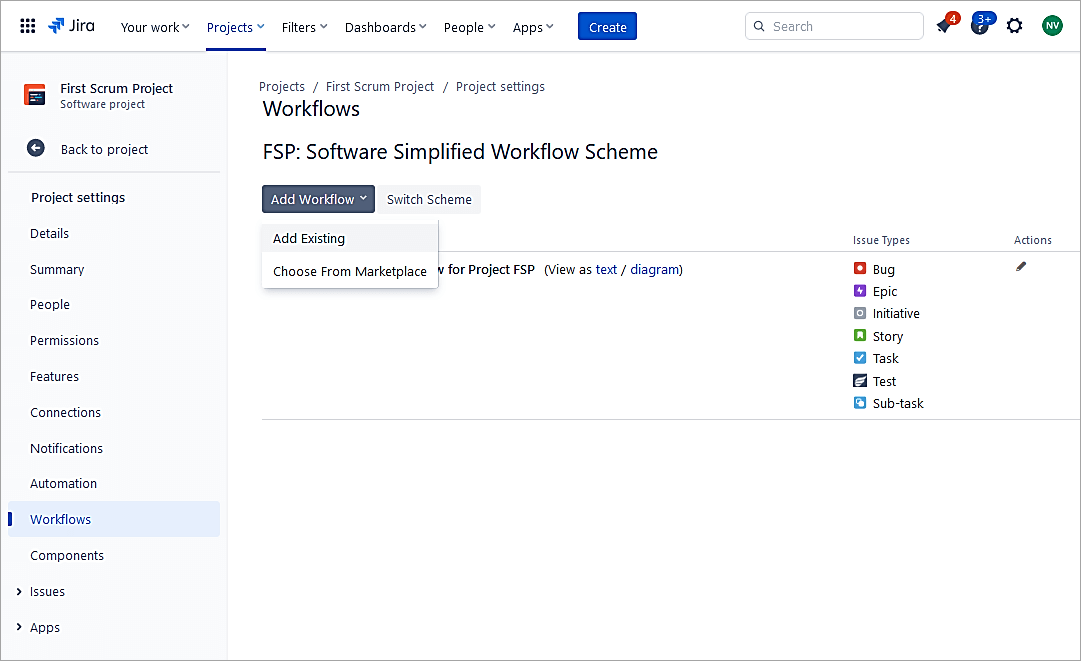
Select the workflow just created.
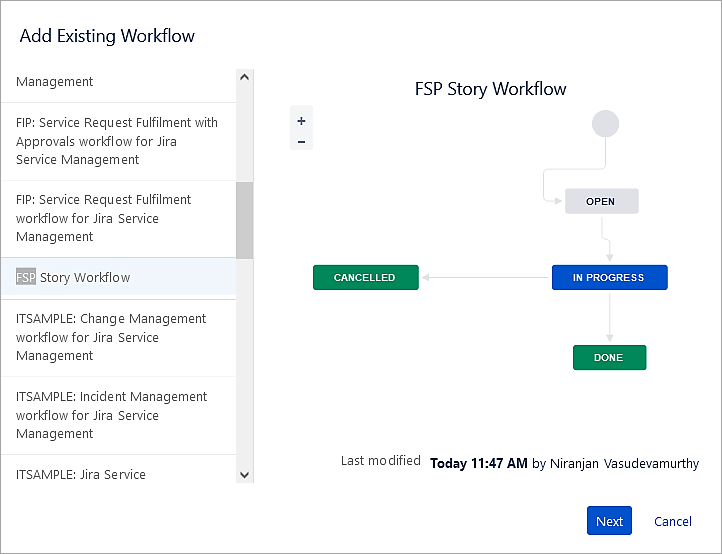
Click Next.
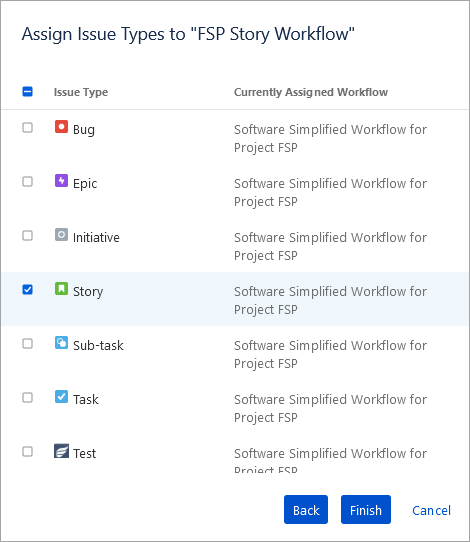
Select the Story issue and click on Finish
Click on Publish.
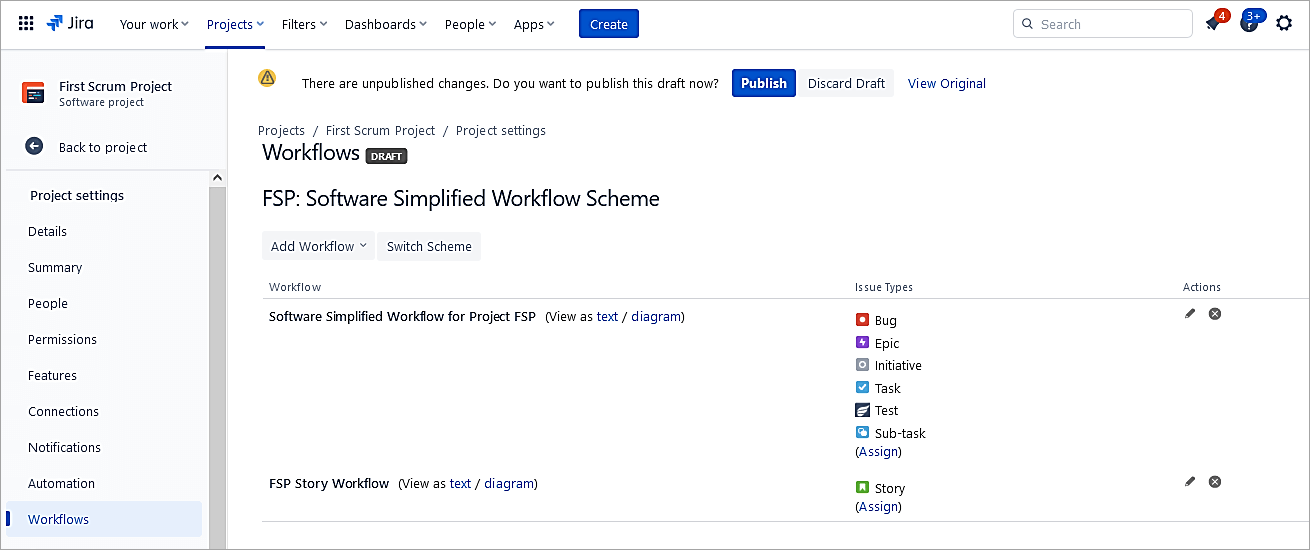
Click on Associate to ensure compatibility of existing issues with the new workflow.
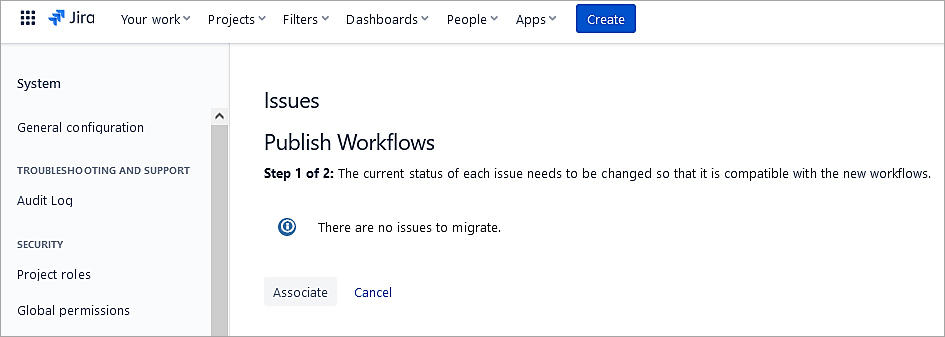
Final view.
New and any existing Story issues will use this workflow.
As a Jira Administrator in the workflow transition, we can add the below aspects:
- Conditions
- Validator
- Trigger
- Post function
- Properties
In the next section, we will look at some examples of this.
Suggested Read =>> JIRA Administration and User Management Tutorial
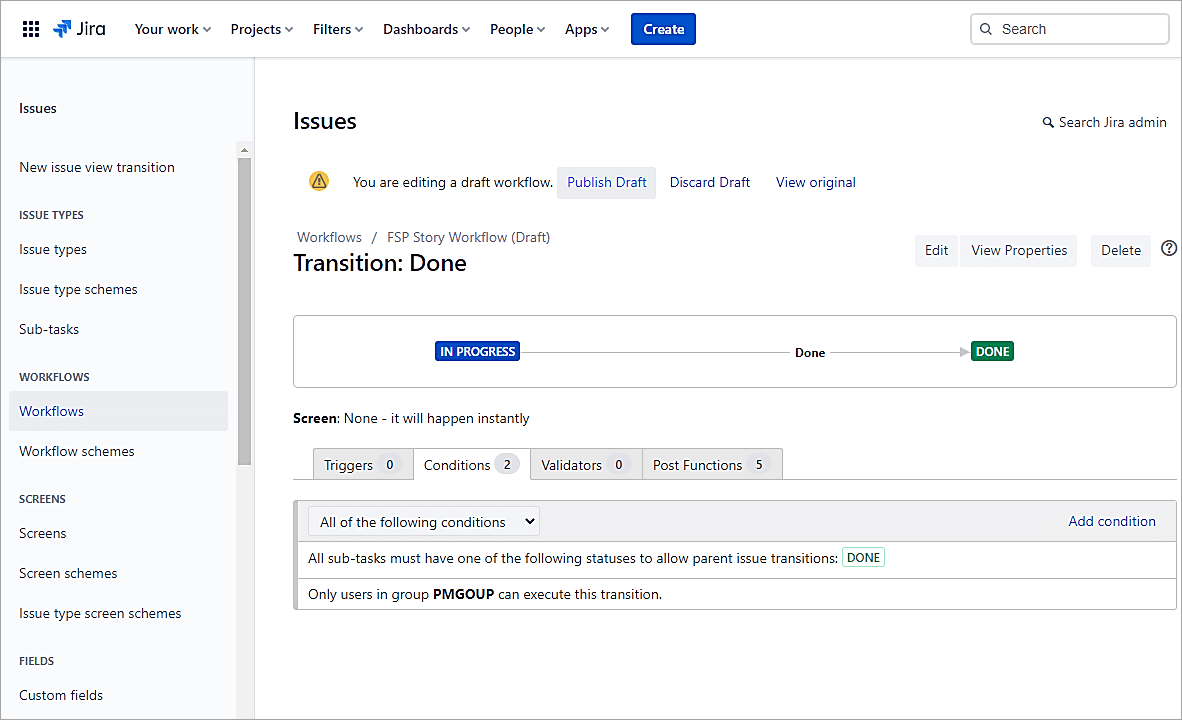
Workflow Example 1: Close Parent Issue Only if Sub-tasks are Closed
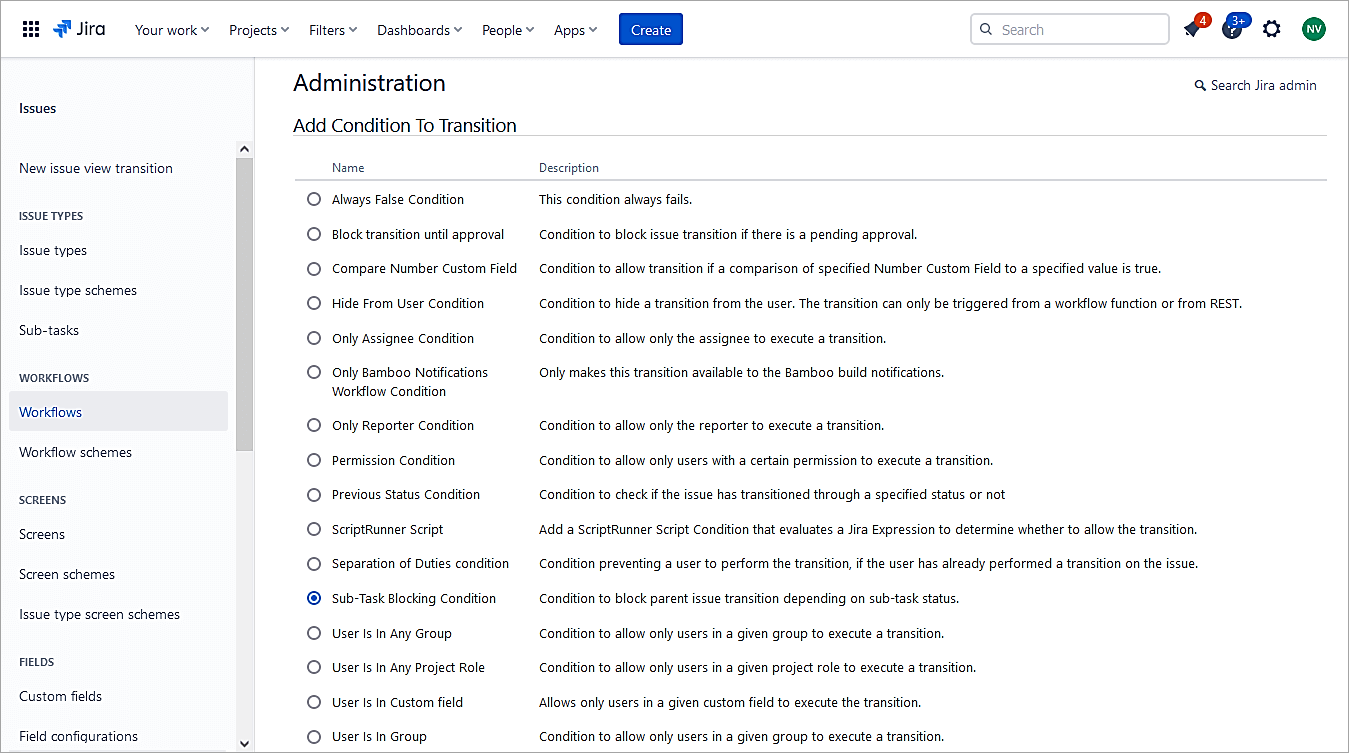
A Condition in Jira workflow controls whether or not a user can execute a transition.
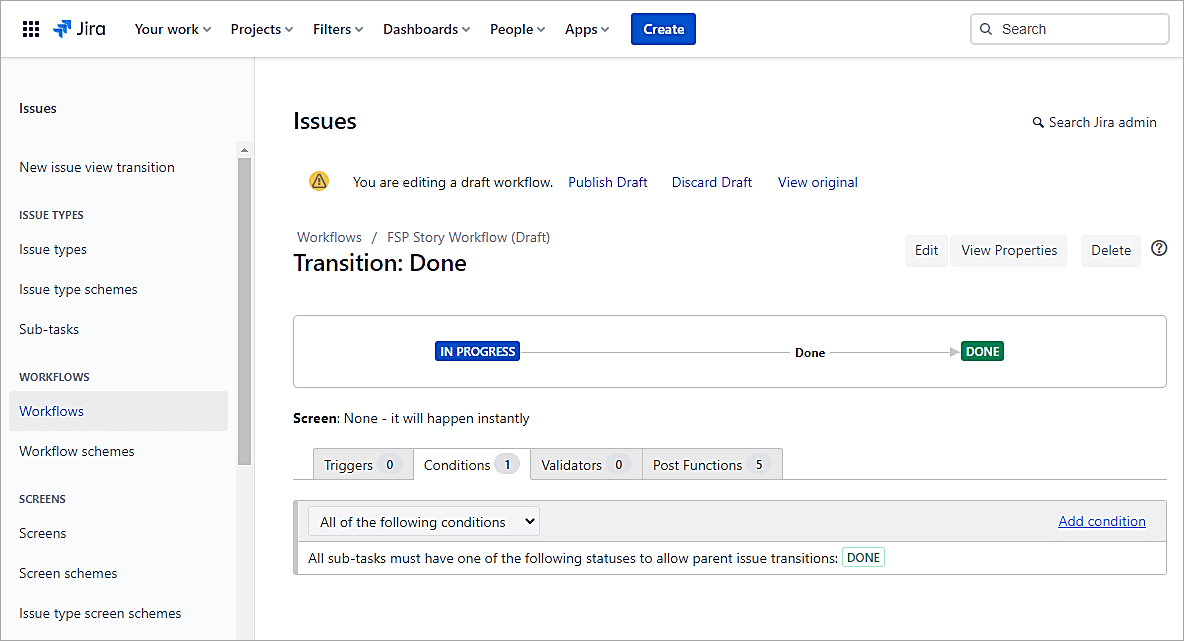
So, let’s add a condition for the Done transition in the Story workflow. Click on the Done transition and select Conditions.
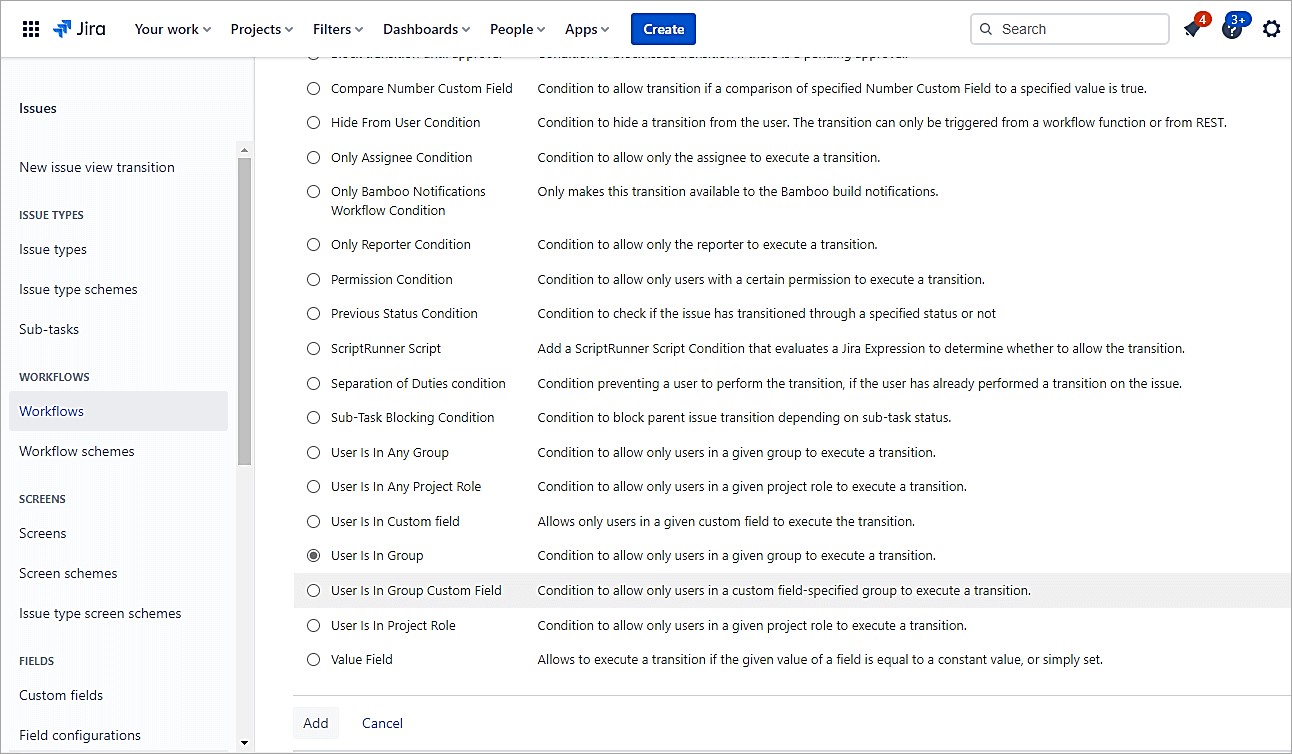
Click on Add condition.

Select the Sub-task Blocking Condition radio button. Click on Add.
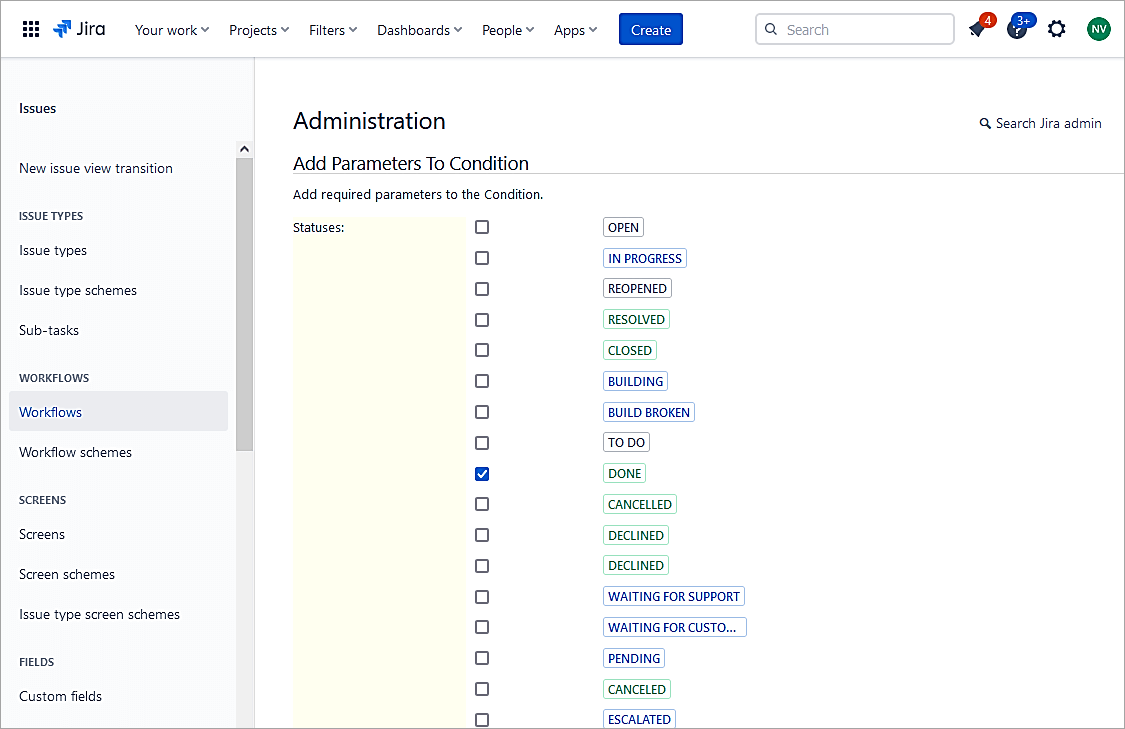
Select the sub-task status of Done to allow for parent issues to transition.
Recommended Reading =>> Most Frequently Asked JIRA Interview Questions and Answers
Click on Add once selected.
Click on the Publish Draft.

To test the condition in the example below, you can see that the Story issue cannot transition to Done status unless the Sub-task is in the Done state.
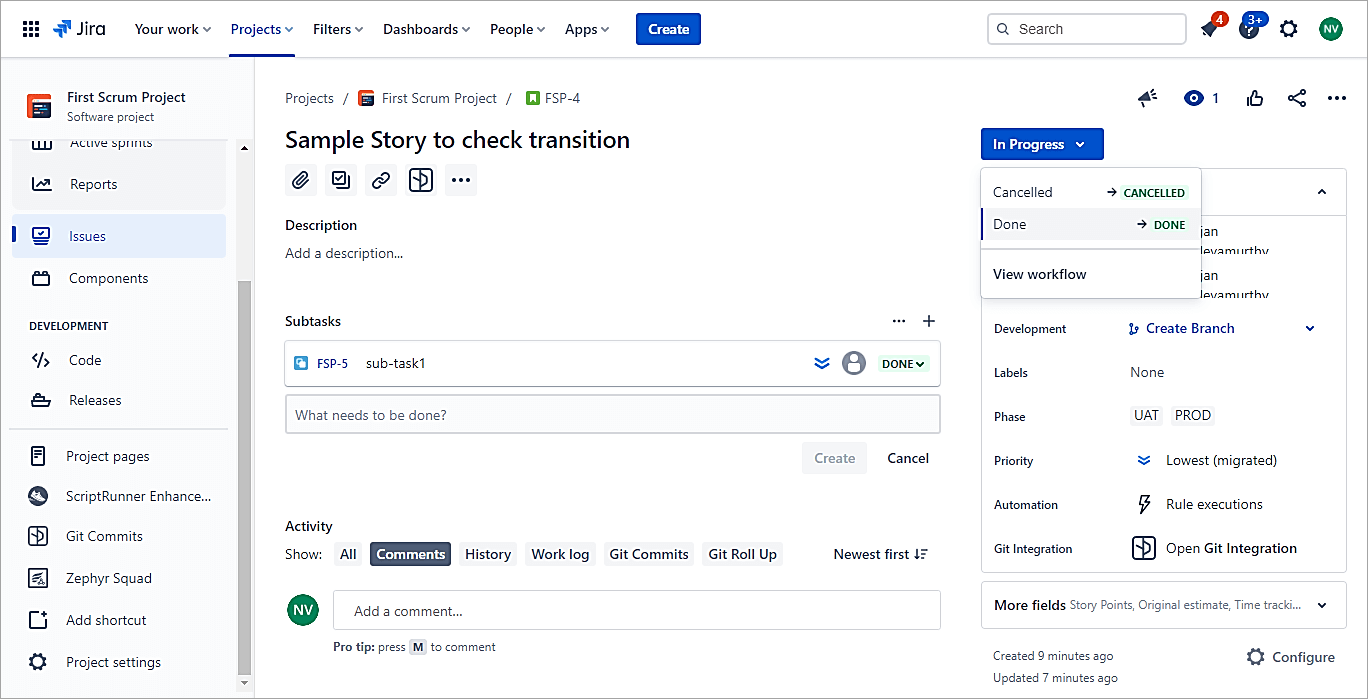
Once the sub-task status is in Done state, then the Story can be transitioned to Done status.
Workflow Example 2: Users in Groups Can Perform Certain Transitions
We will add a Jira workflow condition to ensure that only users in groups can perform certain transitions.
Open the workflow, select the transition for the Done status and add a condition.
Select the User in group option and click on Add.
Select the group and click on Add.

Publish Draft
As any other user other than the one in the group, the DONE option will not be seen.
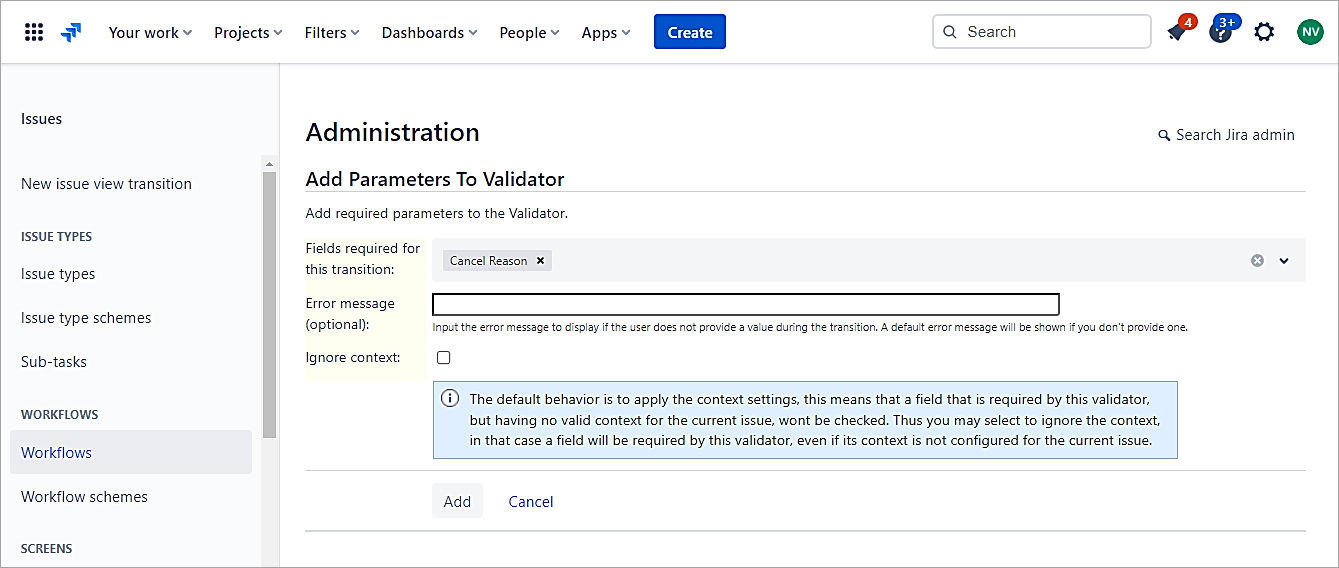
Workflow Example 3: Make a Custom Field Mandatory During the Transition
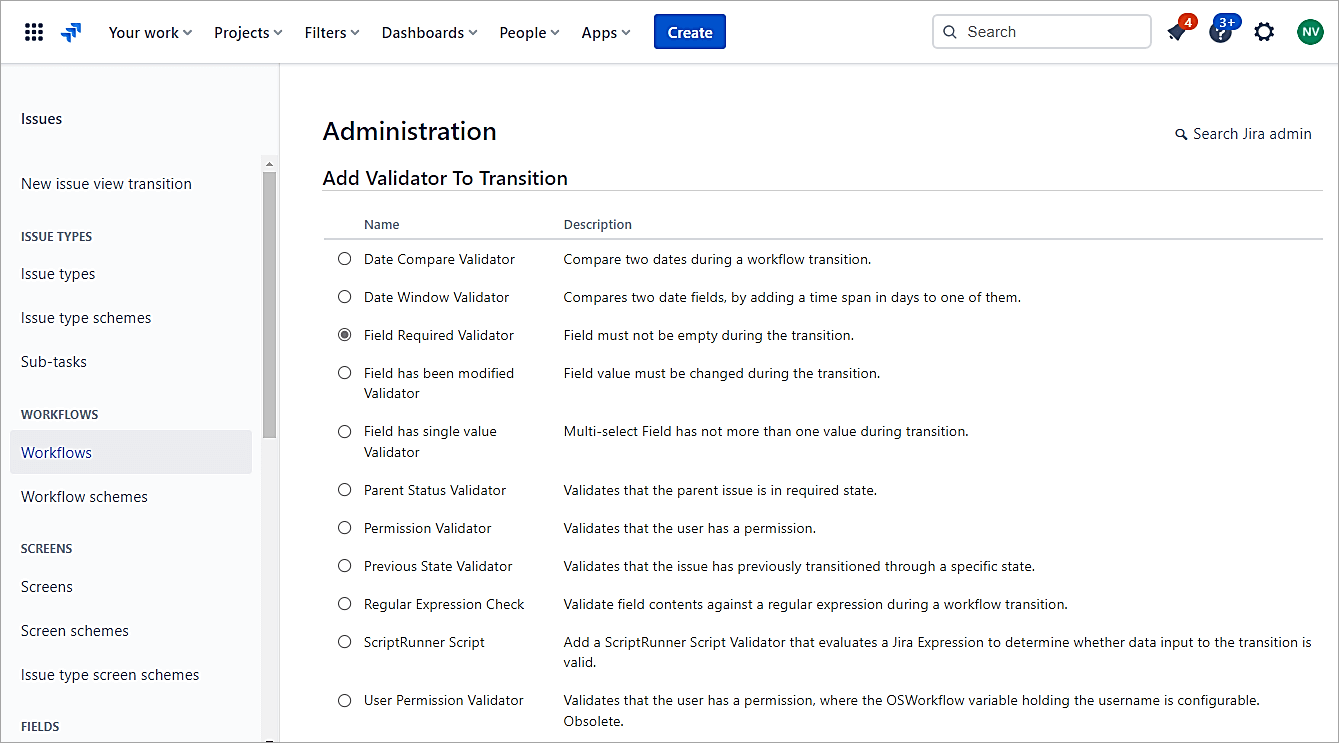
A Jira validator checks that any input made during the transition is valid.
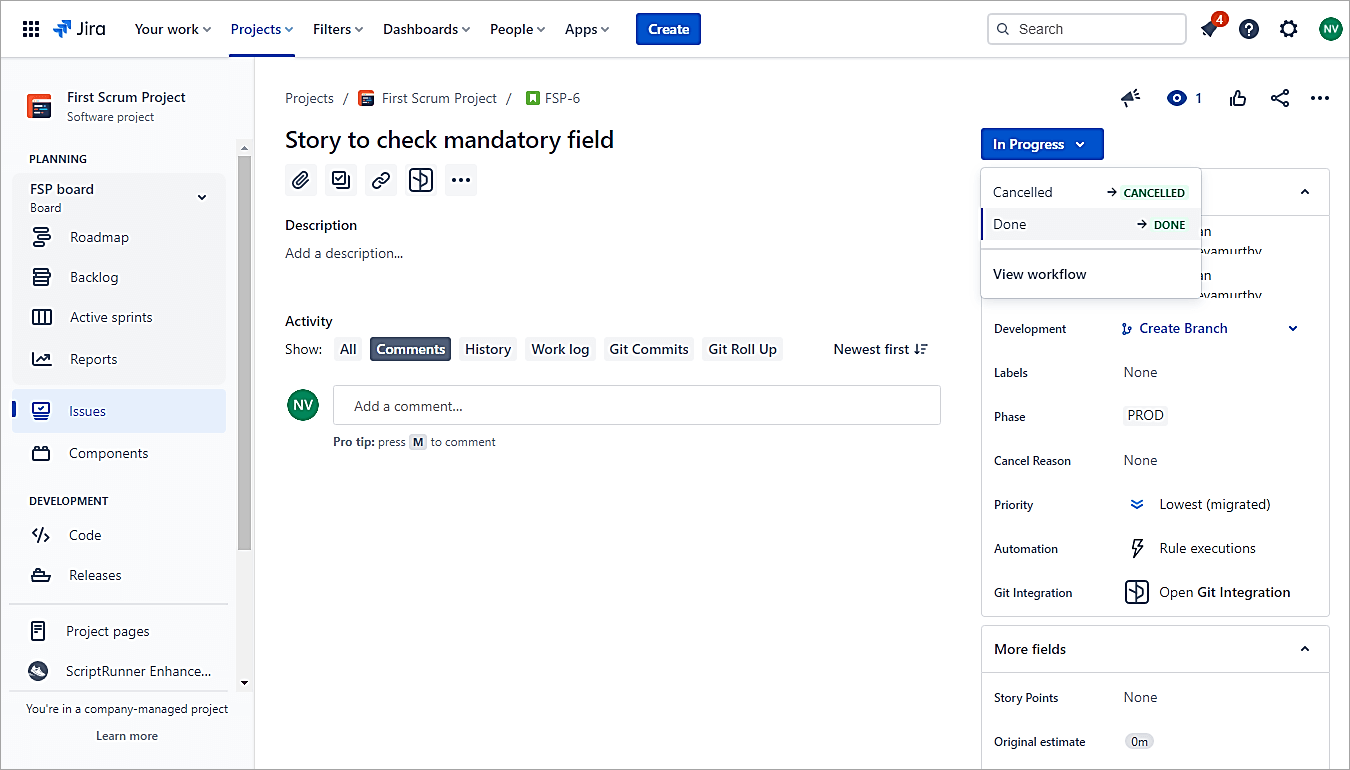
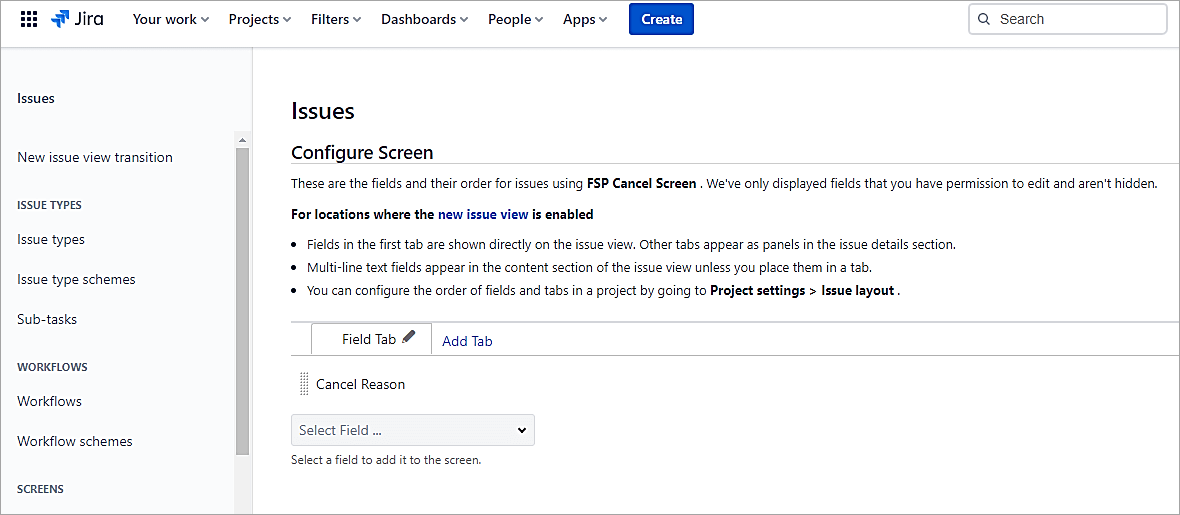
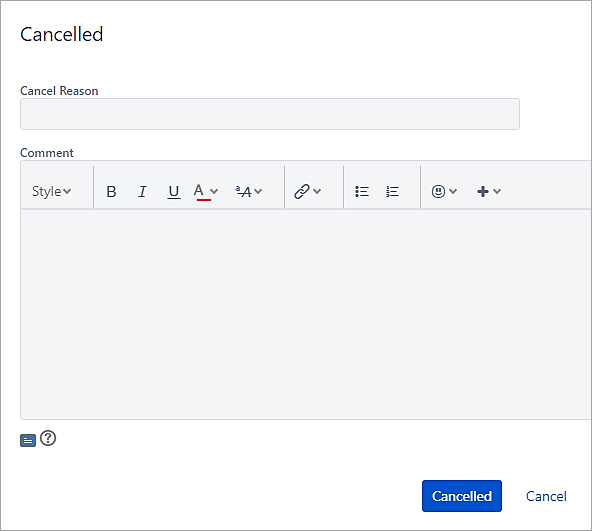
This example will focus on the transition to the Cancelled status. When the user transitions to the Cancelled status, the field ‘Cancel Reason’ should pop up.
Open the workflow and click on the transition to the Cancelled status. Click on Validators.

Click on Add validator.
Select the field that requires a validator and click on Add.
Select the fields to be made mandatory during the transition. Click on Add.
Publish Draft
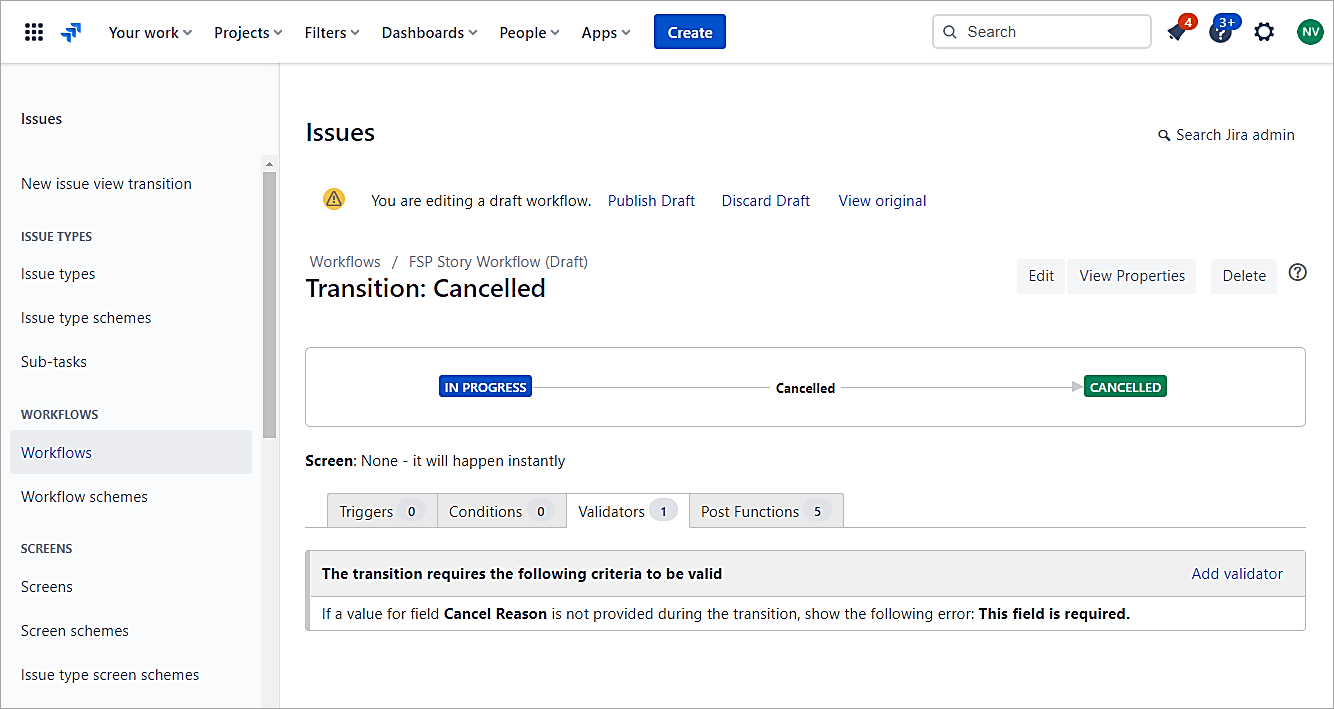
Test the validator. Change the status to Cancelled and you will see a failed message below mentioning that the Cancel Reason filed value is a must.
Workflow Example 4: Display a Screen During the Transition
During a transition, the need is to pop up a screen during the transition. We will see during the transition to Cancelled status, a screen should come up for users to enter a reason for Cancel.
Go to Settings -> Screens and add a screen.
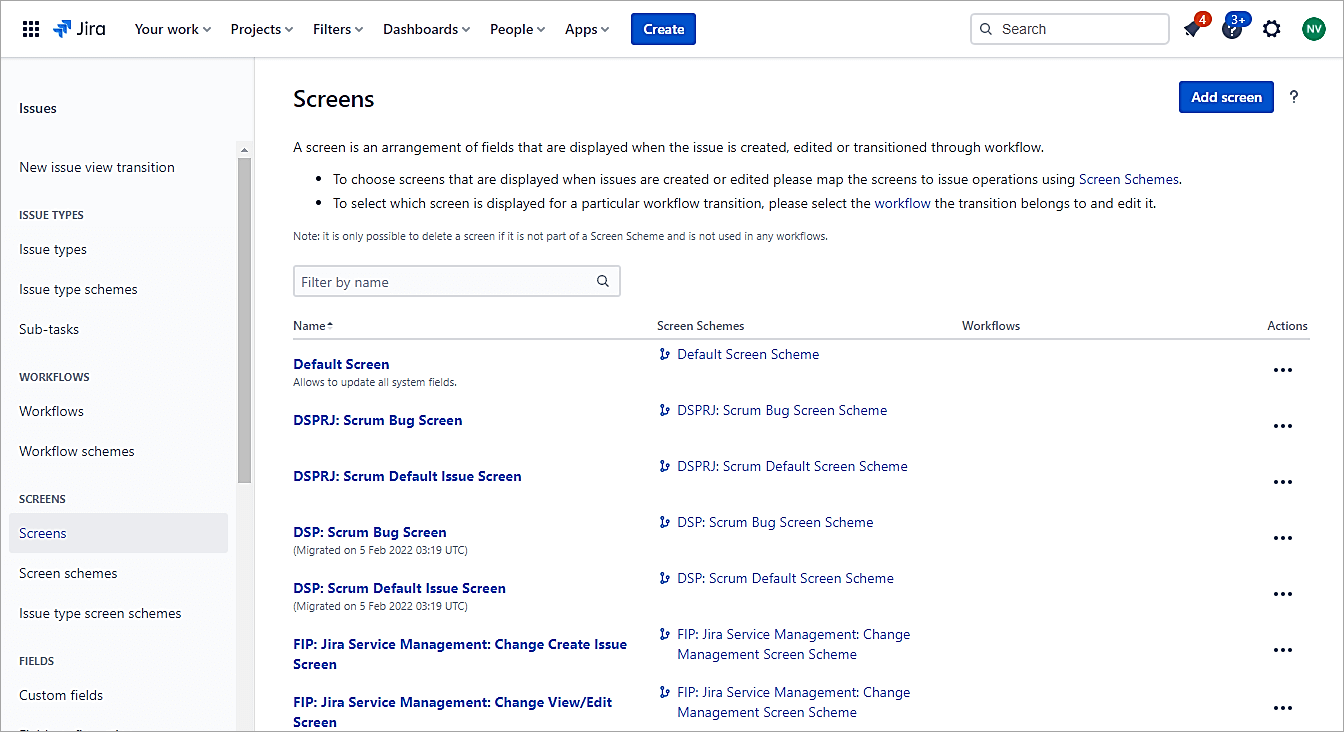
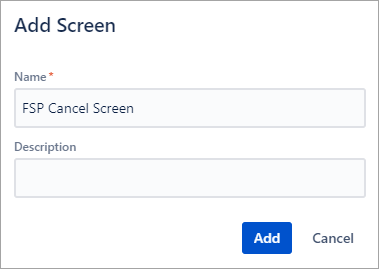
Click Add and update the screen with only one field.
Open the workflow and double-click on the transition for the Cancelled status.
Select the screen just created.
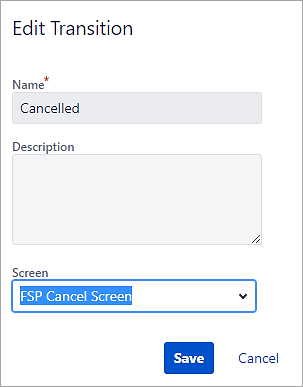
Click on Save.
Publish the Draft and test the scenario.
Click on the transition to Cancelled status.
The Cancel screen comes up.
Also Read => Overview of Jira Download, Installation and Setup
Workflow Example 5: Update the Assignee Field on the Transition to Done
Post Function helps to perform additional processing. In this example, we will add a Post Function to automatically update the Assignee field on the transition to Done status.
Click on the transition to Done and select Post Functions.
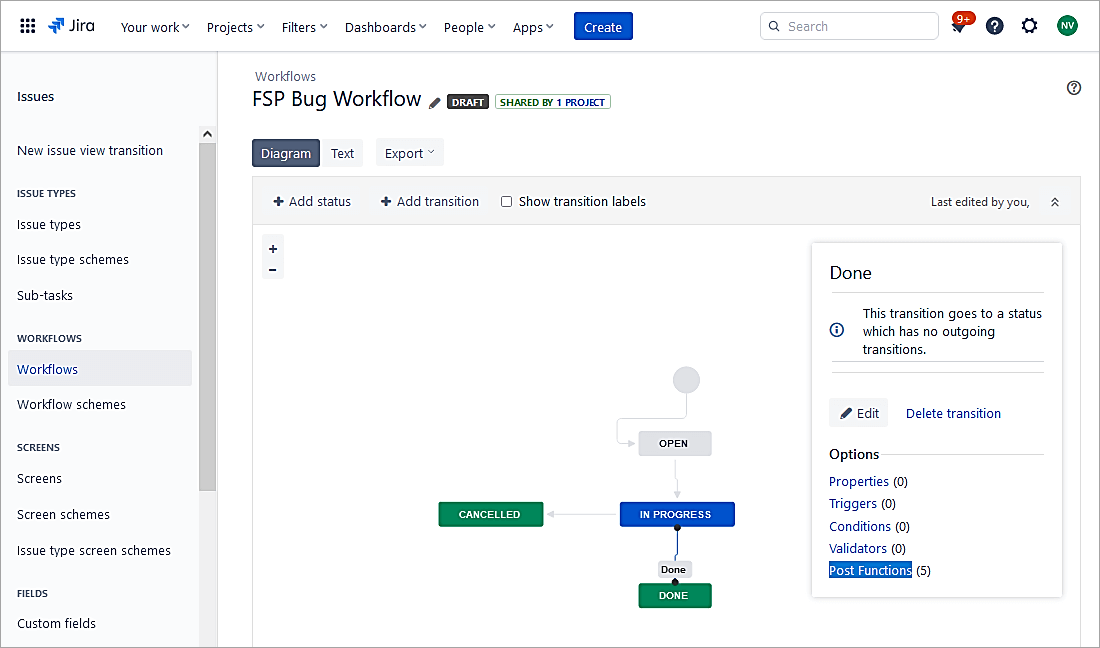
Click on Add Post Function.
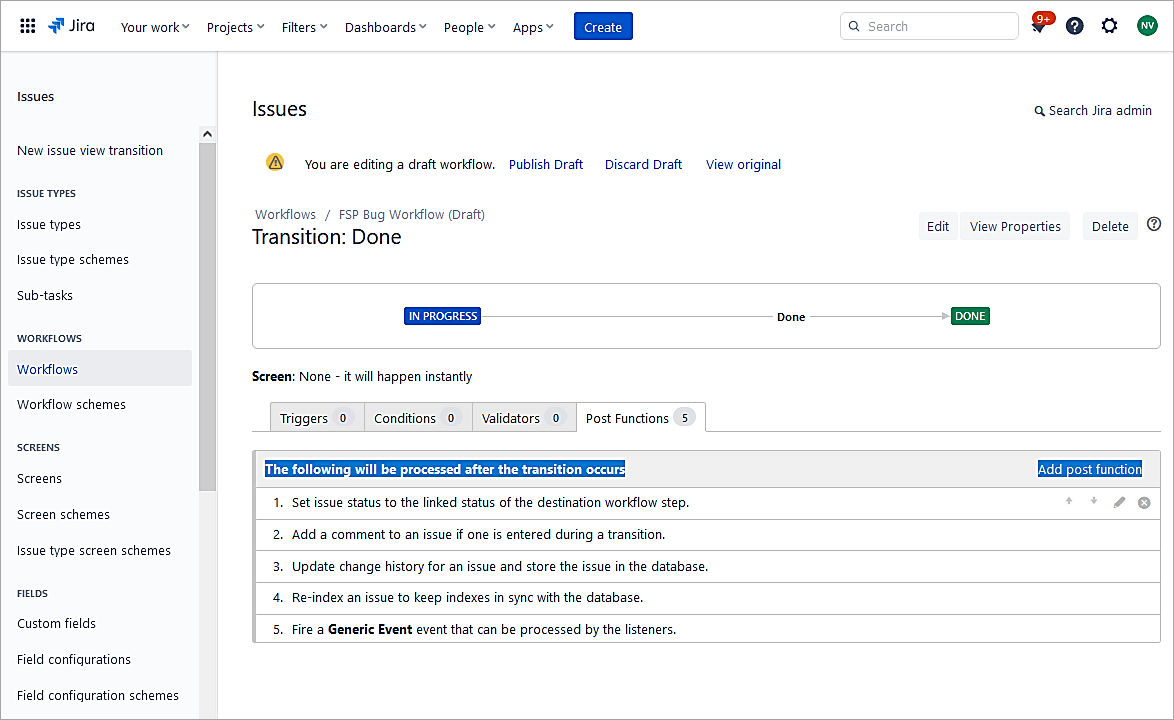
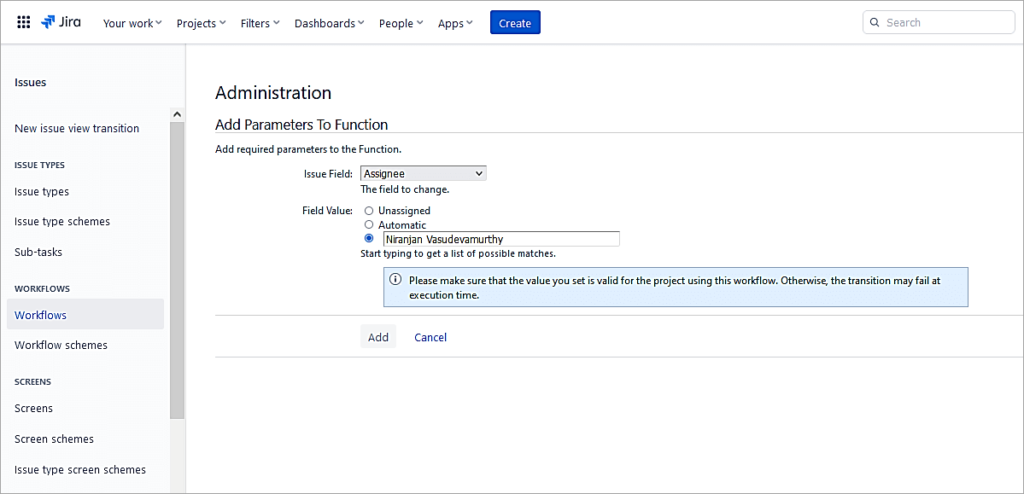
Select the radio button Update Issue Field and click on Add.
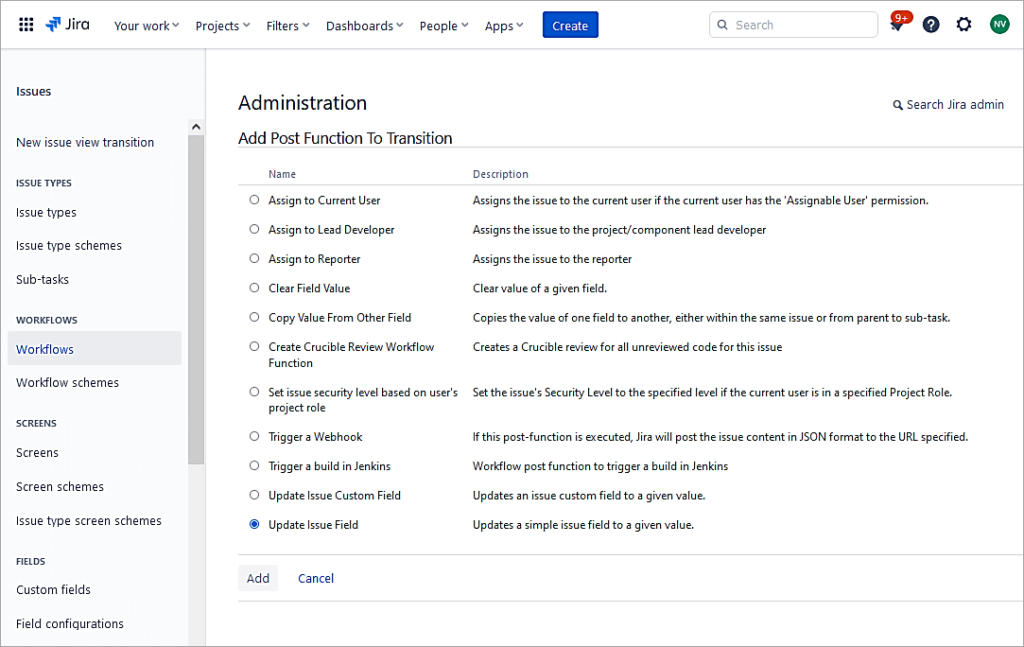
Select the value and click on Add.
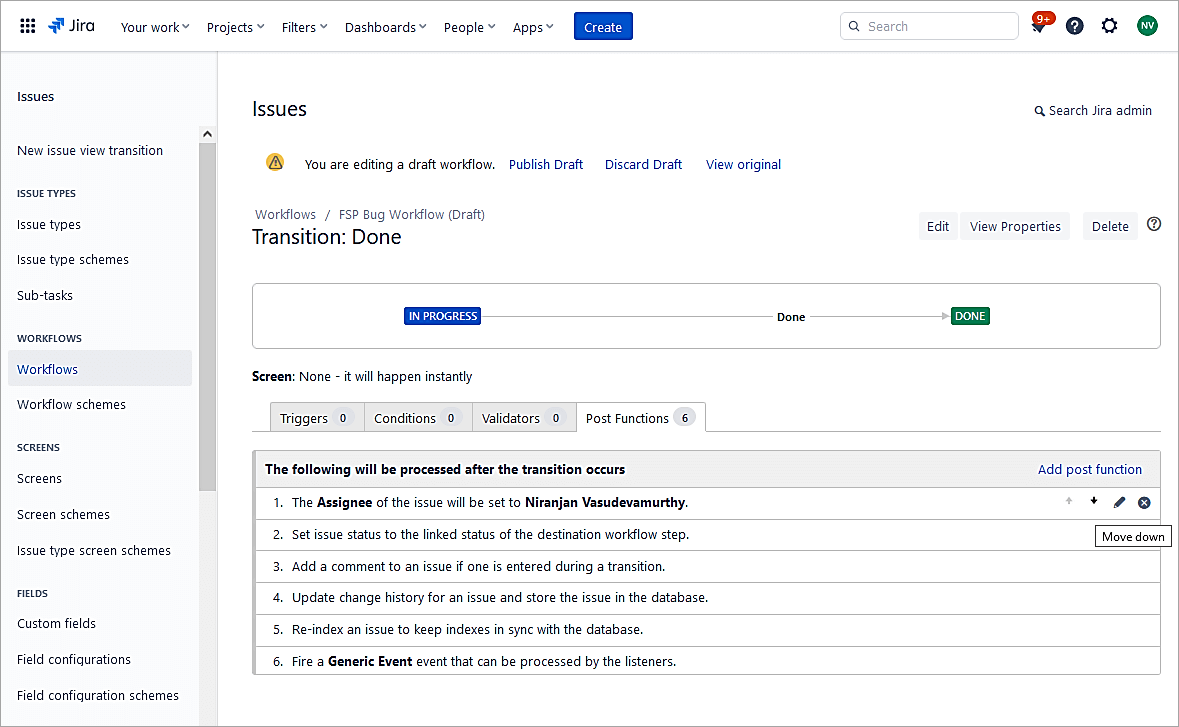
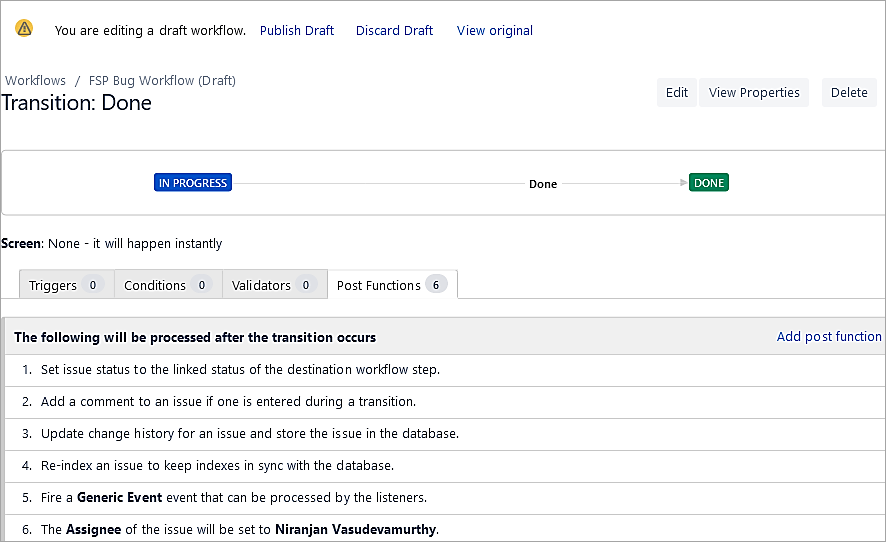
Move the step to the last.
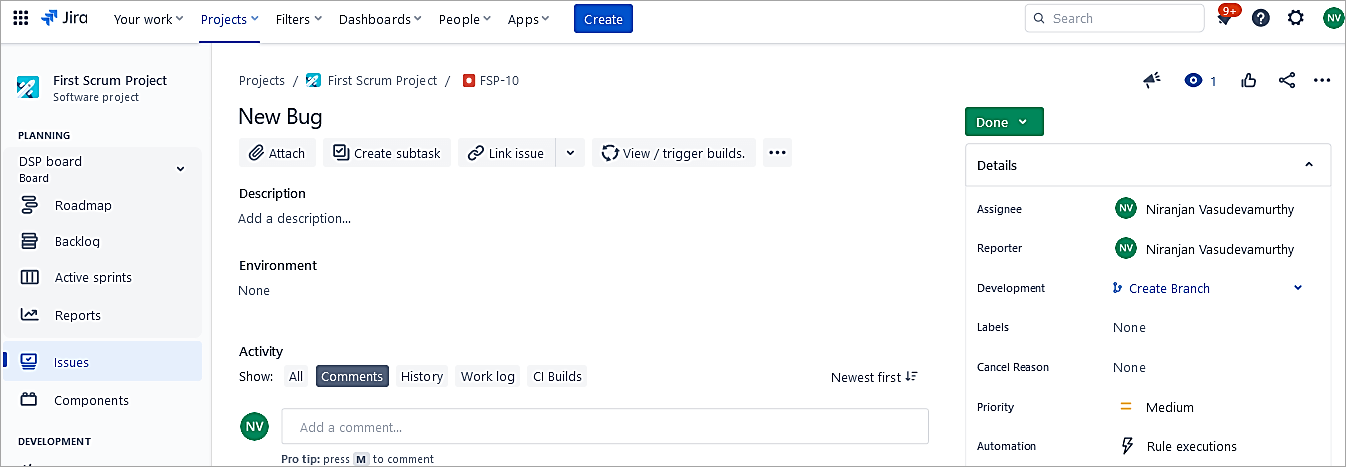
Publish the Draft and test the post function. In the below bug issue, the Assignee is Unassigned.
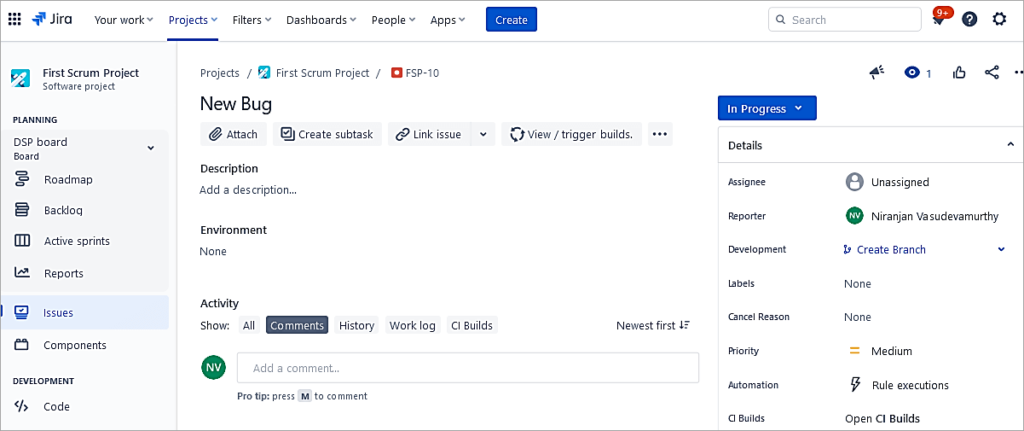
Transition the bug to Done status.
The Assignee field is populated.
Recommended Reading => Guide to Creating Jira Dashboard Quickly
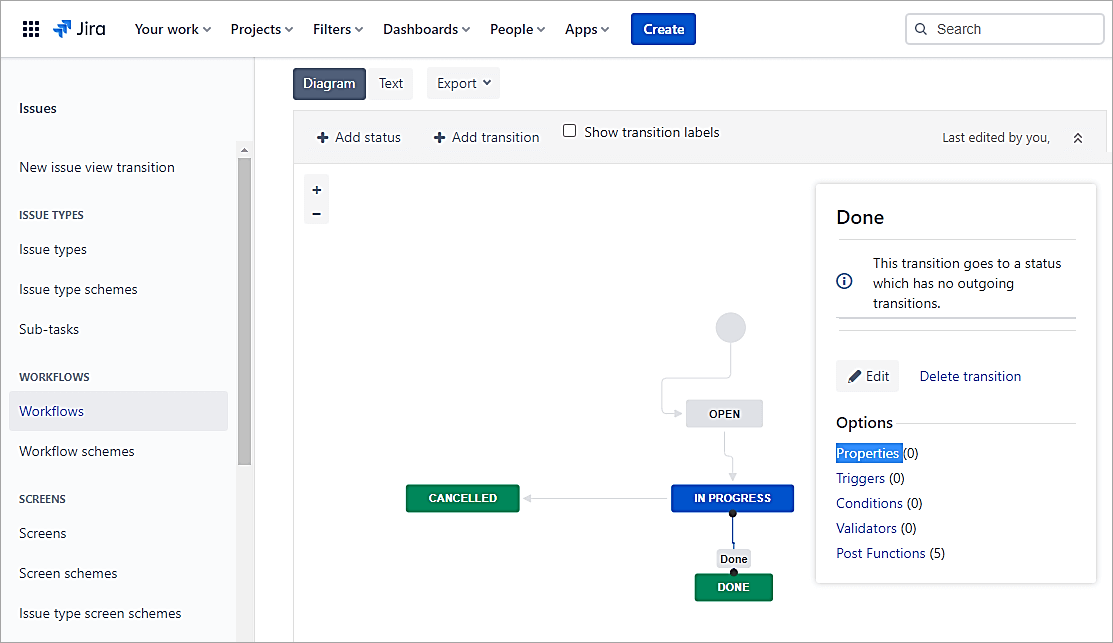
Workflow Example 6: Workflow Transition and Status Properties
Jira workflow properties help to add restrictions to status and transitions using key-value pairs. We will look at an example for both.
The workflow properties for transition can be found @ Workflow properties | Administering Jira applications Data Center and Server 8.22 | Atlassian Documentation and for status @ Use workflow properties | Atlassian Support
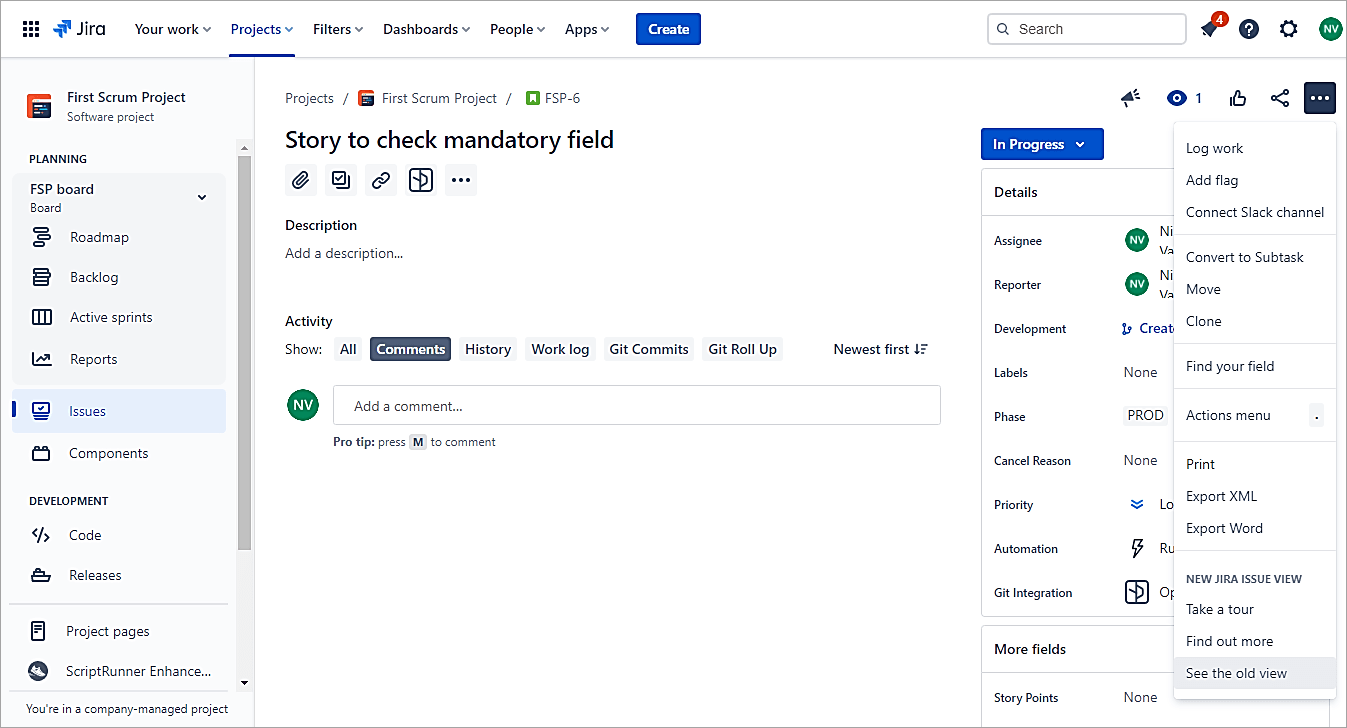
Scenario #1: Open an issue in the old view. Click on 3 DOTS and select See the old view
If you look at the Status sequence, the Done status is first, and Cancelled is second.

If we need to reverse the same, then open the workflow and open the properties for both Cancelled and Done transitions in different tabs.
Enter the property as shown below and add a value such as 10 for Cancelled transition.
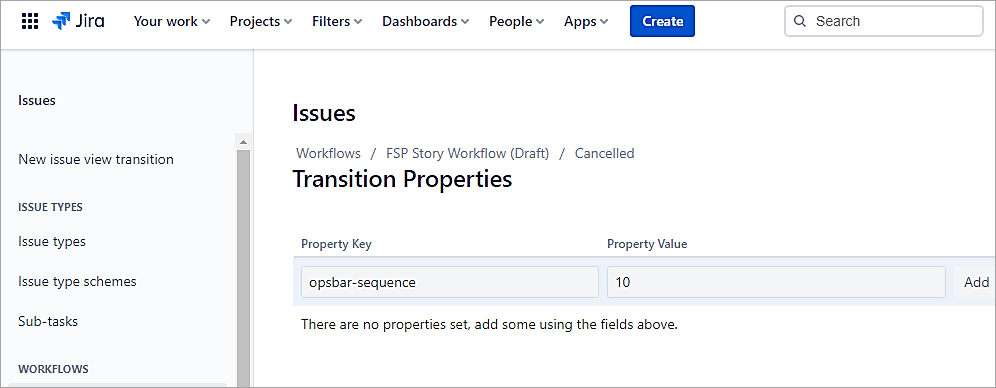
Click on Add.
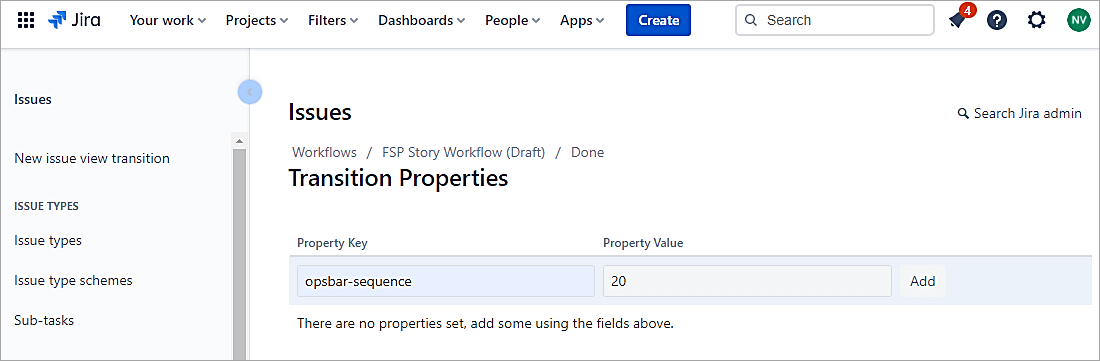
Similarly, for the Done transition, add the same property and value of 20. The value is high since the sequence has to be reversed.
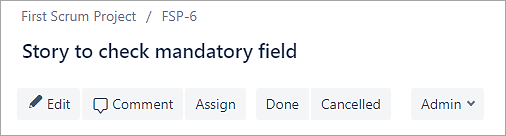
Publish the Draft workflow and look at the old view.
Scenario #2: Once the issue is transitioned to Done status, then the issue should not be editable.
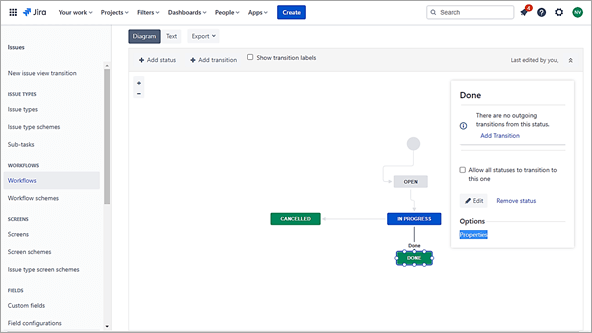
Open the workflow and select the properties for the Done status.
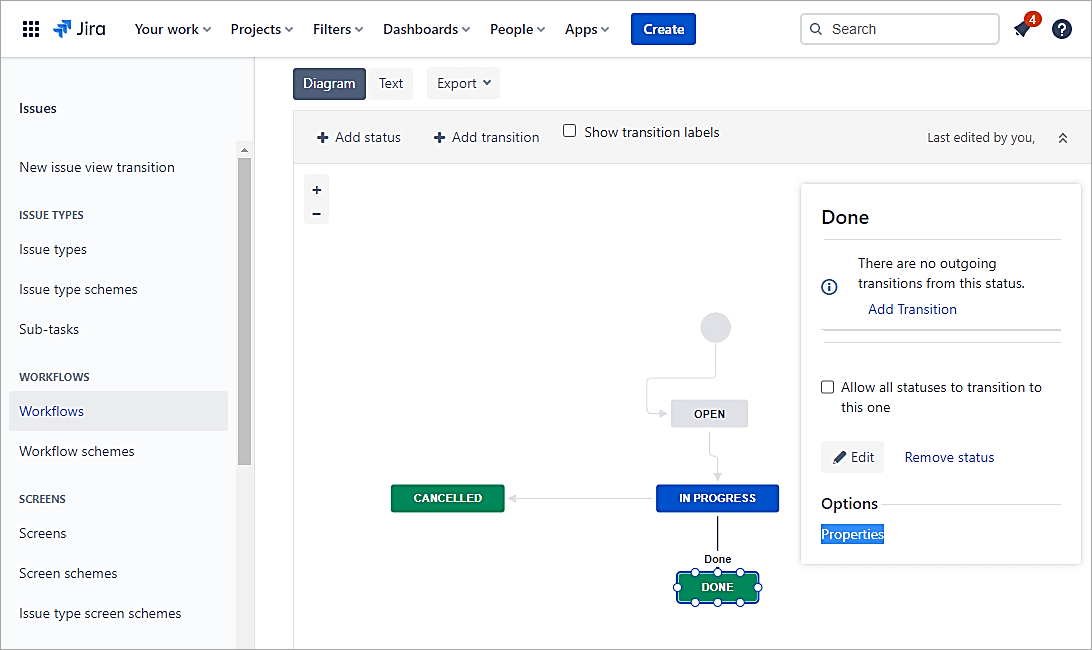
Enter the below property key and value of false. Click on Add.
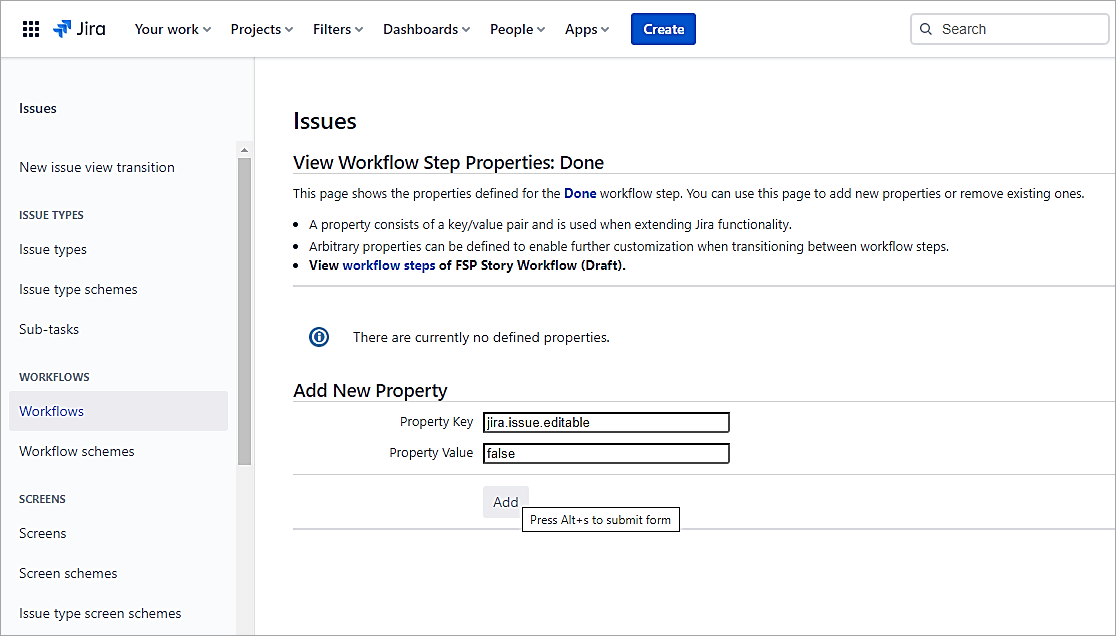
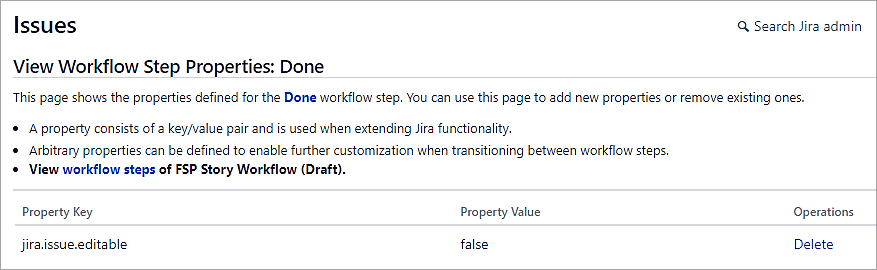
Publish the draft.
Transition an issue to Done status
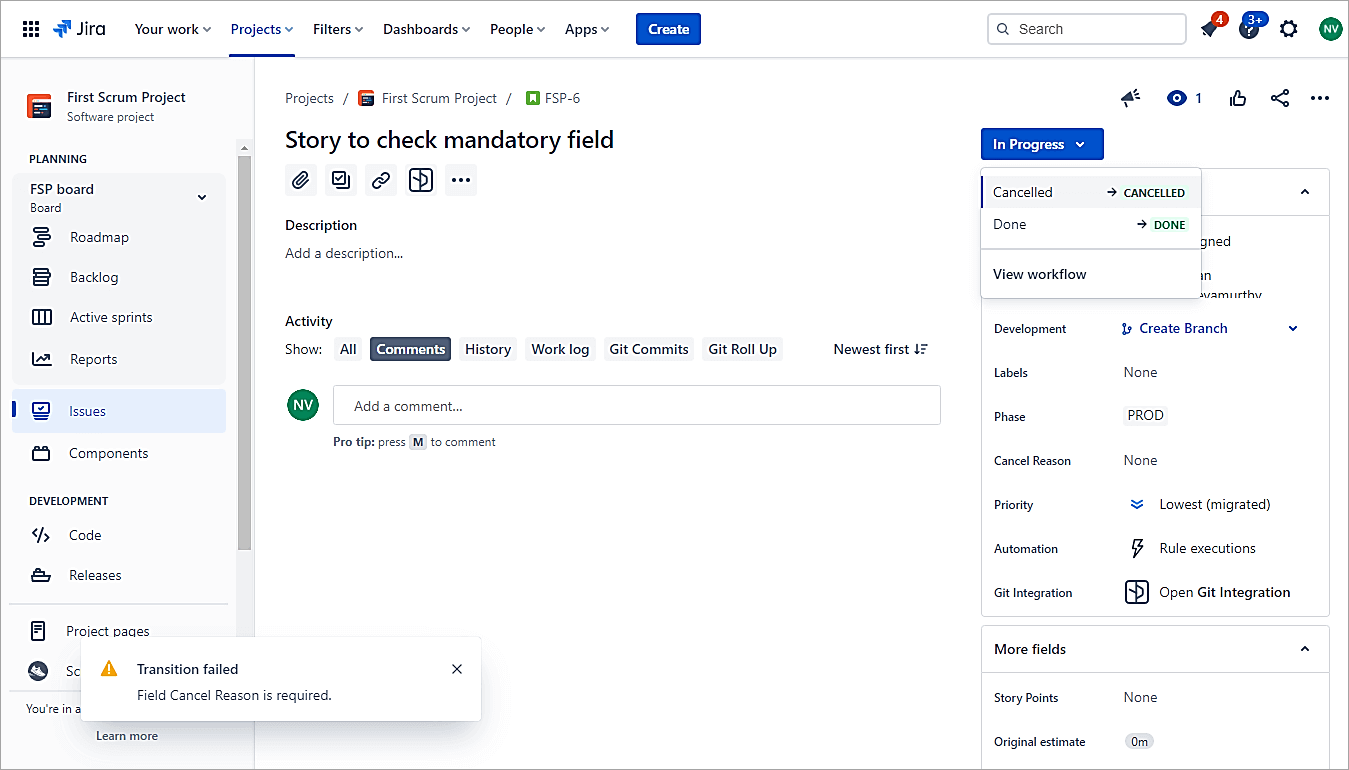
You will not see any Edit button in the old view or be able to edit in the new view.

Scenario #3: Only a specific user can edit the issue once the status is Done.
Open the workflow and click on the properties of the Done status
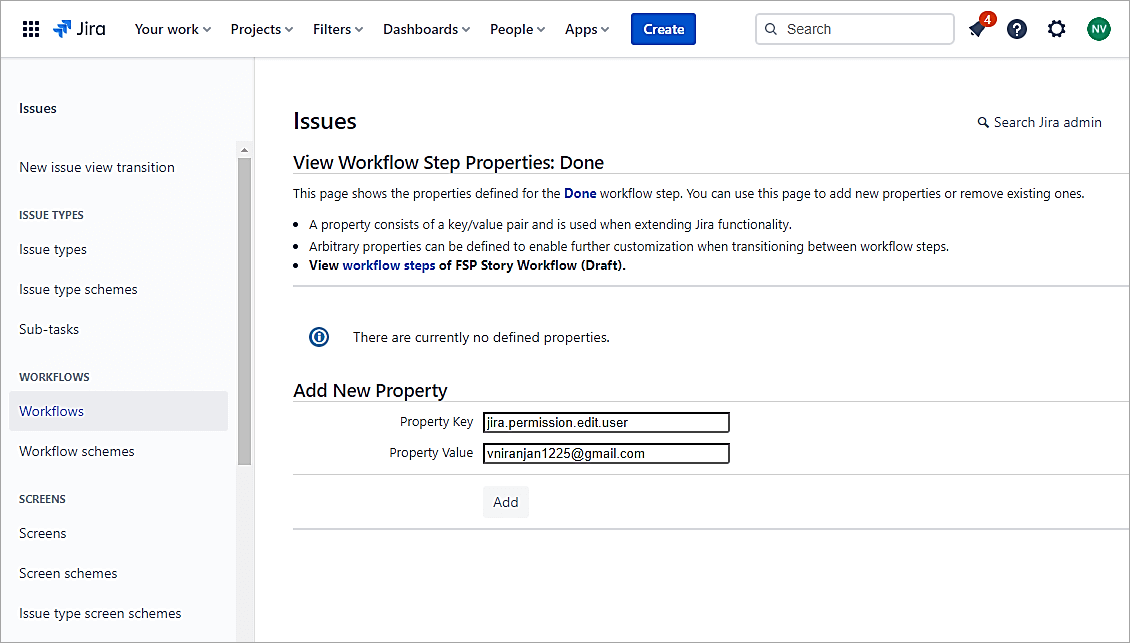
Click on Add.
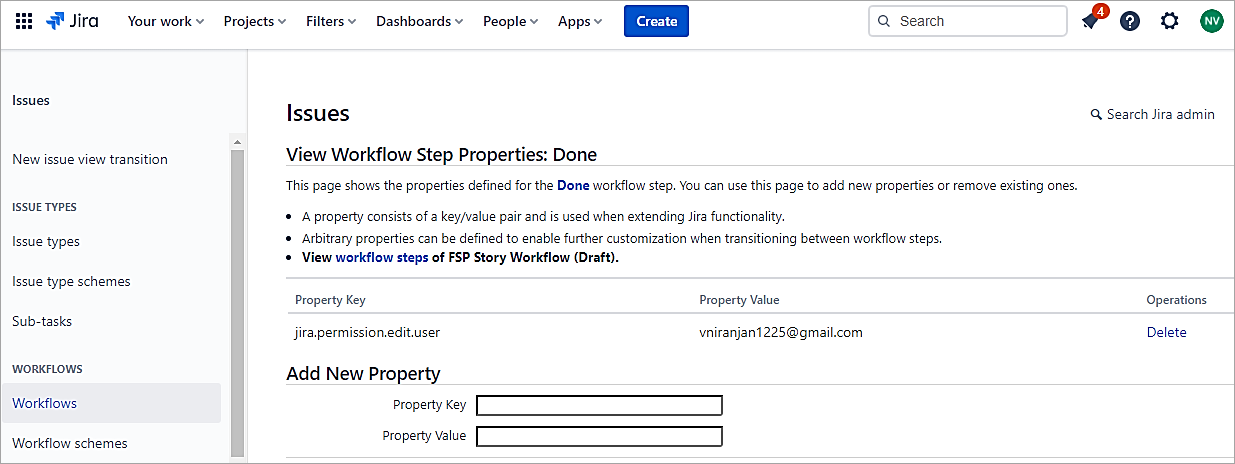
Publish Draft.
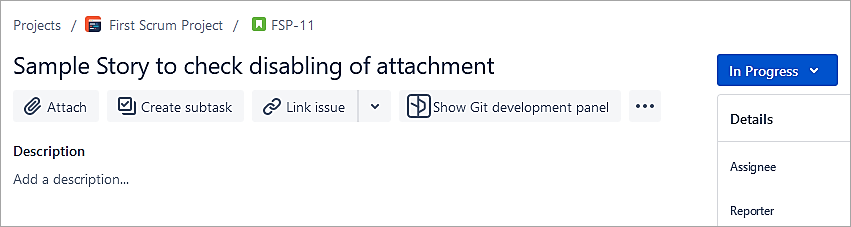
Scenario #4: Disable adding attachments
Let’s add the property to disable adding attachments to all statuses other than In Progress status.
Select the properties for the Done status and add them as
Property key: jira.permission.attach.denied
Property value: (leave it empty)

Click Add.
For the Story in the In Progress status, the attachment is enabled.
In the Done status, the attach option is not seen.

Add this property to all statuses on Story, where work logs normally should not be added. If you want to additionally disable deleting only own or all attachments, use one of the following properties.
Property key: jira.permission.attachdeleteown.denied
Property key: jira.permission.attachdeleteall.denied
Publish Draft after adding the properties to test the scenario.
Scenario #5: Disable adding comments
Disable adding comments to Done status.
Property key: jira.permission.comment.denied
Property value: (leave empty)
The property can be added to other status also.
Publish Draft after adding the properties to test the scenario.
Scenario #6: Property to restrict editing permissions to only selected roles or groups
Make issues editable to a specific group in Done status only.
Property key: jira.permission.edit.projectrole
Property value: 10002
Here, the property value 10002 is the role ID of the Administrator role and can be found out from the URL when you click on Edit for that role.
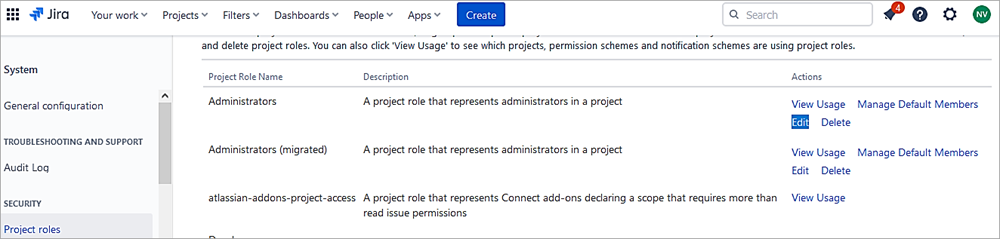
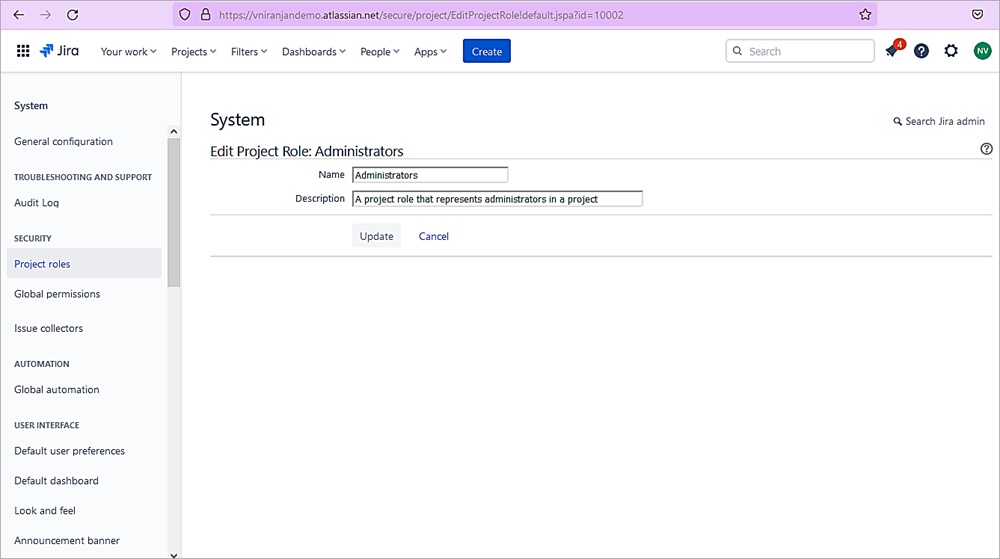
The role ID in the URL is at the end, which is 10002
https://vniranjandemo.atlassian.net/secure/project/EditProjectRole!default.jspa?id=10002
Publish the Draft after adding the properties to test the scenario.
Scenario #7: Property to restrict editing permissions to only Administrators and Developer roles in Done status.
In this example, we need to add a property to restrict editing permissions to only Administrators and Developer roles in Done status.
Add 2 properties as below and Suffix 1 or 2 or 3…. is added multiple times.
Property key (1): jira.permission.edit.projectrole.1
Property value: 10002
Property key (2): jira.permission.edit.projectrole.2
Property value: 10005
Check the role id (property value) from the browser URL.
Publish Draft after adding the properties to test the scenario.
Scenario 8: Restrict the Edit permission to a specific user group in the Done status only
In this example, restrict the edit to specific user group in the Done status.
Property key: jira.permission.edit.group
Property value: jira-administrators
Groups can be found from Directory which is part of User Management. Only Site admins or Org owners have access to the same.

For multiple groups add 2 or more properties
jira.permission.edit.group.1=group-one
jira.permission.edit.group.2=group-two
Publish Draft after adding the properties to test the scenario.
Scenario #9: Restrict edit permission to only Developer role for all Sub-tasks
In this example, we need to restrict edit permission to only Developer role for all sub-tasks.
Property key: jira.permission.subtasks.edit.projectrole
Property value: 10005
Publish Draft after adding the properties to test the scenario.
Scenario #10: Restrict adding comments to a specific role in Done status
In this example, we need to restrict adding comments to a specific role (Administrators) in the Done status only.
Property key: jira.permission.comment.projectrole
Property value: 10001
10001 is the role id of the Administrator role.
Publish Draft after adding the properties to test the scenario.
Scenario #10: Restrict adding comments to a specific group in Done status
In this example, we need to restrict adding comments to a specific group (Administrators) in the Done status only.
Property key: jira.permission.comment.group
Property value: jira-administrators
Groups can be found from Directory, which is part of User Management. Only Site admins or Org owners have access to the same.
Publish Draft after adding the properties to test the scenario.
Scenario #11: Restrict changes to Assignee field
In this example, when a task is In Progress status no one can change the Assignee.
Property key: jira.permission.assign.denied
Property value: (leave empty)
Publish Draft after adding the properties to test the scenario.
Scenario #12: Restrict changes to Assignee field only to a specific role
In this example, when the task is In Progress status, only the Administrator role can change the Assignee.
Property key: jira.permission.assign.projectrole
Property value: 10001
Also Read => Overview of Jira Download, Installation and Setup
Conclusion
In this part of the series, we look at the most important aspect of Jira issues, which are workflows and its customization in various scenarios.
In the next part, we will look at more automation to avoid most of the manual activities, which will help every developer be more productive and also integrate with GitHub and Confluence Cloud.
Was this helpful?
Recommended Reading
-

Quickly discover Jira Service Management Cloud's ability in ticket management and task automation. This tutorial will guide you on the aspect of setting up SLAs with step-step screenshots: In the previous tutorial, we looked at how to set up a Jira Service Management Project and how customers typically use the…
-
Learn Jira Admin Aspects: JIRA Administration and User Management Tutorial We learned about the JIRA workflow in detail in our previous tutorial. We are going to learn all about the JIRA Administration today. This is a unique opportunity to learn the admin aspects of a Project/Incident/Test Management tool. Not all…
-
JIRA Agile Tutorial: Agile Project Management Using Jira Our previous tutorial on JIRA Administration explained about JIRA Admin and User Management. Agile methodology for software development has gained immense popularity in recent years. JIRA Tool supports the Agile Software Development methodologies like Scrum and Kanban. Using JIRA Agile boards and…
-
A Step-By-Step Guide to JIRA and Subversion SVN Integration: JIRA is a very powerful issue & project tracking tool and is most popularly known by its use for bug tracking as well. The other tools from the Atlassian suite which cover the ALM approach and that are tightly integrated with…
-

JIRA Bug Tracking: Defect Life Cycle in JIRA Jira Download and Installation was explained in detail in our previous tutorial. Test teams are always apprehensive about picking up JIRAs for Defect Management. Doubts are warranted. This stems from the fact that though JIRA bug tracking tool is applicable to IT businesses,…
-

Top Free Open Source and Commercial JIRA Alternatives/Competitors: Popular JIRA plug-ins were explained in detail in our previous tutorial. Read through our entire range of tutorials in this JIRA series. JIRA is a bug tracking and project management tool for agile teams. It was developed by Atlassian and is currently used…
-
A Guide to Managing Issues in JIRA, Creating JIRA Workflow and JIRA Reports: JIRA Sub-task was explained in our previous tutorial from the Series of JIRA Tutorials. We have seen the different kinds of issues and how to create them in our earlier JIRA Tutorials. This is the next JIRA…
-

We have provided an extensive, step-by-step guide on how to integrate JIRA with QTest for your benefit. Let's get started. Atlassian Confluence has been explained in very simple terms for your understanding in our previous tutorial. At STH, we believe in sharing best practices, tools, techniques, and processes. We also…